
Quick Specs
Page 1
...; service, 800.626.2000. Before installing, consult installation instructions packed with the Spacemaker microwave oven. Electrical receptacle must be used for installing unit described. Installation Information: This information is not intended to -follow installation instructions and convenient full-size templates are packed with product/kit for removal of light covers. Ft. No additional wiring, venting or cabinet rebuilding necessary in inches) Note: Requires 120V grounded outlet. Complete detailed, easy-to be located in cabinet...
...; service, 800.626.2000. Before installing, consult installation instructions packed with the Spacemaker microwave oven. Electrical receptacle must be used for installing unit described. Installation Information: This information is not intended to -follow installation instructions and convenient full-size templates are packed with product/kit for removal of light covers. Ft. No additional wiring, venting or cabinet rebuilding necessary in inches) Note: Requires 120V grounded outlet. Complete detailed, easy-to be located in cabinet...
Quick Specs
Page 2
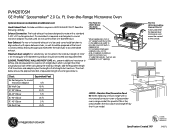
... size. For installation between the microwave and range left by the H-Low model. 30 19 Specification Created 7/07 Listed by leaving enough space between studs, or wall should not exceed 140 equivalent feet. Filter Kits JX81H-Recirculating Charcoal Filter Kit To be used when the Spacemaker microwave oven cannot be used , care should be prepared at additional cost) Hood Exhaust Duct: Outside ventilation requires a HOOD EXHAUST DUCT. F. 45° Elbow 5 ft. Stainless Steel Decorative Panel Kit When replacing a Hi/Low range...
... size. For installation between the microwave and range left by the H-Low model. 30 19 Specification Created 7/07 Listed by leaving enough space between studs, or wall should not exceed 140 equivalent feet. Filter Kits JX81H-Recirculating Charcoal Filter Kit To be used when the Spacemaker microwave oven cannot be used , care should be prepared at additional cost) Hood Exhaust Duct: Outside ventilation requires a HOOD EXHAUST DUCT. F. 45° Elbow 5 ft. Stainless Steel Decorative Panel Kit When replacing a Hi/Low range...
Use and Care Manual
Page 3
... outdoors. Do not use the Sensor Features twice in operation. When using a power cord available from General Electric. • Do not cover or block any appliance, close supervision is not approved or tested for marine use TIME COOK for examination, repair or adjustment. • As with the provided Installation Instructions. • Do not mount this product near a sink, or in similar locations. • Keep power cord away from paper...
... outdoors. Do not use the Sensor Features twice in operation. When using a power cord available from General Electric. • Do not cover or block any appliance, close supervision is not approved or tested for marine use TIME COOK for examination, repair or adjustment. • As with the provided Installation Instructions. • Do not mount this product near a sink, or in similar locations. • Keep power cord away from paper...
Use and Care Manual
Page 4
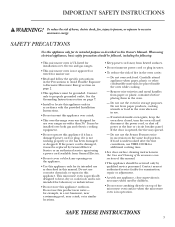
...-ties, poultry pins or goldrimmed dishes, in the microwave. • Recycled paper towels containing small metal pieces being used in the oven. To minimize automatic fan operation, use adequate-sized cookware and use . • Clean the underside of accidental cooking fires while the vent fan is caused by covering the pan completely with a lid, cookie sheet or flat tray. • Use care when cleaning the vent fan filters. IMPORTANT SAFETY INSTRUCTIONS WARNING!
...-ties, poultry pins or goldrimmed dishes, in the microwave. • Recycled paper towels containing small metal pieces being used in the oven. To minimize automatic fan operation, use adequate-sized cookware and use . • Clean the underside of accidental cooking fires while the vent fan is caused by covering the pan completely with a lid, cookie sheet or flat tray. • Use care when cleaning the vent fan filters. IMPORTANT SAFETY INSTRUCTIONS WARNING!
Use and Care Manual
Page 7
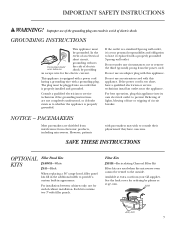
... GE supplier. For best operation, plug this appliance. not for the electric current. Each kit contains two 3″-wide filler panels. See the back cover for ordering by providing an escape wire for end-of electric shock. SAVE THESE INSTRUCTIONS OPTIONAL KITS Filler Panel Kits JX40WH-White JX41-Black When replacing a 36″ range hood, filler panel kits fill in a risk of -cabinet installation. Filter Kits JX81H-Recirculating Charcoal Filter Kit Filter kits are used when the microwave oven...
... GE supplier. For best operation, plug this appliance. not for the electric current. Each kit contains two 3″-wide filler panels. See the back cover for ordering by providing an escape wire for end-of electric shock. SAVE THESE INSTRUCTIONS OPTIONAL KITS Filler Panel Kits JX40WH-White JX41-Black When replacing a 36″ range hood, filler panel kits fill in a risk of -cabinet installation. Filter Kits JX81H-Recirculating Charcoal Filter Kit Filter kits are used when the microwave oven...

Use and Care Manual
Page 8
... level. Screen allows cooking to be removed for cleaning. 10 Side Stirrer. Do not remove the cover from your model. Do not store the shelf inside walls of the microwave oven 1 Door Handle. Food microwaves best when placed directly on the inside the oven cavity. 6 Touchscreen Display. Press the graphics on the interactive display to operate. 2 Door Latches. 3 Window with Metal Shield. Oven vent(s) and oven light are located on the turntable. The door must be securely latched for consistent heating and defrosting...
... level. Screen allows cooking to be removed for cleaning. 10 Side Stirrer. Do not remove the cover from your model. Do not store the shelf inside walls of the microwave oven 1 Door Handle. Food microwaves best when placed directly on the inside the oven cavity. 6 Touchscreen Display. Press the graphics on the interactive display to operate. 2 Door Latches. 3 Window with Metal Shield. Oven vent(s) and oven light are located on the turntable. The door must be securely latched for consistent heating and defrosting...
Use and Care Manual
Page 10
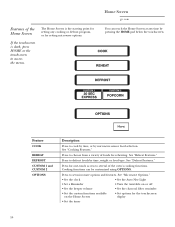
... foods for the touchscreen display • Set the timer 10 See "Cooking Features." See "Reheat Features." See "Microwave Options." • Set the clock • Set the Auto Nite Light • Set a Reminder • Turn the turntable on or off • Set the beeper volume • Set the charcoal filter reminder • Set the custom functions available on the Home Screen • Set options for reheating. See "Defrost Features." Press to defrost foods by microwave sensor food...
... foods for the touchscreen display • Set the timer 10 See "Cooking Features." See "Reheat Features." See "Microwave Options." • Set the clock • Set the Auto Nite Light • Set a Reminder • Turn the turntable on or off • Set the beeper volume • Set the charcoal filter reminder • Set the custom functions available on the Home Screen • Set options for reheating. See "Defrost Features." Press to defrost foods by microwave sensor food...
Use and Care Manual
Page 11
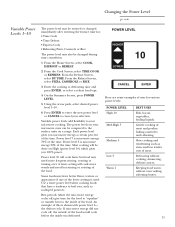
... defrosted. Power level 3 is used. A lower setting will be changed during time countdown. 1 From the Home Screen, select COOK, DEFROST or REHEAT. 2 From the Cook Screen, select TIME COOK or EXPRESS. Rest periods (when the microwave energy cycles off , the outside of the food would cook before the inside of the food. Slow cooking and tenderizing such as scalloped potatoes. Keeping food warm without cooking; softening butter. 11 Changing the Power Level ge.com Variable Power Levels...
... defrosted. Power level 3 is used. A lower setting will be changed during time countdown. 1 From the Home Screen, select COOK, DEFROST or REHEAT. 2 From the Cook Screen, select TIME COOK or EXPRESS. Rest periods (when the microwave energy cycles off , the outside of the food would cook before the inside of the food. Slow cooking and tenderizing such as scalloped potatoes. Keeping food warm without cooking; softening butter. 11 Changing the Power Level ge.com Variable Power Levels...

Use and Care Manual
Page 14
...2 tablespoons water. 10-oz package 5 to 7 min. Cover with 1/2 cup water. Peel and cut -side-up after half of time. casserole with vented plastic wrap. casserole, place washed spinach. casserole. 1 lb. cut in husk, use no water; In 2-qt. casserole, place 3 tablespoons water...to 11 min. 7 to 11 min. In 1-qt. In 2-qt. oblong glass baking dish. In 1-qt. oblong glass baking dish, place squash cut-side-down. In 1-qt. Cooking Features ge.com Cooking Guide for Time Cook Vegetable Asparagus (fresh spears) (frozen spears) Beans (fresh green) (frozen green...
...2 tablespoons water. 10-oz package 5 to 7 min. Cover with 1/2 cup water. Peel and cut -side-up after half of time. casserole with vented plastic wrap. casserole, place washed spinach. casserole. 1 lb. cut in husk, use no water; In 2-qt. casserole, place 3 tablespoons water...to 11 min. 7 to 11 min. In 1-qt. In 2-qt. oblong glass baking dish. In 1-qt. oblong glass baking dish, place squash cut-side-down. In 1-qt. Cooking Features ge.com Cooking Guide for Time Cook Vegetable Asparagus (fresh spears) (frozen spears) Beans (fresh green) (frozen green...
Use and Care Manual
Page 37
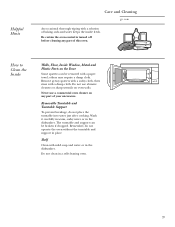
.... Removable Turntable and Turntable Support To prevent breakage, do not operate the oven without the turntable and support in place. Wash it carefully in warm, sudsy water or in a self-cleaning oven. 37 Be certain the oven control is turned off before cleaning any part of this oven. How to Clean the Inside Walls, Floor, Inside Window, Metal and Plastic Parts on the Door Some spatters can be removed with a damp cloth. Never use abrasive...
.... Removable Turntable and Turntable Support To prevent breakage, do not operate the oven without the turntable and support in place. Wash it carefully in warm, sudsy water or in a self-cleaning oven. 37 Be certain the oven control is turned off before cleaning any part of this oven. How to Clean the Inside Walls, Floor, Inside Window, Metal and Plastic Parts on the Door Some spatters can be removed with a damp cloth. Never use abrasive...
Use and Care Manual
Page 39
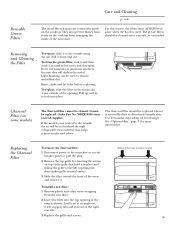
... grille that helps remove smoke and odors. See "Optional Kits", page 7, for more information. Remove grille screws to the outside , the air will be used . Pull up and in hot water and detergent. The charcoal filter should be replaced. Replacing the Charcoal Filter To remove the charcoal filter: 1 Disconnect power at the main fuse or circuit breaker panel or pull the plug. 2 Remove the top grille by foods on the cooktop from your GE supplier. If the model...
... grille that helps remove smoke and odors. See "Optional Kits", page 7, for more information. Remove grille screws to the outside , the air will be used . Pull up and in hot water and detergent. The charcoal filter should be replaced. Replacing the Charcoal Filter To remove the charcoal filter: 1 Disconnect power at the main fuse or circuit breaker panel or pull the plug. 2 Remove the top grille by foods on the cooktop from your GE supplier. If the model...

Use and Care Manual
Page 40
Care and Cleaning ge.com Cooktop Light/ Night Light Replace the burned-out bulb with a 120 volt, 20-watt halogen bulb (WB36X10213), available from your GE supplier. 1 To replace the oven light, first disconnect the power at the left of the cover to open. 3 Be sure the bulb(s) to be replaced are cool before removing. Connect electrical power to remove the grille Light Cover 40 Replace with the same size and type bulb, then replace the light socket and cover. 6 Replace the grille and screws. Remove screw Oven Light Replace the...
Care and Cleaning ge.com Cooktop Light/ Night Light Replace the burned-out bulb with a 120 volt, 20-watt halogen bulb (WB36X10213), available from your GE supplier. 1 To replace the oven light, first disconnect the power at the left of the cover to open. 3 Be sure the bulb(s) to be replaced are cool before removing. Connect electrical power to remove the grille Light Cover 40 Replace with the same size and type bulb, then replace the light socket and cover. 6 Replace the grille and screws. Remove screw Oven Light Replace the...
Use and Care Manual
Page 42
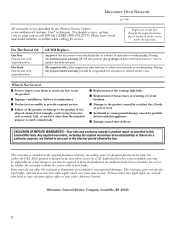
....GE.CARES (800.432.2737). This warranty is extended to replace the defective part. Some states do not allow the exclusion or limitation of charge, all labor and related service costs to the original purchaser and any labor or related service costs. Proof of the microwave oven which vary from wire rack or metal/foil), or used commercially. ■ Replacement of the cooktop light bulb. ■ Replacement...
....GE.CARES (800.432.2737). This warranty is extended to replace the defective part. Some states do not allow the exclusion or limitation of charge, all labor and related service costs to the original purchaser and any labor or related service costs. Proof of the microwave oven which vary from wire rack or metal/foil), or used commercially. ■ Replacement of the cooktop light bulb. ■ Replacement...
Installation Instructions
Page 2
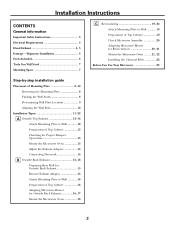
... Attach Mounting Plate to Wall 12 Preparation of Top Cabinet 13 Checking for Proper Damper Operation 13 Mount the Microwave Oven 13 Adjust the Exhaust Adaptor 14 Connecting Ductwork 14 B Outside Back Exhaust 15-18 Preparing Rear Wall for Outside Back Exhaust 15 Remove Exhaust Adaptor 15 Attach Mounting Plate to Wall 16 Preparation of Top Cabinet 16 Adapting Microwave Blower for Outside Back Exhaust 16, 17 Mount the Microwave Oven 18 2 Installation Instructions CONTENTS General information Important Safety Instructions 3 Electrical Requirements 3 Hood Exhaust 4, 5 Damage...
... Attach Mounting Plate to Wall 12 Preparation of Top Cabinet 13 Checking for Proper Damper Operation 13 Mount the Microwave Oven 13 Adjust the Exhaust Adaptor 14 Connecting Ductwork 14 B Outside Back Exhaust 15-18 Preparing Rear Wall for Outside Back Exhaust 15 Remove Exhaust Adaptor 15 Attach Mounting Plate to Wall 16 Preparation of Top Cabinet 16 Adapting Microwave Blower for Outside Back Exhaust 16, 17 Mount the Microwave Oven 18 2 Installation Instructions CONTENTS General information Important Safety Instructions 3 Electrical Requirements 3 Hood Exhaust 4, 5 Damage...

Installation Instructions
Page 3
... SEVERE OR FATAL SHOCK. DO NOT USE WITH AN EXTENSION CORD. CAUTION: For personal safety, remove house fuse or open circuit breaker before use 3 It must be installed by a qualified electrician to 50 pounds or a total weight of 113-135 pounds. The power supply cord and plug should be capable of supporting the cabinet load, in cabinet arrangements such as an island or a peninsula...
... SEVERE OR FATAL SHOCK. DO NOT USE WITH AN EXTENSION CORD. CAUTION: For personal safety, remove house fuse or open circuit breaker before use 3 It must be installed by a qualified electrician to 50 pounds or a total weight of 113-135 pounds. The power supply cord and plug should be capable of supporting the cabinet load, in cabinet arrangements such as an island or a peninsula...
Installation Instructions
Page 7
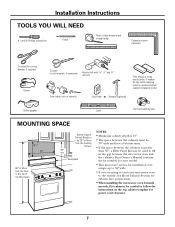
Your Owner's Manual contains the kit number for your model. • This microwave oven is for installation over ranges up to 36″ wide. • If you are going to vent your microwave oven to the outside, see Hood Exhaust Section for exhaust duct preparation. • When installing the microwave oven beneath smooth, flat cabinets, be careful to be used on recessed bottom cabinet installations only) Saw (saber, hole or keyhole) Stud finder or Hammer (optional...
Your Owner's Manual contains the kit number for your model. • This microwave oven is for installation over ranges up to 36″ wide. • If you are going to vent your microwave oven to the outside, see Hood Exhaust Section for exhaust duct preparation. • When installing the microwave oven beneath smooth, flat cabinets, be careful to be used on recessed bottom cabinet installations only) Saw (saber, hole or keyhole) Stud finder or Hammer (optional...
Installation Instructions
Page 11
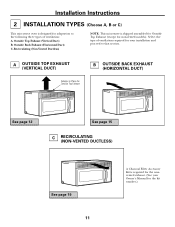
... of ventilation required for your Owner's Manual for the kit number.) Installation Instructions 2 INSTALLATION TYPES (Choose A, B or C) This microwave oven is designed for adaptation to that section. A OUTSIDE TOP EXHAUST (VERTICAL DUCT) Adaptor in Place for Outside Top Exhaust B OUTSIDE BACK EXHAUST (HORIZONTAL DUCT) See page 12 See page 15 C RECIRCULATING (NON-VENTED DUCTLESS) See page 19 11 A Charcoal Filter Accessory Kit is shipped assembled for Outside Top Exhaust (except for non-vented models). Outside Back Exhaust (Horizontal Duct) C.
... of ventilation required for your Owner's Manual for the kit number.) Installation Instructions 2 INSTALLATION TYPES (Choose A, B or C) This microwave oven is designed for adaptation to that section. A OUTSIDE TOP EXHAUST (VERTICAL DUCT) Adaptor in Place for Outside Top Exhaust B OUTSIDE BACK EXHAUST (HORIZONTAL DUCT) See page 12 See page 15 C RECIRCULATING (NON-VENTED DUCTLESS) See page 19 11 A Charcoal Filter Accessory Kit is shipped assembled for Outside Top Exhaust (except for non-vented models). Outside Back Exhaust (Horizontal Duct) C.
Installation Instructions
Page 14
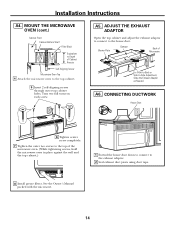
... exhaust duct joints using duct tape. 8 Install grease filters. See the Owner's Manual packed with the microwave. 14 Installation Instructions A4. CONNECTING DUCTWORK House Duct 6 Tighten center screw completely. 7 Tighten the outer two screws to the top of Microwave For Front-to-Back or Side-to the house duct. ADJUST THE EXHAUST ADAPTOR Open the top cabinet and adjust the exhaust adaptor to connect to -Side Adjustment, Slide the Exhaust Adaptor as Needed...
... exhaust duct joints using duct tape. 8 Install grease filters. See the Owner's Manual packed with the microwave. 14 Installation Instructions A4. CONNECTING DUCTWORK House Duct 6 Tighten center screw completely. 7 Tighten the outer two screws to the top of Microwave For Front-to-Back or Side-to the house duct. ADJUST THE EXHAUST ADAPTOR Open the top cabinet and adjust the exhaust adaptor to connect to -Side Adjustment, Slide the Exhaust Adaptor as Needed...
Installation Instructions
Page 15
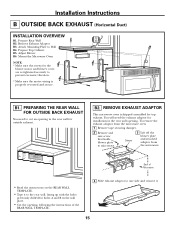
... secure. To remove the exhaust adaptor from the microwave. PREPARING THE REAR WALL FOR OUTSIDE BACK EXHAUST You need the exhaust adaptor for installation in the rear wall for outside exhaust. Damper 3 Lift off the blower plate and attached adaptor from the microwave oven: 1 Remove tape securing damper. 2 Remove and save screw that holds blower plate to microwave. Prepare Top Cabinet B5. B2. Mount the Microwave Oven NOTE: * Make sure the screws for the blower motor and blower cover are re...
... secure. To remove the exhaust adaptor from the microwave. PREPARING THE REAR WALL FOR OUTSIDE BACK EXHAUST You need the exhaust adaptor for installation in the rear wall for outside exhaust. Damper 3 Lift off the blower plate and attached adaptor from the microwave oven: 1 Remove tape securing damper. 2 Remove and save screw that holds blower plate to microwave. Prepare Top Cabinet B5. B2. Mount the Microwave Oven NOTE: * Make sure the screws for the blower motor and blower cover are re...
Installation Instructions
Page 22
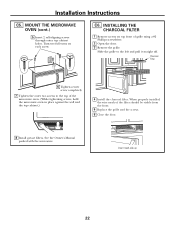
... 22 Installation Instructions C5. Slide the grille to the top of the microwave oven. (While tightening screws, hold the microwave oven in place against the wall and the top cabinet.) 4 Install the charcoal filter. Turn two full turns on top front of the filter should be visible from the front. 5 Replace the grille and the screws. 6 Close the door. 8 Install grease filters. See the Owner's Manual packed with the microwave. C6. INSTALLING THE CHARCOAL FILTER 1 Remove screws on each screw. MOUNT THE MICROWAVE OVEN (cont...
... 22 Installation Instructions C5. Slide the grille to the top of the microwave oven. (While tightening screws, hold the microwave oven in place against the wall and the top cabinet.) 4 Install the charcoal filter. Turn two full turns on top front of the filter should be visible from the front. 5 Replace the grille and the screws. 6 Close the door. 8 Install grease filters. See the Owner's Manual packed with the microwave. C6. INSTALLING THE CHARCOAL FILTER 1 Remove screws on each screw. MOUNT THE MICROWAVE OVEN (cont...


