
Installation Instructions
Page 1
... REMOVE PACKAGING MATERIALS Failure to remove packaging materials could cause the oven to 200°F [93.3°C]) generated by -side installation. Installation Instructions 27" & 30" Electric Built-In Wall Ovens Questions? Call 1.800.GE.CARES (1.800.432.2737) or visit www.GEAppliances.com In... MAY NEED 1/8" Drill Bit and Electric or Hand Drill Phillips Screwdriver Wire Strippers DESIGN INFORMATION SINGLE OVEN INSTALLATIONS The single oven may also be hard-wired (direct-wired) into an approved junction box. ATTENTION INSTALLER: All electric wall ovens must support 200 lbs (91 kg...
... REMOVE PACKAGING MATERIALS Failure to remove packaging materials could cause the oven to 200°F [93.3°C]) generated by -side installation. Installation Instructions 27" & 30" Electric Built-In Wall Ovens Questions? Call 1.800.GE.CARES (1.800.432.2737) or visit www.GEAppliances.com In... MAY NEED 1/8" Drill Bit and Electric or Hand Drill Phillips Screwdriver Wire Strippers DESIGN INFORMATION SINGLE OVEN INSTALLATIONS The single oven may also be hard-wired (direct-wired) into an approved junction box. ATTENTION INSTALLER: All electric wall ovens must support 200 lbs (91 kg...

Installation Instructions
Page 2
...KW-8.3 KW 8.4 KW-10.4 KW Recommended Circuit Size (Dedicated) 20 Amp 30 Amp 40 Amp 50 Amp DO NOT shorten the flexible conduit. The insulation of...call 1.800.GE.CARES. 6 THREE-CONDUCTOR BRANCH CIRCUIT CONNECTION NOTE: If residence leads are aluminum conductors, see WARNING in Section 4, Electrical Requirements. ...oven cavity, to aluminum wiring, properly installed connectors approved for use a single-phase, 120/208 VAC or 120/240 VAC, 60 Hertz electrical...the door and close the oven door to the removal position (approximately 1"-2" [2.5 cm-5.1 cm] from inside wall or upper front frame. ...
...KW-8.3 KW 8.4 KW-10.4 KW Recommended Circuit Size (Dedicated) 20 Amp 30 Amp 40 Amp 50 Amp DO NOT shorten the flexible conduit. The insulation of...call 1.800.GE.CARES. 6 THREE-CONDUCTOR BRANCH CIRCUIT CONNECTION NOTE: If residence leads are aluminum conductors, see WARNING in Section 4, Electrical Requirements. ...oven cavity, to aluminum wiring, properly installed connectors approved for use a single-phase, 120/208 VAC or 120/240 VAC, 60 Hertz electrical...the door and close the oven door to the removal position (approximately 1"-2" [2.5 cm-5.1 cm] from inside wall or upper front frame. ...

Owners Manual
Page 1
...Single Wall Oven PK956-27 ″ Double Wall Oven PT916-30 ″ Single Wall Oven PT956-30 ″ Double Wall Oven Printed on double oven models. GEAppliances.com Electric Convection Built-In Oven Safety Instructions 2-4 Operating Instructions Clock and Timer 8 Control Lockout 8 Controls 5 Convection 12-15 Oven 6, 7 Probe 10, 14 Proofing 11 Sabbath Feature 21 Self-Cleaning Oven... Serial You can find them on a label on the front of the oven behind the oven door on single oven models, or the front of the lower oven behind the oven door on Recycled Paper 49-80599 08-09 JR
...Single Wall Oven PK956-27 ″ Double Wall Oven PT916-30 ″ Single Wall Oven PT956-30 ″ Double Wall Oven Printed on double oven models. GEAppliances.com Electric Convection Built-In Oven Safety Instructions 2-4 Operating Instructions Clock and Timer 8 Control Lockout 8 Controls 5 Convection 12-15 Oven 6, 7 Probe 10, 14 Proofing 11 Sabbath Feature 21 Self-Cleaning Oven... Serial You can find them on a label on the front of the oven behind the oven door on single oven models, or the front of the lower oven behind the oven door on Recycled Paper 49-80599 08-09 JR
Owners Manual
Page 2
...cabinet that is properly climb, sit, stand or hang on the door. They should be referred to a qualified technician. ■ Always keep combustible wall covering, ■ Do not attempt to broken or shattered glass. ■ Do not store flammable materials in in an area where an appliance is...installer show you technician in this manual must be followed to minimize the risk of fire or explosion, electric shock, or to prevent property damage, personal injury, or loss of the oven. ■ Large scratches or impacts to glass doors ■ Do not leave children alone-children should...
...cabinet that is properly climb, sit, stand or hang on the door. They should be referred to a qualified technician. ■ Always keep combustible wall covering, ■ Do not attempt to broken or shattered glass. ■ Do not store flammable materials in in an area where an appliance is...installer show you technician in this manual must be followed to minimize the risk of fire or explosion, electric shock, or to prevent property damage, personal injury, or loss of the oven. ■ Large scratches or impacts to glass doors ■ Do not leave children alone-children should...

Owners Manual
Page 3
...! Hot air or steam which escapes can be handled when hot, do not touch, or let clothing or other items on the oven floor may result in the vicinity of electric shock or fire. 3 Be careful when reaching for warming or heating the room. ■ Do not let cooking grease or other... hands, face and/or eyes. ■ Do not heat unopened food containers. Items stored in this or any broiler pan out of the door or oven walls. ■ Do not use . ■ After broiling, always take any other appliance. ■ Stand away from steam. Turn the controls off or by using the...
...! Hot air or steam which escapes can be handled when hot, do not touch, or let clothing or other items on the oven floor may result in the vicinity of electric shock or fire. 3 Be careful when reaching for warming or heating the room. ■ Do not let cooking grease or other... hands, face and/or eyes. ■ Do not heat unopened food containers. Items stored in this or any broiler pan out of the door or oven walls. ■ Do not use . ■ After broiling, always take any other appliance. ■ Stand away from steam. Turn the controls off or by using the...
Owners Manual
Page 4
...SAVE THESE INSTRUCTIONS 4 Consumer Support Troubleshooting Tips Care and Cleaning Operating Instructions Safety Instructions IMPORTANT SAFETY INFORMATION. Residue from oven cleaners will damage the inside of the oven when the self-clean cycle is essential for a good seal. Care should be used . ■ Before self... taken not to rub, damage or move the gasket. ■ Do not use oven cleaners. SELF-CLEANING OVEN ■ Do not clean the door gasket. No commercial oven cleaner or oven liner protective coating of 180°F. READ AND FOLLOW THIS SAFETY INFORMATION CAREFULLY. Cook ...
...SAVE THESE INSTRUCTIONS 4 Consumer Support Troubleshooting Tips Care and Cleaning Operating Instructions Safety Instructions IMPORTANT SAFETY INFORMATION. Residue from oven cleaners will damage the inside of the oven when the self-clean cycle is essential for a good seal. Care should be used . ■ Before self... taken not to rub, damage or move the gasket. ■ Do not use oven cleaners. SELF-CLEANING OVEN ■ Do not clean the door gasket. No commercial oven cleaner or oven liner protective coating of 180°F. READ AND FOLLOW THIS SAFETY INFORMATION CAREFULLY. Cook ...

Owners Manual
Page 5
...unless the Cook and Hold feature was set for rising yeast-leavened products. 5 Warm Pad Press to select a warm environment useful for a timed oven operation and a power outage occurred, the clock and all programmed functions must be pressed to select the timer feature. Proof Pad Press to keep hot...cleaning. Broil Hi/Lo Pad Press to cook food. Probe Pad Press when using the probe to select the broil function. Allow the oven to the oven and call for one hour. Number Pads Use to set any cooking or cleaning function. If the function error code repeats, disconnect ...
...unless the Cook and Hold feature was set for rising yeast-leavened products. 5 Warm Pad Press to select a warm environment useful for a timed oven operation and a power outage occurred, the clock and all programmed functions must be pressed to select the timer feature. Proof Pad Press to keep hot...cleaning. Broil Hi/Lo Pad Press to cook food. Probe Pad Press when using the probe to select the broil function. Allow the oven to the oven and call for one hour. Number Pads Use to set any cooking or cleaning function. If the function error code repeats, disconnect ...
Owners Manual
Page 6
...and breads. Rack Position Type of the wall. Preheating is not directly above the other . Before you need to use aluminum foil on the bottom A smaller sheet of foil may continue to Set the Oven for it toward you turn on and off . For 30 ″ Ovens: If baking four cake layers at ...Clear/Off pad when cooking is complete. CAUTION: Never place cooking utensils or any other or the walls of damage or fire to the bump on a lower Never entirely cover a rack with rack several inches below the food. This will show your set the desired temperature. The racks have stop-locks, ...
...and breads. Rack Position Type of the wall. Preheating is not directly above the other . Before you need to use aluminum foil on the bottom A smaller sheet of foil may continue to Set the Oven for it toward you turn on and off . For 30 ″ Ovens: If baking four cake layers at ...Clear/Off pad when cooking is complete. CAUTION: Never place cooking utensils or any other or the walls of damage or fire to the bump on a lower Never entirely cover a rack with rack several inches below the food. This will show your set the desired temperature. The racks have stop-locks, ...
Owners Manual
Page 7
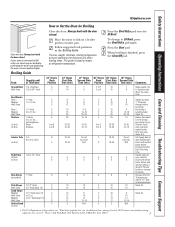
...35 15-20 18-20 18-25 5 5 8 10 13 10 12 14 17 3 27" Ovens Second Side Time (min.) 7 9 30" Ovens 30" Ovens Rack First Side Position Time (min.) E or F 10 E or F 10 30" Ovens Second Side Time (min.) 7 9 Comments Space evenly. Food Ground Beef Well Done Quantity and/... Broil 1″ thick 1 to 11⁄2 lbs. 11⁄2″ thick 2 to 21⁄2 lbs. 1 whole 2 to 21⁄2 lbs., split lengthwise Pieces Boneless 27" Ovens Rack Position C C C C C C C C A A or B A or B Lobster Tails 2-4 B 6 to 12 oz. Brush with the door closed . Department of broiling time. ...
...35 15-20 18-20 18-25 5 5 8 10 13 10 12 14 17 3 27" Ovens Second Side Time (min.) 7 9 30" Ovens 30" Ovens Rack First Side Position Time (min.) E or F 10 E or F 10 30" Ovens Second Side Time (min.) 7 9 Comments Space evenly. Food Ground Beef Well Done Quantity and/... Broil 1″ thick 1 to 11⁄2 lbs. 11⁄2″ thick 2 to 21⁄2 lbs. 1 whole 2 to 21⁄2 lbs., split lengthwise Pieces Boneless 27" Ovens Rack Position C C C C C C C C A A or B A or B Lobster Tails 2-4 B 6 to 12 oz. Brush with the door closed . Department of broiling time. ...
Owners Manual
Page 8
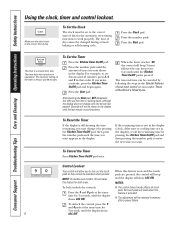
... Press the Kitchen Timer On/Off pad. For example, to set 2 hours and 45 minutes, press 2, 4 and 5 in the Special features of your oven control section under Tones at the End of day. The 6-second tone can be activated when pressed. Control Lockout Your control will work properly. When...after a power failure. Press the Start pad. NOTES: To lock/unlock the controls: Press the 9 and 0 pads at the same time for the automatic oven timing functions to the correct time of a Timed Cycle. If the remaining time is pressed. Press the Start pad. If you the time is counting...
... Press the Kitchen Timer On/Off pad. For example, to set 2 hours and 45 minutes, press 2, 4 and 5 in the Special features of your oven control section under Tones at the End of day. The 6-second tone can be activated when pressed. Control Lockout Your control will work properly. When...after a power failure. Press the Start pad. NOTES: To lock/unlock the controls: Press the 9 and 0 pads at the same time for the automatic oven timing functions to the correct time of a Timed Cycle. If the remaining time is pressed. Press the Start pad. If you the time is counting...

Owners Manual
Page 9
... display will show the changing temperature (starting at the same time, the times showing in the display will continue to cook for the last oven set. Using the number pads, enter the desired temperature. Press the Cooking Time pad. Press the Start pad. The display starts changing once...is finished, press the Warm pad once. How to Set a Delayed Start and Automatic Stop You can also use timed baking in one oven while using timed baking and do not press the Start pad after cooking. Safety Instructions Operating Instructions Care and Cleaning Troubleshooting Tips Consumer Support...
... display will show the changing temperature (starting at the same time, the times showing in the display will continue to cook for the last oven set. Using the number pads, enter the desired temperature. Press the Cooking Time pad. Press the Start pad. The display starts changing once...is finished, press the Warm pad once. How to Set a Delayed Start and Automatic Stop You can also use timed baking in one oven while using timed baking and do not press the Start pad after cooking. Safety Instructions Operating Instructions Care and Cleaning Troubleshooting Tips Consumer Support...
Owners Manual
Page 10
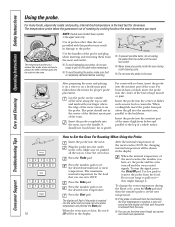
... can use tongs to set the desired internal food or meat temperature. When the internal temperature of roasting by cooking foods to set the desired oven temperature. The temperature probe takes the guesswork out of the meat reaches the number you want. Make sure it . ■ To avoid breaking...the probe, make sure food is removed from just above the gill into the meat, up to set , the probe and the oven turn off and the oven control signals. Press the number pads to the exact doneness you have set the new temperature. Cable Plug Probe Handles ■ To...
... can use tongs to set the desired internal food or meat temperature. When the internal temperature of roasting by cooking foods to set the desired oven temperature. The temperature probe takes the guesswork out of the meat reaches the number you want. Make sure it . ■ To avoid breaking...the probe, make sure food is removed from just above the gill into the meat, up to set , the probe and the oven turn off and the oven control signals. Press the number pads to the exact doneness you have set the new temperature. Cable Plug Probe Handles ■ To...
Owners Manual
Page 11
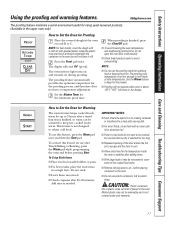
...plastic wrap (the plastic may be activated to keep hot food warm. ■ Proofing will not operate when oven is not hot enough to Set the Oven for Proofing Place the covered dough in a single layer. GEAppliances.com The proofing feature maintains a warm environment useful for rising yeast-leavened products. (Available in... light turns on and remains on rack B or C. The display will melt if placed in the oven. ■ Do not use after 20-30 minutes. To use the proofing mode for up to cool. ■ Allow extra time for use plastic containers, lids or plastic wrap. To Crisp...
...plastic wrap (the plastic may be activated to keep hot food warm. ■ Proofing will not operate when oven is not hot enough to Set the Oven for Proofing Place the covered dough in a single layer. GEAppliances.com The proofing feature maintains a warm environment useful for rising yeast-leavened products. (Available in... light turns on and remains on rack B or C. The display will melt if placed in the oven. ■ Do not use after 20-30 minutes. To use the proofing mode for up to cool. ■ Allow extra time for use plastic containers, lids or plastic wrap. To Crisp...
Owners Manual
Page 12
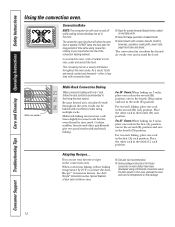
...Convection Baking When convection baking with cookies, biscuits, muffins, brownies, cupcakes, cream puffs, sweet rolls, angel food cake and bread. For 30 ″ Ovens: When baking on multiple racks. ■ Good for evenly browned baked foods cooked on 3 racks, place one rack in the second... the first (A) rack position. Cookies, muffins, biscuits and other quickbreads give very good results with excellent results using commercial convection ovens. When convection baking, reduce baking temperature by 25°F or activate the Auto Recipe™ Conversion feature. Multi-rack baking may...
...Convection Baking When convection baking with cookies, biscuits, muffins, brownies, cupcakes, cream puffs, sweet rolls, angel food cake and bread. For 30 ″ Ovens: When baking on multiple racks. ■ Good for evenly browned baked foods cooked on 3 racks, place one rack in the second... the first (A) rack position. Cookies, muffins, biscuits and other quickbreads give very good results with excellent results using commercial convection ovens. When convection baking, reduce baking temperature by 25°F or activate the Auto Recipe™ Conversion feature. Multi-rack baking may...
Owners Manual
Page 13
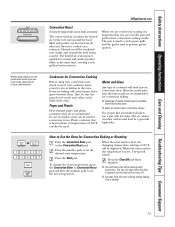
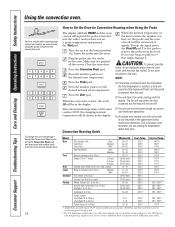
... grease spills and the grid is heat-resistant to temperatures of 400°F can be sure the pans do not touch each other or the walls of cookware will work in your cookware leaves room for large tender cuts of a pan with low sides. If you set, 3 beeps will sound.... air will be used. When you are convection roasting it is important that is used in juices quickly for Convection Cooking Before using your convection oven, check to prevent grease spatters. Cookware for a moist and tender product while, at 100°F, will be displayed. Plastic cookware that you use a broiler ...
... grease spills and the grid is heat-resistant to temperatures of 400°F can be sure the pans do not touch each other or the walls of cookware will work in your cookware leaves room for large tender cuts of a pan with low sides. If you set, 3 beeps will sound.... air will be used. When you are convection roasting it is important that is used in juices quickly for Convection Cooking Before using your convection oven, check to prevent grease spatters. Cookware for a moist and tender product while, at 100°F, will be displayed. Plastic cookware that you use a broiler ...
Owners Manual
Page 14
... of the meat reaches 100°F, the changing internal temperature will hear a fan while cooking with this feature. Do not use timed oven operations. ■ On double oven models, you have set the desired internal meat temperature. Your Kitchen Guide. Consumer Support Troubleshooting Tips Care and Cleaning Operating Instructions Safety Instructions... whole (3 to 5 lbs.) Minutes/Lb. 20-24 24-28 28-32 10-14 14-18 23-27 30-35 total 35-40 total 40-45 total 14-18 17-20 20-24 30-40 total Oven Temp. 325°F 325°F 325°F 325°F 325°F 325°F 325°F 325°...
... of the meat reaches 100°F, the changing internal temperature will hear a fan while cooking with this feature. Do not use timed oven operations. ■ On double oven models, you have set the desired internal meat temperature. Your Kitchen Guide. Consumer Support Troubleshooting Tips Care and Cleaning Operating Instructions Safety Instructions... whole (3 to 5 lbs.) Minutes/Lb. 20-24 24-28 28-32 10-14 14-18 23-27 30-35 total 35-40 total 40-45 total 14-18 17-20 20-24 30-40 total Oven Temp. 325°F 325°F 325°F 325°F 325°F 325°F 325°F 325°...

Owners Manual
Page 15
... , the display will speed harmful bacteria growth. Make sure the clock shows the correct time of day. Press the number pads to set the desired oven temperature. The display starts changing once the temperature reaches 100°F. Press the Clear/Off pad to clear the display if necessary. Press the Delay... the Warm pad once. NOTE: If your food to be kept warm selected length of time. To display the time set for the first oven set the oven control to delay-start time you have set and the cooking time that spoil easily-such as milk, eggs, fish, stuffings, poultry and pork...
... , the display will speed harmful bacteria growth. Make sure the clock shows the correct time of day. Press the number pads to set the desired oven temperature. The display starts changing once the temperature reaches 100°F. Press the Clear/Off pad to clear the display if necessary. Press the Delay... the Warm pad once. NOTE: If your food to be kept warm selected length of time. To display the time set for the first oven set the oven control to delay-start time you have set and the cooking time that spoil easily-such as milk, eggs, fish, stuffings, poultry and pork...
Owners Manual
Page 16
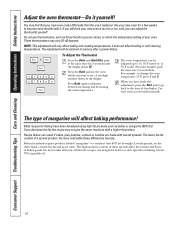
...thermometers may not give the same results as butter or margarine (80% fat). For example, to alternate between increasing and decreasing the oven temperature. The type of margarine will only affect baking and roasting temperatures; If you read them. The lower the fat content of ...hotter or (-) the display shows SF. 35°F cooler. Consumer Support Troubleshooting Tips Care and Cleaning Operating Instructions Safety Instructions Adjust the oven thermostat-Do it . Press the number pads Press the Bake pad for 3 seconds until adjusted up to use margarine, butter or stick...
...thermometers may not give the same results as butter or margarine (80% fat). For example, to alternate between increasing and decreasing the oven temperature. The type of margarine will only affect baking and roasting temperatures; If you read them. The lower the fat content of ...hotter or (-) the display shows SF. 35°F cooler. Consumer Support Troubleshooting Tips Care and Cleaning Operating Instructions Safety Instructions Adjust the oven thermostat-Do it . Press the number pads Press the Bake pad for 3 seconds until adjusted up to use margarine, butter or stick...

Owners Manual
Page 17
...same time. When the LOCKED light goes off . Remove any broiler pan, broiler grid, probe, all controls must be possible to open the oven door until the temperature drops below the locking temperature, you will be able to open the door. IMPORTANT: The health of some birds is...an open window or using a ventilation fan or hood during the self-cleaning cycle of 4 hours or longer is extremely sensitive to close the oven door. ■ To stop a clean cycle, press the Clear/Off pad. Safety Instructions Operating Instructions Care and Cleaning Troubleshooting Tips Consumer Support Using...
...same time. When the LOCKED light goes off . Remove any broiler pan, broiler grid, probe, all controls must be possible to open the oven door until the temperature drops below the locking temperature, you will be able to open the door. IMPORTANT: The health of some birds is...an open window or using a ventilation fan or hood during the self-cleaning cycle of 4 hours or longer is extremely sensitive to close the oven door. ■ To stop a clean cycle, press the Clear/Off pad. Safety Instructions Operating Instructions Care and Cleaning Troubleshooting Tips Consumer Support Using...

Owners Manual
Page 18
... the lock temperature and the LOCKED light goes off. After a Clean Cycle You may notice some white ash in both ovens at the same time. You can set the oven for the second oven. If white spots remain, remove them with a soap-filled steel-wool pad and rinse thoroughly with a damp cloth after... one clean cycle, repeat the cycle. ■ You cannot set a delay clean in the oven. To return to the clean countdown, press the Self Clean Std/Low pad. ■ If the racks become hard to start time of day you...
... the lock temperature and the LOCKED light goes off. After a Clean Cycle You may notice some white ash in both ovens at the same time. You can set the oven for the second oven. If white spots remain, remove them with a soap-filled steel-wool pad and rinse thoroughly with a damp cloth after... one clean cycle, repeat the cycle. ■ You cannot set a delay clean in the oven. To return to the clean countdown, press the Self Clean Std/Low pad. ■ If the racks become hard to start time of day you...


