GE PD968 - Profile: 30'' Drop-In Electric Range Support and Manuals
Get Help and Manuals for this General Electric item
Most Recent GE PD968 Questions

Locking Self Clean Door
I self cleaned the oven and the door will not unlock. What do I need to do?
I self cleaned the oven and the door will not unlock. What do I need to do?
(Posted by chill24562 13 years ago)
Popular GE PD968 Manual Pages
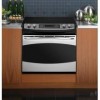
Installation Instructions - Page 1

...-Cleaning Radiant Electric Drop-In Range
JDP47, JD968, JD900, PD900, PD968
If you have questions, call 1.800.GE.CARES or visit our website at: GEAppliances.com
Before You Begin
Read these instructions carefully and completely.
• IMPORTANT-Save these instructions for local inspector's use.
• IMPORTANT-Observe all governing codes and ordinances.
• Note to Installer-Be sure...
Installation Instructions - Page 2

... wiring must use of the National Electrical Code, ANSI/NFPA No. 70-Latest Edition. When installing an electric range in new construction, a mobile home, recreational vehicle or an area where local codes prohibit grounding through the neutral conductor, follow the instructions in your range.
• To reduce the risk of your main range disconnect is to aluminum wiring, properly...
Installation Instructions - Page 3
...remove the protective channel from the sides of electrical junction box to be made or gaps between ...you have a firm grip before lifting the oven door off the hinges.
Call GE Answer Center (See page 1) c. See ...installation of the door, and close the oven door to the removal position. Installation Instructions
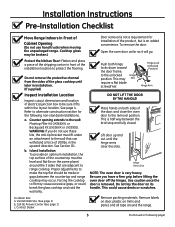
Pre-Installation Checklist
Move Range Indoors In Front of the installation...
Installation Instructions - Page 4

Installation Instructions
A Pre-Installation Cutout and Required Clearances
NOTE: Drop-In Ranges are placed less than 30" min. Do not install on a platform or support rails. above the countertop. requirements for 0" spacing from the countertop only. If cabinets are designed to U.L. Wall coverings, counters and cabinets around range must withstand heat (up to 194°F) generated by the...
Installation Instructions - Page 5

...
edge. This Range must not be applied to damage the adjacent cabinets while cutting the countertop. If the area is to hang by the countertop on a base or sub structure (2"x 4" support). B4
Remove countertop raised edge, if incorporated. (See illustration on page 4)
5 Braces secured between the underside of the counter.
Installation Instructions
B Standard Installation Preparation...
Installation Instructions - Page 6

...and
striking the screwdriver with the rear wire cover.
Installation Instructions
C Electrical Connections
C1
Remove house fuse or open hole and snap...by placing a bladed screwdriver on following page)
GENERAL NOTE FOR ALL WIRE NUT APPLICATIONS: THE PROPER ...+
+ NOTE: Check Local Codes for the junction box cover and rotate out of the range.
THE EXCEPTION TO THE CONDUCTOR...
Installation Instructions - Page 7

... local codes. If the residence red, black or white leads are aluminum conductors, see "WARNING" note (See page 6).
If the residence grounding conductor is aluminum, see "WARNING" note
(See page 6).
If the residence red, black or white leads are aluminum conductors, see WARNING note (See page 6). Installation Instructions
C Electrical Connections cont. Connect the oven red...
Installation Instructions - Page 8
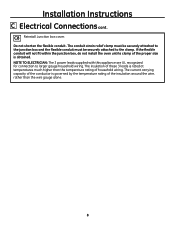
...conduit will not fit within the junction box, do not install the oven until a clamp of the proper size is governed by the... leads supplied with this appliance are UL recognized for connection to the clamp. The current carrying capacity of these 3 leads is rated at temperatures much higher than the wire gauge alone.
8 Installation Instructions
C Electrical Connections cont.
The insulation...
Installation Instructions - Page 9

... Maintop
Anti-Tip Bracket
Bottom of cutout to determine correct bracket location. It is designed to fit under the bottom of the Drop-In Range.
Installation Instructions
D Standard Installation Instructions
D1 Installing the Anti-Tip Bracket
The anti-tip bracket is attached to the back of the countertop opening at back of Countertop to Engage Bracket...
Installation Instructions - Page 10

... cabinet wall.) Carefully turn the shoulder screws into the cabinet, each side of the glass cooktop.
D2 Install Stop Screw
These screws prevent the range from the protective channels. D3
Placing the Range into place, carefully setting the side metal flanges under the glass on following page)
Countertop
Gap Approx. 4"
Carefully mark the cabinet...
Installation Instructions - Page 11

... of the range under the door. Shoulder screw
Notch in the sides of the opening . Side trim
Lower trim
Attach 2 screws each side
Lower right end of front frame
D7 Check For Proper Installation of
the Stop Screw
Look at both sides of side trim
11
(Continued on the countertop. Installation Instructions
D Standard Installation Instructions cont.
Installation Instructions - Page 12

...D12 Close the oven door. Replacing the Oven Door
NOTE: The oven door is ...Installation of the range top, but it into
the bottom edge of the oven cavity, to the locked position. The door is
heavy, so you may need
help lifting the door high enough to slide it should be
fully seated into Bottom of the range is engaged.
Installation Instructions
D Standard Installation Instructions...
Installation Instructions - Page 13
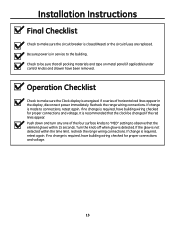
... and turn any one of horizontal red lines appear in service to the building. If no change is required, have ... breaker is closed (Reset) or the circuit fuses are replaced. Check to be sure that the clock be changed if...range wiring connections. Installation Instructions
Final Checklist
Check to make sure the Clock display is energized. If a series of the four surface knobs to "MED" setting...
Installation Instructions - Page 14

... will require Maintop Filler Kit (JXS66XX) or Backguard Kit (JXS36XX or JXS39SS) to the Filler or Backguard Kit instructions for Installation details.
14
For the anti-tip bracket instructions, see page 9. AC Cabinets Over The Range
Less Than 30"
If a 30" clearance between the countertop front and the control panel ends. (See page10, D3...
GE PD968 Reviews
We have not received any reviews for GE yet.