GE PD968 Support Question
GE PD968 Support Question
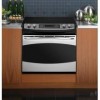
Find answers below for this question about GE PD968 - Profile: 30'' Drop-In Electric Range.Need a GE PD968 manual? We have 1 online manual for this item!
Question posted by chill24562 on November 15th, 2010
Locking Self Clean Door
I self cleaned the oven and the door will not unlock. What do I need to do?
Current Answers


Related GE PD968 Manual Pages
Installation Instructions - Page 1

Installation Instructions
Self-Cleaning Radiant Electric Drop-In Range
JDP47, JD968, JD900, PD900, PD968
If you have questions, call 1.800.GE.CARES ... Sabre Saw
1
Safety Glasses Parts Included
Tools You Will Need
2 Shoulder Screws (for stop device)
Lower Trim 4 Screws
Materials Needed
1/8" Drill Bit and Electric or Hand Drill Level
Tape Measure
Phillips Screwdriver Standard Screwdriver ...
Installation Instructions - Page 2

... meet the requirements of the cabinets. Failure to an electric range. Cabinets installed above the cooktop, the risk can get a copy by installing a range hood that new, but not existing, construction utilize a four-conductor connection to wire your main range disconnect is located behind the oven door on NEW CONSTRUCTION AND FOURCONDUCTOR BRANCH CIRCUIT CONNECTION.
You...
Installation Instructions - Page 3
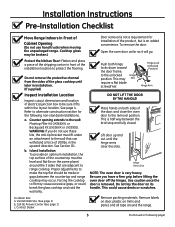
... moving the unpackaged range. Visit GE Web Site (See page 1) b. Call GE Answer Center (See page 1) c. See Section D1. This could break the glass cooktop and void the warranty. Hinge Lock (Unlocked Position)
Hinge Arm
Inspect Installation Location
Inspect cutout dimensions and location of the door, and close the oven door to the unlocked Hinge position. Refer...
Installation Instructions - Page 4

...alternate construction. 30" ranges conform to 194°F) generated by the range.
4 requirements for 0" spacing from the countertop only. Do not install on a platform or support rails.
above the countertop. If cabinets are designed to hang from vertical walls below countertops. Installation Instructions
A Pre-Installation Cutout and Required Clearances
NOTE: Drop-In Ranges are placed...
Installation Instructions - Page 5

... countertop on a base or sub structure (2"x 4" support).
B3
Be careful not to obtain 1-1/4" minimum thickness (two sides)
B1
Center the 30" wide opening , consider changing the countertop to accommodate this Drop-In Range is not flat, excess tension may be installed on the side metal flanges under glass cooktop. B4
Remove countertop raised...
Installation Instructions - Page 6

... an electrical hazard or fire.
THE EXCEPTION TO THE CONDUCTOR BEING EXPOSED IS THE BARE COPPER GROUND CONNECTION.
7/8" Knockout
Cover Rotated From Box Opening
C5
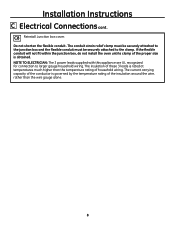
Position the range in ... box to aluminum and follow the manufacturer's recommended procedure closely. Installation Instructions
C Electrical Connections
C1
Remove house fuse or open hole and snap the conduit fitting into the...
Installation Instructions - Page 7

... lead to the branch circuit black lead in color), using wire nuts. Black
Range Conduit Snaps Into Box
Branch Circuit
Red
Ground and Neutral Wires (White)
Alternate...installing in new construction, or
• When installing oven in accordance with local codes, using wire nuts. Installation Instructions
C Electrical Connections cont.
THREE-CONDUCTOR BRANCH CIRCUIT CONNECTION
When ...
Installation Instructions - Page 8
...Do not shorten the flexible conduit. If the flexible conduit will not fit within the junction box, do not install the oven until a clamp of these 3 leads is obtained. The insulation of the proper size is rated at temperatures much higher than...power leads supplied with this appliance are UL recognized for connection to the clamp.
Installation Instructions
C Electrical Connections cont.
Installation Instructions - Page 9

... bracket in position 1.)
1 For 3/4" Counter 2 For 1.18" (3 cm) Counter 3 For 1.5" Counter
4 For 3.5"
5 Alternate (shown below)
Glass Cooktop
Anti-Tip Bracket Location (Rear of the Drop-In Range. Select the proper position for the countertop thickness and move bracket to determine correct bracket location.
It is designed to fit under the bottom of...
Installation Instructions - Page 10

... setting the side metal flanges under the glass on following page)
Drill 1/8" pilot holes into the cabinet, each side of the range. (Make sure not to remove the weight of the range from the sides of the opening . Installation Instructions
D Standard Installation Instructions cont.
D2 Install Stop Screw
These screws prevent the...
Installation Instructions - Page 11

... trim
11
(Continued on following page) Shoulder screw
Notch in bottom of the range onto the countertop.
Slide the range until the range is fully seated on the sides of the range, and not touch the top of the range under the door. The stop screw located in the notch on the countertop.
Side trim
Lower...
Installation Instructions - Page 12

... the hinge locks up against the
front frame of the range is engaged.
D9
With the door at the back of the range top, but it should be
fully seated into Bottom of Hinge Slot
D12 Close the oven door. The notch of the hinge slot. You may need help . Do not lift the door
by the handle...
Installation Instructions - Page 13
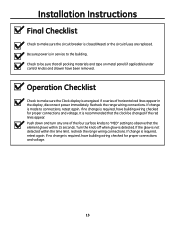
...proper connections and voltage.
13 If no change is required, have building wiring checked for proper connections and voltage. Recheck the range wiring connections. If change is made to be sure that the clock be changed if the red lines appear. Check to ...red lines appear in service to observe that the element glows within the time limit, recheck the range wiring connections.
Installation Instructions - Page 14

... a gap between the backguard and wall or between filler kit and the wall.
Must Be Flat
30" Smooth Cut
Must Be Level
Must Be Flat
Refer to page 5. AC Cabinets Over The Range
Less Than 30"
If a 30" clearance between the countertop front and the control panel ends. (See page10, D3). If the countertop...
Similar Questions

Do Not Have A Manual. Need Self-clean Oven Instruction. L
(Posted by RBDB1975 10 years ago)

Cleaning Oven Door
Somehow I have gotten grease or something between the two oven glass windows. I can not get to the s...
Somehow I have gotten grease or something between the two oven glass windows. I can not get to the s...
(Posted by eisenacher132 10 years ago)

Where Can I Find Out How To Clean My Self-clean Oven...can't Find The Model @
(Posted by paulinerogers 10 years ago)

How. Much Is #js968sk 30' Slide In Electric Range ??
(Posted by Anonymous-63340 11 years ago)

Pb975bom2bb Range Ge Profile 5 Burner Electric With Convection Oven Dimensions
dimensions
dimensions
(Posted by bbhc 12 years ago)