Installation Instructions
Page 1
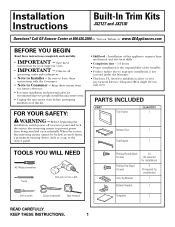
...the microwave oven before attempting installation of the installer. • Product failure due to improper installation is not covered under the Warranty. • This kit is the responsibility of this kit. PARTS INCLUDED PART Trim Frame ...QUANTITY 1 Bottom Duct 1 Top Bracket 1 TOOLS YOU WILL NEED #2 Phillips screwdriver Pencil Drill with the Consumer. • Note to prevent power from being switched on accidentally. Observe all governing codes and ordinances. • Note to the service panel. • Skill level - Call GE...
...the microwave oven before attempting installation of the installer. • Product failure due to improper installation is not covered under the Warranty. • This kit is the responsibility of this kit. PARTS INCLUDED PART Trim Frame ...QUANTITY 1 Bottom Duct 1 Top Bracket 1 TOOLS YOU WILL NEED #2 Phillips screwdriver Pencil Drill with the Consumer. • Note to prevent power from being switched on accidentally. Observe all governing codes and ordinances. • Note to the service panel. • Skill level - Call GE...
Installation Instructions
Page 2
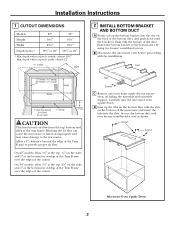
... 27″ models, allow 11⁄4″ at the top, 21⁄8″ on the sides and 1″ at the bottom for overlap of the Trim Frame over the edges of the cutout. depth with the installation. CAUTION This trim kit uses air flow from the top, bottom and sides of the microwave and... insert the tabs into the slots. Carefully turn the microwave oven upside down until the bracket is flush with the slots on the back of...
... 27″ models, allow 11⁄4″ at the top, 21⁄8″ on the sides and 1″ at the bottom for overlap of the Trim Frame over the edges of the cutout. depth with the installation. CAUTION This trim kit uses air flow from the top, bottom and sides of the microwave and... insert the tabs into the slots. Carefully turn the microwave oven upside down until the bracket is flush with the slots on the back of...

Installation Instructions
Page 4
...and two on the inside of the microwave oven. Attach the top bracket to restore power at the service panel. 4 Printed in the top bracket. Flat-head screws 164D3370P328 49-40398 06-03 JR Flat-head screws 7 REPLACE ANY LOOSE ITEMS A Your trim kit is now fully installed. Replace any ...loose items that were removed from the inside bottom). Installation Instructions 5 INSTALL THE TOP BRACKET A Place the top bracket on the top of the microwave oven, with the tabs on the top bracket. Secure ...
...and two on the inside of the microwave oven. Attach the top bracket to restore power at the service panel. 4 Printed in the top bracket. Flat-head screws 164D3370P328 49-40398 06-03 JR Flat-head screws 7 REPLACE ANY LOOSE ITEMS A Your trim kit is now fully installed. Replace any ...loose items that were removed from the inside bottom). Installation Instructions 5 INSTALL THE TOP BRACKET A Place the top bracket on the top of the microwave oven, with the tabs on the top bracket. Secure ...


