Installation Instructions
Page 1
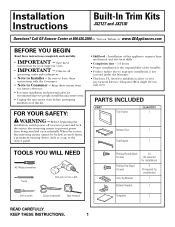
.... • Note to the service panel. • Skill level - KEEP THESE INSTRUCTIONS. 1 PARTS INCLUDED PART Trim Frame QUANTITY 1 Bottom Duct 1 Top Bracket 1 TOOLS YOU WILL NEED #2 Phillips screwdriver Pencil Drill with the Consumer. • Note to improper installation is not covered under the Warranty. • This kit is UL listed for installation alone or over any General Electric/Hotpoint/RCA single electric wall oven. Before beginning the installation, switch power off at : www.GEAppliances...
.... • Note to the service panel. • Skill level - KEEP THESE INSTRUCTIONS. 1 PARTS INCLUDED PART Trim Frame QUANTITY 1 Bottom Duct 1 Top Bracket 1 TOOLS YOU WILL NEED #2 Phillips screwdriver Pencil Drill with the Consumer. • Note to improper installation is not covered under the Warranty. • This kit is UL listed for installation alone or over any General Electric/Hotpoint/RCA single electric wall oven. Before beginning the installation, switch power off at : www.GEAppliances...
Installation Instructions
Page 2
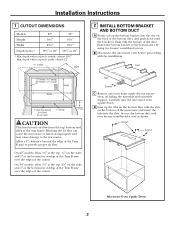
...; at the bottom for overlap of the Trim Frame over the edges of the Trim Frame to provide proper air flow. Rear Screws C Remove any loose items inside cabinet 22″ 11⁄4″ overlap Depth 2 INSTALL BOTTOM BRACKET AND BOTTOM DUCT A Fit the tab on the bottom bracket into the slots. Screws Screws Microwave Oven Upside Down 2 Installation Instructions 1 CUTOUT DIMENSIONS Models 27″ 30″ Height 163⁄4″...
...; at the bottom for overlap of the Trim Frame over the edges of the Trim Frame to provide proper air flow. Rear Screws C Remove any loose items inside cabinet 22″ 11⁄4″ overlap Depth 2 INSTALL BOTTOM BRACKET AND BOTTOM DUCT A Fit the tab on the bottom bracket into the slots. Screws Screws Microwave Oven Upside Down 2 Installation Instructions 1 CUTOUT DIMENSIONS Models 27″ 30″ Height 163⁄4″...
Installation Instructions
Page 3
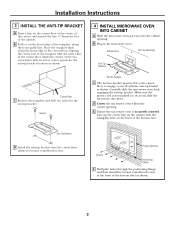
Place the template flush along the front guide line. Mark the centers of the cutout floor. Screws 4 INSTALL MICROWAVE OVEN INTO CABINET A Slide the microwave oven part way into place. Make sure the power cord is accurately centered. D Center the microwave oven within the cutout opening . Cutout Floor C Remove the template and drill two holes for the anti-tip bracket location as you slide the microwave into the cabinet opening . Cutout Opening Screws Positioning Flange F Drill pilot holes through...
Place the template flush along the front guide line. Mark the centers of the cutout floor. Screws 4 INSTALL MICROWAVE OVEN INTO CABINET A Slide the microwave oven part way into place. Make sure the power cord is accurately centered. D Center the microwave oven within the cutout opening . Cutout Floor C Remove the template and drill two holes for the anti-tip bracket location as you slide the microwave into the cabinet opening . Cutout Opening Screws Positioning Flange F Drill pilot holes through...

Installation Instructions
Page 4
... microwave oven. Attach the top bracket to restore power at the service panel. 4 Printed in the microwave oven. B Keep these installation instructions for future reference. Flat-head screws 164D3370P328 49-40398 06-03 JR Flat-head screws 7 REPLACE ANY LOOSE ITEMS A Your trim kit is now fully installed. Slots Spring Clips B Drill pilot holes through the holes in the top bracket. C Open the microwave oven door. Save or discard the extra screws...
... microwave oven. Attach the top bracket to restore power at the service panel. 4 Printed in the microwave oven. B Keep these installation instructions for future reference. Flat-head screws 164D3370P328 49-40398 06-03 JR Flat-head screws 7 REPLACE ANY LOOSE ITEMS A Your trim kit is now fully installed. Slots Spring Clips B Drill pilot holes through the holes in the top bracket. C Open the microwave oven door. Save or discard the extra screws...


