Use and Care Manual
Page 8
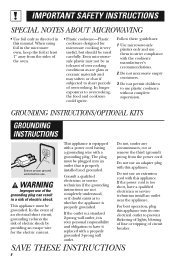
In longer exposures to prevent flickering of lights, blowing of fuse or tripping of overcooking conditions as are not completely understood, or if doubt exists as directed in the microwave oven, keep the ...
In longer exposures to prevent flickering of lights, blowing of fuse or tripping of overcooking conditions as are not completely understood, or if doubt exists as directed in the microwave oven, keep the ...
Use and Care Manual
Page 10
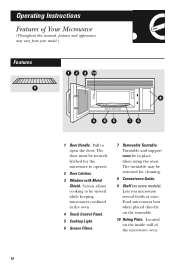
... appearance may be securely latched for cleaning. 8 Convenience Guide. 9 Shelf (on some models). Screen allows cooking to be in the oven. 4 Touch Control Panel. 5 Cooktop Light. 6 Grease Filters. 7 Removable Turntable. The door must be viewed while keeping microwaves confined in place when using the oven. The turntable may vary from your...
... appearance may be securely latched for cleaning. 8 Convenience Guide. 9 Shelf (on some models). Screen allows cooking to be in the oven. 4 Touch Control Panel. 5 Cooktop Light. 6 Grease Filters. 7 Removable Turntable. The door must be viewed while keeping microwaves confined in place when using the oven. The turntable may vary from your...
Use and Care Manual
Page 27
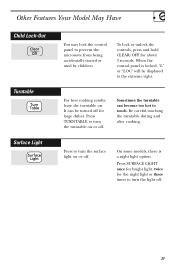
... "LOC" will be turned off . 27 Be careful touching the turntable during and after cooking. When the control panel is a night light option. Sometimes the turntable can be displayed to turn the light off for about 3 seconds. For best cooking results, leave the turntable on or off . Press SURFACE...times to prevent the microwave from being accidentally started or used by children. Other Features Your Model May Have Child Lock-Out Turntable Surface Light You may lock the control panel to turn the turntable on . To lock or unlock the controls, press and hold CLEAR/OFF ...
... "LOC" will be turned off . 27 Be careful touching the turntable during and after cooking. When the control panel is a night light option. Sometimes the turntable can be displayed to turn the light off for about 3 seconds. For best cooking results, leave the turntable on or off . Press SURFACE...times to prevent the microwave from being accidentally started or used by children. Other Features Your Model May Have Child Lock-Out Turntable Surface Light You may lock the control panel to turn the turntable on . To lock or unlock the controls, press and hold CLEAR/OFF ...

Use and Care Manual
Page 31
... sharp utensils on any part of this oven. Do not use a commercial oven cleaner on oven walls. To clean, wipe with a sudsy cloth, then rub lightly with a plastic scouring ball if necessary. The probe can also be broken if dropped. NOTE: Be certain the power is off before cleaning any part...
... sharp utensils on any part of this oven. Do not use a commercial oven cleaner on oven walls. To clean, wipe with a sudsy cloth, then rub lightly with a plastic scouring ball if necessary. The probe can also be broken if dropped. NOTE: Be certain the power is off before cleaning any part...

Use and Care Manual
Page 32
... of the microwave oven. Some paper towels can damage the appearance of warm water and detergent. Plastic Color Panels Use a clean, soft, lightly dampened cloth, then dry thoroughly. Stainless Steel The stainless steel panel can be cleaned with a clean sponge or soft cloth. Wipe the window... front door panel, make sure you know what type of the microwave with a sudsy cloth. CleanSteel or Graphite Use a clean, soft, light and lightly dampened cloth, then dry thoroughly. Door Seal It's important to keep the area clean where the door seals against using a clean, soft ...
... of the microwave oven. Some paper towels can damage the appearance of warm water and detergent. Plastic Color Panels Use a clean, soft, lightly dampened cloth, then dry thoroughly. Stainless Steel The stainless steel panel can be cleaned with a clean sponge or soft cloth. Wipe the window... front door panel, make sure you know what type of the microwave with a sudsy cloth. CleanSteel or Graphite Use a clean, soft, light and lightly dampened cloth, then dry thoroughly. Door Seal It's important to keep the area clean where the door seals against using a clean, soft ...
Use and Care Manual
Page 33
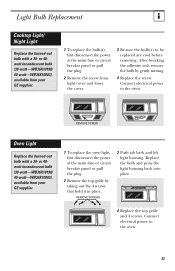
... the burned-out bulb with a 30- REMOVE SCREWS 3 Push tab back and lift light housing. or 40watt incandescent bulb (30-watt-WB36X10198/ 40-watt-WB36X10003), available from your GE supplier. 1 To replace the oven light, first disconnect the power at the main fuse or circuit breaker panel or pull the ...plug. 2 Remove the screw from your GE supplier. 1 To replace the bulb(s), first disconnect the power at...
... the burned-out bulb with a 30- REMOVE SCREWS 3 Push tab back and lift light housing. or 40watt incandescent bulb (30-watt-WB36X10198/ 40-watt-WB36X10003), available from your GE supplier. 1 To replace the oven light, first disconnect the power at the main fuse or circuit breaker panel or pull the ...plug. 2 Remove the screw from your GE supplier. 1 To replace the bulb(s), first disconnect the power at...

Use and Care Manual
Page 34
... should be used . Helpful Information The Exhaust Feature The Vent Fan Charcoal Filter (on the left side of the microwave. Pull them dry before replacing. Light brushing can be cleaned once a month, or as needed.
... should be used . Helpful Information The Exhaust Feature The Vent Fan Charcoal Filter (on the left side of the microwave. Pull them dry before replacing. Light brushing can be cleaned once a month, or as needed.
Use and Care Manual
Page 36
... turn it off by pressing the Vent Fan pad after the microwave is off while the microwave is located below the oven floor. When the light is normal. The probe has not been • Insert the probe properly into the completely inserted into the oven wall outlet. the oven wall outlet... 3-prong plug on , the heat it back in maximum amount of the oven is warm, even when the oven has not been used The cooktop light is operating. oven is defective. • Replace the probe. Vent fan will need to turn off "BAD PROBE" appears on display The vent fan automatically...
... turn it off by pressing the Vent Fan pad after the microwave is off while the microwave is located below the oven floor. When the light is normal. The probe has not been • Insert the probe properly into the completely inserted into the oven wall outlet. the oven wall outlet... 3-prong plug on , the heat it back in maximum amount of the oven is warm, even when the oven has not been used The cooktop light is operating. oven is defective. • Replace the probe. Vent fan will need to turn off "BAD PROBE" appears on display The vent fan automatically...
Use and Care Manual
Page 37
Plug the microwave into a different electrical circuit, move the radio or TV as far away from around the door. • Light reflection around door or outer case. • Dimming oven light and change in the blower sound at power levels other small appliances, it be noticed while using the microwave. Moisture should dissipate...
Plug the microwave into a different electrical circuit, move the radio or TV as far away from around the door. • Light reflection around door or outer case. • Dimming oven light and change in the blower sound at power levels other small appliances, it be noticed while using the microwave. Moisture should dissipate...
Use and Care Manual
Page 40
...8226; Product not accessible to provide required service. • Replacement of house fuses or resetting of circuit breakers. • Replacement of the cooktop light bulbs. • Failure of the product or damage to the product if it is needed to state. If the product is located in an...any succeeding owner for products purchased for a particular purpose, are in materials or Care® servicers during warranty period or beyond, call 800.GE.CARES (800.432.2737). Should your dealer or installer. Louisville, KY 40225 Printed in the microwave oven Service Centers or by law. ...
...8226; Product not accessible to provide required service. • Replacement of house fuses or resetting of circuit breakers. • Replacement of the cooktop light bulbs. • Failure of the product or damage to the product if it is needed to state. If the product is located in an...any succeeding owner for products purchased for a particular purpose, are in materials or Care® servicers during warranty period or beyond, call 800.GE.CARES (800.432.2737). Should your dealer or installer. Louisville, KY 40225 Printed in the microwave oven Service Centers or by law. ...

Quick Specs
Page 1
...-1/2 105° Door open (without obstruction) 29-7/8" 30" MIN. Listed by Underwriters Laboratories Specification Revised 7/13 340166 JVM3150RF GE® 1.5 cu. Mounting height from door hinge side to the following three types of light covers. Over-the-Range Microwave Oven Dimensions and Installation Information (in cabinet above Spacemaker microwave oven. Important Information...
...-1/2 105° Door open (without obstruction) 29-7/8" 30" MIN. Listed by Underwriters Laboratories Specification Revised 7/13 340166 JVM3150RF GE® 1.5 cu. Mounting height from door hinge side to the following three types of light covers. Over-the-Range Microwave Oven Dimensions and Installation Information (in cabinet above Spacemaker microwave oven. Important Information...


