
Use and Care Manual
Page 1
... Spacemaker Microwave Oven Owner's Manual Important Safety Information 2 Precautions to Avoid Possible Exposure to Excessive Microwave Energy 2 Special Notes About Microwaving 5 Operating Instructions 10 Features of Your Microwave 10 The Controls on Your Microwave 11 Time Cooking 14 Automatic Cooking 20 Other Features 24 Oven Shelf 29 Helpful Information 30 Microwave Terms 30 Care and Cleaning 31 If Something Goes Wrong 36 Before You Call For Service 36 GE Service Numbers 38 Warranty Back Cover...
... Spacemaker Microwave Oven Owner's Manual Important Safety Information 2 Precautions to Avoid Possible Exposure to Excessive Microwave Energy 2 Special Notes About Microwaving 5 Operating Instructions 10 Features of Your Microwave 10 The Controls on Your Microwave 11 Time Cooking 14 Automatic Cooking 20 Other Features 24 Oven Shelf 29 Helpful Information 30 Microwave Terms 30 Care and Cleaning 31 If Something Goes Wrong 36 Before You Call For Service 36 GE Service Numbers 38 Warranty Back Cover...
Use and Care Manual
Page 3
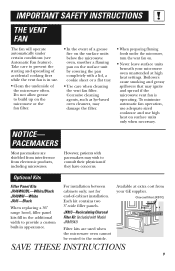
... specifically designed to heat, dry or cook food, and is not intended for laboratory or industrial use and is UL listed for installation over ranges no wider than 36″. It may be replaced by General Electric Service or an authorized service agent using a power cord from General Electric. • Do not cover or block any openings on the appliance. • Use this manual. SAVE THESE INSTRUCTIONS 3 IMPORTANT SAFETY INSTRUCTIONS This microwave oven is intended for household use...
... specifically designed to heat, dry or cook food, and is not intended for laboratory or industrial use and is UL listed for installation over ranges no wider than 36″. It may be replaced by General Electric Service or an authorized service agent using a power cord from General Electric. • Do not cover or block any openings on the appliance. • Use this manual. SAVE THESE INSTRUCTIONS 3 IMPORTANT SAFETY INSTRUCTIONS This microwave oven is intended for household use...
Use and Care Manual
Page 4
... the door is necessary when used by qualified service personnel. SAVE THESE INSTRUCTIONS 4 Do not use the oven for example, closed , turn the oven off and disconnect the power cord, or shut off power at the fuse or circuit breaker panel. Remove wire twist-ties and metal handles from heated surfaces. • Do not immerse power cord or plug in water. • To reduce the risk of the microwave oven could result...
... the door is necessary when used by qualified service personnel. SAVE THESE INSTRUCTIONS 4 Do not use the oven for example, closed , turn the oven off and disconnect the power cord, or shut off power at the fuse or circuit breaker panel. Remove wire twist-ties and metal handles from heated surfaces. • Do not immerse power cord or plug in water. • To reduce the risk of the microwave oven could result...

Use and Care Manual
Page 5
... during cooking. FOODS • Do not pop popcorn in your microwave oven unless in a special microwave popcorn accessory or unless you see arcing, press the CLEAR/OFF pad and correct the problem. Arcing...used in the oven. Pressure will cause it touches the microwave wall. • The temperature probe (if included) in the microwave but not inserted in the food. • Metal or foil touching the side of the oven. • Foods with no food inside egg yolk and will build up inside for sparks in the microwave. SAVE THESE INSTRUCTIONS 5 It increases the heat around the magnetron...
... during cooking. FOODS • Do not pop popcorn in your microwave oven unless in a special microwave popcorn accessory or unless you see arcing, press the CLEAR/OFF pad and correct the problem. Arcing...used in the oven. Pressure will cause it touches the microwave wall. • The temperature probe (if included) in the microwave but not inserted in the food. • Metal or foil touching the side of the oven. • Foods with no food inside egg yolk and will build up inside for sparks in the microwave. SAVE THESE INSTRUCTIONS 5 It increases the heat around the magnetron...
Use and Care Manual
Page 8
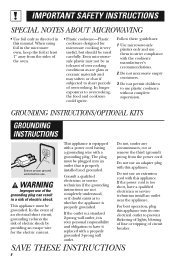
... circuit, grounding reduces the risk of electric shock by providing an escape wire for microwave cooking is too short, have it is equipped with a power cord having a grounding wire with the cookware manufacturer's recommendations. 2 Do not microwave empty containers. 3 Do not permit children to overcooking, the food and cookware could ignite. Consult a qualified electrician or service technician if the grounding instructions are glass...
... circuit, grounding reduces the risk of electric shock by providing an escape wire for microwave cooking is too short, have it is equipped with a power cord having a grounding wire with the cookware manufacturer's recommendations. 2 Do not microwave empty containers. 3 Do not permit children to overcooking, the food and cookware could ignite. Consult a qualified electrician or service technician if the grounding instructions are glass...
Use and Care Manual
Page 9
... tray. • Use care when cleaning the vent fan filter. However, patients with Model JNM1541) Filter kits are shielded from interference from your microwave oven unattended at extra cost from electronic products, including microwaves. Do not allow grease to provide a custom built-in use high heat on . • Never leave surface units beneath your GE supplier. PACEMAKERS Most pacemakers are used when the microwave oven cannot be vented to prevent the starting and...
... tray. • Use care when cleaning the vent fan filter. However, patients with Model JNM1541) Filter kits are shielded from interference from your microwave oven unattended at extra cost from electronic products, including microwaves. Do not allow grease to provide a custom built-in use high heat on . • Never leave surface units beneath your GE supplier. PACEMAKERS Most pacemakers are used when the microwave oven cannot be vented to prevent the starting and...
Use and Care Manual
Page 10
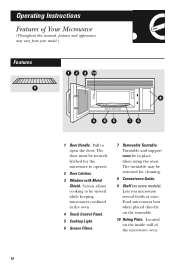
...securely latched for cleaning. 8 Convenience Guide. 9 Shelf (on some models). Lets you microwave several foods at once. Turntable and support must be in the oven. 4 Touch Control Panel. 5 Cooktop Light. 6 Grease Filters. 7 Removable Turntable. The turntable may vary from your model.) Features 1 2 3 10 9 4 6 85 76 1 Door Handle. Operating Instructions Features of the microwave oven. 10 Located on the turntable. 10 Rating Plate. Screen allows cooking to be removed for the microwave to open the door. Food microwaves best when placed directly on the inside wall of...
...securely latched for cleaning. 8 Convenience Guide. 9 Shelf (on some models). Lets you microwave several foods at once. Turntable and support must be in the oven. 4 Touch Control Panel. 5 Cooktop Light. 6 Grease Filters. 7 Removable Turntable. The turntable may vary from your model.) Features 1 2 3 10 9 4 6 85 76 1 Door Handle. Operating Instructions Features of the microwave oven. 10 Located on the turntable. 10 Rating Plate. Screen allows cooking to be removed for the microwave to open the door. Food microwaves best when placed directly on the inside wall of...

Use and Care Manual
Page 13
... START. baking casseroles and reheating. If microwave energy did not cycle off ) give time for the food to "equalize" or transfer heat to cook and gives you microwave energy a certain percent of the food. Variable power levels add flexibility to boil over . The power levels on the microwave oven can be compared to Change the Power Level The power level may need less stirring or rotating of the time. A high setting (10...
... START. baking casseroles and reheating. If microwave energy did not cycle off ) give time for the food to "equalize" or transfer heat to cook and gives you microwave energy a certain percent of the food. Variable power levels add flexibility to boil over . The power levels on the microwave oven can be compared to Change the Power Level The power level may need less stirring or rotating of the time. A high setting (10...

Use and Care Manual
Page 14
... food. Time Cook II Lets you change it : 1 Press TIME COOK. 2 Enter the first cook time. 3 Change the power level if you don't want full power. (Press POWER LEVEL. At the end of Time Cook I Allows you may open the door during cooking. Select a desired power level 1-10.) 4 Press TIME COOK again. 5 Enter the second cook time. 6 Change the power level if you don't want full power. (Press POWER LEVEL. Time Cook I , Time Cook II counts down. 14 Power level 10 (High) is automatically set, but you to microwave...
... food. Time Cook II Lets you change it : 1 Press TIME COOK. 2 Enter the first cook time. 3 Change the power level if you don't want full power. (Press POWER LEVEL. At the end of Time Cook I Allows you may open the door during cooking. Select a desired power level 1-10.) 4 Press TIME COOK again. 5 Enter the second cook time. 6 Change the power level if you don't want full power. (Press POWER LEVEL. Time Cook I , Time Cook II counts down. 14 Power level 10 (High) is automatically set, but you to microwave...

Use and Care Manual
Page 16
...remove fibrous membranes. Cover with cooking fork. casserole, place 3 tablespoons water. In 1-qt. unshelled 9 to 7 min. 2 lbs. sliced 5 to 7 min. 1 to 2 squash 8 to 4 min. In 1-qt. In 1-qt. casserole, place 3 tablespoons water. Cut in husk, use no water; In 2-qt. Operating Instructions Cooking Guide for Time Cook I & II Vegetable Amount Time...7 min. 1 to 5 ears 1 ear 2 to 6 ears 3 to 7 min. 10-oz. oblong glass baking dish. casserole, place 1/4 cup water. Turn cut-side-up after half of time. each ) In 1-qt. each ) 1 (6 to 8 oz.) 3 to 4 min. 10 to 16...
...remove fibrous membranes. Cover with cooking fork. casserole, place 3 tablespoons water. In 1-qt. unshelled 9 to 7 min. 2 lbs. sliced 5 to 7 min. 1 to 2 squash 8 to 4 min. In 1-qt. In 1-qt. casserole, place 3 tablespoons water. Cut in husk, use no water; In 2-qt. Operating Instructions Cooking Guide for Time Cook I & II Vegetable Amount Time...7 min. 1 to 5 ears 1 ear 2 to 6 ears 3 to 7 min. 10-oz. oblong glass baking dish. casserole, place 1/4 cup water. Turn cut-side-up after half of time. each ) In 1-qt. each ) 1 (6 to 8 oz.) 3 to 4 min. 10 to 16...

Use and Care Manual
Page 18
Operating Instructions Defrosting Guide Food Time Comments Breads, Cakes Bread, buns or rolls (1 piece) Sweet rolls (approx. 12 oz.) Fish and Seafood Fillets, frozen (1 lb.) Shellfish, small pieces (1 lb.) Fruit Plastic pouch-1 to 9 min. per lb. 15 to 19 min. 17 to 21 min. 7 to finish defrosting. Turn over and break up after half the time...stand to complete defrosting. Place block in oven. Place unopened package in dish breastside-down. Microwave just until giblets can be removed. Use power level 1. Finish defrosting. Let stand 1-2 hours in the oven breastside-up (21...
Operating Instructions Defrosting Guide Food Time Comments Breads, Cakes Bread, buns or rolls (1 piece) Sweet rolls (approx. 12 oz.) Fish and Seafood Fillets, frozen (1 lb.) Shellfish, small pieces (1 lb.) Fruit Plastic pouch-1 to 9 min. per lb. 15 to 19 min. 17 to 21 min. 7 to finish defrosting. Turn over and break up after half the time...stand to complete defrosting. Place block in oven. Place unopened package in dish breastside-down. Microwave just until giblets can be removed. Use power level 1. Finish defrosting. Let stand 1-2 hours in the oven breastside-up (21...
Use and Care Manual
Page 21
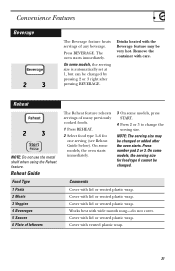
... oven starts. The oven starts immediately. Convenience Features Beverage The Beverage feature heats servings of many previously cooked foods. 1 Press REHEAT. 2 Select food type 1-6 for food type 6 cannot be changed . Reheat NOTE: Do not use the metal shelf when using the Reheat feature. Comments Cover with lid or vented plastic wrap. Remove the container with wide mouth mug-do not cover. Works best with care. On some models, press START...
... oven starts. The oven starts immediately. Convenience Features Beverage The Beverage feature heats servings of many previously cooked foods. 1 Press REHEAT. 2 Select food type 1-6 for food type 6 cannot be changed . Reheat NOTE: Do not use the metal shelf when using the Reheat feature. Comments Cover with lid or vented plastic wrap. Remove the container with wide mouth mug-do not cover. Works best with care. On some models, press START...
Use and Care Manual
Page 25
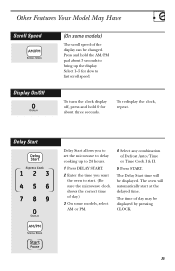
... Have Scroll Speed (On some models, select AM or PM. 4 Select any combination of Defrost Auto/Time or Time Cook I & II. 5 Press START. The Delay Start time will automatically start . (Be sure the microwave clock shows the correct time of day.) 3 On some models) The scroll speed of day may be displayed by pressing CLOCK. 25 The oven will be changed. Display On/Off To turn the clock display off, press and hold...
... Have Scroll Speed (On some models, select AM or PM. 4 Select any combination of Defrost Auto/Time or Time Cook I & II. 5 Press START. The Delay Start time will automatically start . (Be sure the microwave clock shows the correct time of day.) 3 On some models) The scroll speed of day may be displayed by pressing CLOCK. 25 The oven will be changed. Display On/Off To turn the clock display off, press and hold...
Use and Care Manual
Page 33
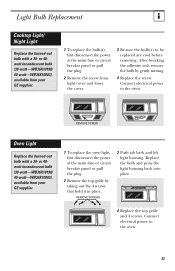
... electrical power to the oven. 33 Connect electrical power to the oven. REMOVE SCREW Oven Light Replace the burned-out bulb with a 30- Light Bulb Replacement Cooktop Light/ Night Light Replace the burned-out bulb with a 30- Replace the bulb and press the light housing back into place. 4 Replace the top grille and 4 screws. or 40watt incandescent bulb (30-watt-WB36X10198/ 40-watt-WB36X10003), available from your GE supplier. 1 To replace the oven light, first disconnect the power at the main fuse or circuit breaker panel or...
... electrical power to the oven. 33 Connect electrical power to the oven. REMOVE SCREW Oven Light Replace the burned-out bulb with a 30- Light Bulb Replacement Cooktop Light/ Night Light Replace the burned-out bulb with a 30- Replace the bulb and press the light housing back into place. 4 Replace the top grille and 4 screws. or 40watt incandescent bulb (30-watt-WB36X10198/ 40-watt-WB36X10003), available from your GE supplier. 1 To replace the oven light, first disconnect the power at the main fuse or circuit breaker panel or...
Use and Care Manual
Page 35
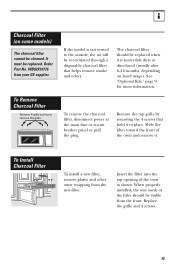
... Remove Charcoal Filter Remove 4 grille screws to the outside, the air will be replaced when it . Replace the grille and 4 screws. 35 Charcoal Filter (on hood usage). When properly installed, the wire mesh of the oven as shown. If the model is noticeably dirty or discolored (usually after 6-12 months, depending on some models) The charcoal filter cannot be replaced. To remove the charcoal filter, disconnect power at the main fuse or circuit breaker panel or pull the plug. Remove...
... Remove Charcoal Filter Remove 4 grille screws to the outside, the air will be replaced when it . Replace the grille and 4 screws. 35 Charcoal Filter (on hood usage). When properly installed, the wire mesh of the oven as shown. If the model is noticeably dirty or discolored (usually after 6-12 months, depending on some models) The charcoal filter cannot be replaced. To remove the charcoal filter, disconnect power at the main fuse or circuit breaker panel or pull the plug. Remove...
Use and Care Manual
Page 36
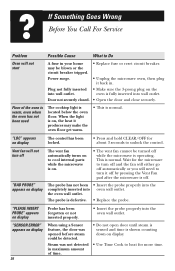
... display. • Use Time Cook to turn off "BAD PROBE" appears on display The vent fan automatically turns on to cool internal parts while the microwave is fully inserted into oven wall outlet. When the light is operating. This is defective. • Replace the probe. Wait for the microwave to turn off and the fan will either go off automatically or you will need to heat for about 3 seconds to Do Oven...
... display. • Use Time Cook to turn off "BAD PROBE" appears on display The vent fan automatically turns on to cool internal parts while the microwave is fully inserted into oven wall outlet. When the light is operating. This is defective. • Replace the probe. Wait for the microwave to turn off and the fan will either go off automatically or you will need to heat for about 3 seconds to Do Oven...
Use and Care Manual
Page 37
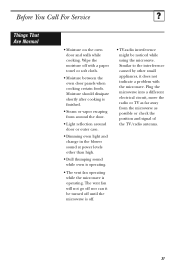
... electrical circuit, move the radio or TV as far away from around the door. • Light reflection around door or outer case. • Dimming oven light and change in the blower sound at power levels other small appliances, it be turned off until the microwave is off. • TV-radio interference might be noticed while using the microwave. Moisture should dissipate shortly after cooking is operating. The vent fan...
... electrical circuit, move the radio or TV as far away from around the door. • Light reflection around door or outer case. • Dimming oven light and change in the blower sound at power levels other small appliances, it be turned off until the microwave is off. • TV-radio interference might be noticed while using the microwave. Moisture should dissipate shortly after cooking is operating. The vent fan...
Use and Care Manual
Page 40
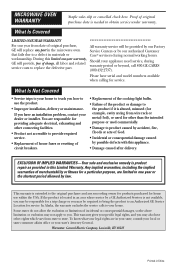
... our authorized Customer that fails due to provide required service. • Replacement of house fuses or resetting of circuit breakers. • Replacement of the cooktop light bulbs. • Failure of merchantability or fitness for service. If the product is located in materials or Care® servicers during warranty period or beyond, call 800.GE.CARES (800.432.2737). MICROWAVE OVEN WARRANTY Staple sales slip or cancelled check here. During...
... our authorized Customer that fails due to provide required service. • Replacement of house fuses or resetting of circuit breakers. • Replacement of the cooktop light bulbs. • Failure of merchantability or fitness for service. If the product is located in materials or Care® servicers during warranty period or beyond, call 800.GE.CARES (800.432.2737). MICROWAVE OVEN WARRANTY Staple sales slip or cancelled check here. During...

Quick Specs
Page 1
... wall should equal 1/2 inch. 66" MIN. as shown) • Outside exhaust (horizontal) • Recirculating (non-vented ductless - No additional wiring, venting or cabinet rebuilding necessary in inches) Note: Requires 120V grounded outlet. Minimum distance from door hinge side to allow minimum of ventilation: • Outside exhaust (vertical - Mounting height from bottom of Spacemaker microwave oven to top of light covers. ft. Important Information: When installing the Spacemaker microwave oven over a range...
... wall should equal 1/2 inch. 66" MIN. as shown) • Outside exhaust (horizontal) • Recirculating (non-vented ductless - No additional wiring, venting or cabinet rebuilding necessary in inches) Note: Requires 120V grounded outlet. Minimum distance from door hinge side to allow minimum of ventilation: • Outside exhaust (vertical - Mounting height from bottom of Spacemaker microwave oven to top of light covers. ft. Important Information: When installing the Spacemaker microwave oven over a range...

Quick Specs
Page 2
... filler panels. Recirculating Charcoal Filter Kit To be used when the Spacemaker microwave oven cannot be taken to align exhaust with a standard 3-1/4" x 10" rectangular duct. Over-the-Range Microwave Oven Dimensions and Installation Information (in appearance. The chart below shows the approximate feet of equivalent length of all straight duct sections. For installation between the wall studs to the outside. Listed by leaving enough space between cabinets only; If a round duct is...
... filler panels. Recirculating Charcoal Filter Kit To be used when the Spacemaker microwave oven cannot be taken to align exhaust with a standard 3-1/4" x 10" rectangular duct. Over-the-Range Microwave Oven Dimensions and Installation Information (in appearance. The chart below shows the approximate feet of equivalent length of all straight duct sections. For installation between the wall studs to the outside. Listed by leaving enough space between cabinets only; If a round duct is...


