Owners Manual
Page 1
Spacemaker Microwave Oven ge.com Safety Instructions 2-7 Operating Instructions Care and Cleaning 37-40 Cooking Features 12-18 Defrosting Features 21-27 Easy Guide™ Menu System . . . . .9 Help Features 34 Home Screen 10 Microwave Oven Features . . . . . .8 Microwave Terms 36 Options 28-32 Other Features 33, 35 Power Levels 11 Reheating Features 19-20 Troubleshooting Tips...
Spacemaker Microwave Oven ge.com Safety Instructions 2-7 Operating Instructions Care and Cleaning 37-40 Cooking Features 12-18 Defrosting Features 21-27 Easy Guide™ Menu System . . . . .9 Help Features 34 Home Screen 10 Microwave Oven Features . . . . . .8 Microwave Terms 36 Options 28-32 Other Features 33, 35 Power Levels 11 Reheating Features 19-20 Troubleshooting Tips...
Owners Manual
Page 2
... important not to defeat or tamper with the door open since open-door operation can result in harmful exposure to microwave energy. IMPORTANT SAFETY INSTRUCTIONS PRECAUTIONS TO AVOID POSSIBLE EXPOSURE TO EXCESSIVE MICROWAVE ENERGY (a) Do Not Attempt to operate this oven with the safety interlocks. (b) Do Not Place any object between the...
... important not to defeat or tamper with the door open since open-door operation can result in harmful exposure to microwave energy. IMPORTANT SAFETY INSTRUCTIONS PRECAUTIONS TO AVOID POSSIBLE EXPOSURE TO EXCESSIVE MICROWAVE ENERGY (a) Do Not Attempt to operate this oven with the safety interlocks. (b) Do Not Place any object between the...
Owners Manual
Page 3
...appliance over a sink. • This over-the-range oven was designed for its intended use as described in the Care and Cleaning of the microwave oven section of fire or explosion, electric shock, or to properly grounded outlet. Do not leave paper products, cooking utensils or food in the oven... cord away from heated surfaces. • Do not immerse power cord or plug in water. • To reduce the risk of the microwave oven surface when the microwave oven is opened, the fire may be installed over both gas and electric cooking equipment. • Do not operate this manual. •...
...appliance over a sink. • This over-the-range oven was designed for its intended use as described in the Care and Cleaning of the microwave oven section of fire or explosion, electric shock, or to properly grounded outlet. Do not leave paper products, cooking utensils or food in the oven... cord away from heated surfaces. • Do not immerse power cord or plug in water. • To reduce the risk of the microwave oven surface when the microwave oven is opened, the fire may be installed over both gas and electric cooking equipment. • Do not operate this manual. •...
Owners Manual
Page 4
...-sized cookware and use . • Clean the underside of accidental cooking fires while the vent fan is operating. Arcing is the microwave term for sparks in the microwave. Arcing is caused by covering the pan completely with a lid, cookie sheet or flat tray. • Use care when cleaning ...! ARCING If you see Automatic Fan feature). Corrosive cleaning agents, such as twist-ties, poultry pins or goldrimmed dishes, in the microwave. • Recycled paper towels containing small metal pieces being used in the oven. VENT FAN The fan will operate automatically under the...
...-sized cookware and use . • Clean the underside of accidental cooking fires while the vent fan is operating. Arcing is the microwave term for sparks in the microwave. Arcing is caused by covering the pan completely with a lid, cookie sheet or flat tray. • Use care when cleaning ...! ARCING If you see Automatic Fan feature). Corrosive cleaning agents, such as twist-ties, poultry pins or goldrimmed dishes, in the microwave. • Recycled paper towels containing small metal pieces being used in the oven. VENT FAN The fan will operate automatically under the...
Owners Manual
Page 5
.... • Cook meat and poultry thoroughly-meat to at least an INTERNAL temperature of 160°F and poultry to your microwave oven unless in a special microwave popcorn accessory or unless you use popcorn labeled for more than the milk really is opened, pressure can shorten the life of...''skin'' such as potatoes, hot dogs, sausages, tomatoes, apples, chicken livers and other utensil into the container. • Don't defrost frozen beverages in microwave ovens. • Some products such as water, coffee or tea are able to persons: - Do not overheat the liquid. - Do not use of ...
.... • Cook meat and poultry thoroughly-meat to at least an INTERNAL temperature of 160°F and poultry to your microwave oven unless in a special microwave popcorn accessory or unless you use popcorn labeled for more than the milk really is opened, pressure can shorten the life of...''skin'' such as potatoes, hot dogs, sausages, tomatoes, apples, chicken livers and other utensil into the container. • Don't defrost frozen beverages in microwave ovens. • Some products such as water, coffee or tea are able to persons: - Do not overheat the liquid. - Do not use of ...
Owners Manual
Page 6
...hands and face. • Plastic cookware-Plastic cookware designed for use plastic cookware without complete supervision. 6 Follow these guidelines: 1 Use microwave-safe plastics only and use this manual. Most glass casseroles, cooking dishes, measuring cups, custard cups, pottery or china dinnerware which may... the oven both the dish you are not, plastic could ignite. If the dish heats, it is suitable for microwave cooking is microwave- Check the package for microwaving." • If you use a meat thermometer while cooking, make sure it should not be avoided, as tolerant...
...hands and face. • Plastic cookware-Plastic cookware designed for use plastic cookware without complete supervision. 6 Follow these guidelines: 1 Use microwave-safe plastics only and use this manual. Most glass casseroles, cooking dishes, measuring cups, custard cups, pottery or china dinnerware which may... the oven both the dish you are not, plastic could ignite. If the dish heats, it is suitable for microwave cooking is microwave- Check the package for microwaving." • If you use a meat thermometer while cooking, make sure it should not be avoided, as tolerant...
Owners Manual
Page 7
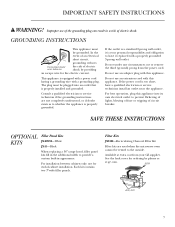
...is a standard 2-prong wall outlet, it is too short, have it replaced with this appliance. If the power cord is your GE supplier. See the back cover for ordering by providing an escape wire for end-of an electrical short circuit, grounding reduces Ensure proper... qualified electrician or service technician if the grounding instructions are used when the microwave oven cannot be vented to have a qualified electrician or service technician install an outlet near the appliance. Available at ge.com. GROUNDING INSTRUCTIONS This appliance must be grounded. The plug must be ...
...is a standard 2-prong wall outlet, it is too short, have it replaced with this appliance. If the power cord is your GE supplier. See the back cover for ordering by providing an escape wire for end-of an electrical short circuit, grounding reduces Ensure proper... qualified electrician or service technician if the grounding instructions are used when the microwave oven cannot be vented to have a qualified electrician or service technician install an outlet near the appliance. Available at ge.com. GROUNDING INSTRUCTIONS This appliance must be grounded. The plug must be ...
Owners Manual
Page 8
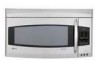
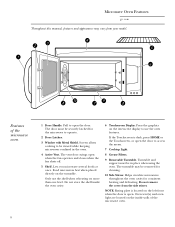
... shelf when reheating on the turntable. Screen allows cooking to operate. 2 Door Latches. 3 Window with Metal Shield. Microwave Oven Features ge.com Throughout this manual, features and appearance may be securely latched for the microwave to be in the oven. 4 Active Vent. Do not remove the cover from your model. Press the graphics...
... shelf when reheating on the turntable. Screen allows cooking to operate. 2 Door Latches. 3 Window with Metal Shield. Microwave Oven Features ge.com Throughout this manual, features and appearance may be securely latched for the microwave to be in the oven. 4 Active Vent. Do not remove the cover from your model. Press the graphics...
Owners Manual
Page 10
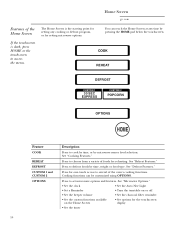
...on the Home Screen • Set options for one-touch access to cook by time, or by time, weight or food type. Home Screen ge.com Features of the Home Screen If the touchscreen is the starting point for setting any time by pressing the HOME pad below the touchscreen... functions. Press to access the menu. See "Reheat Features." The Home Screen is dark, press HOME or the touchscreen to defrost foods by microwave sensor food selection. Press to choose from a variety of foods for setting microwave options. Press for the touchscreen display • Set the timer 10 Press to set...
...on the Home Screen • Set options for one-touch access to cook by time, or by time, weight or food type. Home Screen ge.com Features of the Home Screen If the touchscreen is the starting point for setting any time by pressing the HOME pad below the touchscreen... functions. Press to access the menu. See "Reheat Features." The Home Screen is dark, press HOME or the touchscreen to defrost foods by microwave sensor food selection. Press to choose from a variety of foods for setting microwave options. Press for the touchscreen display • Set the timer 10 Press to set...
Owners Manual
Page 11
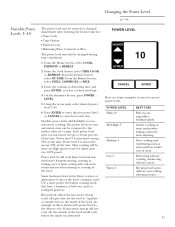
... ENTER to enter the new power level or CANCEL to your selection. A lower setting will be done on a range. Changing the Power Level ge.com Variable Power Levels 1-10 The power level may be entered or changed during time countdown. 1 From the Home Screen, select COOK, DEFROST ...or REHEAT. 2 From the Cook Screen, select TIME COOK or EXPRESS. Variable power levels add flexibility to cancel your microwave cooking. If microwave energy did not cycle off ) give time for various power levels: POWER LEVEL High 10 Med-High 7 Medium 5 Low 3 Warm 1 BEST...
... ENTER to enter the new power level or CANCEL to your selection. A lower setting will be done on a range. Changing the Power Level ge.com Variable Power Levels 1-10 The power level may be entered or changed during time countdown. 1 From the Home Screen, select COOK, DEFROST ...or REHEAT. 2 From the Cook Screen, select TIME COOK or EXPRESS. Variable power levels add flexibility to cancel your microwave cooking. If microwave energy did not cycle off ) give time for various power levels: POWER LEVEL High 10 Med-High 7 Medium 5 Low 3 Warm 1 BEST...
Owners Manual
Page 12
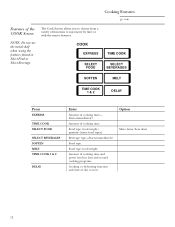
... of cooking time and power level for first and second cooking programs. Cooking or defrosting function and time of cooking time- Cooking Features ge.com Features of functions to microwave by time or with the sensor features. Option More done/Less done 12 The Cook Screen allows you to choose from a variety...
... of cooking time and power level for first and second cooking programs. Cooking or defrosting function and time of cooking time- Cooking Features ge.com Features of functions to microwave by time or with the sensor features. Option More done/Less done 12 The Cook Screen allows you to choose from a variety...
Owners Manual
Page 13
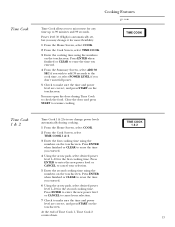
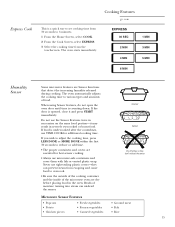
.... 2 From the Cook Screen, select TIME COOK 1 & 2. 3 Enter the first cooking time using the numbers on the touchscreen. TIME COOK 1 & 2 13 Time Cook Cooking Features ge.com Time Cook allows you to microwave for any time up to resume cooking. Close the door and press START to 99 minutes and 99 seconds.
.... 2 From the Cook Screen, select TIME COOK 1 & 2. 3 Enter the first cooking time using the numbers on the touchscreen. TIME COOK 1 & 2 13 Time Cook Cooking Features ge.com Time Cook allows you to microwave for any time up to resume cooking. Close the door and press START to 99 minutes and 99 seconds.
Owners Manual
Page 15
...overcook. • Be sure the outside of the cooking container and the inside of moisture turning into steam can prevent steam from the touchscreen. Microwave Sensor Features • Popcorn • Potato • Chicken pieces • Fresh vegetables • Frozen vegetables • Canned vegetables •...in succession on the same food portion-it and press START immediately. Cooking Features ge.com EXPRESS 30 SEC 2 MIN 4 MIN 1 MIN 3 MIN 5 MIN 6 MIN Humidity Sensor Some microwave features are essential for additional cooking time. Covered Vented Dry off dishes so ...
...overcook. • Be sure the outside of the cooking container and the inside of moisture turning into steam can prevent steam from the touchscreen. Microwave Sensor Features • Popcorn • Potato • Chicken pieces • Fresh vegetables • Frozen vegetables • Canned vegetables •...in succession on the same food portion-it and press START immediately. Cooking Features ge.com EXPRESS 30 SEC 2 MIN 4 MIN 1 MIN 3 MIN 5 MIN 6 MIN Humidity Sensor Some microwave features are essential for additional cooking time. Covered Vented Dry off dishes so ...
Owners Manual
Page 16
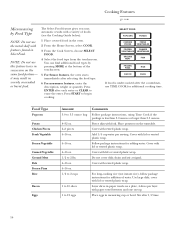
... the oven. 2 From the Home Screen, select COOK. 3 From the Cook Screen, choose SELECT FOOD. 4 Select the food type from the touchscreen. Cooking Features ge.com Microwaving by pressing MORE at signal. Place potatoes on top. Cover with features found in succession on a plate, 4 slices per serving. NOTE: Do not use the...
... the oven. 2 From the Home Screen, select COOK. 3 From the Cook Screen, choose SELECT FOOD. 4 Select the food type from the touchscreen. Cooking Features ge.com Microwaving by pressing MORE at signal. Place potatoes on top. Cover with features found in succession on a plate, 4 slices per serving. NOTE: Do not use the...
Owners Manual
Page 17
...may result in the center of popcorn you use TIME COOK for 20 seconds less cooking time. If you find that the brand of the microwave. 2 From the Home Screen, select COOK. 3 From the Cook Screen, choose SELECT FOOD. 4 Select POPCORN from the touchscreen. Do... overpops consistently, you to 3.5 ounces. 1 Follow package instructions, using Time Cook if the package is counting down. Cooking Features ge.com Microwaving Popcorn NOTE: Do not use the metal shelf when microwaving beverages. The oven starts immediately. The oven starts immediately. Do not open the oven door...
...may result in the center of popcorn you use TIME COOK for 20 seconds less cooking time. If you find that the brand of the microwave. 2 From the Home Screen, select COOK. 3 From the Cook Screen, choose SELECT FOOD. 4 Select POPCORN from the touchscreen. Do... overpops consistently, you to 3.5 ounces. 1 Follow package instructions, using Time Cook if the package is counting down. Cooking Features ge.com Microwaving Popcorn NOTE: Do not use the metal shelf when microwaving beverages. The oven starts immediately. The oven starts immediately. Do not open the oven door...
Owners Manual
Page 18
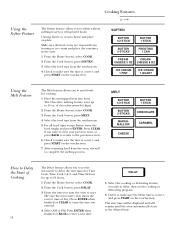
Cooking Features ge.com Using the Soften Feature The Soften feature allows you to melt foods for cooking. 1 Place the unwrapped item into bowl. The Chocolate melting feature ... entered. 4 Select AM or PM. DELAY 5 Select the cooking or defrosting feature you wish to delay, then set the microwave to erase the time you want the oven to start. (Be sure the microwave clock shows the correct time of chocolate morsels (chips). 2 From the Home Screen, select COOK. 3 From the Cook...
Cooking Features ge.com Using the Soften Feature The Soften feature allows you to melt foods for cooking. 1 Place the unwrapped item into bowl. The Chocolate melting feature ... entered. 4 Select AM or PM. DELAY 5 Select the cooking or defrosting feature you wish to delay, then set the microwave to erase the time you want the oven to start. (Be sure the microwave clock shows the correct time of chocolate morsels (chips). 2 From the Home Screen, select COOK. 3 From the Cook...
Owners Manual
Page 20
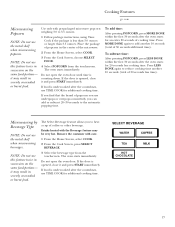
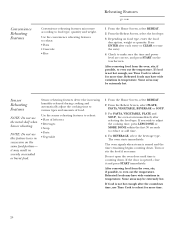
...immediately after each entry or CLEAR to erase the entry. 4 Check to reheat: • Pizza • Casserole • Rice Reheating Features ge.com 1 From the Home Screen, select REHEAT. 2 From the Reheat Screen, select the food type. 3 Depending on the touchscreen. Convenience... Reheating Features Convenience reheating features microwave according to reduce or add time. 4 For BEVERAGE, select the beverage type. The oven starts immediately. Use the convenience reheating features ...
...immediately after each entry or CLEAR to erase the entry. 4 Check to reheat: • Pizza • Casserole • Rice Reheating Features ge.com 1 From the Home Screen, select REHEAT. 2 From the Reheat Screen, select the food type. 3 Depending on the touchscreen. Convenience... Reheating Features Convenience reheating features microwave according to reduce or add time. 4 For BEVERAGE, select the beverage type. The oven starts immediately. Use the convenience reheating features ...
Owners Manual
Page 22
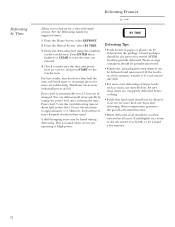
... use Auto Defrost. A dull thumping noise may be slit, pierced or vented AFTER food has partially defrosted. If still slightly icy, return to the microwave very briefly, or let it to a microwavesafe dish. • For more than usual. BY TIME Defrosting Tips • Foods frozen in paper or... plastic can defrost small items quickly by Time Defrosting Features ge.com Allows you entered. 4 Check to defrost for more even defrosting of time. Be sure large meats are correct, and press START on the...
... use Auto Defrost. A dull thumping noise may be slit, pierced or vented AFTER food has partially defrosted. If still slightly icy, return to the microwave very briefly, or let it to a microwavesafe dish. • For more than usual. BY TIME Defrosting Tips • Foods frozen in paper or... plastic can defrost small items quickly by Time Defrosting Features ge.com Allows you entered. 4 Check to defrost for more even defrosting of time. Be sure large meats are correct, and press START on the...
Owners Manual
Page 23
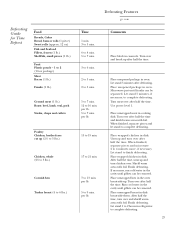
... cutlets Poultry Chicken, broiler-fryer cut up (21⁄2 to 3 lbs.) Chicken, whole (21⁄2 to 3 lbs.) Cornish hen Turkey breast (4 to 6 lbs.) Defrosting Features ge.com Time 1 min. 3 to 5 min. 6 to 8 min. 5 to 7 min. 3 to 6 min. 2 to 5 min. 2 to 5 min. 5 to 7 min. 12 to 9 min. ...shield warm areas with foil. When finished, separate pieces and let stand to 4 minutes more, if necessary. When finished, separate pieces and microwave 2 to complete defrosting. Place wrapped chicken in the oven breast-side-up after half the time and shield warm areas with foil. Place ...
... cutlets Poultry Chicken, broiler-fryer cut up (21⁄2 to 3 lbs.) Chicken, whole (21⁄2 to 3 lbs.) Cornish hen Turkey breast (4 to 6 lbs.) Defrosting Features ge.com Time 1 min. 3 to 5 min. 6 to 8 min. 5 to 7 min. 3 to 6 min. 2 to 5 min. 2 to 5 min. 5 to 7 min. 12 to 9 min. ...shield warm areas with foil. When finished, separate pieces and let stand to 4 minutes more, if necessary. When finished, separate pieces and microwave 2 to complete defrosting. Place wrapped chicken in the oven breast-side-up after half the time and shield warm areas with foil. Place ...
Owners Manual
Page 24
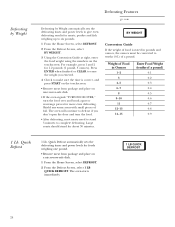
BY WEIGHT Conversion Guide If the weight of food is correct, and press START on the touchscreen. • Remove meat from package and place on a microwave-safe dish. 1 From the Home Screen, select DEFROST. 2 From the Defrost Screen, select 1 LB QUICK DEFROST. Weight of a pound) 0.1 0.2 0.3 0.4 0.5 ...DEFROST 24 Large roasts should stand for 1.2 pounds (1 pound, 3 ounces). Quick Defrost 1 Lb. Defrosting by Weight Defrosting Features ge.com Defrosting by Weight automatically sets the defrosting times and power levels to give even defrosting results for meats, poultry and fish ...
BY WEIGHT Conversion Guide If the weight of food is correct, and press START on the touchscreen. • Remove meat from package and place on a microwave-safe dish. 1 From the Home Screen, select DEFROST. 2 From the Defrost Screen, select 1 LB QUICK DEFROST. Weight of a pound) 0.1 0.2 0.3 0.4 0.5 ...DEFROST 24 Large roasts should stand for 1.2 pounds (1 pound, 3 ounces). Quick Defrost 1 Lb. Defrosting by Weight Defrosting Features ge.com Defrosting by Weight automatically sets the defrosting times and power levels to give even defrosting results for meats, poultry and fish ...


