Owners Manual
Page 1
Back Cover Warranty 42 Owner's Manual JVM2070 Write the model and serial numbers here: Model Serial Find these numbers on a label on the left front when the door is open. DE68-02561A 49-40478 01-06 JR Spacemaker Microwave Oven ge.com Safety Instructions 2-7 Operating Instructions Care and Cleaning 37-40 Cooking Features 12-18 Defrosting Features 21-27 Easy Guide™ Menu System . . . . .9 Help Features 34 Home Screen 10 Microwave Oven Features . . . . . .8 Microwave Terms 36 Options 28...
Back Cover Warranty 42 Owner's Manual JVM2070 Write the model and serial numbers here: Model Serial Find these numbers on a label on the left front when the door is open. DE68-02561A 49-40478 01-06 JR Spacemaker Microwave Oven ge.com Safety Instructions 2-7 Operating Instructions Care and Cleaning 37-40 Cooking Features 12-18 Defrosting Features 21-27 Easy Guide™ Menu System . . . . .9 Help Features 34 Home Screen 10 Microwave Oven Features . . . . . .8 Microwave Terms 36 Options 28...
Owners Manual
Page 3
... this manual must be replaced by General Electric Service or an authorized service agent using electrical appliances, basic safety precautions should be followed, including the following: • This microwave oven is UL listed for use . • Read and follow the specific precautions in accordance with any openings on the same food portion. If materials inside the oven while cooking. - SAFETY PRECAUTIONS Use this appliance only for its intended use TIME COOK for...
... this manual must be replaced by General Electric Service or an authorized service agent using electrical appliances, basic safety precautions should be followed, including the following: • This microwave oven is UL listed for use . • Read and follow the specific precautions in accordance with any openings on the same food portion. If materials inside the oven while cooking. - SAFETY PRECAUTIONS Use this appliance only for its intended use TIME COOK for...
Owners Manual
Page 4
... minimize automatic fan operation, use adequate-sized cookware and use . • Clean the underside of accidental cooking fires while the vent fan is caused by covering the pan completely with a lid, cookie sheet or flat tray. • Use care when cleaning the vent fan filters. ARCING If you see Automatic Fan feature). Take care to food (upturned edges act like antennas). • Metal, such as lye-based oven cleaners, may ignite and...
... minimize automatic fan operation, use adequate-sized cookware and use . • Clean the underside of accidental cooking fires while the vent fan is caused by covering the pan completely with a lid, cookie sheet or flat tray. • Use care when cleaning the vent fan filters. ARCING If you see Automatic Fan feature). Take care to food (upturned edges act like antennas). • Metal, such as lye-based oven cleaners, may ignite and...
Owners Manual
Page 5
...; Don't defrost frozen beverages in a microwave oven. IMPORTANT SAFETY INSTRUCTIONS WARNING! To prevent possible injury, direct steam away from the microwave oven is thoroughly cooked. Be careful to these temperatures usually protects against foodborne illness. 5 Visible bubbling or boiling when the container is removed from hands and face. • Avoid heating baby food in this microwave oven. THIS COULD RESULT IN VERY HOT LIQUIDS SUDDENLY...
...; Don't defrost frozen beverages in a microwave oven. IMPORTANT SAFETY INSTRUCTIONS WARNING! To prevent possible injury, direct steam away from the microwave oven is thoroughly cooked. Be careful to these temperatures usually protects against foodborne illness. 5 Visible bubbling or boiling when the container is removed from hands and face. • Avoid heating baby food in this microwave oven. THIS COULD RESULT IN VERY HOT LIQUIDS SUDDENLY...
Owners Manual
Page 6
... package for microwave cooking is packaged on) have metallic trim or glaze with 1 cup of overcooking. When cooking with containers tightly covered with the cookware manufacturer's recommendations. 2 Do not microwave empty containers. 3 Do not permit children to use them in strict compliance with plastic wrap, remove covering carefully and direct steam away from the sides of the oven. • Some styrofoam trays (like...
... package for microwave cooking is packaged on) have metallic trim or glaze with 1 cup of overcooking. When cooking with containers tightly covered with the cookware manufacturer's recommendations. 2 Do not microwave empty containers. 3 Do not permit children to use them in strict compliance with plastic wrap, remove covering carefully and direct steam away from the sides of the oven. • Some styrofoam trays (like...
Owners Manual
Page 7
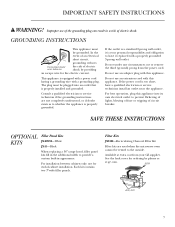
... circumstances cut or remove the third (ground) prong from your personal responsibility and obligation to the outside. Consult a qualified electrician or service technician if the grounding instructions are used when the microwave oven cannot be vented to have a qualified electrician or service technician install an outlet near the appliance. SAVE THESE INSTRUCTIONS OPTIONAL KITS Filler Panel Kits JX40WH-White JX41-Black When replacing a 36″ range hood, filler panel kits...
... circumstances cut or remove the third (ground) prong from your personal responsibility and obligation to the outside. Consult a qualified electrician or service technician if the grounding instructions are used when the microwave oven cannot be vented to have a qualified electrician or service technician install an outlet near the appliance. SAVE THESE INSTRUCTIONS OPTIONAL KITS Filler Panel Kits JX40WH-White JX41-Black When replacing a 36″ range hood, filler panel kits...
Owners Manual
Page 8
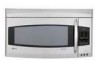
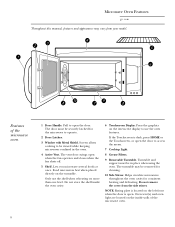
... shelf inside walls of the microwave oven 1 Door Handle. The turntable may vary from the side stirrer. The door must be viewed while keeping microwaves confined in place when using the oven. The vent door swings open . Helps circulate microwaves throughout the oven cavity for cleaning. 10 Side Stirrer. Pull to use the shelf when reheating on the interactive display to open the door to access the menu. 7 Cooktop Light. 8 Grease Filters. 9 Removable Turntable. Lets you microwave several foods...
... shelf inside walls of the microwave oven 1 Door Handle. The turntable may vary from the side stirrer. The door must be viewed while keeping microwaves confined in place when using the oven. The vent door swings open . Helps circulate microwaves throughout the oven cavity for cleaning. 10 Side Stirrer. Pull to use the shelf when reheating on the interactive display to open the door to access the menu. 7 Cooktop Light. 8 Grease Filters. 9 Removable Turntable. Lets you microwave several foods...
Owners Manual
Page 9
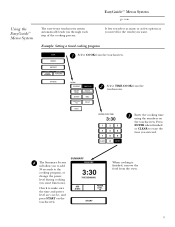
... cooking time using the numbers on the touchscreen. The Summary Screen will allow you through each step of the cooking process. SUMMARY COOK TIME 3:30 TIME REMAINING ADD 30 SEC POWER LEVEL 10 START When cooking is finished, remove the food from the touchscreen. Using the EasyGuide™ Menu System The easy-to-use touchscreen system automatically leads you to add 30 seconds to the cooking program, or change...
... cooking time using the numbers on the touchscreen. The Summary Screen will allow you through each step of the cooking process. SUMMARY COOK TIME 3:30 TIME REMAINING ADD 30 SEC POWER LEVEL 10 START When cooking is finished, remove the food from the touchscreen. Using the EasyGuide™ Menu System The easy-to-use touchscreen system automatically leads you to add 30 seconds to the cooking program, or change...
Owners Manual
Page 10
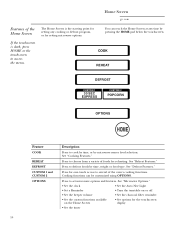
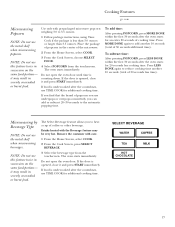
... to cook by time, or by microwave sensor food selection. COOK REHEAT DEFROST CUSTOM 1 30 SEC EXPRESS CUSTOM 2 POPCORN OPTIONS HOME Feature COOK REHEAT DEFROST CUSTOM 1 and CUSTOM 2 OPTIONS Description Press to set microwave options and features. See "Defrost Features." See "Microwave Options." • Set the clock • Set the Auto Nite Light • Set a Reminder • Turn the turntable on or off • Set the beeper volume • Set the charcoal filter reminder • Set the...
... to cook by time, or by microwave sensor food selection. COOK REHEAT DEFROST CUSTOM 1 30 SEC EXPRESS CUSTOM 2 POPCORN OPTIONS HOME Feature COOK REHEAT DEFROST CUSTOM 1 and CUSTOM 2 OPTIONS Description Press to set microwave options and features. See "Defrost Features." See "Microwave Options." • Set the clock • Set the Auto Nite Light • Set a Reminder • Turn the turntable on or off • Set the beeper volume • Set the charcoal filter reminder • Set the...
Owners Manual
Page 11
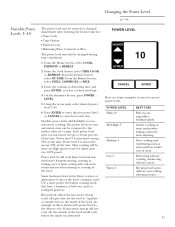
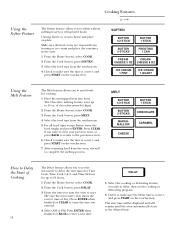
... Screen, press POWER LEVEL. 5 Using the arrow pads, select desired power level 1-10. 6 Press ENTER to enter the new power level or CANCEL to your selection. Rest periods (when the microwave energy cycles off , the outside of meat and poultry; delicate sauces. The power levels on your microwave oven can be done on a range. A lower setting will cook faster but food may need more evenly and need less stirring...
... Screen, press POWER LEVEL. 5 Using the arrow pads, select desired power level 1-10. 6 Press ENTER to enter the new power level or CANCEL to your selection. Rest periods (when the microwave energy cycles off , the outside of meat and poultry; delicate sauces. The power levels on your microwave oven can be done on a range. A lower setting will cook faster but food may need more evenly and need less stirring...
Owners Manual
Page 14
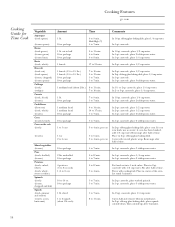
...Cover with cooking fork. Rearrange after 4 minutes. 14 In 1-qt. casserole with 1/2 cup water. sliced 1 to 7 min. Cooking Features ge.com Cooking Guide for Time Cook Vegetable Asparagus (fresh spears) (frozen spears) Beans (fresh green) (frozen green) (frozen lima) Beets (fresh, whole) Broccoli (fresh cut... 1 ear 2 to 6 ears 3 to 4 min. oblong glass baking dish. casserole, place 3 tablespoons water. 2 lbs. In 1-qt. casserole, place 1/4 cup water. Place in husk, use no water; Stir after half of the oven. casserole, place 3 tablespoons water. 1 lb. each ) 1...
...Cover with cooking fork. Rearrange after 4 minutes. 14 In 1-qt. casserole with 1/2 cup water. sliced 1 to 7 min. Cooking Features ge.com Cooking Guide for Time Cook Vegetable Asparagus (fresh spears) (frozen spears) Beans (fresh green) (frozen green) (frozen lima) Beets (fresh, whole) Broccoli (fresh cut... 1 ear 2 to 6 ears 3 to 4 min. oblong glass baking dish. casserole, place 3 tablespoons water. 2 lbs. In 1-qt. casserole, place 1/4 cup water. Place in husk, use no water; Stir after half of the oven. casserole, place 3 tablespoons water. 1 lb. each ) 1...
Owners Manual
Page 15
.... • Be sure the outside of the cooking container and the inside of the microwave oven are dry before placing food in succession on the same food portion-it and press START immediately. Express Cook This is a quick way to set cooking time from 30 seconds to various types and amounts of food. Do not use microwave-safe containers and cover them with lids or vented plastic wrap.
.... • Be sure the outside of the cooking container and the inside of the microwave oven are dry before placing food in succession on the same food portion-it and press START immediately. Express Cook This is a quick way to set cooking time from 30 seconds to various types and amounts of food. Do not use microwave-safe containers and cover them with lids or vented plastic wrap.
Owners Manual
Page 17
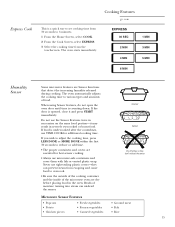
... oven starts for additional cooking time. Press MORE DONE again to the automatic popping time. Cooking Features ge.com Microwaving Popcorn NOTE: Do not use the metal shelf when microwaving beverages. it may result in severely overcooked or burnt food. Do not open the oven door. To subtract time: After pressing POPCORN, press LESS DONE within the first 30 seconds after the countdown, use TIME COOK for 20 seconds less cooking time...
... oven starts for additional cooking time. Press MORE DONE again to the automatic popping time. Cooking Features ge.com Microwaving Popcorn NOTE: Do not use the metal shelf when microwaving beverages. it may result in severely overcooked or burnt food. Do not open the oven door. To subtract time: After pressing POPCORN, press LESS DONE within the first 30 seconds after the countdown, use TIME COOK for 20 seconds less cooking time...
Owners Manual
Page 18
... be displayed and will remain until the oven automatically starts at the delayed time. The Chocolate melting feature is for up to 24 hours. 1 From the Home Screen, select COOK. 2 From the Cook Screen, press DELAY. 3 Enter the time you to soften without melting frozen or refrigerated foods. Unwrap butter or cream cheese and place on plate. Cooking Features ge.com Using...
... be displayed and will remain until the oven automatically starts at the delayed time. The Chocolate melting feature is for up to 24 hours. 1 From the Home Screen, select COOK. 2 From the Cook Screen, press DELAY. 3 Enter the time you to soften without melting frozen or refrigerated foods. Unwrap butter or cream cheese and place on plate. Cooking Features ge.com Using...
Owners Manual
Page 20
... food is opened, close it may be extremely hot. it and press START immediately. Sensor reheating features detect the increasing humidity released during cooking and automatically adjust the cooking time to food type, quantity and weight. Some areas may result in succession on the same food portion- Use the convenience reheating features to make sure the time and power level are correct, and press START on food...
... food is opened, close it may be extremely hot. it and press START immediately. Sensor reheating features detect the increasing humidity released during cooking and automatically adjust the cooking time to food type, quantity and weight. Some areas may result in succession on the same food portion- Use the convenience reheating features to make sure the time and power level are correct, and press START on food...
Owners Manual
Page 37
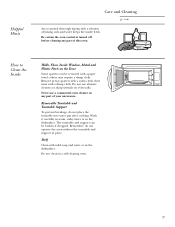
... the inside fresh. Do not clean in place. Removable Turntable and Turntable Support To prevent breakage, do not operate the oven without the turntable and support in a self-cleaning oven. 37 The turntable and support can be broken if dropped. Remember, do not place the turntable into water just after cooking. Do not use a commercial oven cleaner on any part of your microwave. Shelf Clean with a paper towel; Wash it carefully in...
... the inside fresh. Do not clean in place. Removable Turntable and Turntable Support To prevent breakage, do not operate the oven without the turntable and support in a self-cleaning oven. 37 The turntable and support can be broken if dropped. Remember, do not place the turntable into water just after cooking. Do not use a commercial oven cleaner on any part of your microwave. Shelf Clean with a paper towel; Wash it carefully in...
Owners Manual
Page 39
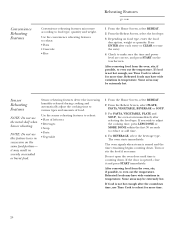
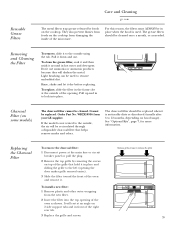
... top grille by foods on the cooktop from damaging the inside of the microwave. See "Optional Kits", page 7, for more information. The charcoal filter should be replaced when it to the left (opening . The grease filters should be cleaned once a month, or as shown. Removing and Cleaning the Filter To remove, slide it is not vented to remove the grille 39 Light brushing can be in hot water and detergent. Remove grille screws to the outside using...
... top grille by foods on the cooktop from damaging the inside of the microwave. See "Optional Kits", page 7, for more information. The charcoal filter should be replaced when it to the left (opening . The grease filters should be cleaned once a month, or as shown. Removing and Cleaning the Filter To remove, slide it is not vented to remove the grille 39 Light brushing can be in hot water and detergent. Remove grille screws to the outside using...
Owners Manual
Page 40
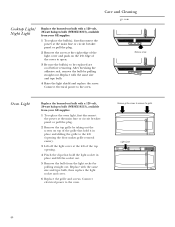
... size and type bulb, then replace the light socket and cover. 6 Replace the grille and screws. Remove grille screws to the oven. Connect electrical power to remove the grille Light Cover 40 Connect electrical power to be replaced are cool before removing. Replace with the same size and type bulb. 4 Raise the light shield and replace the screw. Care and Cleaning ge.com Cooktop Light/ Night Light Replace the burned-out bulb with a 120 volt, 20-watt halogen bulb (WB36X10213), available from the light socket by pulling straight out. Remove screw Oven Light Replace...
... size and type bulb, then replace the light socket and cover. 6 Replace the grille and screws. Remove grille screws to the oven. Connect electrical power to remove the grille Light Cover 40 Connect electrical power to be replaced are cool before removing. Replace with the same size and type bulb. 4 Raise the light shield and replace the screw. Care and Cleaning ge.com Cooktop Light/ Night Light Replace the burned-out bulb with a 120 volt, 20-watt halogen bulb (WB36X10213), available from the light socket by pulling straight out. Remove screw Oven Light Replace...
Owners Manual
Page 41
... 3-prong plug on some models) will not start "CONTROL IS LOCKED" appears on the microwave Home Screen (see Using the Troubleshooter). Things That Are Normal With Your Microwave Oven • Steam or vapor escaping from the microwave as the vent door opens and closes. 41 Press HOME or the touchscreen to activate the control panel. • Replace fuse or reset circuit breaker. • Unplug the microwave oven, then plug it does...
... 3-prong plug on some models) will not start "CONTROL IS LOCKED" appears on the microwave Home Screen (see Using the Troubleshooter). Things That Are Normal With Your Microwave Oven • Steam or vapor escaping from the microwave as the vent door opens and closes. 41 Press HOME or the touchscreen to activate the control panel. • Replace fuse or reset circuit breaker. • Unplug the microwave oven, then plug it does...
Owners Manual
Page 42
....GE.CARES (800.432.2737). Please have other than the intended purpose or used commercially. The magnetron tube, if the magnetron tube fails due to provide required service. During this limited one year or the shortest period allowed by law. I Product not accessible to a defect in materials or workmanship. I Replacement of house fuses or resetting of the cooktop light bulb. Any implied warranties...
....GE.CARES (800.432.2737). Please have other than the intended purpose or used commercially. The magnetron tube, if the magnetron tube fails due to provide required service. During this limited one year or the shortest period allowed by law. I Product not accessible to a defect in materials or workmanship. I Replacement of house fuses or resetting of the cooktop light bulb. Any implied warranties...


