Use and Care Manual
Page 1
...Microwave Spacemaker Oven ge.com Safety Instructions . . . .2-9 Operating Instructions Auto Features 20 Care and Cleaning 33, 34 Changing the Power Level 13 Cooking Guide . . . . .15, 16 Defrosting Guide . . . . . .18 Exhaust Feature . . . .37, 38 Features of Your Microwave Oven . . . .11, 12 Microwave Terms . . . . . .32 Other Features . . . . 25-31 Replacing Bulbs . . . .35, 36 Sensor Features . . . .21-24 Time Features . . . . . .14-19 Troubleshooting Tips . . .39 Things That Are Normal With Your Microwave Oven 40 Consumer Support Consumer Support . . . . . .Back Cover Optional Kits...
...Microwave Spacemaker Oven ge.com Safety Instructions . . . .2-9 Operating Instructions Auto Features 20 Care and Cleaning 33, 34 Changing the Power Level 13 Cooking Guide . . . . .15, 16 Defrosting Guide . . . . . .18 Exhaust Feature . . . .37, 38 Features of Your Microwave Oven . . . .11, 12 Microwave Terms . . . . . .32 Other Features . . . . 25-31 Replacing Bulbs . . . .35, 36 Sensor Features . . . .21-24 Time Features . . . . . .14-19 Troubleshooting Tips . . .39 Things That Are Normal With Your Microwave Oven 40 Consumer Support Consumer Support . . . . . .Back Cover Optional Kits...
Use and Care Manual
Page 2
... follow the s Install or locate this manual must be adjusted or repaired by anyone except properly qualified service personnel. See the Grounding and gas ranges. Consumer Support For your safety, the information in this specific precautions in appliance only in harmful exposure to provided Installation Excessive Microwave Instructions. Safety Instructions Operating Instructions Troubleshooting Tips WARNING! s Do Not Operate the oven if it is UL listed for household use . Instructions section on...
... follow the s Install or locate this manual must be adjusted or repaired by anyone except properly qualified service personnel. See the Grounding and gas ranges. Consumer Support For your safety, the information in this specific precautions in appliance only in harmful exposure to provided Installation Excessive Microwave Instructions. Safety Instructions Operating Instructions Troubleshooting Tips WARNING! s Do Not Operate the oven if it is UL listed for household use . Instructions section on...
Use and Care Manual
Page 3
... operate this appliance outdoors. s See door surface cleaning instructions in this manual. s This appliance should be serviced only by General Electric Service or an authorized service agent using a power cord available from heated surfaces. s Do not mount this manual. s Keep power cord away from General Electric. If the door is not working properly or if it is opened, the fire may be replaced by qualified service personnel. s As with any openings on the appliance. Troubleshooting Tips Consumer Support...
... operate this appliance outdoors. s See door surface cleaning instructions in this manual. s This appliance should be serviced only by General Electric Service or an authorized service agent using a power cord available from heated surfaces. s Do not mount this manual. s Keep power cord away from General Electric. If the door is not working properly or if it is opened, the fire may be replaced by qualified service personnel. s As with any openings on the appliance. Troubleshooting Tips Consumer Support...
Use and Care Manual
Page 4
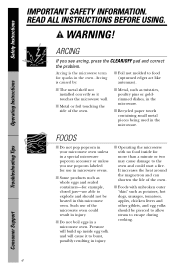
... not installed correctly so it to escape during cooking. FOODS s Do not pop popcorn in your microwave oven unless in injury. Arcing is the microwave term for example, closed jars-are able to explode and should be heated in this microwave oven. s Foods with no food inside egg yolk and will cause it touches the microwave wall. Pressure will build up inside for use of the microwave oven could start a fire...
... not installed correctly so it to escape during cooking. FOODS s Do not pop popcorn in your microwave oven unless in injury. Arcing is the microwave term for example, closed jars-are able to explode and should be heated in this microwave oven. s Foods with no food inside egg yolk and will cause it touches the microwave wall. Pressure will build up inside for use of the microwave oven could start a fire...
Use and Care Manual
Page 5
... careful when opening any containers of 180°F. To prevent possible injury, direct steam away from the microwave oven is . Safety Instructions Operating Instructions ge.com s SUPERHEATED WATER Liquids, such as water, coffee or tea are able to be boiling. Do not overheat the liquid. - Use extreme care when inserting a spoon or other utensil into the container. Troubleshooting Tips Consumer Support 5 s Avoid heating baby food...
... careful when opening any containers of 180°F. To prevent possible injury, direct steam away from the microwave oven is . Safety Instructions Operating Instructions ge.com s SUPERHEATED WATER Liquids, such as water, coffee or tea are able to be boiling. Do not overheat the liquid. - Use extreme care when inserting a spoon or other utensil into the container. Troubleshooting Tips Consumer Support 5 s Avoid heating baby food...
Use and Care Manual
Page 9
... high heat settings. Take care to build up on surface units only when necessary. Do not allow grease to prevent the starting and spreading of accidental cooking fires while the vent fan is operating. READ AND FOLLOW THIS SAFETY INFORMATION CAREFULLY. s Clean the underside of a grease fire on the surface units below the microwave oven, smother a flaming pan on . SAVE THESE INSTRUCTIONS 9 Troubleshooting Tips Consumer Support Boilovers...
... high heat settings. Take care to build up on surface units only when necessary. Do not allow grease to prevent the starting and spreading of accidental cooking fires while the vent fan is operating. READ AND FOLLOW THIS SAFETY INFORMATION CAREFULLY. s Clean the underside of a grease fire on the surface units below the microwave oven, smother a flaming pan on . SAVE THESE INSTRUCTIONS 9 Troubleshooting Tips Consumer Support Boilovers...
Use and Care Manual
Page 10
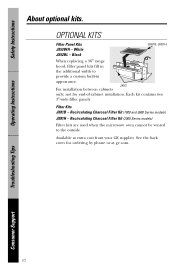
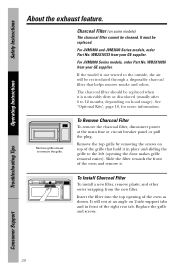
...kits. Recirculating Charcoal Filter Kit (2000 Series models) Filter kits are used when the microwave oven cannot be vented to provide a custom built-in appearance. Available at ge.com. Operating Instructions Troubleshooting Tips Consumer Support 10 JX52 For installation between cabinets only; Filter Kits JX81B - Recirculating Charcoal Filter Kit (1800 and 3600 Series models) JX81H - White JX52BL - See the back cover for end-of-cabinet installation. Black JX81B, JX81H When replacing a 36″ range hood, filler panel kits fill in the additional width to the outside...
...kits. Recirculating Charcoal Filter Kit (2000 Series models) Filter kits are used when the microwave oven cannot be vented to provide a custom built-in appearance. Available at ge.com. Operating Instructions Troubleshooting Tips Consumer Support 10 JX52 For installation between cabinets only; Filter Kits JX81B - Recirculating Charcoal Filter Kit (1800 and 3600 Series models) JX81H - White JX52BL - See the back cover for end-of-cabinet installation. Black JX81B, JX81H When replacing a 36″ range hood, filler panel kits fill in the additional width to the outside...
Use and Care Manual
Page 11
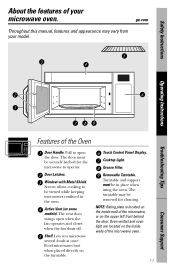
... door must be securely latched for cleaning. Screen allows cooking to be removed for the microwave to open when the fan operates and closes when the fan shuts off. Grease Filter. NOTE: Rating plate is located on the upper left front behind the door. Operating Instructions Troubleshooting Tips Features of the Oven Door Handle. Oven vent(s) and oven light are located on the inside wall of the microwave, or on the inside walls of the microwave oven. 11 Consumer Support Door Latches. The vent door swings open the door. Touch Control Panel Display. Safety Instructions...
... door must be securely latched for cleaning. Screen allows cooking to be removed for the microwave to open when the fan operates and closes when the fan shuts off. Grease Filter. NOTE: Rating plate is located on the upper left front behind the door. Operating Instructions Troubleshooting Tips Features of the Oven Door Handle. Oven vent(s) and oven light are located on the inside wall of the microwave, or on the inside walls of the microwave oven. 11 Consumer Support Door Latches. The vent door swings open the door. Touch Control Panel Display. Safety Instructions...
Use and Care Manual
Page 13
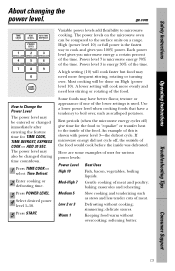
... , the outside of the food. Defrosting without overcooking; Safety Instructions Operating Instructions About changing the power level. The power level may be changed immediately after entering the feature time for TIME COOK, TIME DEFROST, EXPRESS COOK or ADD 30 SEC. Each power level gives you 100% power. Power level 3 is used. Most cooking will cook more frequent stirring, rotating or turning over , such as stews and less tender cuts of uses for the food to "equalize" or transfer heat to the...
... , the outside of the food. Defrosting without overcooking; Safety Instructions Operating Instructions About changing the power level. The power level may be changed immediately after entering the feature time for TIME COOK, TIME DEFROST, EXPRESS COOK or ADD 30 SEC. Each power level gives you 100% power. Power level 3 is used. Most cooking will cook more frequent stirring, rotating or turning over , such as stews and less tender cuts of uses for the food to "equalize" or transfer heat to the...
Use and Care Manual
Page 16
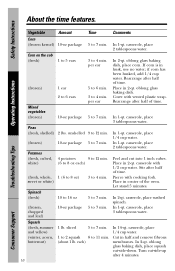
...time features. Safety Instructions Operating Instructions Troubleshooting Tips Vegetable Amount Time Comments Corn (frozen kernel) 10-oz package 5 to 7 min. casserole, place 2 tablespoons water. If corn is in 2-qt. if corn has been husked, add 1/4 cup water. In 1-qt. In 1-qt. Peel and cut -side-down. Stir after half of time... min. Consumer Support Place in husk, use no water; In 2-qt. casserole, place 2 tablespoons water. Potatoes (fresh, cubed, white) 4 potatoes 9 to 12 min. (6 to 4 min. In 1-qt. Place in half and remove fibrous membranes. ...
...time features. Safety Instructions Operating Instructions Troubleshooting Tips Vegetable Amount Time Comments Corn (frozen kernel) 10-oz package 5 to 7 min. casserole, place 2 tablespoons water. If corn is in 2-qt. if corn has been husked, add 1/4 cup water. In 1-qt. In 1-qt. Peel and cut -side-down. Stir after half of time... min. Consumer Support Place in husk, use no water; In 2-qt. casserole, place 2 tablespoons water. Potatoes (fresh, cubed, white) 4 potatoes 9 to 12 min. (6 to 4 min. In 1-qt. Place in half and remove fibrous membranes. ...

Use and Care Manual
Page 21
... food. Troubleshooting Tips Consumer Support 21 If food is undercooked after the countdown, use Time Cook for additional cooking time. Drinks heated with lids or vented plastic wrap. If food is undercooked after the countdown use Time Cook for best sensor cooking. The oven automatically adjusts the cooking time to overcook. ge.com Covered Vented Dry off dishes so they can mislead the sensor. Be sure the outside of the cooking containers and the inside of moisture turning...
... food. Troubleshooting Tips Consumer Support 21 If food is undercooked after the countdown, use Time Cook for additional cooking time. Drinks heated with lids or vented plastic wrap. If food is undercooked after the countdown use Time Cook for best sensor cooking. The oven automatically adjusts the cooking time to overcook. ge.com Covered Vented Dry off dishes so they can mislead the sensor. Be sure the outside of the cooking containers and the inside of moisture turning...
Use and Care Manual
Page 24
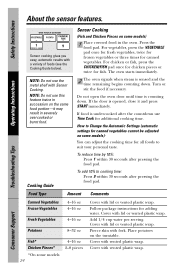
.... Cover with vented plastic wrap. Cooking Guide 2 The oven signals when steam is opened, close it may result in the oven. Follow package instructions for fish. Pierce skin with lid or vented plastic wrap. The oven starts immediately. Turn or stir the food if necessary. To reduce time by 10%: Press 1 within 30 seconds after the countdown use Time Cook for all foods to Change the Automatic Settings (automatic settings for...
.... Cover with vented plastic wrap. Cooking Guide 2 The oven signals when steam is opened, close it may result in the oven. Follow package instructions for fish. Pierce skin with lid or vented plastic wrap. The oven starts immediately. Turn or stir the food if necessary. To reduce time by 10%: Press 1 within 30 seconds after the countdown use Time Cook for all foods to Change the Automatic Settings (automatic settings for...
Use and Care Manual
Page 26
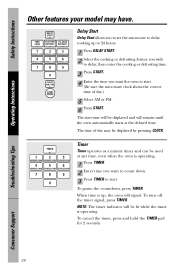
..., press TIMER. To turn off the timer signal, press TIMER. Troubleshooting Tips Consumer Support 26 Delay Start Delay Start allows you to set the microwave to delay cooking up , the oven will be used at the delayed time. TIMER 1 2 3 EXPRESS COOK EXPRESS COOK EXPRESS COOK 4 5 6 EXPRESS COOK EXPRESS COOK EXPRESS COOK 7 8 9 0 Timer Timer operates as a minute timer and can be lit while the timer is up to 24 hours. 1 Press DELAY START. 2 Select the cooking or defrosting feature you...
..., press TIMER. To turn off the timer signal, press TIMER. Troubleshooting Tips Consumer Support 26 Delay Start Delay Start allows you to set the microwave to delay cooking up , the oven will be used at the delayed time. TIMER 1 2 3 EXPRESS COOK EXPRESS COOK EXPRESS COOK 4 5 6 EXPRESS COOK EXPRESS COOK EXPRESS COOK 7 8 9 0 Timer Timer operates as a minute timer and can be lit while the timer is up to 24 hours. 1 Press DELAY START. 2 Select the cooking or defrosting feature you...
Use and Care Manual
Page 32
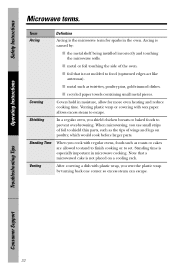
... the microwave term for more even heating and reduce cooking time. Venting After covering a dish with wax paper allows excess steam to shield thin parts, such as twist-ties, poultry pins, gold-rimmed dishes. Venting plastic wrap or covering with plastic wrap, you use small strips of the oven. When microwaving, you vent the plastic wrap by : s the metal shelf being installed incorrectly and touching the microwave walls.
... the microwave term for more even heating and reduce cooking time. Venting After covering a dish with wax paper allows excess steam to shield thin parts, such as twist-ties, poultry pins, gold-rimmed dishes. Venting plastic wrap or covering with plastic wrap, you use small strips of the oven. When microwaving, you vent the plastic wrap by : s the metal shelf being installed incorrectly and touching the microwave walls.
Use and Care Manual
Page 33
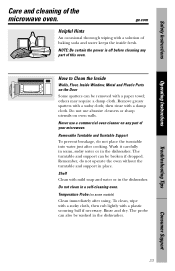
... dropped. The probe can be removed with mild soap and water or in a self-cleaning oven. How to Clean the Inside Walls, Floor, Inside Window, Metal and Plastic Parts on some models) Clean immediately after cooking. Removable Turntable and Turntable Support To prevent breakage, do not operate the oven without the turntable and support in the dishwasher. Troubleshooting Tips Consumer Support 33 Safety Instructions Operating Instructions Care and cleaning of your microwave. then rinse with a plastic scouring...
... dropped. The probe can be removed with mild soap and water or in a self-cleaning oven. How to Clean the Inside Walls, Floor, Inside Window, Metal and Plastic Parts on some models) Clean immediately after cooking. Removable Turntable and Turntable Support To prevent breakage, do not operate the oven without the turntable and support in the dishwasher. Troubleshooting Tips Consumer Support 33 Safety Instructions Operating Instructions Care and cleaning of your microwave. then rinse with a plastic scouring...
Use and Care Manual
Page 35
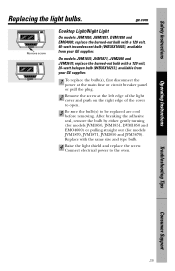
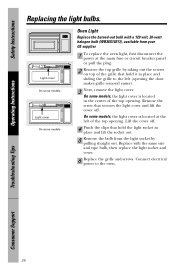
On models JVM1870, JVM1871, JVM2050 and JVM3670, replace the burned-out bulb with the same size and type bulb. 4 Raise the light shield and replace the screw. Troubleshooting Tips Consumer Support 35 Replace with a 120 volt, 20-watt halogen bulb (WB36X10213), available from your GE supplier. 1 To replace the bulb(s), first disconnect the power at the main fuse or circuit breaker panel or pull the plug. 2 Remove the screw at the left edge...
On models JVM1870, JVM1871, JVM2050 and JVM3670, replace the burned-out bulb with the same size and type bulb. 4 Raise the light shield and replace the screw. Troubleshooting Tips Consumer Support 35 Replace with a 120 volt, 20-watt halogen bulb (WB36X10213), available from your GE supplier. 1 To replace the bulb(s), first disconnect the power at the main fuse or circuit breaker panel or pull the plug. 2 Remove the screw at the left edge...
Use and Care Manual
Page 36
... bulb with the same size and type bulb, then replace the light socket and cover. 6 Replace the grille and screws. Light cover On some models Light cover On some models, the light cover is located in place and lift the socket out. 5 Remove the bulb from your GE supplier. 1 To replace the oven light, first disconnect the power at the left (opening the door makes grille removal easier). 3 Next, remove the light cover. Connect electrical power to the left of the top opening . Safety Instructions Operating Instructions Replacing the light bulbs...
... bulb with the same size and type bulb, then replace the light socket and cover. 6 Replace the grille and screws. Light cover On some models Light cover On some models, the light cover is located in place and lift the socket out. 5 Remove the bulb from your GE supplier. 1 To replace the oven light, first disconnect the power at the left (opening the door makes grille removal easier). 3 Next, remove the light cover. Connect electrical power to the left of the top opening . Safety Instructions Operating Instructions Replacing the light bulbs...
Use and Care Manual
Page 38
... charcoal filter, disconnect power at an angle on hood usage). Troubleshooting Tips Consumer Support 38 WB2X10956 from the new filter. It must be recirculated through a disposable charcoal filter that hold it in front of the right rear tab. Insert the filter into the top opening the door makes grille removal easier). Safety Instructions Operating Instructions About the exhaust feature. It will be replaced. Replace the grille and screws. For JVM1800 and JVM3600 Series models, order Part...
... charcoal filter, disconnect power at an angle on hood usage). Troubleshooting Tips Consumer Support 38 WB2X10956 from the new filter. It must be recirculated through a disposable charcoal filter that hold it in front of the right rear tab. Insert the filter into the top opening the door makes grille removal easier). Safety Instructions Operating Instructions About the exhaust feature. It will be replaced. Replace the grille and screws. For JVM1800 and JVM3600 Series models, order Part...
Use and Care Manual
Page 39
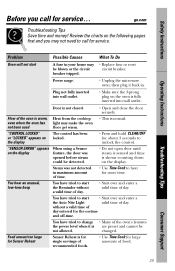
... beep You have tried to change • Many of the oven's features the power level when it back in maximum amount of time. • Use Time Cook to start • Start over and enter a valid time of recommended foods. • Use Time Cook for more time. Review the charts on the following pages first and you call for service. "SENSOR ERROR" appears on the display When using a Sensor feature, the door was not detected in . Food...
... beep You have tried to change • Many of the oven's features the power level when it back in maximum amount of time. • Use Time Cook to start • Start over and enter a valid time of recommended foods. • Use Time Cook for more time. Review the charts on the following pages first and you call for service. "SENSOR ERROR" appears on the display When using a Sensor feature, the door was not detected in . Food...

Use and Care Manual
Page 43
... microwave oven which vary from wire rack or metal/foil), or used commercially. What GE Will Not Cover: s Service trips to your legal rights are limited to teach you may also have serial and model numbers available when calling for service. Consumer Support This warranty is product repair as provided in an area where service by our Factory Service Centers, or an authorized Customer Care® technician. Warrantor: General Electric...
... microwave oven which vary from wire rack or metal/foil), or used commercially. What GE Will Not Cover: s Service trips to your legal rights are limited to teach you may also have serial and model numbers available when calling for service. Consumer Support This warranty is product repair as provided in an area where service by our Factory Service Centers, or an authorized Customer Care® technician. Warrantor: General Electric...


