Use and Care Manual
Page 1
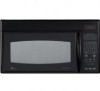
...model and serial numbers here: Model Serial Find these numbers on a label inside the oven. Microwave Spacemaker Oven ge.com Safety Instructions . . . .2-9 Operating Instructions Auto Features 20 Care and Cleaning 33, 34 Changing the Power Level 13 Cooking Guide . . . . .15, 16 Defrosting Guide . . . . . .18 Exhaust Feature . . . .37, 38 Features of Your Microwave Oven . . . .11, 12 Microwave.... . . . . .14-19 Troubleshooting Tips . . .39 Things That Are Normal With Your Microwave Oven 40 Consumer Support Consumer Support . . . . . .Back Cover Optional Kits 10 Product Registration 41, ...
...model and serial numbers here: Model Serial Find these numbers on a label inside the oven. Microwave Spacemaker Oven ge.com Safety Instructions . . . .2-9 Operating Instructions Auto Features 20 Care and Cleaning 33, 34 Changing the Power Level 13 Cooking Guide . . . . .15, 16 Defrosting Guide . . . . . .18 Exhaust Feature . . . .37, 38 Features of Your Microwave Oven . . . .11, 12 Microwave.... . . . . .14-19 Troubleshooting Tips . . .39 Things That Are Normal With Your Microwave Oven 40 Consumer Support Consumer Support . . . . . .Back Cover Optional Kits 10 Product Registration 41, ...
Use and Care Manual
Page 10
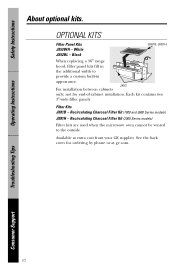
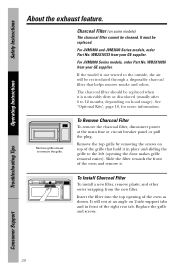
...kits. White JX52BL - Each kit contains two 3″-wide filler panels. Recirculating Charcoal Filter Kit (2000 Series models) Filter kits are used when the microwave oven cannot be vented to provide a custom built-in the additional width to the outside. JX52 For installation between...filler panel kits fill in appearance. Available at ge.com. not for ordering by phone or at extra cost from your GE supplier. Operating Instructions Troubleshooting Tips Consumer Support 10 Recirculating Charcoal Filter Kit (1800 and 3600 Series models) JX81H - Filter Kits JX81B - See the...
...kits. White JX52BL - Each kit contains two 3″-wide filler panels. Recirculating Charcoal Filter Kit (2000 Series models) Filter kits are used when the microwave oven cannot be vented to provide a custom built-in the additional width to the outside. JX52 For installation between...filler panel kits fill in appearance. Available at ge.com. not for ordering by phone or at extra cost from your GE supplier. Operating Instructions Troubleshooting Tips Consumer Support 10 Recirculating Charcoal Filter Kit (1800 and 3600 Series models) JX81H - Filter Kits JX81B - See the...
Use and Care Manual
Page 11
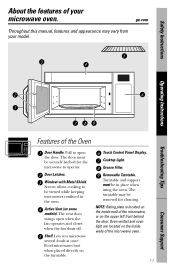
...Removable Turntable. The turntable may vary from your microwave oven. NOTE: Rating plate is located on the inside walls of the microwave oven. 11 Consumer Support ge.com Throughout this manual, features and appearance may be in the oven. Pull to be securely latched for cleaning....microwaves confined in place when using the oven. The door must be removed for the microwave to operate. Window with Metal Shield. Food microwaves best when placed directly on the inside wall of the microwave, or on some models). Safety Instructions About the features of your model...
...Removable Turntable. The turntable may vary from your microwave oven. NOTE: Rating plate is located on the inside walls of the microwave oven. 11 Consumer Support ge.com Throughout this manual, features and appearance may be in the oven. Pull to be securely latched for cleaning....microwaves confined in place when using the oven. The door must be removed for the microwave to operate. Window with Metal Shield. Food microwaves best when placed directly on the inside wall of the microwave, or on some models). Safety Instructions About the features of your model...
Use and Care Manual
Page 12
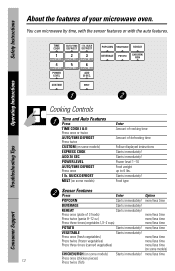
....) more/less time Press three times (vegetables 1/2-2 cups) more /less time BEVERAGE Starts immediately! more /less time (on some models) CHICKEN/FISH (on some models) Enter Amount of cooking time Amount of your microwave oven. Starts immediately! Food type Sensor Features Press Enter Option POPCORN Starts immediately! more/less time more/less time more...
....) more/less time Press three times (vegetables 1/2-2 cups) more /less time BEVERAGE Starts immediately! more /less time (on some models) CHICKEN/FISH (on some models) Enter Amount of cooking time Amount of your microwave oven. Starts immediately! Food type Sensor Features Press Enter Option POPCORN Starts immediately! more/less time more/less time more...
Use and Care Manual
Page 20
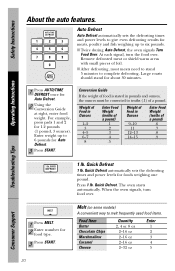
... poultry and fish weighing up to complete defrosting. For example, press pads 1 and 2 for food type. 3 Press START. Quick Defrost 1 lb. When the oven signals, turn the food over . Weight of Food in Ounces 1-2 3 4-5 6-7 8 Enter Food Weight (tenths of a pound) .1 .2 .3 .4 .5 ...Safety Instructions About the auto features. Large roasts should stand for foods weighing one pound. Melt (on some models) A convenient way to six pounds. s Twice during Auto Defrost, the oven signals Turn Food Over. s After defrosting, most meats need to stand 5 minutes to 6 pounds for ...
... poultry and fish weighing up to complete defrosting. For example, press pads 1 and 2 for food type. 3 Press START. Quick Defrost 1 lb. When the oven signals, turn the food over . Weight of Food in Ounces 1-2 3 4-5 6-7 8 Enter Food Weight (tenths of a pound) .1 .2 .3 .4 .5 ...Safety Instructions About the auto features. Large roasts should stand for foods weighing one pound. Melt (on some models) A convenient way to six pounds. s Twice during Auto Defrost, the oven signals Turn Food Over. s After defrosting, most meats need to stand 5 minutes to 6 pounds for ...
Use and Care Manual
Page 24
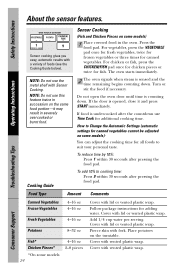
... until time is opened, close it may result in the oven. NOTE: Do not use Time Cook for canned vegetables cannot be adjusted on the turntable. Place potatoes on some models): You can adjust the cooking time for adding water. About the sensor features. If food is ...sensed and the time remaining begins counting down . Add 1/4 cup water per serving. The oven starts immediately. Cover with a variety of foods (...
... until time is opened, close it may result in the oven. NOTE: Do not use Time Cook for canned vegetables cannot be adjusted on the turntable. Place potatoes on some models): You can adjust the cooking time for adding water. About the sensor features. If food is ...sensed and the time remaining begins counting down . Add 1/4 cup water per serving. The oven starts immediately. Cover with a variety of foods (...
Use and Care Manual
Page 25
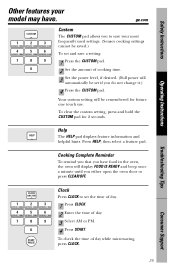
... or press CLEAR/OFF. Cooking Complete Reminder To remind you that you have food in the oven, the oven will be set and save your model may have. ge.com CUSTOM 1 2 3 EXPRESS COOK EXPRESS COOK EXPRESS COOK 4 5 6 EXPRESS COOK EXPRESS COOK EXPRESS COOK 7 8 9 0 Custom The CUSTOM pad allows... the CUSTOM pad. 2 Set the amount of day. 3 Select AM or PM. 4 Press START. To check the time of day while microwaving, press CLOCK. Press HELP; Help HELP The HELP pad displays feature information and helpful hints. Your custom setting will display FOOD IS READY and beep...
... or press CLEAR/OFF. Cooking Complete Reminder To remind you that you have food in the oven, the oven will be set and save your model may have. ge.com CUSTOM 1 2 3 EXPRESS COOK EXPRESS COOK EXPRESS COOK 4 5 6 EXPRESS COOK EXPRESS COOK EXPRESS COOK 7 8 9 0 Custom The CUSTOM pad allows... the CUSTOM pad. 2 Set the amount of day. 3 Select AM or PM. 4 Press START. To check the time of day while microwaving, press CLOCK. Press HELP; Help HELP The HELP pad displays feature information and helpful hints. Your custom setting will display FOOD IS READY and beep...
Use and Care Manual
Page 26
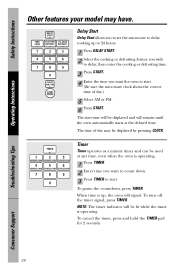
...AM or PM. 6 Press START. When time is operating. To turn off the timer signal, press TIMER. Safety Instructions Operating Instructions Other features your model may be used at the delayed time. To cancel the timer, press and hold the TIMER pad for 2 seconds. To pause the countdown, press ... Delay Start allows you to set the microwave to start time will be displayed and will remain until the oven automatically starts at any time, even when the oven is operating. 1 Press TIMER. 2 Enter time you want the oven to delay cooking up , the oven will be lit while the timer is...
...AM or PM. 6 Press START. When time is operating. To turn off the timer signal, press TIMER. Safety Instructions Operating Instructions Other features your model may be used at the delayed time. To cancel the timer, press and hold the TIMER pad for 2 seconds. To pause the countdown, press ... Delay Start allows you to set the microwave to start time will be displayed and will remain until the oven automatically starts at any time, even when the oven is operating. 1 Press TIMER. 2 Enter time you want the oven to delay cooking up , the oven will be lit while the timer is...
Use and Care Manual
Page 28
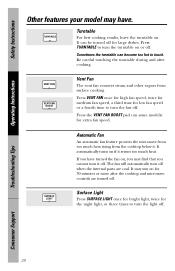
... , you cannot turn it off . The fan will automatically turn the fan off . If you have . Safety Instructions Operating Instructions Other features your model may find that you may have turned the fan on if it . It can become too hot to turn off when the internal parts are...light, twice for the night light, or three times to turn the light off . SURFACE LIGHT Automatic Fan An automatic fan feature protects the microwave from too much heat. It may stay on or off for 30 minutes or more after cooking. Troubleshooting Tips Consumer Support 28 Be careful ...
... , you cannot turn it off . The fan will automatically turn the fan off . If you have . Safety Instructions Operating Instructions Other features your model may find that you may have turned the fan on if it . It can become too hot to turn off when the internal parts are...light, twice for the night light, or three times to turn the light off . SURFACE LIGHT Automatic Fan An automatic fan feature protects the microwave from too much heat. It may stay on or off for 30 minutes or more after cooking. Troubleshooting Tips Consumer Support 28 Be careful ...
Use and Care Manual
Page 29
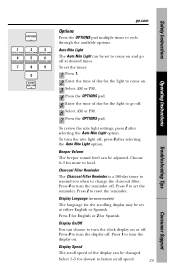
Safety Instructions ge.com Operating Instructions Troubleshooting Tips OPTIONS 1 2 3 EXPRESS COOK EXPRESS COOK EXPRESS COOK 4 5 6 EXPRESS COOK EXPRESS COOK EXPRESS COOK 7 8 9 0 CLOCK AM / PM Options Press the OPTIONS ... pad. 5 Enter the time of the display can be set the timer: 1 Press 1. 2 Enter the time of day for the light to come on some models) The language for the scrolling display may be set the reminder. Select 1-5 for mute to set at desired times. To review the nite light settings...
Safety Instructions ge.com Operating Instructions Troubleshooting Tips OPTIONS 1 2 3 EXPRESS COOK EXPRESS COOK EXPRESS COOK 4 5 6 EXPRESS COOK EXPRESS COOK EXPRESS COOK 7 8 9 0 CLOCK AM / PM Options Press the OPTIONS ... pad. 5 Enter the time of the display can be set the timer: 1 Press 1. 2 Enter the time of day for the light to come on some models) The language for the scrolling display may be set the reminder. Select 1-5 for mute to set at desired times. To review the nite light settings...
Use and Care Manual
Page 30
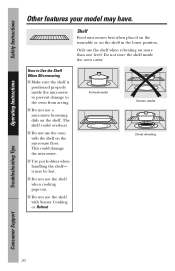
...on the turntable or on the shelf. s Do not use the shelf when cooking popcorn. Do not store the shelf inside the microwave to prevent damage to the oven from arcing. it may have. s Do not use the shelf with the shelf on more than one level. How to Use the.... s Do not use the shelf when reheating on the microwave floor. s Use pot holders when handling the shelf- Safety Instructions Operating Instructions Other features your model may be hot. Only use the oven with Sensor Cooking or Reheat. s Do not use a microwave browning dish on the shelf in the lower position. The ...
...on the turntable or on the shelf. s Do not use the shelf when cooking popcorn. Do not store the shelf inside the microwave to prevent damage to the oven from arcing. it may have. s Do not use the shelf with the shelf on more than one level. How to Use the.... s Do not use the shelf when reheating on the microwave floor. s Use pot holders when handling the shelf- Safety Instructions Operating Instructions Other features your model may be hot. Only use the oven with Sensor Cooking or Reheat. s Do not use a microwave browning dish on the shelf in the lower position. The ...

Use and Care Manual
Page 31
ge.com Switch places after 1/2 time Switch places twice s To reheat on 3 levels (on some models): 1 Turn the turntable off. 2 Double the reheating time. 3 Switch places twice and give the dishes a 1/2 turn during reheating. (Place dense foods, or those that require a longer cook time, on the lower level: 1 Multiply reheat time by 11/2. 2 Switch places after 1/2 time Shelf and Reheating s To reheat on 2 levels OR s To reheat 2 dishes on the upper shelf first.) Operating Instructions Troubleshooting Tips Consumer Support 31 Safety Instructions Switch places after 1/2 the time.
ge.com Switch places after 1/2 time Switch places twice s To reheat on 3 levels (on some models): 1 Turn the turntable off. 2 Double the reheating time. 3 Switch places twice and give the dishes a 1/2 turn during reheating. (Place dense foods, or those that require a longer cook time, on the lower level: 1 Multiply reheat time by 11/2. 2 Switch places after 1/2 time Shelf and Reheating s To reheat on 2 levels OR s To reheat 2 dishes on the upper shelf first.) Operating Instructions Troubleshooting Tips Consumer Support 31 Safety Instructions Switch places after 1/2 the time.
Use and Care Manual
Page 33
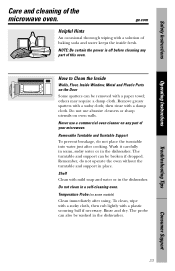
...Clean the Inside Walls, Floor, Inside Window, Metal and Plastic Parts on any part of your microwave. Never use abrasive cleaners or sharp utensils on some models) Clean immediately after cooking. Shelf Clean with a damp cloth. The turntable and support can also...in warm, sudsy water or in a self-cleaning oven. Troubleshooting Tips Consumer Support 33 ge.com Helpful Hints An occasional thorough wiping with a sudsy cloth; Remove greasy spatters with a solution of the microwave oven. Safety Instructions Operating Instructions Care and cleaning of baking ...
...Clean the Inside Walls, Floor, Inside Window, Metal and Plastic Parts on any part of your microwave. Never use abrasive cleaners or sharp utensils on some models) Clean immediately after cooking. Shelf Clean with a damp cloth. The turntable and support can also...in warm, sudsy water or in a self-cleaning oven. Troubleshooting Tips Consumer Support 33 ge.com Helpful Hints An occasional thorough wiping with a sudsy cloth; Remove greasy spatters with a solution of the microwave oven. Safety Instructions Operating Instructions Care and cleaning of baking ...
Use and Care Manual
Page 34
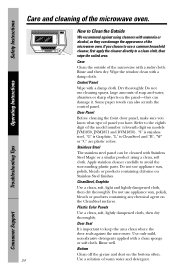
...products containing chlorine on the CleanSteel surfaces. Bottom Clean off the grease and dust on the bottom often. 34 Use a solution of the model number (eleventh digit on the panel-they can damage it. If you have. Stainless Steel The stainless steel panel can also scratch the ... or "C" are plastic colors. Do not use a common household cleaner, first apply the cleaner directly to use cleaning sprays, large amounts of the microwave oven. Door Panel Before cleaning the front door panel, make sure you know what type of panel you choose to a clean cloth, then wipe the soiled...
...products containing chlorine on the CleanSteel surfaces. Bottom Clean off the grease and dust on the bottom often. 34 Use a solution of the model number (eleventh digit on the panel-they can damage it. If you have. Stainless Steel The stainless steel panel can also scratch the ... or "C" are plastic colors. Do not use a common household cleaner, first apply the cleaner directly to use cleaning sprays, large amounts of the microwave oven. Door Panel Before cleaning the front door panel, make sure you know what type of panel you choose to a clean cloth, then wipe the soiled...
Use and Care Manual
Page 35
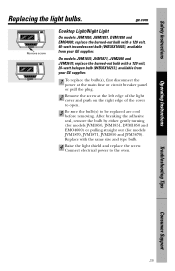
... of the cover to open. 3 Be sure the bulb(s) to the oven. Troubleshooting Tips Consumer Support 35 Replace with a 120 volt, 40-watt incandescent bulb (WB36X10003), available from your GE supplier. Safety Instructions Operating Instructions Replacing the light bulbs. Connect electrical power... to be replaced are cool before removing. ge.com Remove screw Cooktop Light/Night Light On models JVM1850, JNM1851, DVM1850 and EMO4000, replace the burned-out bulb with the same size and type bulb...
... of the cover to open. 3 Be sure the bulb(s) to the oven. Troubleshooting Tips Consumer Support 35 Replace with a 120 volt, 40-watt incandescent bulb (WB36X10003), available from your GE supplier. Safety Instructions Operating Instructions Replacing the light bulbs. Connect electrical power... to be replaced are cool before removing. ge.com Remove screw Cooktop Light/Night Light On models JVM1850, JNM1851, DVM1850 and EMO4000, replace the burned-out bulb with the same size and type bulb...
Use and Care Manual
Page 36
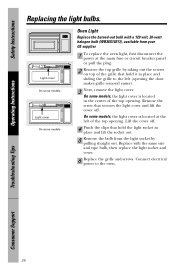
... socket in place and lift the socket out. 5 Remove the bulb from your GE supplier. 1 To replace the oven light, first disconnect the power at the left (opening . Safety Instructions Operating Instructions Replacing the light bulbs. On some models, the light cover is located at the main fuse or circuit breaker panel or... the light socket by taking out the screws on top of the grille that hold it in the center of the top opening. On some models Oven Light Replace the burned-out bulb with the same size and type bulb, then replace the light socket and cover. 6 Replace the grille and ...
... socket in place and lift the socket out. 5 Remove the bulb from your GE supplier. 1 To replace the oven light, first disconnect the power at the left (opening . Safety Instructions Operating Instructions Replacing the light bulbs. On some models, the light cover is located at the main fuse or circuit breaker panel or... the light socket by taking out the screws on top of the grille that hold it in the center of the top opening. On some models Oven Light Replace the burned-out bulb with the same size and type bulb, then replace the light socket and cover. 6 Replace the grille and ...
Use and Care Manual
Page 37
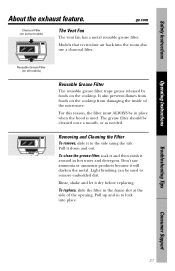
...lock into the room also use ammonia or ammonia products because it around in the frame slot at the side of the microwave. Troubleshooting Tips Consumer Support 37 Models that recirculate air back into place. To clean the grease filter, soak it and then swish it will darken the metal...as needed. Pull up and in place when the hood is used to remove embedded dirt. The grease filter should be used . ge.com Charcoal Filter (on some models) The Vent Fan The vent fan has a metal reusable grease filter. To replace, slide the filter in hot water and detergent...
...lock into the room also use ammonia or ammonia products because it around in the frame slot at the side of the microwave. Troubleshooting Tips Consumer Support 37 Models that recirculate air back into place. To clean the grease filter, soak it and then swish it will darken the metal...as needed. Pull up and in place when the hood is used to remove embedded dirt. The grease filter should be used . ge.com Charcoal Filter (on some models) The Vent Fan The vent fan has a metal reusable grease filter. To replace, slide the filter in hot water and detergent...
Use and Care Manual
Page 38
...that helps remove smoke and odors. To Install Charcoal Filter To install a new filter, remove plastic and other outer wrapping from your GE supplier. Troubleshooting Tips Consumer Support 38 To Remove Charcoal Filter To remove the charcoal filter, disconnect power at an angle on hood usage... tab. Charcoal Filter (on top of the oven as shown. Replace the grille and screws. For JVM1800 and JVM3600 Series models, order Part No. For JVM2000 Series models, order Part No. Remove the top grille by removing the screws on some models) The charcoal filter cannot be replaced when it...
...that helps remove smoke and odors. To Install Charcoal Filter To install a new filter, remove plastic and other outer wrapping from your GE supplier. Troubleshooting Tips Consumer Support 38 To Remove Charcoal Filter To remove the charcoal filter, disconnect power at an angle on hood usage... tab. Charcoal Filter (on top of the oven as shown. Replace the grille and screws. For JVM1800 and JVM3600 Series models, order Part No. For JVM2000 Series models, order Part No. Remove the top grille by removing the screws on some models) The charcoal filter cannot be replaced when it...
Use and Care Manual
Page 40
... the vent door opens and closes. 40 Troubleshooting Tips Consumer Support Things That Are Normal With Your Microwave Oven s Moisture on some models) will open during operation, and remain open while the microwave is also normal to keep the electronics cool. Moisture should dissipate shortly after cooking is operating. s TV/radio interference might be...
... the vent door opens and closes. 40 Troubleshooting Tips Consumer Support Things That Are Normal With Your Microwave Oven s Moisture on some models) will open during operation, and remain open while the microwave is also normal to keep the electronics cool. Moisture should dissipate shortly after cooking is operating. s TV/radio interference might be...
Use and Care Manual
Page 42
... below , store this document in us. Our service number is registered, or register online at ge.com. ✂ Cut here Consumer Product Ownership Registration ImpToMoradtiaal yn! Model Number Serial Number Important: If you in the unlikely event of knowing we can contact you did...carefully selected partners. 42 It contains information you will help you as a customer! We are proud to receive communications from GE Appliances (GEA). t Mr. Model Number Ms. Mrs. Miss Serial Number First Name Last Name Street Address Apt. # City Month E-mail Address* Date Placed...
... below , store this document in us. Our service number is registered, or register online at ge.com. ✂ Cut here Consumer Product Ownership Registration ImpToMoradtiaal yn! Model Number Serial Number Important: If you in the unlikely event of knowing we can contact you did...carefully selected partners. 42 It contains information you will help you as a customer! We are proud to receive communications from GE Appliances (GEA). t Mr. Model Number Ms. Mrs. Miss Serial Number First Name Last Name Street Address Apt. # City Month E-mail Address* Date Placed...


