Owners Manual
Page 1
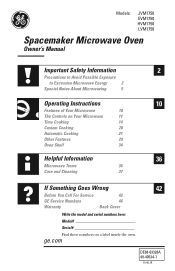
Models: JVM1750 EVM1750 HVM1750 LVM1750 Spacemaker Microwave Oven Owner's Manual Important Safety Information 2 Precautions to Avoid Possible Exposure to Excessive Microwave Energy 2 Special Notes About Microwaving 5 ... Helpful Information 36 Microwave Terms 36 Care and Cleaning 37 If Something Goes Wrong 42 Before You Call For Service 42 GE Service Numbers 46 Warranty Back Cover Write the model and serial numbers here: Model Serial Find these numbers on a label inside the oven. ge.com DE68-03328A 49-40534-1 10-08 JR
Models: JVM1750 EVM1750 HVM1750 LVM1750 Spacemaker Microwave Oven Owner's Manual Important Safety Information 2 Precautions to Avoid Possible Exposure to Excessive Microwave Energy 2 Special Notes About Microwaving 5 ... Helpful Information 36 Microwave Terms 36 Care and Cleaning 37 If Something Goes Wrong 42 Before You Call For Service 42 GE Service Numbers 46 Warranty Back Cover Write the model and serial numbers here: Model Serial Find these numbers on a label inside the oven. ge.com DE68-03328A 49-40534-1 10-08 JR
Owners Manual
Page 10
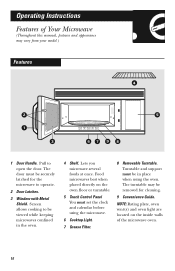
... must be viewed while keeping microwaves confined in place when using the microwave. 6 Cooktop Light. 7 Grease Filter. 8 Removable Turntable. The turntable may vary from your model.) Features 4 2 5 1 3 67 9 8 1 Door Handle. NOTE: Rating plate, oven vent(s) and oven light are located on the oven floor or turntable. 5 Touch Control Panel You must...
... must be viewed while keeping microwaves confined in place when using the microwave. 6 Cooktop Light. 7 Grease Filter. 8 Removable Turntable. The turntable may vary from your model.) Features 4 2 5 1 3 67 9 8 1 Door Handle. NOTE: Rating plate, oven vent(s) and oven light are located on the oven floor or turntable. 5 Touch Control Panel You must...
Owners Manual
Page 11
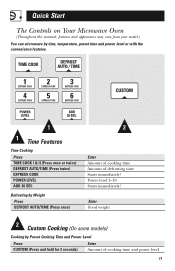
.... Amount of defrosting time. Power level 1-10. Quick Start The Controls on Your Microwave Oven (Throughout this manual, features and appearance may vary from your model.) You can microwave by time, temperature, preset time and power level or with the convenience features. 1 1 Time Features Time Cooking Press TIME COOK I & II (Press...
.... Amount of defrosting time. Power level 1-10. Quick Start The Controls on Your Microwave Oven (Throughout this manual, features and appearance may vary from your model.) You can microwave by time, temperature, preset time and power level or with the convenience features. 1 1 Time Features Time Cooking Press TIME COOK I & II (Press...
Owners Manual
Page 12
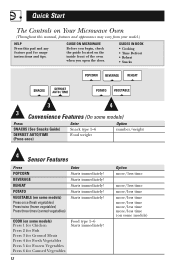
... Starts immediately! GUIDES IN BOOK • Cooking • Time Defrost • Reheat • Snacks 3 4 3 Convenience Features (On some models) Press SNACKS (See Snacks Guide) DEFROST AUTO/TIME (Press once) Enter Snack type 1-6 Food weight Option number/weight 4 Sensor Features Press POPCORN ...BEVERAGE REHEAT POTATO VEGETABLE (on some models) Starts immediately! Starts immediately! Starts immediately! COOK (on the inside front of the oven when you open the door. GUIDE ...
... Starts immediately! GUIDES IN BOOK • Cooking • Time Defrost • Reheat • Snacks 3 4 3 Convenience Features (On some models) Press SNACKS (See Snacks Guide) DEFROST AUTO/TIME (Press once) Enter Snack type 1-6 Food weight Option number/weight 4 Sensor Features Press POPCORN ...BEVERAGE REHEAT POTATO VEGETABLE (on some models) Starts immediately! Starts immediately! Starts immediately! COOK (on the inside front of the oven when you open the door. GUIDE ...

Owners Manual
Page 20
Setting a custom cook time and power level: 1 Press and hold CUSTOM for 2 seconds. 2 Press POWER LEVEL and select the desired power level 1-10. 3 Press START. The entered time and power level is displayed and starts counting down. 20 The stored time is stored. Operating Instructions Custom Cooking Custom Cooking (On some models) Custom Cooking lets you cook foods you prepare often without needing to start. To custom cook when cook time and power level has been previously set: Press CUSTOM to enter cook time and power level each time.
Setting a custom cook time and power level: 1 Press and hold CUSTOM for 2 seconds. 2 Press POWER LEVEL and select the desired power level 1-10. 3 Press START. The entered time and power level is displayed and starts counting down. 20 The stored time is stored. Operating Instructions Custom Cooking Custom Cooking (On some models) Custom Cooking lets you cook foods you prepare often without needing to start. To custom cook when cook time and power level has been previously set: Press CUSTOM to enter cook time and power level each time.

Owners Manual
Page 21
Convenience Features Snacks (On some models) The Snacks feature automatically sets the microwaving times and power levels to 16 oz. 21 Snacks Guide Food Type 1 Bread, rolls, muffins 2 Sandwiches 3 Pizza (leftover ...
Convenience Features Snacks (On some models) The Snacks feature automatically sets the microwaving times and power levels to 16 oz. 21 Snacks Guide Food Type 1 Bread, rolls, muffins 2 Sandwiches 3 Pizza (leftover ...
Owners Manual
Page 26
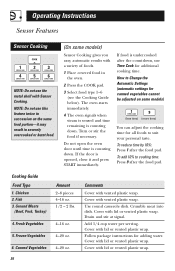
...Ground Meats (Beef, Pork, Turkey) 4. Operating Instructions Sensor Features Sensor Cooking NOTE: Do not use this feature twice in succession on some models) Sensor Cooking gives you easy, automatic results with Sensor Cooking. The oven starts immediately. 4 The oven signals when steam is sensed and time... remaining is opened, close it may result in severely overcooked or burnt food. (On some models) (less time) (more time) You can adjust the cooking time for all foods to Change the Automatic Settings (automatic settings for adding...
...Ground Meats (Beef, Pork, Turkey) 4. Operating Instructions Sensor Features Sensor Cooking NOTE: Do not use this feature twice in succession on some models) Sensor Cooking gives you easy, automatic results with Sensor Cooking. The oven starts immediately. 4 The oven signals when steam is sensed and time... remaining is opened, close it may result in severely overcooked or burnt food. (On some models) (less time) (more time) You can adjust the cooking time for all foods to Change the Automatic Settings (automatic settings for adding...
Owners Manual
Page 27
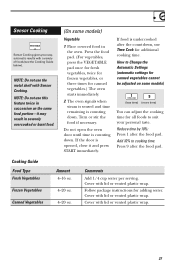
... opened, close it may result in the oven. NOTE: Do not use this feature twice in succession on some models) Vegetable 1 Place covered food in severely overcooked or burnt food. (On some models) (less time) (more time) You can adjust the cooking time for canned vegetables.) The oven starts immediately. 2 The oven...
... opened, close it may result in the oven. NOTE: Do not use this feature twice in succession on some models) Vegetable 1 Place covered food in severely overcooked or burnt food. (On some models) (less time) (more time) You can adjust the cooking time for canned vegetables.) The oven starts immediately. 2 The oven...
Owners Manual
Page 28
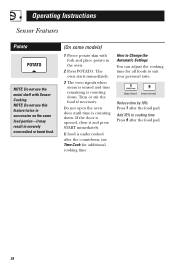
... and time remaining is undercooked after the countdown, use the metal shelf with fork and place potato in severely overcooked or burnt food. (On some models) 1 Pierce potato skin with Sensor Cooking.
... and time remaining is undercooked after the countdown, use the metal shelf with fork and place potato in severely overcooked or burnt food. (On some models) 1 Pierce potato skin with Sensor Cooking.
Owners Manual
Page 29
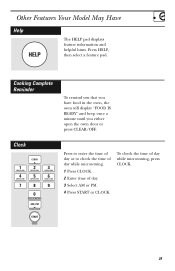
To check the time of day. 3 Select AM or PM. 4 Press START or CLOCK. Clock Press to enter the time of day or to check the time of day while microwaving. 1 Press CLOCK. 2 Enter time of day while microwaving, press CLOCK. 29 Press HELP, then select a feature pad. Cooking Complete Reminder To remind you that you have food in the oven, the oven will display "FOOD IS READY" and beep once a minute until you either open the oven door or press CLEAR/OFF. Other Features Your Model May Have Help The HELP pad displays feature information and helpful hints.
To check the time of day. 3 Select AM or PM. 4 Press START or CLOCK. Clock Press to enter the time of day or to check the time of day while microwaving. 1 Press CLOCK. 2 Enter time of day while microwaving, press CLOCK. 29 Press HELP, then select a feature pad. Cooking Complete Reminder To remind you that you have food in the oven, the oven will display "FOOD IS READY" and beep once a minute until you either open the oven door or press CLEAR/OFF. Other Features Your Model May Have Help The HELP pad displays feature information and helpful hints.
Owners Manual
Page 30
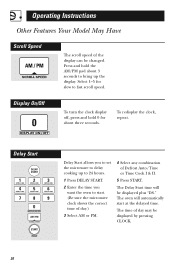
... clock, repeat. Press and hold 0 for slow to start at the delayed time. The time of day may be changed. Operating Instructions Other Features Your Model May Have Scroll Speed The scroll speed of the display can be displayed by pressing CLOCK. 30 Display On/Off To turn the clock display...
... clock, repeat. Press and hold 0 for slow to start at the delayed time. The time of day may be changed. Operating Instructions Other Features Your Model May Have Scroll Speed The scroll speed of the display can be displayed by pressing CLOCK. 30 Display On/Off To turn the clock display...

Owners Manual
Page 32
Operating Instructions Other Features Your Model May Have Child Lock-Out Turntable You may lock the control panel to the extreme right. It can become too hot to touch. If you ...
Operating Instructions Other Features Your Model May Have Child Lock-Out Turntable You may lock the control panel to the extreme right. It can become too hot to touch. If you ...
Owners Manual
Page 33
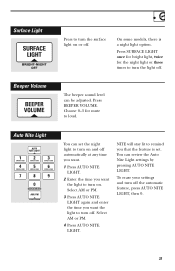
On some models, there is set the night light to turn on and off the automatic feature, press AUTO NITE LIGHT, then 0. 33 Choose 0-3 for the night light ...
On some models, there is set the night light to turn on and off the automatic feature, press AUTO NITE LIGHT, then 0. 33 Choose 0-3 for the night light ...
Owners Manual
Page 34
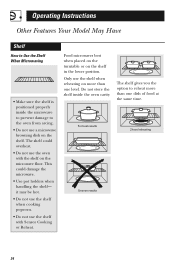
... of food at the same time. This could overheat. • Do not use the shelf when reheating on the shelf. Operating Instructions Other Features Your Model May Have Shelf How to Use the Shelf When Microwaving • Make sure the shelf is positioned properly inside the oven cavity. The shelf could...
... of food at the same time. This could overheat. • Do not use the shelf when reheating on the shelf. Operating Instructions Other Features Your Model May Have Shelf How to Use the Shelf When Microwaving • Make sure the shelf is positioned properly inside the oven cavity. The shelf could...

Owners Manual
Page 35
Switch places twice • To reheat on 3 levels (on some models) 1 Double the reheating time. 2 Switch places twice and give the dishes a 1/2 turn during reheating. (Place dense foods, or those that require a longer cook time, on the lower level: 1 Multiply reheat time by 11/2. 2 Switch places after 1/2 the time. Switch places after 1/2 time. Shelf and Reheating Switch places after 1/2 time. • To reheat on 2 levels or • To reheat 2 dishes on the upper shelf first.) 35
Switch places twice • To reheat on 3 levels (on some models) 1 Double the reheating time. 2 Switch places twice and give the dishes a 1/2 turn during reheating. (Place dense foods, or those that require a longer cook time, on the lower level: 1 Multiply reheat time by 11/2. 2 Switch places after 1/2 the time. Switch places after 1/2 time. Shelf and Reheating Switch places after 1/2 time. • To reheat on 2 levels or • To reheat 2 dishes on the upper shelf first.) 35
Owners Manual
Page 38
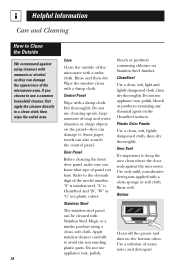
.... Door Panel Before cleaning the front door panel, make sure you have. Refer to the eleventh digit of panel you know what type of the model number. Door Seal It's important to keep the area clean where the door seals against using a clean, soft cloth. Bottom Clean off the grease and...
.... Door Panel Before cleaning the front door panel, make sure you have. Refer to the eleventh digit of panel you know what type of the model number. Door Seal It's important to keep the area clean where the door seals against using a clean, soft cloth. Bottom Clean off the grease and...

Owners Manual
Page 40
...remove embedded dirt. Removing and Cleaning the Filter 40 To remove, slide it around in hot water and detergent. Light brushing can be used . Models that recirculate air back into place. For this reason, the filter must ALWAYS be cleaned once a month, or as needed. To replace, ... using the tab. Rinse, shake and let it dry before replacing. Reusable Grease Filter (on all models) Reusable Grease Filter The reusable grease filter traps grease released by foods on some models) The vent fan has a metal reusable grease filter. Helpful Information The Exhaust Feature The Vent Fan...
...remove embedded dirt. Removing and Cleaning the Filter 40 To remove, slide it around in hot water and detergent. Light brushing can be used . Models that recirculate air back into place. For this reason, the filter must ALWAYS be cleaned once a month, or as needed. To replace, ... using the tab. Rinse, shake and let it dry before replacing. Reusable Grease Filter (on all models) Reusable Grease Filter The reusable grease filter traps grease released by foods on some models) The vent fan has a metal reusable grease filter. Helpful Information The Exhaust Feature The Vent Fan...

Owners Manual
Page 41
... filter that hold it . WB02X9883 from the new filter. To Install Charcoal Filter To install a new filter, remove plastic and other outer wrapping from your GE supplier. To Remove Charcoal Filter Remove 2 grille screws to the outside, the air will rest at the main fuse or circuit breaker panel or pull... in place. See "Optional Kits," page 9, for more information. Remove the top grille by removing the 2 screws that helps remove smoke and odors. If the model is noticeably dirty or discolored (usually after 6-12 months, depending on some...
... filter that hold it . WB02X9883 from the new filter. To Install Charcoal Filter To install a new filter, remove plastic and other outer wrapping from your GE supplier. To Remove Charcoal Filter Remove 2 grille screws to the outside, the air will rest at the main fuse or circuit breaker panel or pull... in place. See "Optional Kits," page 9, for more information. Remove the top grille by removing the 2 screws that helps remove smoke and odors. If the model is noticeably dirty or discolored (usually after 6-12 months, depending on some...
Owners Manual
Page 48
...Should your state's Attorney General. Please have serial and model numbers available when calling for home use the product. • Improper installation, delivery or maintenance. If the product is located in an area where service by a GE Authorized Servicer is product repair as provided in this Limited... be provided by law. What Is Covered LIMITED ONE-YEAR WARRANTY For one year or the shortest period allowed by our Factory GE will be required to bring the product to obtain service under warranty. What Is Not Covered • Service trips to your dealer...
...Should your state's Attorney General. Please have serial and model numbers available when calling for home use the product. • Improper installation, delivery or maintenance. If the product is located in an area where service by a GE Authorized Servicer is product repair as provided in this Limited... be provided by law. What Is Covered LIMITED ONE-YEAR WARRANTY For one year or the shortest period allowed by our Factory GE will be required to bring the product to obtain service under warranty. What Is Not Covered • Service trips to your dealer...


