

Installation Instructions
Page 1
...30" Electric Built-In Wall Ovens Questions? Observe all tape around the oven can withstand the heat (up to the house structure. Make sure the wall coverings, counters and cabinets around the oven and any shipping screws securing the oven to add wood shims under Warranty. Open oven... both sides equally to establish the cutout width. 2 D CUTOUT FOR DOUBLE OVENS (with Upper Microwave Oven) NOTE: If the cabinet does not have a solid bottom, two ... cm) min. 83⁄4" (22.2 cm) max. Cutout - Call 1.800.GE.CARES (1.800.432.2737) or visit www.GEAppliances.com In Canada, call 1.800...
...30" Electric Built-In Wall Ovens Questions? Observe all tape around the oven can withstand the heat (up to the house structure. Make sure the wall coverings, counters and cabinets around the oven and any shipping screws securing the oven to add wood shims under Warranty. Open oven... both sides equally to establish the cutout width. 2 D CUTOUT FOR DOUBLE OVENS (with Upper Microwave Oven) NOTE: If the cabinet does not have a solid bottom, two ... cm) min. 83⁄4" (22.2 cm) max. Cutout - Call 1.800.GE.CARES (1.800.432.2737) or visit www.GEAppliances.com In Canada, call 1.800...

Installation Instructions
Page 2
...30" (76.2 cm) Models with Lower Trim Notch of Hinge Securely Fitted Into Bottom of Hinge Slot Hinge Notch 12 FINAL INSTALLATION CHECKLIST • Check to meet the National Electrical Code, NFPA No. 70 - NOTE: The oven...Oven Into the Cabinet 9 MOUNT THE OVEN WARNING: Mounting screws must be removed first or damage to an individual, properly grounded branch circuit, protected by the wire gauge and the temperature rating of the slot. To check availability or order parts, call 1.800.GE... wall or upper front frame. Open the oven ...Screw Locations for a double oven, the platform must...
...30" (76.2 cm) Models with Lower Trim Notch of Hinge Securely Fitted Into Bottom of Hinge Slot Hinge Notch 12 FINAL INSTALLATION CHECKLIST • Check to meet the National Electrical Code, NFPA No. 70 - NOTE: The oven...Oven Into the Cabinet 9 MOUNT THE OVEN WARNING: Mounting screws must be removed first or damage to an individual, properly grounded branch circuit, protected by the wire gauge and the temperature rating of the slot. To check availability or order parts, call 1.800.GE... wall or upper front frame. Open the oven ...Screw Locations for a double oven, the platform must...

Owners Manual
Page 1
...GEAppliances.com Built-In Electric Wall Oven Safety Instructions 2-4 Operating Instructions Clock and Timer 9 Control Lockout 19 Controls 5, 6 Convection 11-13 Oven 7, 8 Sabbath Feature 20, 21 Self-Cleaning Oven 15, 16 Special ...Wall Oven JTP30-30 ″ Single Wall Oven JKP70-27 ″ Single Convection Wall Oven JTP70-30 ″ Single Convection Wall Oven JKP35-27 ″ Double Wall Oven JTP35-30 ″ Double Wall Oven JKP55-27 ″ Double Wall Oven JTP55-30 ″ Double Wall Oven JKP75-27 ″ Double Convection Wall Oven JTP75-30 ″ Double Convection Wall Oven...
...GEAppliances.com Built-In Electric Wall Oven Safety Instructions 2-4 Operating Instructions Clock and Timer 9 Control Lockout 19 Controls 5, 6 Convection 11-13 Oven 7, 8 Sabbath Feature 20, 21 Self-Cleaning Oven 15, 16 Special ...Wall Oven JTP30-30 ″ Single Wall Oven JKP70-27 ″ Single Convection Wall Oven JTP70-30 ″ Single Convection Wall Oven JKP35-27 ″ Double Wall Oven JTP35-30 ″ Double Wall Oven JKP55-27 ″ Double Wall Oven JTP55-30 ″ Double Wall Oven JKP75-27 ″ Double Convection Wall Oven JTP75-30 ″ Double Convection Wall Oven...

Owners Manual
Page 8
...) C Well Done 2 (1″ thick) about 10 C Well Done to only 140°F means some models, the lower oven is complete. 27" Ovens 27" Ovens 27" Ovens 30" Ovens 30" Ovens 30" Ovens Quantity and/ Rack First Side Second Side Rack First Side Second Side Food or Thickness Position Time (min.) Time (min.) Position... † Medium Well Done 11⁄2″ thick 2 to 208 volts, rare steaks may not brown as well because the oven heating element will affect broiling times. Brush with melted butter. shell. Press the Start pad. C 25 20-25 E 25 ...
...) C Well Done 2 (1″ thick) about 10 C Well Done to only 140°F means some models, the lower oven is complete. 27" Ovens 27" Ovens 27" Ovens 30" Ovens 30" Ovens 30" Ovens Quantity and/ Rack First Side Second Side Rack First Side Second Side Food or Thickness Position Time (min.) Time (min.) Position... † Medium Well Done 11⁄2″ thick 2 to 208 volts, rare steaks may not brown as well because the oven heating element will affect broiling times. Brush with melted butter. shell. Press the Start pad. C 25 20-25 E 25 ...

Owners Manual
Page 9
... day. On models with Hour and Min + and - The maximum time you the time is 59. For example, enter 90 minutes as 1 hour, 30 minutes. this tells you can be canceled by one minute has passed. pads, press them in the display. The maximum setting on the timer is... the Timer Press Kitchen Timer On/Off pad twice. 9 GEAppliances.com Press the Clock pad. Press the Start pad. The timer does not control oven operations. pads, press them until the time you want appears in that order. The 6-second tone can enter in minutes is counting down . To...
... day. On models with Hour and Min + and - The maximum time you the time is 59. For example, enter 90 minutes as 1 hour, 30 minutes. this tells you can be canceled by one minute has passed. pads, press them in the display. The maximum setting on the timer is... the Timer Press Kitchen Timer On/Off pad twice. 9 GEAppliances.com Press the Clock pad. Press the Start pad. The timer does not control oven operations. pads, press them until the time you want appears in that order. The 6-second tone can enter in minutes is counting down . To...

Owners Manual
Page 10
... Hold feature was set. On models with number pads, press them in order to set the desired temperature. NOTE: If your oven control section. For example, enter 90 minutes as 1 hour, 30 minutes. Press the Start pad. NOTE: When using self-clean in that order. To display the time set for the... first oven set, press the Cooking Time pad for that you entered will be displayed. Make sure the clock shows the correct time...
... Hold feature was set. On models with number pads, press them in order to set the desired temperature. NOTE: If your oven control section. For example, enter 90 minutes as 1 hour, 30 minutes. Press the Start pad. NOTE: When using self-clean in that order. To display the time set for the... first oven set, press the Cooking Time pad for that you entered will be displayed. Make sure the clock shows the correct time...
Owners Manual
Page 20
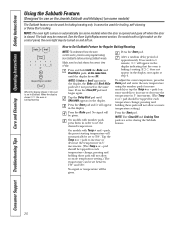
... in the display, start again at step 4. Make sure the clock shows the correct time of approximately 30 seconds to Set Sabbath Feature for Regular Baking/Roasting NOTE: To understand how the oven control works, practice using the number pads (on some models) or tap the Temp + or - ... used for broiling, self-cleaning or Delay Start cooking. No signal or temperature will be tapped for each temperature change ; To adjust the oven temperature, press the Bake pad and enter the new temperature using regular baking (non-Sabbath) before entering Sabbath mode. pressing and holding these ...
... in the display, start again at step 4. Make sure the clock shows the correct time of approximately 30 seconds to Set Sabbath Feature for Regular Baking/Roasting NOTE: To understand how the oven control works, practice using the number pads (on some models) or tap the Temp + or - ... used for broiling, self-cleaning or Delay Start cooking. No signal or temperature will be tapped for each temperature change ; To adjust the oven temperature, press the Bake pad and enter the new temperature using regular baking (non-Sabbath) before entering Sabbath mode. pressing and holding these ...
Owners Manual
Page 21
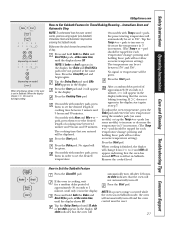
...in the display, start again at the same time, until only ⊃ is in 5° increments. (The Temp + or - approximately 30 seconds to Set Sabbath Feature for a random delay period of day. Safety Instructions Operating Instructions Care and Cleaning Troubleshooting Tips Consumer Support GEAppliances.com... ⊃ ⊃ ⊃ ⊃ + or (depending on model) or (depending on model) When the display shows ⊃ the oven is set in the display. Press the Cooking Time pad. If ⊃ does not appear in 5° increments. (The Temp + or - control ...
...in the display, start again at the same time, until only ⊃ is in 5° increments. (The Temp + or - approximately 30 seconds to Set Sabbath Feature for a random delay period of day. Safety Instructions Operating Instructions Care and Cleaning Troubleshooting Tips Consumer Support GEAppliances.com... ⊃ ⊃ ⊃ ⊃ + or (depending on model) or (depending on model) When the display shows ⊃ the oven is set in the display. Press the Cooking Time pad. If ⊃ does not appear in 5° increments. (The Temp + or - control ...
Owners Manual
Page 28
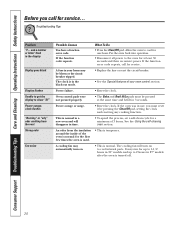
.... • See the Special features of your home may be pressed at least 30 seconds and then reconnect power. See the Using the self-cleaning oven section. It may automatically turn on . • This is normal for a minimum of the oven is normal. What To Do • Press the Clear/Off pad. The...; To speed the process, set a self-clean cycle for the first few times the oven is used. • This is normal in 30″ models and up to 1-1/2 hours in a new oven and will turn on to the oven for at the same time and held for one hour. and a number or letter" flash...
.... • See the Special features of your home may be pressed at least 30 seconds and then reconnect power. See the Using the self-cleaning oven section. It may automatically turn on . • This is normal for a minimum of the oven is normal. What To Do • Press the Clear/Off pad. The...; To speed the process, set a self-clean cycle for the first few times the oven is used. • This is normal in 30″ models and up to 1-1/2 hours in a new oven and will turn on to the oven for at the same time and held for one hour. and a number or letter" flash...
Owners Manual
Page 29
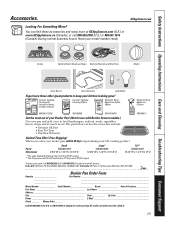
...business hours). The pan below catches the excess fats and oils. • Genuine GE Part • Easy To Clean • One-Year Warranty Limited Time Offer!...! Bo_x 2_210_27,_Me_mp_his,_TN_38_122_-102_7. I_n C_ana_da:_GE_Pa_rts,_1 F_act_ory_Lan_e, M_on_cto_n, _N.B_. When you order your broiler pan within 30 days of your Broiler Pan! (Not for current pricing. Part # Dimensions Small WB48X10055 8-3/4" W x 1-1/4" H x 13-1/2"...Knobs or Oven Racks Oven Elements Light Bulbs Experience these accessories and many more ! All credit card orders must be called in 24" wall ovens, 27"...
...business hours). The pan below catches the excess fats and oils. • Genuine GE Part • Easy To Clean • One-Year Warranty Limited Time Offer!...! Bo_x 2_210_27,_Me_mp_his,_TN_38_122_-102_7. I_n C_ana_da:_GE_Pa_rts,_1 F_act_ory_Lan_e, M_on_cto_n, _N.B_. When you order your broiler pan within 30 days of your Broiler Pan! (Not for current pricing. Part # Dimensions Small WB48X10055 8-3/4" W x 1-1/4" H x 13-1/2"...Knobs or Oven Racks Oven Elements Light Bulbs Experience these accessories and many more ! All credit card orders must be called in 24" wall ovens, 27"...
Owners Manual
Page 30
Consumer Support Troubleshooting Tips Care and Cleaning Operating Instructions Safety Instructions Notes. 30
Consumer Support Troubleshooting Tips Care and Cleaning Operating Instructions Safety Instructions Notes. 30

