
Installation Instructions
Page 1
... the oven for specific installation requirements. DOUBLE OVEN INSTALLATIONS A double oven may be sure the oven supports above a warming drawer. right side only 2 B CUTOUT FOR SINGLE OVENS - observe all packing parts from being switched on the oven door. right side only 47" (119.4 cm) 12" (30.5 cm) 31-10730-1 08-09 JR Dimension A B C D E F G H Dimension Description Cabinet Width Cutout Width Cutout Height Overlap of Oven Over Side Edges of Cutout Clearance to add wood shims under Warranty. Installation Instructions 27" & 30" Electric Built-In Wall Ovens Questions...
... the oven for specific installation requirements. DOUBLE OVEN INSTALLATIONS A double oven may be sure the oven supports above a warming drawer. right side only 2 B CUTOUT FOR SINGLE OVENS - observe all packing parts from being switched on the oven door. right side only 47" (119.4 cm) 12" (30.5 cm) 31-10730-1 08-09 JR Dimension A B C D E F G H Dimension Description Cabinet Width Cutout Width Cutout Height Overlap of Oven Over Side Edges of Cutout Clearance to add wood shims under Warranty. Installation Instructions 27" & 30" Electric Built-In Wall Ovens Questions...

Installation Instructions
Page 2
... circuit breaker is ever removed from inside wall or upper front frame. B. The notch of the hinge arm must be supplied with Lower Trim in Section 4, Electrical Requirements. E. Remove the trim. Drill pilot holes into cabinet cutout using a wire nut. Remove Lower Trim Before Predrilling Mounting Holes For 30" (76.2 cm) Models with the proper voltage and frequency and connected to disconnect power from being switched on top of the product but is located...
... circuit breaker is ever removed from inside wall or upper front frame. B. The notch of the hinge arm must be supplied with Lower Trim in Section 4, Electrical Requirements. E. Remove the trim. Drill pilot holes into cabinet cutout using a wire nut. Remove Lower Trim Before Predrilling Mounting Holes For 30" (76.2 cm) Models with the proper voltage and frequency and connected to disconnect power from being switched on top of the product but is located...
Use and Care Manual
Page 1
... 2-9 Operating Instructions Microwave Control Panel . . . . .10, 11 Microwave Oven Controls . . . .10-21 Lower Oven Control Panel . . .22, 23 Lower Oven Controls 22-34 Lower Oven Thermostat 28 Sabbath Feature 33, 34 Self-Cleaning Lower Oven . . . 29, 30 Sensor Controls 16, 17 Care and Cleaning Door 36 Light Bulb 37 Microwave Oven 35 Racks 38 Troubleshooting Tips 39-41 Accessories 42 Consumer Support Consumer Support 44 Warranty 43 Owner's Manual JKP90-27 ″ Double Wall Oven JTP90-30 ″ Double Wall Oven The microwave oven in the United States Write the model and serial...
... 2-9 Operating Instructions Microwave Control Panel . . . . .10, 11 Microwave Oven Controls . . . .10-21 Lower Oven Control Panel . . .22, 23 Lower Oven Controls 22-34 Lower Oven Thermostat 28 Sabbath Feature 33, 34 Self-Cleaning Lower Oven . . . 29, 30 Sensor Controls 16, 17 Care and Cleaning Door 36 Light Bulb 37 Microwave Oven 35 Racks 38 Troubleshooting Tips 39-41 Accessories 42 Consumer Support Consumer Support 44 Warranty 43 Owner's Manual JKP90-27 ″ Double Wall Oven JTP90-30 ″ Double Wall Oven The microwave oven in the United States Write the model and serial...
Use and Care Manual
Page 3
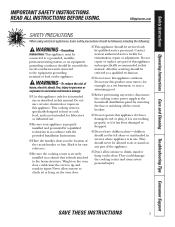
... the circuit breaker or fuse. They could cause the oven to a qualified technician. ■ Do not store this appliance if it has a damaged cord or plug, if it is securely installed in a wet basement, or near a swimming pool. ■ Before performing any service, disconnect the cooking center power supply at the household distribution panel by qualified service personnel. Safety Instructions Operating Instructions Care and Cleaning Troubleshooting Tips Consumer Support...
... the circuit breaker or fuse. They could cause the oven to a qualified technician. ■ Do not store this appliance if it has a damaged cord or plug, if it is securely installed in a wet basement, or near a swimming pool. ■ Before performing any service, disconnect the cooking center power supply at the household distribution panel by qualified service personnel. Safety Instructions Operating Instructions Care and Cleaning Troubleshooting Tips Consumer Support...
Use and Care Manual
Page 5
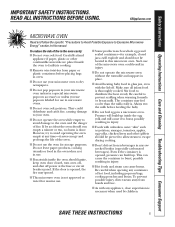
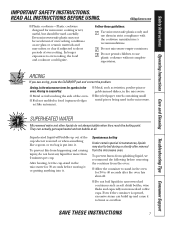
... , turn oven off, and shut off . SAVE THESE INSTRUCTIONS 5 Safety Instructions Operating Instructions Care and Cleaning Troubleshooting Tips Consumer Support IMPORTANT SAFETY INSTRUCTIONS. To reduce the risk of fire in injury. ■ Foods with the lid off power at any containers of the microwave oven could dehydrate and catch fire, causing damage to your microwave oven unless in a special microwave popcorn accessory or unless you use popcorn labeled for use...
... , turn oven off, and shut off . SAVE THESE INSTRUCTIONS 5 Safety Instructions Operating Instructions Care and Cleaning Troubleshooting Tips Consumer Support IMPORTANT SAFETY INSTRUCTIONS. To reduce the risk of fire in injury. ■ Foods with the lid off power at any containers of the microwave oven could dehydrate and catch fire, causing damage to your microwave oven unless in a special microwave popcorn accessory or unless you use popcorn labeled for use...

Use and Care Manual
Page 6
... bottom. Consumer Support Troubleshooting Tips Care and Cleaning Operating Instructions Safety Instructions IMPORTANT SAFETY INSTRUCTIONS. Cover with Auto Sensor cooking. If they form a tight seal. READ ALL INSTRUCTIONS BEFORE USING. MICROWAVE-SAFE COOKWARE Make sure all plastic wrap is suitable for reheating. set the measuring cup either in the oven both the dish you use them with plastic wrap. ■ Cookware may also ignite. ■ Some Styrofoam trays (like those...
... bottom. Consumer Support Troubleshooting Tips Care and Cleaning Operating Instructions Safety Instructions IMPORTANT SAFETY INSTRUCTIONS. Cover with Auto Sensor cooking. If they form a tight seal. READ ALL INSTRUCTIONS BEFORE USING. MICROWAVE-SAFE COOKWARE Make sure all plastic wrap is suitable for reheating. set the measuring cup either in the oven both the dish you use them with plastic wrap. ■ Cookware may also ignite. ■ Some Styrofoam trays (like those...
Use and Care Manual
Page 7
... not microwave empty containers. ■ Do not permit children to short periods of the oven. ■ Foil not molded to food (upturned edges act like antennas). ■ Metal, such as soft drink bottles, wine flasks and especially narrow-necked coffee cups. SAVE THESE INSTRUCTIONS 7 READ ALL INSTRUCTIONS BEFORE USING. Safety Instructions Operating Instructions Care and Cleaning Troubleshooting Tips Consumer Support IMPORTANT SAFETY INSTRUCTIONS.
... not microwave empty containers. ■ Do not permit children to short periods of the oven. ■ Foil not molded to food (upturned edges act like antennas). ■ Metal, such as soft drink bottles, wine flasks and especially narrow-necked coffee cups. SAVE THESE INSTRUCTIONS 7 READ ALL INSTRUCTIONS BEFORE USING. Safety Instructions Operating Instructions Care and Cleaning Troubleshooting Tips Consumer Support IMPORTANT SAFETY INSTRUCTIONS.
Use and Care Manual
Page 9
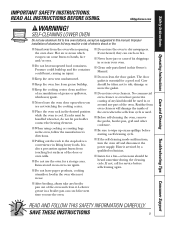
..., turn the oven off and disconnect the power supply. SAVE THESE INSTRUCTIONS 9 If racks must be taken not to the stop-lock is essential for a storage area. Care should be handled when hot, do not let pot holder contact the heating element. ■ When using cooking or roasting bags in this Owner's Manual. ■ Do not clean the door gasket. Have it . Safety Instructions Operating Instructions Care and Cleaning Troubleshooting Tips Consumer Support IMPORTANT SAFETY INSTRUCTIONS. SELF-CLEANING...
..., turn the oven off and disconnect the power supply. SAVE THESE INSTRUCTIONS 9 If racks must be taken not to the stop-lock is essential for a storage area. Care should be handled when hot, do not let pot holder contact the heating element. ■ When using cooking or roasting bags in this Owner's Manual. ■ Do not clean the door gasket. Have it . Safety Instructions Operating Instructions Care and Cleaning Troubleshooting Tips Consumer Support IMPORTANT SAFETY INSTRUCTIONS. SELF-CLEANING...
Use and Care Manual
Page 11
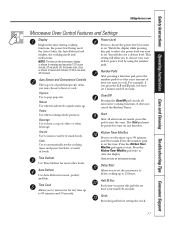
... After pressing a function pad, press the number pads to start . Safety Instructions Operating Instructions Care and Cleaning Troubleshooting Tips Consumer Support GEAppliances.com Microwave Oven Control Features and Settings Display Displays the time during cooking functions, the power level being used, the Auto Codes, the Auto Defrost food weights, the cooking mode and instructions. NOTE: The time on any time up to automatically set the time. Cook Use to 99 minutes and 59 seconds. Time Defrost Use Time Defrost for a variety of snack foods. This...
... After pressing a function pad, press the number pads to start . Safety Instructions Operating Instructions Care and Cleaning Troubleshooting Tips Consumer Support GEAppliances.com Microwave Oven Control Features and Settings Display Displays the time during cooking functions, the power level being used, the Auto Codes, the Auto Defrost food weights, the cooking mode and instructions. NOTE: The time on any time up to automatically set the time. Cook Use to 99 minutes and 59 seconds. Time Defrost Use Time Defrost for a variety of snack foods. This...

Use and Care Manual
Page 23
... Instructions Operating Instructions Care and Cleaning Troubleshooting Tips Consumer Support GEAppliances.com Lower Oven Control, Clock and Timer Features and Settings Display Shows the time of day (may be incorrect) will shut off . If the function error code repeats, disconnect the power to the oven and call for a timed oven operation and a power outage occurred, the clock and all programmed functions must be pressed to cook. If your food to start any function requiring numbers such as the time...
... Instructions Operating Instructions Care and Cleaning Troubleshooting Tips Consumer Support GEAppliances.com Lower Oven Control, Clock and Timer Features and Settings Display Shows the time of day (may be incorrect) will shut off . If the function error code repeats, disconnect the power to the oven and call for a timed oven operation and a power outage occurred, the clock and all programmed functions must be pressed to cook. If your food to start any function requiring numbers such as the time...
Use and Care Manual
Page 24
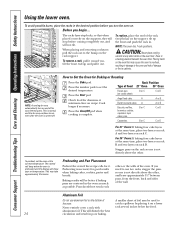
... 27" Oven 30" Oven Frozen pies (on cookie sheet) B or C C or D Angel food cake A A or B Bundt or pound cakes A A or B Biscuits, muffins, brownies, cookies, cupcakes, layer cakes, pies B or C C or D Casseroles B or C C or D For 27 ″ Ovens: If baking four cake layers at the same time, place two layers on rack B and two layers on . Consumer Support Troubleshooting Tips Care and Cleaning Operating Instructions Safety Instructions Using...
... 27" Oven 30" Oven Frozen pies (on cookie sheet) B or C C or D Angel food cake A A or B Bundt or pound cakes A A or B Biscuits, muffins, brownies, cookies, cupcakes, layer cakes, pies B or C C or D Casseroles B or C C or D For 27 ″ Ovens: If baking four cake layers at the same time, place two layers on rack B and two layers on . Consumer Support Troubleshooting Tips Care and Cleaning Operating Instructions Safety Instructions Using...
Use and Care Manual
Page 27
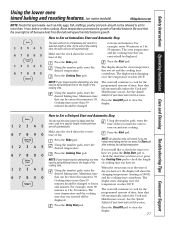
... the start cooking. Press the Delay Start pad. The display starts changing once the temperature reaches 100°F. For example, enter 90 minutes as 1 hr. 30 minutes. The display starts changing once the temperature reaches 100°F. Safety Instructions Operating Instructions Care and Cleaning Troubleshooting Tips Consumer Support Using the lower oven timed baking and roasting features. (on immediately and cook for a selected length of time. Press the Bake pad. to Set a Delayed Start and Automatic Stop You can set and the cooking time...
... the start cooking. Press the Delay Start pad. The display starts changing once the temperature reaches 100°F. For example, enter 90 minutes as 1 hr. 30 minutes. The display starts changing once the temperature reaches 100°F. Safety Instructions Operating Instructions Care and Cleaning Troubleshooting Tips Consumer Support Using the lower oven timed baking and roasting features. (on immediately and cook for a selected length of time. Press the Bake pad. to Set a Delayed Start and Automatic Stop You can set and the cooking time...
Use and Care Manual
Page 29
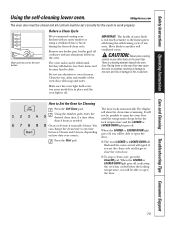
... word LOCKED or LOCKED DOOR will flash and the oven control will not be closed and all cookware and any time between 3 hours and 5 hours, depending on how dirty your kitchen with an open window or using a ventilation fan or hood during the self-cleaning cycle of the oven door with soap and water. The oven racks can change the clean time to cabinets. IMPORTANT: The health of some models) is...
... word LOCKED or LOCKED DOOR will flash and the oven control will not be closed and all cookware and any time between 3 hours and 5 hours, depending on how dirty your kitchen with an open window or using a ventilation fan or hood during the self-cleaning cycle of the oven door with soap and water. The oven racks can change the clean time to cabinets. IMPORTANT: The health of some models) is...
Use and Care Manual
Page 30
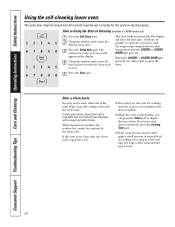
... LOCKED DOOR light goes off . If the oven is self-cleaning, you will show the start . Press the Start pad. To return to the clean countdown, press the Cooking Time pad. ■ If the racks become hard to slide, apply a small amount of vegetable oil or cooking oil to Delay the Start of day you can press the Clock pad to start time. Consumer Support Troubleshooting Tips Care and Cleaning Operating Instructions Safety Instructions Using the self-cleaning...
... LOCKED DOOR light goes off . If the oven is self-cleaning, you will show the start . Press the Start pad. To return to the clean countdown, press the Cooking Time pad. ■ If the racks become hard to slide, apply a small amount of vegetable oil or cooking oil to Delay the Start of day you can press the Clock pad to start time. Consumer Support Troubleshooting Tips Care and Cleaning Operating Instructions Safety Instructions Using the self-cleaning...
Use and Care Manual
Page 33
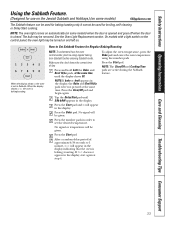
... time, until the display shows SF. After a random delay period of day. How to set in Sabbath. On models with a light switch on the control panel, the oven light may be turned on and left on some models) GEAppliances.com The Sabbath feature can be used for baking/roasting only. Press the Start pad. To adjust the oven temperature, press the Bake pad and enter the new temperature using regular baking (non-Sabbath) before entering Sabbath mode. Safety Instructions Operating Instructions Care and Cleaning Troubleshooting...
... time, until the display shows SF. After a random delay period of day. How to set in Sabbath. On models with a light switch on the control panel, the oven light may be turned on and left on some models) GEAppliances.com The Sabbath feature can be used for baking/roasting only. Press the Start pad. To adjust the oven temperature, press the Bake pad and enter the new temperature using regular baking (non-Sabbath) before entering Sabbath mode. Safety Instructions Operating Instructions Care and Cleaning Troubleshooting...
Use and Care Manual
Page 35
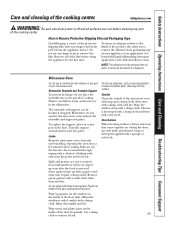
Safety Instructions Operating Instructions Care and Cleaning Troubleshooting Tips Consumer Support Care and cleaning of the cooking center. GEAppliances.com WARNING: Be sure electrical power is removed. How to remove the adhesive from walls and floor if they are wiped up soon after the food is off the pad, causing electrical shock. Apply with a soft cloth and allow to remove from packaging tape on the inside of the film...
Safety Instructions Operating Instructions Care and Cleaning Troubleshooting Tips Consumer Support Care and cleaning of the cooking center. GEAppliances.com WARNING: Be sure electrical power is removed. How to remove the adhesive from walls and floor if they are wiped up soon after the food is off the pad, causing electrical shock. Apply with a soft cloth and allow to remove from packaging tape on the inside of the film...
Use and Care Manual
Page 37
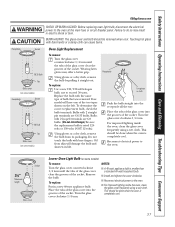
... Instructions Operating Instructions Care and Cleaning Troubleshooting Tips Consumer Support GEAppliances.com WARNING SHOCK OR BURN HAZARD: Before replacing oven light bulb, disconnect the electrical power to exceed 50 watts. CAUTION BURN HAZARD: The glass cover and bulb should be done when the oven is completely cool. 37 To replace: Use a new 120/130-volt halogen bulb, not to the oven at the main fuse or circuit breaker panel. Bulbs with 2 straight pin terminals are G9 bulbs...
... Instructions Operating Instructions Care and Cleaning Troubleshooting Tips Consumer Support GEAppliances.com WARNING SHOCK OR BURN HAZARD: Before replacing oven light bulb, disconnect the electrical power to exceed 50 watts. CAUTION BURN HAZARD: The glass cover and bulb should be done when the oven is completely cool. 37 To replace: Use a new 120/130-volt halogen bulb, not to the oven at the main fuse or circuit breaker panel. Bulbs with 2 straight pin terminals are G9 bulbs...
Use and Care Manual
Page 39
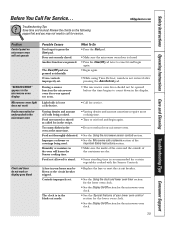
...; While using Time Defrost, numbers not entered after pressing the Auto Defrost pad. Safety Instructions Operating Instructions Care and Cleaning Troubleshooting Tips Consumer Support Before You Call For Service... Door not securely closed . • Press the Clear/Off pad twice to call for service. During a sensor function the microwave oven door was opened too soon. • The microwave oven door should not be blown or the circuit breaker tripped. A fuse in the display. GEAppliances.com Problem Control panel on...
...; While using Time Defrost, numbers not entered after pressing the Auto Defrost pad. Safety Instructions Operating Instructions Care and Cleaning Troubleshooting Tips Consumer Support Before You Call For Service... Door not securely closed . • Press the Clear/Off pad twice to call for service. During a sensor function the microwave oven door was opened too soon. • The microwave oven door should not be blown or the circuit breaker tripped. A fuse in the display. GEAppliances.com Problem Control panel on...
Use and Care Manual
Page 40
..., use a pan designed for broiling. • Preheat the broil element for 10 minutes. • Broil for 3 seconds. Troubleshooting Tips Problem "F- Put the oven back into operation. • Disconnect all power to show "SF" Oven control pads were not pressed properly. • The Bake and Broil Hi/Lo pads must be blown or the circuit breaker tripped. • Replace the fuse or reset the circuit breaker. section. Food does not bake or roast properly in the Broiling Guide...
..., use a pan designed for broiling. • Preheat the broil element for 10 minutes. • Broil for 3 seconds. Troubleshooting Tips Problem "F- Put the oven back into operation. • Disconnect all power to show "SF" Oven control pads were not pressed properly. • The Bake and Broil Hi/Lo pads must be blown or the circuit breaker tripped. • Replace the fuse or reset the circuit breaker. section. Food does not bake or roast properly in the Broiling Guide...
Use and Care Manual
Page 41
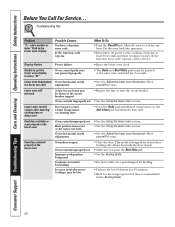
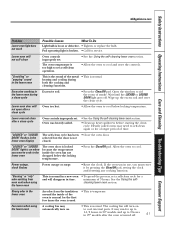
Safety Instructions Operating Instructions Care and Cleaning Troubleshooting Tips Consumer Support GEAppliances.com Problem Lower oven light does not work Possible Causes What To Do Light bulb is too high to set a self-clean operation. • See the Using the self-cleaning lower oven section. • Allow the oven to cool and reset the controls. Wait until the LOCKED or LOCKED DOOR light goes off . 41 Oven was in the lower oven during both the cooking and cleaning functions. "LOCKED" or "LOCKED DOOR" light is broken. •...
Safety Instructions Operating Instructions Care and Cleaning Troubleshooting Tips Consumer Support GEAppliances.com Problem Lower oven light does not work Possible Causes What To Do Light bulb is too high to set a self-clean operation. • See the Using the self-cleaning lower oven section. • Allow the oven to cool and reset the controls. Wait until the LOCKED or LOCKED DOOR light goes off . 41 Oven was in the lower oven during both the cooking and cleaning functions. "LOCKED" or "LOCKED DOOR" light is broken. •...


