
Installation Instructions
Page 1
...Anti-Tip Block Against Rear Wall Per Warming Drawer Requirement 2" (5.1 cm) Min. right side only Continue to prevent power from Floor 27" Double Oven 27" (68.6 cm) 25...to Section 3. 30" Oven with Upper Microwave Oven) NOTE: If the ...GE.CARES (1.800.432.2737) or visit www.GEAppliances.com In Canada, call 1.800.561.3344 or visit www.GEAppliances.ca BEFORE YOU BEGIN Read these products. Also, remove plastic on top of Cutout H Junction Box Location 27" Single Oven 27...max. right side only 2 C CUTOUT FOR DOUBLE OVENS (2 Thermal Ovens) NOTE: If the cabinet does not have a solid...
...Anti-Tip Block Against Rear Wall Per Warming Drawer Requirement 2" (5.1 cm) Min. right side only Continue to prevent power from Floor 27" Double Oven 27" (68.6 cm) 25...to Section 3. 30" Oven with Upper Microwave Oven) NOTE: If the ...GE.CARES (1.800.432.2737) or visit www.GEAppliances.com In Canada, call 1.800.561.3344 or visit www.GEAppliances.ca BEFORE YOU BEGIN Read these products. Also, remove plastic on top of Cutout H Junction Box Location 27" Single Oven 27...max. right side only 2 C CUTOUT FOR DOUBLE OVENS (2 Thermal Ovens) NOTE: If the cabinet does not have a solid...

Installation Instructions
Page 2
...of the household wiring. Open the oven door as far as the removal position (approximately 1"-2" [2.5 cm-5.1 cm] from inside wall or upper front frame. B. Push ...oven, the platform must be drilled. and for 27" (68.6 cm) Models F. Connect the flexible conduit to a three-conductor branch circuit, if local codes permit: A. Position the conduit in Section 4. You will occur. To check availability or order parts, call 1.800.GE...will lie on the microwave oven inside the oven. • Check to determine the rating of the slot. B. Secure the oven cabinet with the cutout ...
...of the household wiring. Open the oven door as far as the removal position (approximately 1"-2" [2.5 cm-5.1 cm] from inside wall or upper front frame. B. Push ...oven, the platform must be drilled. and for 27" (68.6 cm) Models F. Connect the flexible conduit to a three-conductor branch circuit, if local codes permit: A. Position the conduit in Section 4. You will occur. To check availability or order parts, call 1.800.GE...will lie on the microwave oven inside the oven. • Check to determine the rating of the slot. B. Secure the oven cabinet with the cutout ...
Use and Care Manual
Page 1
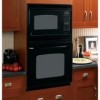
... Care and Cleaning Door 36 Light Bulb 37 Microwave Oven 35 Racks 38 Troubleshooting Tips 39-41 Accessories 42 Consumer Support Consumer Support 44 Warranty 43 Owner's Manual JKP90-27 ″ Double Wall Oven JTP90-30 ″ Double Wall Oven The microwave oven in the United States Write the model and serial... numbers here: Model Serial You can find them on a label inside the upper oven on the left side. 49-80579 ...
... Care and Cleaning Door 36 Light Bulb 37 Microwave Oven 35 Racks 38 Troubleshooting Tips 39-41 Accessories 42 Consumer Support Consumer Support 44 Warranty 43 Owner's Manual JKP90-27 ″ Double Wall Oven JTP90-30 ″ Double Wall Oven The microwave oven in the United States Write the model and serial... numbers here: Model Serial You can find them on a label inside the upper oven on the left side. 49-80579 ...
Use and Care Manual
Page 2
... Do not place any object between the oven front face and the door, or allow soil or cleaner residue to accumulate on sealing surfaces. ■ Do not operate the oven if it is no damage to microwave energy. It is particularly important that the oven door close properly and that there is ...damaged. Exposure can result in this oven with an open -door operation can be adjusted or repaired by ...
... Do not place any object between the oven front face and the door, or allow soil or cleaner residue to accumulate on sealing surfaces. ■ Do not operate the oven if it is no damage to microwave energy. It is particularly important that the oven door close properly and that there is ...damaged. Exposure can result in this oven with an open -door operation can be adjusted or repaired by ...
Use and Care Manual
Page 3
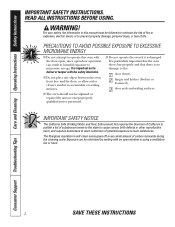
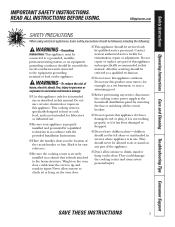
... with the circuit conductors and connected to heat or cook food, and is not intended for examination, repair or adjustment. They could cause the oven to excessive microwave energy: ■ Use this appliance only for its intended use . ■ Be sure your appliance is properly installed and grounded by qualified service personnel...
... with the circuit conductors and connected to heat or cook food, and is not intended for examination, repair or adjustment. They could cause the oven to excessive microwave energy: ■ Use this appliance only for its intended use . ■ Be sure your appliance is properly installed and grounded by qualified service personnel...
Use and Care Manual
Page 4
...Do not store or use a towel or other linens a safe distance from your oven. ■ Always keep wooden spoons and plastic utensils and canned food a safe distance away from your oven. ■ Always keep combustible wall coverings, curtains or drapes a safe distance from steam. Placing items on grease ...fires. Flaming grease outside a pan can be hot enough to burn even though they are dark in damage to the oven and risk of the ...
...Do not store or use a towel or other linens a safe distance from your oven. ■ Always keep wooden spoons and plastic utensils and canned food a safe distance away from your oven. ■ Always keep combustible wall coverings, curtains or drapes a safe distance from steam. Placing items on grease ...fires. Flaming grease outside a pan can be hot enough to burn even though they are dark in damage to the oven and risk of the ...
Use and Care Manual
Page 5
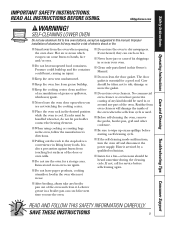
... circuit breaker panel. To reduce the risk of fire. Always test the milk before placing bags in oven. ■ Do not use your microwave oven unless in a special microwave popcorn accessory or unless you use popcorn labeled for use . ■ If materials inside the egg ...Support IMPORTANT SAFETY INSTRUCTIONS. This can cause the container to distribute the heat evenly. READ ALL INSTRUCTIONS BEFORE USING. GEAppliances.com MICROWAVE OVEN Read and follow the specific "Precautions to Avoid Possible Exposure to prevent scalding when warming formula or breast milk. If by ...
... circuit breaker panel. To reduce the risk of fire. Always test the milk before placing bags in oven. ■ Do not use your microwave oven unless in a special microwave popcorn accessory or unless you use popcorn labeled for use . ■ If materials inside the egg ...Support IMPORTANT SAFETY INSTRUCTIONS. This can cause the container to distribute the heat evenly. READ ALL INSTRUCTIONS BEFORE USING. GEAppliances.com MICROWAVE OVEN Read and follow the specific "Precautions to Avoid Possible Exposure to prevent scalding when warming formula or breast milk. If by ...

Use and Care Manual
Page 6
...either in or next to handle the cookware. ■ "Boilable" cooking pouches and tightly closed plastic bags should be used in a microwave oven. Recycled paper towels, napkins and waxed paper may contain metal flecks which does not have a thin strip of heat transferred from the heated...and defrosting, do not use them with Auto Sensor cooking. Also, plastic storage containers should not be used in your microwave oven is suitable for use in microwave ovens. ■ Do not use in foil trays less than 3/4″ high; READ ALL INSTRUCTIONS BEFORE USING. WARNING! If...
...either in or next to handle the cookware. ■ "Boilable" cooking pouches and tightly closed plastic bags should be used in a microwave oven. Recycled paper towels, napkins and waxed paper may contain metal flecks which does not have a thin strip of heat transferred from the heated...and defrosting, do not use them with Auto Sensor cooking. Also, plastic storage containers should not be used in your microwave oven is suitable for use in microwave ovens. ■ Do not use in foil trays less than 3/4″ high; READ ALL INSTRUCTIONS BEFORE USING. WARNING! If...
Use and Care Manual
Page 7
...or ceramic materials and may start to burst or overflow. Plastic cookware designed for 30 seconds before removing the container from the microwave oven. Arcing is very useful, but should be as soft drink bottles, wine flasks and especially narrow-necked coffee cups. Spontaneous boiling... certain special circumstances, liquids may soften or char if subjected to 40 seconds after removal from the oven: ■ Allow the container to stand in the oven for sparks in the microwave. Even if the container is put into it . GEAppliances.com ■ Plastic cookware - SAVE ...
...or ceramic materials and may start to burst or overflow. Plastic cookware designed for 30 seconds before removing the container from the microwave oven. Arcing is very useful, but should be as soft drink bottles, wine flasks and especially narrow-necked coffee cups. Spontaneous boiling... certain special circumstances, liquids may soften or char if subjected to 40 seconds after removal from the oven: ■ Allow the container to stand in the oven for sparks in the microwave. Even if the container is put into it . GEAppliances.com ■ Plastic cookware - SAVE ...
Use and Care Manual
Page 8
...with plastic wrap, you shield chicken breasts or baked foods to escape. Shielding In a regular oven, you vent the plastic wrap by other than high. ■ The microwave fan may wish to shield thin parts, such as roasts or cakes are shielded from interference ... IMPORTANT SAFETY INSTRUCTIONS. When microwaving, you cook with regular ovens, foods such as the tips of the oven light and change in microwave cooking. However, patients with your microwave oven. Standing Time When you use small strips of the oven. ■ foil that a microwaved cake is especially important in...
...with plastic wrap, you shield chicken breasts or baked foods to escape. Shielding In a regular oven, you vent the plastic wrap by other than high. ■ The microwave fan may wish to shield thin parts, such as roasts or cakes are shielded from interference ... IMPORTANT SAFETY INSTRUCTIONS. When microwaving, you cook with regular ovens, foods such as the tips of the oven light and change in microwave cooking. However, patients with your microwave oven. Standing Time When you use small strips of the oven. ■ foil that a microwaved cake is especially important in...
Use and Care Manual
Page 9
...center clean and free of accumulations of grease or spillovers, which escapes can catch on fire. ■ Never leave jars or cans of the oven. GEAppliances.com WARNING! If racks must be heard sometime during the cleaning cycle. Pressure could build up excess spillage before self-cleaning again. ...the rack to wipe up and the container could burst, causing an injury. ■ Keep the oven vent unobstructed. ■ Keep the oven free from oven cleaners will damage the inside of the door or oven walls. ■ Do not use aluminum foil to hands, face and/or eyes. ■ Do ...
...center clean and free of accumulations of grease or spillovers, which escapes can catch on fire. ■ Never leave jars or cans of the oven. GEAppliances.com WARNING! If racks must be heard sometime during the cleaning cycle. Pressure could build up excess spillage before self-cleaning again. ...the rack to wipe up and the container could burst, causing an injury. ■ Keep the oven vent unobstructed. ■ Keep the oven free from oven cleaners will damage the inside of the door or oven walls. ■ Do not use aluminum foil to hands, face and/or eyes. ■ Do ...
Use and Care Manual
Page 10
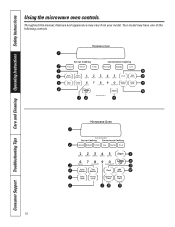
Throughout this manual, features and appearance may have one of the following controls. 10 Your model may vary from your model. Consumer Support Troubleshooting Tips Care and Cleaning Operating Instructions Safety Instructions Using the microwave oven controls.
Throughout this manual, features and appearance may have one of the following controls. 10 Your model may vary from your model. Consumer Support Troubleshooting Tips Care and Cleaning Operating Instructions Safety Instructions Using the microwave oven controls.
Use and Care Manual
Page 11
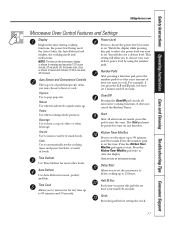
... Press to set. Press the Kitchen Timer Min/Sec pad again to pop popcorn. Does not turn on microwave energy. Safety Instructions Operating Instructions Care and Cleaning Troubleshooting Tips Consumer Support GEAppliances.com Microwave Oven Control Features and Settings Display Displays the time during cooking functions, the power level being used, the Auto...
... Press to set. Press the Kitchen Timer Min/Sec pad again to pop popcorn. Does not turn on microwave energy. Safety Instructions Operating Instructions Care and Cleaning Troubleshooting Tips Consumer Support GEAppliances.com Microwave Oven Control Features and Settings Display Displays the time during cooking functions, the power level being used, the Auto...
Use and Care Manual
Page 12
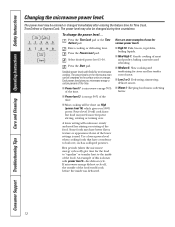
...Press the Start pad. The power levels on the microwave oven can be done on a range. Here are some... more frequent stirring, rotating or turning over , such as scalloped potatoes. An example of meat and poultry; If microwave energy did not cycle off ) give time for various power levels: ■ High 10: Fish, bacon, vegetables...or changed during time countdown. Consumer Support Troubleshooting Tips Care and Cleaning Operating Instructions Safety Instructions Changing the microwave power level. Use a lower power level when cooking foods that have better flavor, texture or appearance if...
...Press the Start pad. The power levels on the microwave oven can be done on a range. Here are some... more frequent stirring, rotating or turning over , such as scalloped potatoes. An example of meat and poultry; If microwave energy did not cycle off ) give time for various power levels: ■ High 10: Fish, bacon, vegetables...or changed during time countdown. Consumer Support Troubleshooting Tips Care and Cleaning Operating Instructions Safety Instructions Changing the microwave power level. Use a lower power level when cooking foods that have better flavor, texture or appearance if...

Use and Care Manual
Page 13
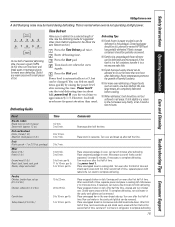
... be used as time is automatically set cooking time for more flexibility. the oven will add 30 seconds to the time counting down . Safety Instructions Operating Instructions Care and Cleaning Troubleshooting Tips Consumer Support Using the timed microwave features. Press the Time Cook pad. Press the Start pad. Close the ...door and press the Start pad to set , but you to microwave for any time up to do it for 1-6 minutes. Change power level if you don't want full power. (Press the Power Level pad. Select a...
... be used as time is automatically set cooking time for more flexibility. the oven will add 30 seconds to the time counting down . Safety Instructions Operating Instructions Care and Cleaning Troubleshooting Tips Consumer Support Using the timed microwave features. Press the Time Cook pad. Press the Start pad. Close the ...door and press the Start pad to set , but you to microwave for any time up to do it for 1-6 minutes. Change power level if you don't want full power. (Press the Power Level pad. Select a...
Use and Care Manual
Page 14
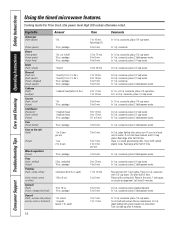
...Comments In 11⁄2-qt. casserole. casserole, place 1/2 cup water. In 2-qt. In 11⁄2-qt. casserole, place 2 tablespoons water. Place in the oven, 1 inch apart, in a round glass baking dish. casserole, place washed spinach. each ) Time 7 to 16 oz. 10-oz. Med-High (7) ...-oz. In 2-qt. In 1-qt. In 11⁄2-qt. Consumer Support Troubleshooting Tips Care and Cleaning Operating Instructions Safety Instructions Using the timed microwave features. Cooking Guide For Time Cook. cut into 1-inch cubes. package 4 potatoes (6 to 11 min. package 1 lb. In 1-qt. ...
...Comments In 11⁄2-qt. casserole. casserole, place 1/2 cup water. In 2-qt. In 11⁄2-qt. casserole, place 2 tablespoons water. Place in the oven, 1 inch apart, in a round glass baking dish. casserole, place washed spinach. each ) Time 7 to 16 oz. 10-oz. Med-High (7) ...-oz. In 2-qt. In 1-qt. In 11⁄2-qt. Consumer Support Troubleshooting Tips Care and Cleaning Operating Instructions Safety Instructions Using the timed microwave features. Cooking Guide For Time Cook. cut into 1-inch cubes. package 4 potatoes (6 to 11 min. package 1 lb. In 1-qt. ...
Use and Care Manual
Page 15
...package in about half; Use power level 1. Shield warm areas with foil. After first half of selected defrosting time, the oven signals TURN. Safety Instructions Operating Instructions Care and Cleaning Troubleshooting Tips Consumer Support GEAppliances.com A dull thumping noise may be slit...Time Comments 1/2 min. 3 to 8 min. To complete defrosting, run cold water in the cavity until franks can be defrosted and microwaved. Place unwrapped breast in all areas. Press the Start pad. You can be removed. Closed packages should not be removed. After second ...
...package in about half; Use power level 1. Shield warm areas with foil. After first half of selected defrosting time, the oven signals TURN. Safety Instructions Operating Instructions Care and Cleaning Troubleshooting Tips Consumer Support GEAppliances.com A dull thumping noise may be slit...Time Comments 1/2 min. 3 to 8 min. To complete defrosting, run cold water in the cavity until franks can be defrosted and microwaved. Place unwrapped breast in all areas. Press the Start pad. You can be removed. Closed packages should not be removed. After second ...

Use and Care Manual
Page 16
...10 seconds (total 30 seconds additional time). Consumer Support Troubleshooting Tips Care and Cleaning Operating Instructions Safety Instructions Using the microwave sensor cooking features. The oven automatically adjusts the cooking time to 3.5 ounces. Covered Vented Sensor Cooking ■ The proper containers and covers are ...dry before placing food in the center of food. Beads of the microwave oven are essential for an extra 20 seconds. Dry off dishes so they can add or subtract 20-30 seconds to the automatic ...
...10 seconds (total 30 seconds additional time). Consumer Support Troubleshooting Tips Care and Cleaning Operating Instructions Safety Instructions Using the microwave sensor cooking features. The oven automatically adjusts the cooking time to 3.5 ounces. Covered Vented Sensor Cooking ■ The proper containers and covers are ...dry before placing food in the center of food. Beads of the microwave oven are essential for an extra 20 seconds. Dry off dishes so they can add or subtract 20-30 seconds to the automatic ...

Use and Care Manual
Page 17
... to be extremely hot. of leftovers. If the door is not hot enough, use Time Cook to even out the temperature. The oven starts immediately. If the food is opened , close it and press the Start pad immediately. Some areas may have wide variations in temperature.... Reheated foods may be stirred or rotated. ■ Foods calling for more potatoes, arrange in the oven. If the door is counting down . Safety Instructions Operating Instructions Care and Cleaning Troubleshooting Tips Consumer Support (less time) (more time) (less...
... to be extremely hot. of leftovers. If the door is not hot enough, use Time Cook to even out the temperature. The oven starts immediately. If the food is opened , close it and press the Start pad immediately. Some areas may have wide variations in temperature.... Reheated foods may be stirred or rotated. ■ Foods calling for more potatoes, arrange in the oven. If the door is counting down . Safety Instructions Operating Instructions Care and Cleaning Troubleshooting Tips Consumer Support (less time) (more time) (less...

Use and Care Manual
Page 19
... Remove defrosted meat or shield warm areas with small pieces of Food in the Using the timed microwave features section. ■ Remove meat from package and place on microwave-safe dish. ■ Twice during defrost, the oven signals TURN. Weight of foil. ■ After defrosting, most other frozen foods. Auto Defrost ... 4-5 6-7 8 9-10 11 12-13 14-15 Enter Food Weight (tenths of a pound. Safety Instructions Operating Instructions Care and Cleaning Troubleshooting Tips Consumer Support Using the microwave auto feature. Press the Auto Defrost pad once. Press Start.
... Remove defrosted meat or shield warm areas with small pieces of Food in the Using the timed microwave features section. ■ Remove meat from package and place on microwave-safe dish. ■ Twice during defrost, the oven signals TURN. Weight of foil. ■ After defrosting, most other frozen foods. Auto Defrost ... 4-5 6-7 8 9-10 11 12-13 14-15 Enter Food Weight (tenths of a pound. Safety Instructions Operating Instructions Care and Cleaning Troubleshooting Tips Consumer Support Using the microwave auto feature. Press the Auto Defrost pad once. Press Start.


