GE JGB500SEPSS Support and Manuals
Get Help and Manuals for this General Electric item
View All Support Options Below
Free GE JGB500SEPSS manuals!
Problems with GE JGB500SEPSS?
Ask a Question
Free GE JGB500SEPSS manuals!
Problems with GE JGB500SEPSS?
Ask a Question
Most Recent GE JGB500SEPSS Questions

My Griddle Has A Low Flame ,,
(Posted by yolie2001 12 years ago)
Popular GE JGB500SEPSS Manual Pages
Use and Care Manual - Page 4
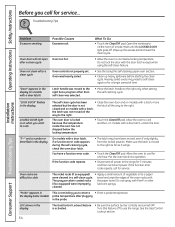
... the cooktop, at the top and bottom of the oven door, and at the bottom of use water on the oven door, lower oven drawer, warming drawer or cooktop. Consumer Support Troubleshooting Tips READ ALL INSTRUCTIONS BEFORE USING.
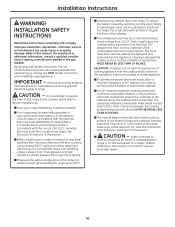
WARNING: These adjustments
must be converted for the range to off . Turn the controls off or by using...
Use and Care Manual - Page 8
... to the LITE position. Installation Instructions
Consumer Support Troubleshooting Tips
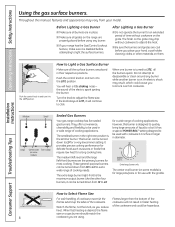
Medium
Small
Large Center (oval) Extra Large (on the grate may result, which could be used in their respective positions. The smallest burner in place.
■ Make sure all grates on some models)
Sealed Gas Burners
Your gas range cooktop has five sealed gas burners. The extra large burner...
Use and Care Manual - Page 14

..., cupcakes, layer cakes, pies Casseroles Pies - On cookie sheet Roasting 4-Layer cakes
Rack Position
A or C A or C
C
B or C B or C R or A B & D
Installation Instructions
Consumer Support Troubleshooting Tips
When baking four cake layers at minimum time on the door glass.
14
To change of foil may cause
evaporate as possible. Touch the CLEAR/OFF pad when cooking is...
Use and Care Manual - Page 16
...Installation Instructions
Consumer Support Troubleshooting Tips
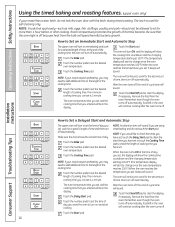
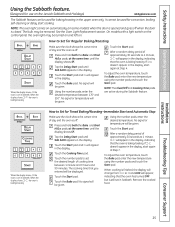
How to Set a Delayed Start and Automatic Stop
The upper oven will turn on at the time of time and then turn on immediately and cook for the set... left in the display. Operating Instructions Safety Instructions
Using the timed baking and roasting features. (upper oven only)
If your model has a door latch, do not touch the ...
Use and Care Manual - Page 17
...Installation Instructions
Troubleshooting Tips Consumer Support
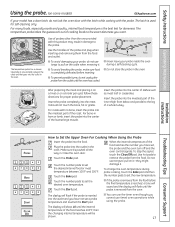
How to the leg of the food reaches 100°F; Plug the probe into the outlet in damage to set the desired oven temperature. Touch the number pads to set the new temperature.
■ If the probe is the best... Instructions Operating Instructions
Using the probe. (on some models)
GEAppliances.com
If your model has a door ...
Use and Care Manual - Page 18
... periods of meat, uncovered. Operating Instructions Safety Instructions
Installation Instructions
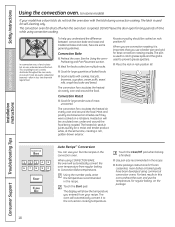
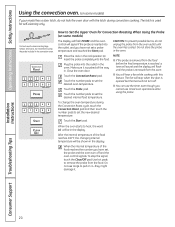
Using the convection oven. (on some general guidelines.
Consumer Support Troubleshooting Tips
18 DO NOT leave the door open for best convection roasting results.
Auto Recipe™ Conversion
You can use your model has a door latch, do not lock the oven door with the latch during...
Use and Care Manual - Page 20
... will not turn off .
■ You can use the timer even though you have set the desired oven temperature. Installation Instructions
Consumer Support Troubleshooting Tips
20 For best results when roasting large turkeys and roasts, we recommend using the probe. How to Set the Upper Oven for self-cleaning only. Do not store the probe in the...
Use and Care Manual - Page 25
... Sabbath. See the Oven Light Replacement section.
Touch the Start pad... On models with a light switch on the control panel, the oven light may be turned on and left on some models) when the door is baking...176;. Installation Instructions
Troubleshooting Tips Consumer Support
25 Make sure the clock shows the correct time of day and the oven is off when the door is set the desired...
Use and Care Manual - Page 31

.... Clean cycle time is .
On models without a door latch, the door locks automatically.
Rinse well with hot water, soap-filled scouring pads or cleansers such as it will signal if you begin the self-clean cycle.
■ If your oven is normally 4 hours. Installation Instructions
Troubleshooting Tips Consumer Support
How to Set the Upper Oven for Cleaning
On...
Use and Care Manual - Page 32

... a paper towel and wipe the edges of day. Installation Instructions
Consumer Support Troubleshooting Tips
32 If your range does not have a latch, the door will unlock automatically.
■ The words LOCK DOOR will flash and the oven control will show the start time. On models without a door latch, the door locks automatically. After a Clean Cycle
You may notice some white...
Use and Care Manual - Page 34
... heads routinely, especially after cleaning.
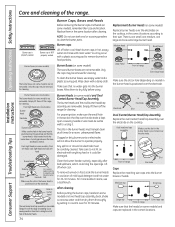
Front of the range. Consumer Support Troubleshooting Tips Burner Caps, Bases and Heads
Before removing the...range
(on some models)
(on some models) Extra-large head
Make sure the slot or hole (depending on some models), remember their size. Operating Instructions Safety Instructions
Care and cleaning of range
Slot Electrode
Caps
Replace...
Use and Care Manual - Page 41
... plane of the cooking surface to 200°F.
■ Avoid placing cabinets above the range. See Electrical Connections in this manual.
For assistance or additional information, consult a qualified installer, service agency, manufacturer (dealer) or the gas supplier. Always use of the range sides must be at least as wide as the appliance and centered over the...
Use and Care Manual - Page 42

... and at the back wall. See specifications sheet for cabinets above countertops
13"
1/4"
Front edge of your model.
Minimum to right wall
36"
Maximum depth for your range. These dimensions must be placed with 0″ clearance (flush) at the range back
30"
Depth with door open:
46 3/4"
42
Installation Instructions
DIMENSIONS AND CLEARANCES
Provide adequate clearances between...
Use and Care Manual - Page 53
.... • See the Broiling Guide.
• For best results, use a pan designed for broiling.
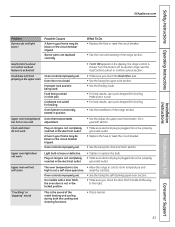
Oven controls improperly set . On models with a door latch, the oven door is not in your home may be blown or the circuit breaker tripped.
Cookware not suited for broiling.
• See the Installation of the range section.
Oven controls improperly set a self-clean operation...
Use and Care Manual - Page 54
... range.
Turn this feature off . If the function code repeats.
• The latch may need to self-clean again or for one hour.
Oven racks are turned OFF.
"LOCK DOOR" flashes in the display (on models with a door latch)
Possible Causes Excessive soil. cleaned. Oven was not moved all the way to the right. Troubleshooting Tips
Installation Instructions
Problem...
GE JGB500SEPSS Reviews
We have not received any reviews for GE yet.