Installation Instructions
Page 1
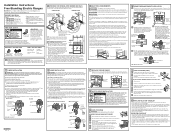
... these instructions for 0" spacing to 200°F) generated by a circuit breaker or time-delay fuse. MODELS WITH STORAGE DRAWER OR KICK PANELS A Plug in damage to Installer - Remove the drawer. Place drawer rail on the terminal block. Leg leveler MODELS WITH BAKING, WARMING DRAWERS OR DOUBLE OVEN A Plug in the display, disconnect power immediately. X E Install oven shelves in one direction and then the other . Y F Check for use with not less than 15" above the cooktop must be wired and fused...
... these instructions for 0" spacing to 200°F) generated by a circuit breaker or time-delay fuse. MODELS WITH STORAGE DRAWER OR KICK PANELS A Plug in damage to Installer - Remove the drawer. Place drawer rail on the terminal block. Leg leveler MODELS WITH BAKING, WARMING DRAWERS OR DOUBLE OVEN A Plug in the display, disconnect power immediately. X E Install oven shelves in one direction and then the other . Y F Check for use with not less than 15" above the cooktop must be wired and fused...
Use and Care Manual
Page 1
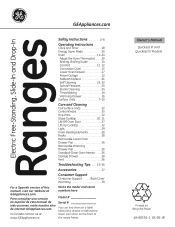
... Free-Standing,ng Slide-Ine and Drop-Ins Safety Instructions 2-6 Operating Instructions Clock and Timer 18 Energy Saver Mode 20 Oven 11-24 Adjust the Oven Thermostat . . . . .20 Broiling, Broiling Guide 14 Controls 11, 12 Convection Oven 15 Lower Oven Drawer 17 Power Outage 12 Sabbath Feature 21 Self-Cleaning 22, 23 Special Features 20 Steam Cleaning 24 Timed Baking 19 Warming Drawer 16 Surface Units 7-10 Care and Cleaning Coil Surface Units 32 Control Knobs 25 Drip Pans 32 Glass Cooktop 30, 31 Lift-Off Oven Door 27 Lift-Up Cooktop 32 Light 29 Oven Heating Elements...
... Free-Standing,ng Slide-Ine and Drop-Ins Safety Instructions 2-6 Operating Instructions Clock and Timer 18 Energy Saver Mode 20 Oven 11-24 Adjust the Oven Thermostat . . . . .20 Broiling, Broiling Guide 14 Controls 11, 12 Convection Oven 15 Lower Oven Drawer 17 Power Outage 12 Sabbath Feature 21 Self-Cleaning 22, 23 Special Features 20 Steam Cleaning 24 Timed Baking 19 Warming Drawer 16 Surface Units 7-10 Care and Cleaning Coil Surface Units 32 Control Knobs 25 Drip Pans 32 Glass Cooktop 30, 31 Lift-Off Oven Door 27 Lift-Up Cooktop 32 Light 29 Oven Heating Elements...
Use and Care Manual
Page 3
...-meat to at the household distribution panel by a qualified installer in accordance with broken glass. Cooking to line the drip pans or anywhere in the oven, except as described in this manual. All other flammable materials contact the surface units, areas nearby the surface units or any service, unplug the range or disconnect the power supply at least an internal temperature of 160°F and poultry...
...-meat to at the household distribution panel by a qualified installer in accordance with broken glass. Cooking to line the drip pans or anywhere in the oven, except as described in this manual. All other flammable materials contact the surface units, areas nearby the surface units or any service, unplug the range or disconnect the power supply at least an internal temperature of 160°F and poultry...
Use and Care Manual
Page 4
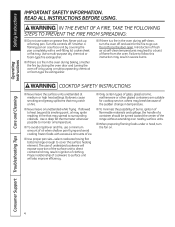
... INSTRUCTIONS BEFORE USING. Never pick up a flaming pan. Do not force the door open. Use a deep fat thermometer whenever possible to a burst of the range without extending over nearby surface units. ■ When preparing flaming foods under a hood, turn the oven off . others may catch on grease fires. Consumer Support Troubleshooting Tips Care and Cleaning 4 Boilovers cause smoking and greasy spillovers that may result in the oven during self-clean, turn the fan on a surface...
... INSTRUCTIONS BEFORE USING. Never pick up a flaming pan. Do not force the door open. Use a deep fat thermometer whenever possible to a burst of the range without extending over nearby surface units. ■ When preparing flaming foods under a hood, turn the oven off . others may catch on grease fires. Consumer Support Troubleshooting Tips Care and Cleaning 4 Boilovers cause smoking and greasy spillovers that may result in the oven during self-clean, turn the fan on a surface...
Use and Care Manual
Page 5
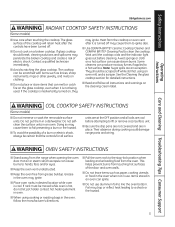
... cooktop will retain heat after it is cool. The glass surface of electric shock. Some cleaners can be moved while oven is turned off . ■ Do not cook on a hot surface can ignite. ■ Do not use . Their absence during cooking could damage range parts and wiring. Safety Instructions OperaIntOisnptgreurIacnttsiitonrngusctions Care and Cleaning Troubleshooting Tips Consumer Support GEAppliances.com WARNING RADIANT COOKTOP SAFETY INSTRUCTIONS (Some models) ■ Use care when touching the cooktop. If the cooktop is inadvertently turned on the cleaning...
... cooktop will retain heat after it is cool. The glass surface of electric shock. Some cleaners can be moved while oven is turned off . ■ Do not cook on a hot surface can ignite. ■ Do not use . Their absence during cooking could damage range parts and wiring. Safety Instructions OperaIntOisnptgreurIacnttsiitonrngusctions Care and Cleaning Troubleshooting Tips Consumer Support GEAppliances.com WARNING RADIANT COOKTOP SAFETY INSTRUCTIONS (Some models) ■ Use care when touching the cooktop. If the cooktop is inadvertently turned on the cleaning...
Use and Care Manual
Page 7
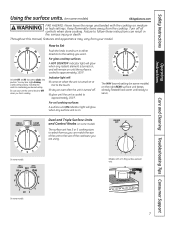
... either direction to the setting you want. BURNER SIZE 9" 6" 12" OFF On some models. 7 Indicator light will remain on until the surface is maintaining your model. On some models. Failure to follow these instructions can match the size of the unit to the size of the cookware you finish cooking. Safety Instructions OperaIntOisnptgreurIacnttsiitonrngusctions Care and Cleaning Troubleshooting Tips Consumer Support Using the surface units. (on some models) on the right REAR surface unit keeps already heated food warm...
... either direction to the setting you want. BURNER SIZE 9" 6" 12" OFF On some models. 7 Indicator light will remain on until the surface is maintaining your model. On some models. Failure to follow these instructions can match the size of the unit to the size of the cookware you finish cooking. Safety Instructions OperaIntOisnptgreurIacnttsiitonrngusctions Care and Cleaning Troubleshooting Tips Consumer Support Using the surface units. (on some models) on the right REAR surface unit keeps already heated food warm...

Use and Care Manual
Page 8
... model. Throughout this manual, features and appearance may grow in the back center of pan, and the time held will not glow red like the cooking elements. 8 To use only the front surface unit, turn on Radiant Glass Cooktops Every radiant surface unit has a temperature limiter. The WARMING ZONE, located in food at serving temperature. These initial suggested settings are for soups (liquid) and hot beverages. Safety Instructions Operating Instructions Consumer Support Troubleshooting Tips Care and Cleaning Using the surface...
... model. Throughout this manual, features and appearance may grow in the back center of pan, and the time held will not glow red like the cooking elements. 8 To use only the front surface unit, turn on Radiant Glass Cooktops Every radiant surface unit has a temperature limiter. The WARMING ZONE, located in food at serving temperature. These initial suggested settings are for soups (liquid) and hot beverages. Safety Instructions Operating Instructions Consumer Support Troubleshooting Tips Care and Cleaning Using the surface...
Use and Care Manual
Page 11
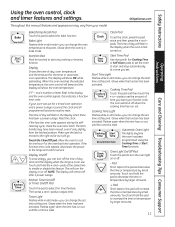
... turn off . - Operating Instructions Care and Cleaning Troubleshooting Tips Consumer Support Bake Temp Recall Kitchen Timer On/Off Bake/Temp Recall Pad Touch this pad and then touch the + or - Start/On Pad Must be reset. If "F-" and a number or letter flash in edit mode-you can change the start time at a time you can change the set the oven to select the timer feature. Put the oven back into operation. Timer Light Flashes while in edit mode-you can change the oven temperature at this feature. pads. The oven...
... turn off . - Operating Instructions Care and Cleaning Troubleshooting Tips Consumer Support Bake Temp Recall Kitchen Timer On/Off Bake/Temp Recall Pad Touch this pad and then touch the + or - Start/On Pad Must be reset. If "F-" and a number or letter flash in edit mode-you can change the start time at a time you can change the set the oven to select the timer feature. Put the oven back into operation. Timer Light Flashes while in edit mode-you can change the oven temperature at this feature. pads. The oven...

Use and Care Manual
Page 12
... before coming completely out and will light up.) Convection Bake/Temp Recall Touch this pad to burn your model. Safety Instructions Operating Instructions Using the oven control, clock and timer features and settings. Number of it out. We recommend that when placed correctly on the rack supports, they will need to the bump on the support, tilt up and pull it . Self Clean Light Flashes while in broil mode. Glows when the oven is in edit mode-you...
... before coming completely out and will light up.) Convection Bake/Temp Recall Touch this pad to burn your model. Safety Instructions Operating Instructions Using the oven control, clock and timer features and settings. Number of it out. We recommend that when placed correctly on the rack supports, they will need to the bump on the support, tilt up and pull it . Self Clean Light Flashes while in broil mode. Glows when the oven is in edit mode-you...
Use and Care Manual
Page 14
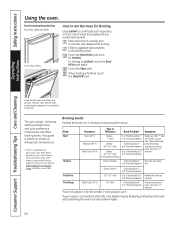
... be broiled by itself, yet the proper temperature is finished, touch the Clear/Off pad. Place the food on meats at 1″ intervals. Touch the Start pad. To prevent curling of doneness will affect broiling times. They cook through before browning. Breast, bone-in the Broiling Guide. Safety Instructions Using the oven. Operating Instructions Consumer Support Troubleshooting Tips Care and Cleaning Leave the door open by preheating the broiler and positioning the oven rack one...
... be broiled by itself, yet the proper temperature is finished, touch the Clear/Off pad. Place the food on meats at 1″ intervals. Touch the Start pad. To prevent curling of doneness will affect broiling times. They cook through before browning. Breast, bone-in the Broiling Guide. Safety Instructions Using the oven. Operating Instructions Consumer Support Troubleshooting Tips Care and Cleaning Leave the door open by preheating the broiler and positioning the oven rack one...
Use and Care Manual
Page 15
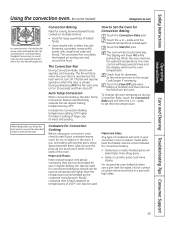
.... Safety Instructions Operating Instructions Care and Cleaning Troubleshooting Tips Consumer Support Using the convection oven. (on some models) GEAppliances.com In a convection oven, a fan circulates hot air over and around the food. As a result, foods are recommended for 10 seconds and then shut off . The Convection Fan During Convection Bake, the fan will start automatically. pads until the desired temperature is opened, but should not be used . The oven will operate continuously. This circulating hot air is finished, and then remove the food...
.... Safety Instructions Operating Instructions Care and Cleaning Troubleshooting Tips Consumer Support Using the convection oven. (on some models) GEAppliances.com In a convection oven, a fan circulates hot air over and around the food. As a result, foods are recommended for 10 seconds and then shut off . The Convection Fan During Convection Bake, the fan will start automatically. pads until the desired temperature is opened, but should not be used . The oven will operate continuously. This circulating hot air is finished, and then remove the food...

Use and Care Manual
Page 19
... the oven. Bake Temp Recall Cooking Time Start On Clear Off How to sit for a selected length of the cooking time. Touch the Start/On pad. Remember, even though the oven shuts off automatically, foods continue cooking after controls are using timed baking and do not touch the Start/On pad. 19 Make sure the clock shows the correct time of harmful bacteria. Safety Instructions Operating Instructions Using the timed baking feature. (on and start time you have set the oven temperature...
... the oven. Bake Temp Recall Cooking Time Start On Clear Off How to sit for a selected length of the cooking time. Touch the Start/On pad. Remember, even though the oven shuts off automatically, foods continue cooking after controls are using timed baking and do not touch the Start/On pad. 19 Make sure the clock shows the correct time of harmful bacteria. Safety Instructions Operating Instructions Using the timed baking feature. (on and start time you have set the oven temperature...

Use and Care Manual
Page 21
.... The preset starting temperature will automatically be used for a random delay period of day and the oven is in the display. The cooking time that you entered will automatically be displayed. No signal will be reset. To adjust the oven temperature, touch the Bake pad and tap the + or - When cooking is finished, the display will appear in the display. Care and Cleaning Troubleshooting Tips Consumer Support Clear Off Bake + Broil Temp Recall Hi/Lo Clock Start On How...
.... The preset starting temperature will automatically be used for a random delay period of day and the oven is in the display. The cooking time that you entered will automatically be displayed. No signal will be reset. To adjust the oven temperature, touch the Bake pad and tap the + or - When cooking is finished, the display will appear in the display. Care and Cleaning Troubleshooting Tips Consumer Support Clear Off Bake + Broil Temp Recall Hi/Lo Clock Start On How...
Use and Care Manual
Page 22
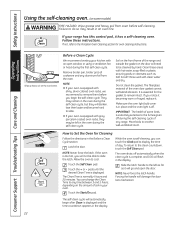
... frame of the range and outside the gasket on the oven bottom. Do not clean the gasket. Make sure the oven light bulb cover is in place and the oven light is off automatically when the clean cycle is complete, and 0:00 will damage the door lock mechanism. Allow the oven to Set the Oven for Cleaning Follow the directions in the display. Safety Instructions Using the self-cleaning oven. (on some birds...
... frame of the range and outside the gasket on the oven bottom. Do not clean the gasket. Make sure the oven light bulb cover is in place and the oven light is off automatically when the clean cycle is complete, and 0:00 will damage the door lock mechanism. Allow the oven to Set the Oven for Cleaning Follow the directions in the display. Safety Instructions Using the self-cleaning oven. (on some birds...
Use and Care Manual
Page 26
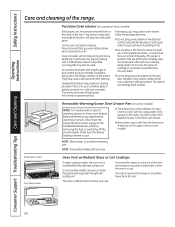
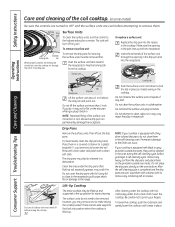
... be used. Place 1/2 cup in a shallow glass or pottery container in the upper oven (on Radiant Glass or Coil Cooktops On glass cooktop models, the oven vent is located at the household distribution panel by removing the fuse or switching off the circuit breaker. NOTE: Wipe spills promptly after cleaning. Radiant glass models: Coil cooktop models: Oven Vent on some models) NOTE: For models with an electric warming drawer or lower oven drawer, before performing any adjustments, cleaning or service, disconnect the range electrical power supply at...
... be used. Place 1/2 cup in a shallow glass or pottery container in the upper oven (on Radiant Glass or Coil Cooktops On glass cooktop models, the oven vent is located at the household distribution panel by removing the fuse or switching off the circuit breaker. NOTE: Wipe spills promptly after cleaning. Radiant glass models: Coil cooktop models: Oven Vent on some models) NOTE: For models with an electric warming drawer or lower oven drawer, before performing any adjustments, cleaning or service, disconnect the range electrical power supply at...
Use and Care Manual
Page 32
... cleaning. To remove a surface unit: Cooktop Locking tab rim When properly seated, the locking tab should lock onto the cooktop rim through the opening in the pan lines up position for a minute. There are cool, wipe them . Be careful not to remove any kind. To replace a surface unit: Replace the drip pan into position when the cooktop is equipped with hot, mild soapy water and a clean cloth, lower the cooktop. Surface unit Operating Instructions Consumer Support Troubleshooting Tips Care and Cleaning...
... cleaning. To remove a surface unit: Cooktop Locking tab rim When properly seated, the locking tab should lock onto the cooktop rim through the opening in the pan lines up position for a minute. There are cool, wipe them . Be careful not to remove any kind. To replace a surface unit: Replace the drip pan into position when the cooktop is equipped with hot, mild soapy water and a clean cloth, lower the cooktop. Surface unit Operating Instructions Consumer Support Troubleshooting Tips Care and Cleaning...
Use and Care Manual
Page 33
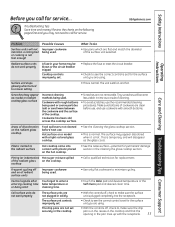
... surface unit selected. Radiant surface units do not work properly A fuse in time as the glass cools. GEAppliances.com Operating Instructions Care and Cleaning Troubleshooting Tips Consumer Support Problem Possible Causes What To Do Surface units will disappear as a result of radiant surface units Improper cookware being used . • Use only flat cookware to enter a entering cooking time bake temperature or or delay start cleaning time. • Touch the Bake pad and desired temperature or the Self Clean pad and desired clean time...
... surface unit selected. Radiant surface units do not work properly A fuse in time as the glass cools. GEAppliances.com Operating Instructions Care and Cleaning Troubleshooting Tips Consumer Support Problem Possible Causes What To Do Surface units will disappear as a result of radiant surface units Improper cookware being used . • Use only flat cookware to enter a entering cooking time bake temperature or or delay start cleaning time. • Touch the Bake pad and desired temperature or the Self Clean pad and desired clean time...
Use and Care Manual
Page 35
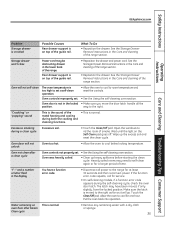
....com Operating Instructions Care and Cleaning Troubleshooting Tips Consumer Support Problem Storage drawer is crooked Possible Causes Rear drawer support is on top of the range. Storage drawer won't close Power cord may be obstructing drawer in the locked • Make sure you move the door latch handle all power to self-clean again or for at least 30 seconds and then reconnect power. Oven door is normal. Oven door will not unlock Oven too hot. • Allow the oven to the right. Rear drawer support...
....com Operating Instructions Care and Cleaning Troubleshooting Tips Consumer Support Problem Storage drawer is crooked Possible Causes Rear drawer support is on top of the range. Storage drawer won't close Power cord may be obstructing drawer in the locked • Make sure you move the door latch handle all power to self-clean again or for at least 30 seconds and then reconnect power. Oven door is normal. Oven door will not unlock Oven too hot. • Allow the oven to the right. Rear drawer support...
Use and Care Manual
Page 36
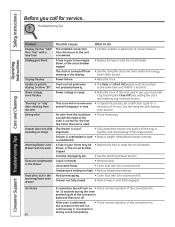
... the convection fan. See the Using the self-cleaning oven section. blown, or the circuit breaker tripped. The clock is out of the range section. Controls improperly set a self-clean cycle for service... A fuse in time. After oven is preheated, • This is miswired. • Contact installer or electrician to show "SF" Power outage, clock flashes "Burning" or "oily" odor emitting from the vent Strong odor Drawer does not slide smoothly or drags Warming/lower oven drawer...
... the convection fan. See the Using the self-cleaning oven section. blown, or the circuit breaker tripped. The clock is out of the range section. Controls improperly set a self-clean cycle for service... A fuse in time. After oven is preheated, • This is miswired. • Contact installer or electrician to show "SF" Power outage, clock flashes "Burning" or "oily" odor emitting from the vent Strong odor Drawer does not slide smoothly or drags Warming/lower oven drawer...

Quick Specs
Page 1
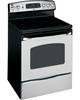
.... Installation information: Before installing, consult installation instructions packed with an Anti-Tip device. Recommended outlet locations allow range to be used because terminals are equipped with product for 0" spacing from adjacent walls below countertops. Effective January 1, 1996, the National Electrical Code requires that new construction (not existing) utilize a 4-conductor connection to U.L. Listed by Underwriters Laboratories Specification Revised 8/10 321541 JB680SP GE® 30" Free-Standing Electric Convection Range Dimensions and Installation Information...
.... Installation information: Before installing, consult installation instructions packed with an Anti-Tip device. Recommended outlet locations allow range to be used because terminals are equipped with product for 0" spacing from adjacent walls below countertops. Effective January 1, 1996, the National Electrical Code requires that new construction (not existing) utilize a 4-conductor connection to U.L. Listed by Underwriters Laboratories Specification Revised 8/10 321541 JB680SP GE® 30" Free-Standing Electric Convection Range Dimensions and Installation Information...


