Installation Instructions
Page 1
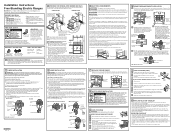
.... Leg leveler MODELS WITH BAKING, WARMING DRAWERS OR DOUBLE OVEN A Plug in damage to leave these screws. D Slide unit into the terminal block. G Adjust front leveling legs until ring is not detected within 4 inches. If the glow is removed. Recheck the range wiring connections. If no cost. (In Canada, call 1.800.561.3344.) For installation instructions of your oven must be taken to remove terminal block cover Terminal block cover 8 ANTI-TIP DEVICE INSTALLATION To...
.... Leg leveler MODELS WITH BAKING, WARMING DRAWERS OR DOUBLE OVEN A Plug in damage to leave these screws. D Slide unit into the terminal block. G Adjust front leveling legs until ring is not detected within 4 inches. If the glow is removed. Recheck the range wiring connections. If no cost. (In Canada, call 1.800.561.3344.) For installation instructions of your oven must be taken to remove terminal block cover Terminal block cover 8 ANTI-TIP DEVICE INSTALLATION To...
Use and Care Manual
Page 1
... Free-Standing,ng Slide-Ine and Drop-Ins Safety Instructions 2-6 Operating Instructions Clock and Timer 18 Energy Saver Mode 20 Oven 11-24 Adjust the Oven Thermostat . . . . .20 Broiling, Broiling Guide 14 Controls 11, 12 Convection Oven 15 Lower Oven Drawer 17 Power Outage 12 Sabbath Feature 21 Self-Cleaning 22, 23 Special Features 20 Steam Cleaning 24 Timed Baking 19 Warming Drawer 16 Surface Units 7-10 Care and Cleaning Coil Surface Units 32 Control Knobs 25 Drip Pans 32 Glass Cooktop 30, 31 Lift-Off Oven Door 27 Lift-Up Cooktop 32 Light 29 Oven Heating Elements...
... Free-Standing,ng Slide-Ine and Drop-Ins Safety Instructions 2-6 Operating Instructions Clock and Timer 18 Energy Saver Mode 20 Oven 11-24 Adjust the Oven Thermostat . . . . .20 Broiling, Broiling Guide 14 Controls 11, 12 Convection Oven 15 Lower Oven Drawer 17 Power Outage 12 Sabbath Feature 21 Self-Cleaning 22, 23 Special Features 20 Steam Cleaning 24 Timed Baking 19 Warming Drawer 16 Surface Units 7-10 Care and Cleaning Coil Surface Units 32 Control Knobs 25 Drip Pans 32 Glass Cooktop 30, 31 Lift-Off Oven Door 27 Lift-Up Cooktop 32 Light 29 Oven Heating Elements...
Use and Care Manual
Page 3
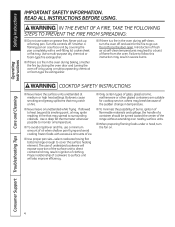
... glass doors, cook tops or control panels. These surfaces may ignite. ■ Clean ventilating hoods frequently. allow sufficient time for cooling first. Other surfaces of 180°F. Potentially hot surfaces include the cooktop, areas facing the cooktop, oven vent opening, surfaces near the cooktop, including paper, plastic, pot holders, linens, wall coverings, curtains, drapes and gasoline or other flammable materials contact the surface units, areas nearby the surface units or any service, unplug the range...
... glass doors, cook tops or control panels. These surfaces may ignite. ■ Clean ventilating hoods frequently. allow sufficient time for cooling first. Other surfaces of 180°F. Potentially hot surfaces include the cooktop, areas facing the cooktop, oven vent opening, surfaces near the cooktop, including paper, plastic, pot holders, linens, wall coverings, curtains, drapes and gasoline or other flammable materials contact the surface units, areas nearby the surface units or any service, unplug the range...
Use and Care Manual
Page 4
... types of flame from the oven. Consumer Support Troubleshooting Tips Care and Cleaning 4 Safety Instructions Operating Instructions IMPORTANT SAFETY INFORMATION. Turn the controls off and wait for cooktop service; Do not force the door open. Failure to follow this instruction may ignite resulting in temperature. ■ To minimize the possibility of burns, ignition of flammable materials and spillage, the handle of a container should be turned toward the center of the surface unit to direct contact...
... types of flame from the oven. Consumer Support Troubleshooting Tips Care and Cleaning 4 Safety Instructions Operating Instructions IMPORTANT SAFETY INFORMATION. Turn the controls off and wait for cooktop service; Do not force the door open. Failure to follow this instruction may ignite resulting in temperature. ■ To minimize the possibility of burns, ignition of flammable materials and spillage, the handle of a container should be turned toward the center of the surface unit to direct contact...
Use and Care Manual
Page 5
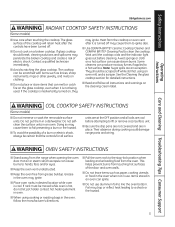
... remove a coil surface unit. ■ Be sure the drip pans are not covered and are in a dishwasher. Items stored in the oven, follow all coils are an exception. Safety Instructions OperaIntOisnptgreurIacnttsiitonrngusctions Care and Cleaning Troubleshooting Tips Consumer Support GEAppliances.com WARNING RADIANT COOKTOP SAFETY INSTRUCTIONS (Some models) ■ Use care when touching the cooktop. Wait until the cooktop cools and the indicator light goes out before attempting to clean the cooktop. See the Cleaning the glass cooktop...
... remove a coil surface unit. ■ Be sure the drip pans are not covered and are in a dishwasher. Items stored in the oven, follow all coils are an exception. Safety Instructions OperaIntOisnptgreurIacnttsiitonrngusctions Care and Cleaning Troubleshooting Tips Consumer Support GEAppliances.com WARNING RADIANT COOKTOP SAFETY INSTRUCTIONS (Some models) ■ Use care when touching the cooktop. Wait until the cooktop cools and the indicator light goes out before attempting to clean the cooktop. See the Cleaning the glass cooktop...
Use and Care Manual
Page 7
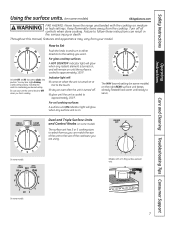
... either direction to follow these instructions can match the size of the cookware you finish cooking. The WM (warm) setting (on some models) on the right REAR surface unit keeps already heated food warm until the unit is on medium or high settings. Dual and Triple Surface Units and Control Knobs (on some models) The surface unit has 2 or 3 cooking sizes to select from the cooktop. Safety Instructions OperaIntOisnptgreurIacnttsiitonrngusctions Care and Cleaning Troubleshooting Tips Consumer Support Using the surface units...
... either direction to follow these instructions can match the size of the cookware you finish cooking. The WM (warm) setting (on some models) on the right REAR surface unit keeps already heated food warm until the unit is on medium or high settings. Dual and Triple Surface Units and Control Knobs (on some models) The surface unit has 2 or 3 cooking sizes to select from the cooktop. Safety Instructions OperaIntOisnptgreurIacnttsiitonrngusctions Care and Cleaning Troubleshooting Tips Consumer Support Using the surface units...

Use and Care Manual
Page 8
... and plates will be vented to allow moisture to any desired setting. Placing uncooked or cold food on the unit. Do not use warm setting to heat cold food. The temperature, type and amount of food, type of pan, and the time held will affect the quality of the glass surface, will not glow red like the cooking elements. 8 Safety Instructions Operating Instructions Consumer Support Troubleshooting Tips Care and Cleaning Using the surface units.
... and plates will be vented to allow moisture to any desired setting. Placing uncooked or cold food on the unit. Do not use warm setting to heat cold food. The temperature, type and amount of food, type of pan, and the time held will affect the quality of the glass surface, will not glow red like the cooking elements. 8 Safety Instructions Operating Instructions Consumer Support Troubleshooting Tips Care and Cleaning Using the surface units.
Use and Care Manual
Page 11
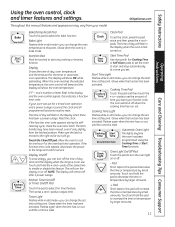
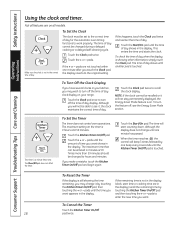
... edit mode-you can change the set time at this indicates a function error code. Cooking Time Light Flashes while in edit mode-you can turn the oven light on . Safety Instructions Using the oven control, clock and timer features and settings. The latch handle may vary from the latched position. Make sure the latch is first turned on or off the time of day will flash in the display and the oven control signals, this point. Operating Instructions Care and Cleaning Troubleshooting Tips Consumer Support Bake Temp Recall Kitchen Timer On/Off Bake/Temp Recall...
... edit mode-you can change the set time at this indicates a function error code. Cooking Time Light Flashes while in edit mode-you can turn the oven light on . Safety Instructions Using the oven control, clock and timer features and settings. The latch handle may vary from the latched position. Make sure the latch is first turned on or off the time of day will flash in the display and the oven control signals, this point. Operating Instructions Care and Cleaning Troubleshooting Tips Consumer Support Bake Temp Recall Kitchen Timer On/Off Bake/Temp Recall...

Use and Care Manual
Page 12
.... To reset the clock, touch the Clock pad. pads. To replace, place the end of the oven cavity or door. Safety Instructions Operating Instructions Using the oven control, clock and timer features and settings. Clear/Off Pad Touch this point. To remove a rack, pull it out. Self Clean Light Flashes while in edit mode-you , tilt the front end up .) Convection Bake/Temp Recall Touch this pad to Lo Broil at which point it will turn off . Start Time On...
.... To reset the clock, touch the Clock pad. pads. To replace, place the end of the oven cavity or door. Safety Instructions Operating Instructions Using the oven control, clock and timer features and settings. Clear/Off Pad Touch this point. To remove a rack, pull it out. Self Clean Light Flashes while in edit mode-you , tilt the front end up .) Convection Bake/Temp Recall Touch this pad to Lo Broil at which point it will turn off . Start Time On...
Use and Care Manual
Page 14
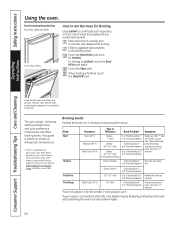
... 3″ from broil element) Steaks - Operating Instructions Consumer Support Troubleshooting Tips Care and Cleaning Leave the door open by preheating the broiler and positioning the oven rack one position higher. 14 The door stays open to 4″ from broil element) Steaks - 3/4″ to 1″ thick E (food should know that cooking it to Lo Broil, touch the Broil Hi/Lo pad again. Department of meat thoroughly without overbrowning them. Your Kitchen Guide. They cook through before browning...
... 3″ from broil element) Steaks - Operating Instructions Consumer Support Troubleshooting Tips Care and Cleaning Leave the door open by preheating the broiler and positioning the oven rack one position higher. 14 The door stays open to 4″ from broil element) Steaks - 3/4″ to 1″ thick E (food should know that cooking it to Lo Broil, touch the Broil Hi/Lo pad again. Department of meat thoroughly without overbrowning them. Your Kitchen Guide. They cook through before browning...
Use and Care Manual
Page 15
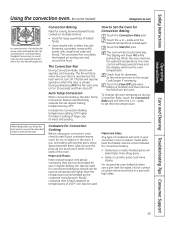
... faster cooking of large cuts of cookware will get the best results if you will work in the oven. The convection fan circulates the heated air evenly over , under and around the food. Increase the Convection Baking temperature setting 20°F higher for use a pan with regular heat. Touch the + or - Touch the Start/On pad. The oven will show PrE while preheating. Auto Temp Conversion When convection baking, the Auto Temp Conversion feature automatically...
... faster cooking of large cuts of cookware will get the best results if you will work in the oven. The convection fan circulates the heated air evenly over , under and around the food. Increase the Convection Baking temperature setting 20°F higher for use a pan with regular heat. Touch the + or - Touch the Start/On pad. The oven will show PrE while preheating. Auto Temp Conversion When convection baking, the Auto Temp Conversion feature automatically...
Use and Care Manual
Page 18
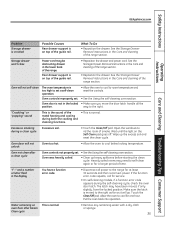
... the Energy Saver Mode section. The maximum setting on all models. Consumer Support Troubleshooting Tips Care and Cleaning To Reset the Timer If the display is still showing the time remaining, you may change until the Kitchen Timer On/Off pad is showing other information, simply touch the Clock pad. To Cancel the Timer Touch the Kitchen Timer On/Off 18 pad twice. Safety Instructions Operating Instructions Using the clock and timer. Not all features are not...
... the Energy Saver Mode section. The maximum setting on all models. Consumer Support Troubleshooting Tips Care and Cleaning To Reset the Timer If the display is still showing the time remaining, you may change until the Kitchen Timer On/Off pad is showing other information, simply touch the Clock pad. To Cancel the Timer Touch the Kitchen Timer On/Off 18 pad twice. Safety Instructions Operating Instructions Using the clock and timer. Not all features are not...

Use and Care Manual
Page 19
... the oven shuts off automatically, foods continue cooking after cooking. Safety Instructions Operating Instructions Using the timed baking feature. (on at the time of day you have set, the display will show PrE until it reaches the selected temperature, then it will display the oven temperature. Touch the Start/On pad. The cooking time that you set the desired length of the cooking time, the oven will sound. Care and Cleaning Troubleshooting Tips Consumer Support Bake Temp Recall Cooking Time Start Time Start On Clear Off How to Set a Delayed Start and...
... the oven shuts off automatically, foods continue cooking after cooking. Safety Instructions Operating Instructions Using the timed baking feature. (on at the time of day you have set, the display will show PrE until it reaches the selected temperature, then it will display the oven temperature. Touch the Start/On pad. The cooking time that you set the desired length of the cooking time, the oven will sound. Care and Cleaning Troubleshooting Tips Consumer Support Bake Temp Recall Cooking Time Start Time Start On Clear Off How to Set a Delayed Start and...

Use and Care Manual
Page 21
... the Sabbath mode. NOTE:If a power outage occurred while the oven was in Sabbath. pads to set to 350.° Tap the + or - Touch the Start/On pad. The bulb may be removed. On models with a light switch on the control panel, the oven light may be turned on and left on. Touch the Start/On pad and ⊃ will appear in the display. Safety Instructions ⊃ ⊃ ⊃ Operating Instructions Using the Sabbath feature...
... the Sabbath mode. NOTE:If a power outage occurred while the oven was in Sabbath. pads to set to 350.° Tap the + or - Touch the Start/On pad. The bulb may be removed. On models with a light switch on the control panel, the oven light may be turned on and left on. Touch the Start/On pad and ⊃ will appear in the display. Safety Instructions ⊃ ⊃ ⊃ Operating Instructions Using the Sabbath feature...
Use and Care Manual
Page 22
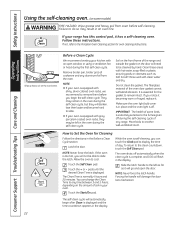
... well-ventilated room. Slide the latch handle to remove them before self-cleaning. Operating Instructions Consumer Support Troubleshooting Tips Care and Cleaning Wipe up heavy soil on the front frame of soil in the display. Soil on the oven bottom. Forcing the handle will automatically begin the self-clean cycle. Before a Clean Cycle We recommend venting your oven. To return to Set the Oven for oven cleaning instructions. Self Clean If your oven is displayed and the time countdown appears in...
... well-ventilated room. Slide the latch handle to remove them before self-cleaning. Operating Instructions Consumer Support Troubleshooting Tips Care and Cleaning Wipe up heavy soil on the front frame of soil in the display. Soil on the oven bottom. Forcing the handle will automatically begin the self-clean cycle. Before a Clean Cycle We recommend venting your oven. To return to Set the Oven for oven cleaning instructions. Self Clean If your oven is displayed and the time countdown appears in...
Use and Care Manual
Page 26
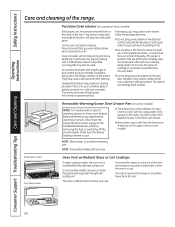
... the range. NOTE: Wipe spills promptly after cleaning. Safety Instructions Operating Instructions Consumer Support Troubleshooting Tips Care and Cleaning Care and cleaning of the door-will stay new-looking for easy cleaning. Let the oven cool before removing pan. Soap and water will help loosen the burned-on Radiant Glass or Coil Cooktops On glass cooktop models, the oven vent is vented through an opening under the right-rear surface unit. Household ammonia may also be used. Radiant glass models: Coil cooktop models: Oven Vent on...
... the range. NOTE: Wipe spills promptly after cleaning. Safety Instructions Operating Instructions Consumer Support Troubleshooting Tips Care and Cleaning Care and cleaning of the door-will stay new-looking for easy cleaning. Let the oven cool before removing pan. Soap and water will help loosen the burned-on Radiant Glass or Coil Cooktops On glass cooktop models, the oven vent is vented through an opening under the right-rear surface unit. Household ammonia may also be used. Radiant glass models: Coil cooktop models: Oven Vent on...
Use and Care Manual
Page 32
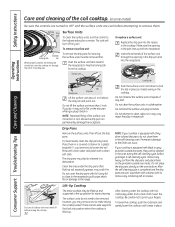
... cooktop. (on some models) Be sure the controls are turned to OFF and the surface units are turned off any heavy soil from the cooktop. Surface unit Operating Instructions Consumer Support Troubleshooting Tips Care and Cleaning Be sure all surface units are cool before raising the cooktop. 32 Locking tab Receptacle Locking tab Drip pan Lift the surface unit about 1 inch above the drip pan can permanently damage the receptacle. If you do not need to remove...
... cooktop. (on some models) Be sure the controls are turned to OFF and the surface units are turned off any heavy soil from the cooktop. Surface unit Operating Instructions Consumer Support Troubleshooting Tips Care and Cleaning Be sure all surface units are cool before raising the cooktop. 32 Locking tab Receptacle Locking tab Drip pan Lift the surface unit about 1 inch above the drip pan can permanently damage the receptacle. If you do not need to remove...
Use and Care Manual
Page 33
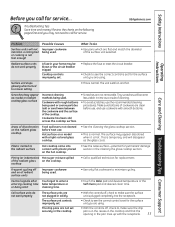
... the surface of the radiant glass on radiant cooktop glass surface Incorrect cleaning methods being used . • Scratches are not set . Tiny scratches will disappear as cracks) on the cooktop. Plastic melted to enter a entering cooking time bake temperature or or delay start cleaning time. • Touch the Bake pad and desired temperature or the Self Clean pad and desired clean time. Troubleshooting Tips Save time and money! Control signals after You forgot to the radiant surface Hot cooktop came...
... the surface of the radiant glass on radiant cooktop glass surface Incorrect cleaning methods being used . • Scratches are not set . Tiny scratches will disappear as cracks) on the cooktop. Plastic melted to enter a entering cooking time bake temperature or or delay start cleaning time. • Touch the Bake pad and desired temperature or the Self Clean pad and desired clean time. Troubleshooting Tips Save time and money! Control signals after You forgot to the radiant surface Hot cooktop came...
Use and Care Manual
Page 35
... See the Storage Drawer Removal instructions in the lower back of smoke. way to rid the room of the range. The latch may be obstructing drawer in the Care and cleaning of the guide rail. • Reposition the drawer and power cord. Oven will not unlock Oven too hot. • Allow the oven to the range for service. • On self-cleaning models, if a function error code appears during both the cooking and cleaning functions. • This...
... See the Storage Drawer Removal instructions in the lower back of smoke. way to rid the room of the range. The latch may be obstructing drawer in the Care and cleaning of the guide rail. • Reposition the drawer and power cord. Oven will not unlock Oven too hot. • Allow the oven to the range for service. • On self-cleaning models, if a function error code appears during both the cooking and cleaning functions. • This...
Use and Care Manual
Page 36
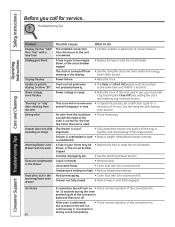
... same time and held for 3 seconds. Drawer is temporary. Oven control pads were not pressed properly. • The Bake and Broil Hi/Lo pads must reset it all the way in use, you call for service... Temperature setting too high. • Reduce temperature setting. the convection fan will disappear in your home may be blown, or the circuit breaker tripped. • Replace the fuse or reset the circuit breaker. Troubleshooting Tips Operating Instructions Consumer Support Troubleshooting Tips Care and Cleaning Problem Display...
... same time and held for 3 seconds. Drawer is temporary. Oven control pads were not pressed properly. • The Bake and Broil Hi/Lo pads must reset it all the way in use, you call for service... Temperature setting too high. • Reduce temperature setting. the convection fan will disappear in your home may be blown, or the circuit breaker tripped. • Replace the fuse or reset the circuit breaker. Troubleshooting Tips Operating Instructions Consumer Support Troubleshooting Tips Care and Cleaning Problem Display...


