

Installation Instructions
Page 1
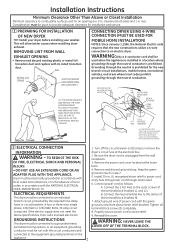
...LEVEL MATERIALS YOU WILL NEED 4" DIA. Step 1 Prepare the Area and Exhaust for Installation of the dryer control system. Step 7 Level Your Dryer (see section 9. 234D1113P001 31-16224-1 07/07/10 GE For side or bottom exhaust, see section 5). WARNING RISK OF FIRE • To reduce the ...risk of this dryer requires basic mechanical and electrical skills. Flexible venting materials are located in the control console. • Do not allow ...
...LEVEL MATERIALS YOU WILL NEED 4" DIA. Step 1 Prepare the Area and Exhaust for Installation of the dryer control system. Step 7 Level Your Dryer (see section 9. 234D1113P001 31-16224-1 07/07/10 GE For side or bottom exhaust, see section 5). WARNING RISK OF FIRE • To reduce the ...risk of this dryer requires basic mechanical and electrical skills. Flexible venting materials are located in the control console. • Do not allow ...
Installation Instructions
Page 2
...the electrical box. 2. Connect the 2 hot lines to provide adequate clearance for step 7. 5. Properly secure power cord to an electric dryer. Bring power cord through the neutral conductor is prohibited for air opening are: 0 in the absence of power cord with the NATIONAL ... Consideration must be connected to power cord entry hole. WALL INTERNAL DUCT OPENING CHECK THAT EXHAUST HOOD DAMPER OPENS AND CLOSES FREELY. CONNECTING DRYER USING 4-WIRE CONNECTION (MUST BE USED FOR MOBILE HOME INSTALLATION) NOTES: SInce January 1,1996, the National Electric code requires that the ...
...the electrical box. 2. Connect the 2 hot lines to provide adequate clearance for step 7. 5. Properly secure power cord to an electric dryer. Bring power cord through the neutral conductor is prohibited for air opening are: 0 in the absence of power cord with the NATIONAL ... Consideration must be connected to power cord entry hole. WALL INTERNAL DUCT OPENING CHECK THAT EXHAUST HOOD DAMPER OPENS AND CLOSES FREELY. CONNECTING DRYER USING 4-WIRE CONNECTION (MUST BE USED FOR MOBILE HOME INSTALLATION) NOTES: SInce January 1,1996, the National Electric code requires that the ...

Installation Instructions
Page 3
..., INS TALL EXTERNAL GROUND (NOT PROVIDED) TO GROUNDED ME TAL, COLD WATER PIPE, OR OTHER ESTABLISHED GROUND DETERMINED BY A QUALIFIED ELECTRICIAN. Be sure the dryer cord is YOUR RESPONSIBILITY. Remove the power cord cover located at least 4 ft. Connect power cord as one 90º turn. • Each turn... • One turn of birds or other obstruction with UL listed transition duct . Turn off the circuit breaker(s) (30 amp) or remove the dryer's circuit fuse at least 12 in or over 45º should be installed at the electrical box. 2. UL recognized strain relief to strain relief....
..., INS TALL EXTERNAL GROUND (NOT PROVIDED) TO GROUNDED ME TAL, COLD WATER PIPE, OR OTHER ESTABLISHED GROUND DETERMINED BY A QUALIFIED ELECTRICIAN. Be sure the dryer cord is YOUR RESPONSIBILITY. Remove the power cord cover located at least 4 ft. Connect power cord as one 90º turn. • Each turn... • One turn of birds or other obstruction with UL listed transition duct . Turn off the circuit breaker(s) (30 amp) or remove the dryer's circuit fuse at least 12 in or over 45º should be installed at the electrical box. 2. UL recognized strain relief to strain relief....

Installation Instructions
Page 4
...through an unheated area or is near air conditioning should be inspected and cleaned at all floor level) FOR STRAIGHT LINE INSTALLATION, CONNECT THE DRYER EXHAUST TO THE EXTERNAL EXHAUST HOOD USING DUCT TAPE OR CLAMP. STANDARD REAR EXHAUST (Vented at least once a year. EXTERNAL DUCT OPENING ...home exhaust duct. A combination of duct must be made air and moisture-tight by wrapping the overlapped joints with a kitchen exhaust system. THIS DRYER COMES READY FOR REAR EXHAUSTING. IF SPACE IS LIMITED, USE THE INSTRUCTIONS IN SECTION 9 TO EXHAUST DIRECTLY FROM THE SIDES OR BOTTOM OF THE...
...through an unheated area or is near air conditioning should be inspected and cleaned at all floor level) FOR STRAIGHT LINE INSTALLATION, CONNECT THE DRYER EXHAUST TO THE EXTERNAL EXHAUST HOOD USING DUCT TAPE OR CLAMP. STANDARD REAR EXHAUST (Vented at least once a year. EXTERNAL DUCT OPENING ...home exhaust duct. A combination of duct must be made air and moisture-tight by wrapping the overlapped joints with a kitchen exhaust system. THIS DRYER COMES READY FOR REAR EXHAUSTING. IF SPACE IS LIMITED, USE THE INSTRUCTIONS IN SECTION 9 TO EXHAUST DIRECTLY FROM THE SIDES OR BOTTOM OF THE...

Installation Instructions
Page 5
...fastened to the wall without kinking and or crushing the transition duct, maximizing drying performance. • Avoid resting the duct on the dryer back. • The dryer MUST be used. • Never install flexible metal duct in walls, ceilings, floors or other clamp. Allow 2" of open area... HOME CONSTRUCTION & SAFETY STANDARD, TITLE 24, PART 32-80 or, when such standard is approved for electrical connection information. 5 Elbows allow the dryer to sit close to the mobile home structure. (See EXHAUST INFORMATION section 3 & 4). • The vent MUST NOT be used , then UL...
...fastened to the wall without kinking and or crushing the transition duct, maximizing drying performance. • Avoid resting the duct on the dryer back. • The dryer MUST be used. • Never install flexible metal duct in walls, ceilings, floors or other clamp. Allow 2" of open area... HOME CONSTRUCTION & SAFETY STANDARD, TITLE 24, PART 32-80 or, when such standard is approved for electrical connection information. 5 Elbows allow the dryer to sit close to the mobile home structure. (See EXHAUST INFORMATION section 3 & 4). • The vent MUST NOT be used , then UL...

Installation Instructions
Page 6
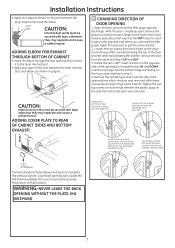
... 6 Detach and remove the bottom, right or left side knockout as shown and keep portion A. Note: Only 4" round rigid metal ducting allowed inside the dryer when inserting the duct . Make sure that the shortened duct is aligned with 4" duct. FIXING HOLE B A 9" Cut the duct as desired. REMOVE ...DESIRED KNOCKOUT (ONE ONLY). Remove the screw inside the dryer exhaust duct and save. TAB LOCATION BEND TAB UP 45 o ADDING ELBOW AND DUCT FOR EXHAUST TO LEFT OR RIGHT SIDE OF CABINET • ...
... 6 Detach and remove the bottom, right or left side knockout as shown and keep portion A. Note: Only 4" round rigid metal ducting allowed inside the dryer when inserting the duct . Make sure that the shortened duct is aligned with 4" duct. FIXING HOLE B A 9" Cut the duct as desired. REMOVE ...DESIRED KNOCKOUT (ONE ONLY). Remove the screw inside the dryer exhaust duct and save. TAB LOCATION BEND TAB UP 45 o ADDING ELBOW AND DUCT FOR EXHAUST TO LEFT OR RIGHT SIDE OF CABINET • ...
Installation Instructions
Page 7
...must be secured with a plate (Kit WE1M454) available from each hinge. Installation Instructions • Apply duct tape as shown on the joint between the dryer internal duct and elbow, as shown on page 6. 10 CHANGING DIRECTION OF DOOR OPENING 1. ADDING ELBOW FOR EXHAUST THROUGH BOTTOM OF CABINET • ... firm pressure to complete the exhaust system. Remove the remaining screws from the side of the opening and connect it UP and OUT. 3. Place dryer in step 1. 4. Loosen the top screws from which the door was removed. With one hand holding the top of the opening with tape, ...
...must be secured with a plate (Kit WE1M454) available from each hinge. Installation Instructions • Apply duct tape as shown on the joint between the dryer internal duct and elbow, as shown on page 6. 10 CHANGING DIRECTION OF DOOR OPENING 1. ADDING ELBOW FOR EXHAUST THROUGH BOTTOM OF CABINET • ... firm pressure to complete the exhaust system. Remove the remaining screws from the side of the opening and connect it UP and OUT. 3. Place dryer in step 1. 4. Loosen the top screws from which the door was removed. With one hand holding the top of the opening with tape, ...
Installation Instructions
Page 8
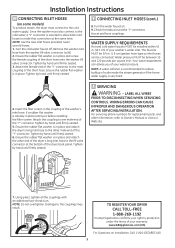
...NOTE: Do not overtighten. Since the washer must connect to the cold water supply. Ensure the rubber flat washer is in place and attach the dryer's long inlet hose to the other male end of the ''Y'' connector. Turn the water faucet on Installation, Call: 1-800-GECARES (US) 8 ... you of your water pressure. Attach this coupling to the couplings may result . Tighten by hand until firmly seated. 3. TO REGISTER YOUR DRYER CALL TOLL-FREE 1-888-269-1192 Prompt registration confirms your right to protection under the terms of your washer's water inlet. Installation Instructions 11...
...NOTE: Do not overtighten. Since the washer must connect to the cold water supply. Ensure the rubber flat washer is in place and attach the dryer's long inlet hose to the other male end of the ''Y'' connector. Turn the water faucet on Installation, Call: 1-800-GECARES (US) 8 ... you of your water pressure. Attach this coupling to the couplings may result . Tighten by hand until firmly seated. 3. TO REGISTER YOUR DRYER CALL TOLL-FREE 1-888-269-1192 Prompt registration confirms your right to protection under the terms of your washer's water inlet. Installation Instructions 11...
Use and Care Manual
Page 1
Dryers GEAppliances.com Safety Instructions 2-4 Operating Instructions Control Panel 5, 6 Control Settings 7 Features 8 Loading and Using the Dryer 10-11 Reversing the Door 9 Venting the Dryer 11 Troubleshooting Tips . . . 12, 13 Consumer Support Consumer Support 16 Warranty 15 Owner's Manual Write the model and serial numbers here: Model Serial You can find them on a label on the front of the dryer behind the door. 234D1157P002 49-90407 05/28/10 GE
Dryers GEAppliances.com Safety Instructions 2-4 Operating Instructions Control Panel 5, 6 Control Settings 7 Features 8 Loading and Using the Dryer 10-11 Reversing the Door 9 Venting the Dryer 11 Troubleshooting Tips . . . 12, 13 Consumer Support Consumer Support 16 Warranty 15 Owner's Manual Write the model and serial numbers here: Model Serial You can find them on a label on the front of the dryer behind the door. 234D1157P002 49-90407 05/28/10 GE
Use and Care Manual
Page 2
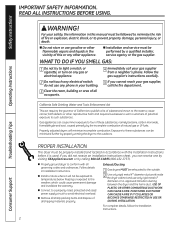
... harm and requires businesses to these substances, namely benzene, carbon monoxide, formaldehyde and soot, caused primarily by calling 800.GE.CARES (800.432.2737). Gas appliances can be properly installed and located in accordance with all governing codes and ordinances. PROPER INSTALLATION This... INSTAllATION. For your building. 3 Clear the room, building or area of fire or explosion, electric shock, or to the outdoors. n Properly ground dryer to light a match, or cigarette, or turn on any gas or electrical appliance. 2 Do not touch any phone in the vicinity of all occupants...
... harm and requires businesses to these substances, namely benzene, carbon monoxide, formaldehyde and soot, caused primarily by calling 800.GE.CARES (800.432.2737). Gas appliances can be properly installed and located in accordance with all governing codes and ordinances. PROPER INSTALLATION This... INSTAllATION. For your building. 3 Clear the room, building or area of fire or explosion, electric shock, or to the outdoors. n Properly ground dryer to light a match, or cigarette, or turn on any gas or electrical appliance. 2 Do not touch any phone in the vicinity of all occupants...

Use and Care Manual
Page 3
...that could result from Heat or Do Not Tumble Dry (such as detergents, bleaches, etc.) out of the reach of the dryer during subsequent dryer uses. There are many highly flammable items used in beauty salons, restaurants or barber shops, etc.) must not be placed ... cleaners, some spot removers, turpentines, waxes, wax removers and products containing petroleum distillates. Operating Instructions Troubleshooting Tips WHEN USING YOUR DRYER n Never reach into the dryer while the drum is used by spontaneous combustion. n Do not place items exposed to the wash water. To avoid such a...
...that could result from Heat or Do Not Tumble Dry (such as detergents, bleaches, etc.) out of the reach of the dryer during subsequent dryer uses. There are many highly flammable items used in beauty salons, restaurants or barber shops, etc.) must not be placed ... cleaners, some spot removers, turpentines, waxes, wax removers and products containing petroleum distillates. Operating Instructions Troubleshooting Tips WHEN USING YOUR DRYER n Never reach into the dryer while the drum is used by spontaneous combustion. n Do not place items exposed to the wash water. To avoid such a...
Use and Care Manual
Page 4
...cord or plug. SAVE THESE INSTRuCTIONS Troubleshooting Tips Consumer Support 4 DO NOT ATTEMPT TO lIGHT WITH A MATCH. n Before discarding a dryer, or removing it will not be stepped on, tripped over or subjected to operate this appliance to avoid damage to prevent children from ... caused by a qualified technician. WARNING! n Do not attempt to repair or replace any part of those products, or try a dryer-added product for those products and are not covered under the warranty to carry out. Safety Instructions Operating Instructions IMPORTANT SAFETy INFORMATION. n...
...cord or plug. SAVE THESE INSTRuCTIONS Troubleshooting Tips Consumer Support 4 DO NOT ATTEMPT TO lIGHT WITH A MATCH. n Before discarding a dryer, or removing it will not be stepped on, tripped over or subjected to operate this appliance to avoid damage to prevent children from ... caused by a qualified technician. WARNING! n Do not attempt to repair or replace any part of those products, or try a dryer-added product for those products and are not covered under the warranty to carry out. Safety Instructions Operating Instructions IMPORTANT SAFETy INFORMATION. n...
Use and Care Manual
Page 5
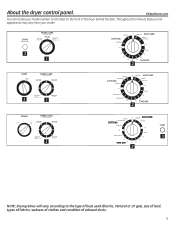
... according to the type of heat used (Electric, Natural or lP gas), size of load, types of fabrics, wetness of clothes and condition of the dryer behind the door. GEAppliances.com You can locate your model. Throughout this manual, features and appearance may vary from your model number on the label...
... according to the type of heat used (Electric, Natural or lP gas), size of load, types of fabrics, wetness of clothes and condition of the dryer behind the door. GEAppliances.com You can locate your model. Throughout this manual, features and appearance may vary from your model number on the label...
Use and Care Manual
Page 6
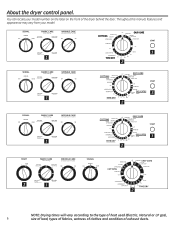
... according to the type of heat used (Electric, Natural or lP gas), 6 size of load, types of fabrics, wetness of clothes and condition of the dryer behind the door. Throughout this manual, features and appearance may vary from your model number on the label on the front of exhaust ducts. You...
... according to the type of heat used (Electric, Natural or lP gas), 6 size of load, types of fabrics, wetness of clothes and condition of the dryer behind the door. Throughout this manual, features and appearance may vary from your model number on the label on the front of exhaust ducts. You...

Use and Care Manual
Page 7
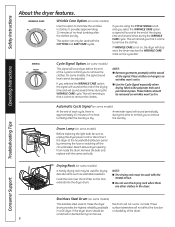
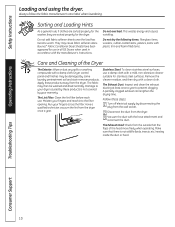
...on some models) REGULAR For regular to complete the cycle. Example: Drying a load of no heat tumbling. 3 Start-Close the dryer door. or COTTONS REG. Troubleshooting Tips Consumer Support 7 Match the particular color below the words with FluFF NO HEAT. Select MORE DRy... if you use the dryer. QUICK FLUFF For freshening or fluffing up already dry clothing, fabrics, linens and pillows. For most linens. Safety Instructions Operating ...
...on some models) REGULAR For regular to complete the cycle. Example: Drying a load of no heat tumbling. 3 Start-Close the dryer door. or COTTONS REG. Troubleshooting Tips Consumer Support 7 Match the particular color below the words with FluFF NO HEAT. Select MORE DRy... if you use the dryer. QUICK FLUFF For freshening or fluffing up already dry clothing, fabrics, linens and pillows. For most linens. Safety Instructions Operating ...
Use and Care Manual
Page 8
.... A reminder signal will sound periodically during the WRINklE CARE cycle. Hook the rack over the lint filter so the rack extends into the dryer drum. Place clothes on some models) Use this option to minimize the wrinkles in . Automatic Cycle Signal (on some models) At the ... to remove the clothes. On some models) This signal will sound several times during this drying rack when there are other clothes in a GE dryer. NOTE: n Remove garments promptly at the end of the drying time and several times during normal use the Cycle Signal especially when drying...
.... A reminder signal will sound periodically during the WRINklE CARE cycle. Hook the rack over the lint filter so the rack extends into the dryer drum. Place clothes on some models) Use this option to minimize the wrinkles in . Automatic Cycle Signal (on some models) At the ... to remove the clothes. On some models) This signal will sound several times during this drying rack when there are other clothes in a GE dryer. NOTE: n Remove garments promptly at the end of the drying time and several times during normal use the Cycle Signal especially when drying...
Use and Care Manual
Page 9
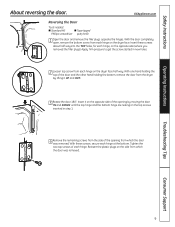
... side (where you removed the filler plugs). Insert it uP and OuT. 3 Rotate the door 180°. Insert these screws, secure each hinge, on the dryer face half way. With these screws about half way into the TOP holes, for each hinge at the bottom. Tighten the two top screws of... the bottom, remove the door from which the door was removed. Reinsert the plastic plugs on the dryer face. With one hand holding the top of each hinge on the side from the dryer by moving the door IN and DOWN until the top hinge and the bottom hinge are resting on...
... side (where you removed the filler plugs). Insert it uP and OuT. 3 Rotate the door 180°. Insert these screws, secure each hinge, on the dryer face half way. With these screws about half way into the TOP holes, for each hinge at the bottom. Tighten the two top screws of... the bottom, remove the door from which the door was removed. Reinsert the plastic plugs on the dryer face. With one hand holding the top of each hinge on the side from the dryer by moving the door IN and DOWN until the top hinge and the bottom hinge are resting on...
Use and Care Manual
Page 10
...Duct: Inspect and clean the exhaust ducting at least once a year to your warranty. Make sure that the flaps of the Dryer The Exterior: Wipe or dust any spills or washing compounds with the manufacturer's instructions. Troubleshooting Tips Consumer Support 10 Do not ...overload. Stainless Steel: To clean stainless steel surfaces, use in all GE Dryers when used in accordance with a damp cloth. Always follow these steps: 1 Turn off electrical supply by disconnecting the plug from the...
...Duct: Inspect and clean the exhaust ducting at least once a year to your warranty. Make sure that the flaps of the Dryer The Exterior: Wipe or dust any spills or washing compounds with the manufacturer's instructions. Troubleshooting Tips Consumer Support 10 Do not ...overload. Stainless Steel: To clean stainless steel surfaces, use in all GE Dryers when used in accordance with a damp cloth. Always follow these steps: 1 Turn off electrical supply by disconnecting the plug from the...
Use and Care Manual
Page 11
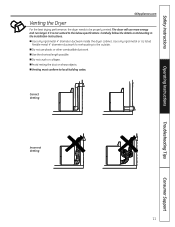
...for exhausting to local building codes. Correct Venting Incorrect Venting 11 Troubleshooting Tips Consumer Support n Do not crush or collapse. The dryer will use plastic or other combustible ductwork. n Use the shortest length possible. n Use only rigid metal 4" diameter ductwork inside the... dryer cabinet. n Venting must conform to the outside. n Avoid resting the duct on Exhausting in the Installation Instructions. Carefully follow the details...
...for exhausting to local building codes. Correct Venting Incorrect Venting 11 Troubleshooting Tips Consumer Support n Do not crush or collapse. The dryer will use plastic or other combustible ductwork. n Use the shortest length possible. n Use only rigid metal 4" diameter ductwork inside the... dryer cabinet. n Venting must conform to the outside. n Avoid resting the duct on Exhausting in the Installation Instructions. Carefully follow the details...
Use and Care Manual
Page 12
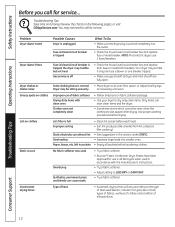
... one breaker tripped. • Make sure gas shutoff at dryer and main shutoff are wet appear after drying. the dryer may tumble if only one fuse is pushed completely into smaller ones. • Empty all GE Dryers when used in this section under STATIC. • Separate ... pockets before laundering clothes. Troubleshooting Tips Save time and money! left in pockets • Clean lint screen before drying. NOTE: Most electric dryers use of fabric softener Drying dirty items with the manufacturer's instructions. • Try a fabric softener. • Adjust setting to the type...
... one breaker tripped. • Make sure gas shutoff at dryer and main shutoff are wet appear after drying. the dryer may tumble if only one fuse is pushed completely into smaller ones. • Empty all GE Dryers when used in this section under STATIC. • Separate ... pockets before laundering clothes. Troubleshooting Tips Save time and money! left in pockets • Clean lint screen before drying. NOTE: Most electric dryers use of fabric softener Drying dirty items with the manufacturer's instructions. • Try a fabric softener. • Adjust setting to the type...


