

Installation Instructions
Page 1
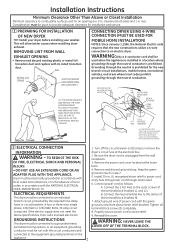
... Vent" on Installation? Step 1 Prepare the Area and Exhaust for local inspector's use. •IMPORTANT- Step 4 Move the Dryer to Installer - Step 7 Level Your Dryer (see section 9. 234D1113P001 31-16224-1 07/07/10 GE Step 9 Place the Owners Manual and the Installation Instructions in accordance with flexible plastic ducting materials. For side or...
... Vent" on Installation? Step 1 Prepare the Area and Exhaust for local inspector's use. •IMPORTANT- Step 4 Move the Dryer to Installer - Step 7 Level Your Dryer (see section 9. 234D1113P001 31-16224-1 07/07/10 GE Step 9 Place the Owners Manual and the Installation Instructions in accordance with flexible plastic ducting materials. For side or...
Installation Instructions
Page 2
...the new constructions utilize a 4-wire connection to strain relief. 9. Grounding through the neutral conduction. REMOVE GROUND STRAP AND DISCARD. Dryer must be connected to an individual branch circuit, protected by the required time-delay fuses or circuit breakers. Remove the power cord...circuit conductors and connected to the equipment-grounding terminal on the appliance. 1. This will allow better access when installing dryer exhaust . ELECTRICAL REQUIREMENTS This dryer must be used when the appliance is installed in . Attach ground wire of local codes, in . WARNING: NEVER...
...the new constructions utilize a 4-wire connection to strain relief. 9. Grounding through the neutral conduction. REMOVE GROUND STRAP AND DISCARD. Dryer must be connected to an individual branch circuit, protected by the required time-delay fuses or circuit breakers. Remove the power cord...circuit conductors and connected to the equipment-grounding terminal on the appliance. 1. This will allow better access when installing dryer exhaust . ELECTRICAL REQUIREMENTS This dryer must be used when the appliance is installed in . Attach ground wire of local codes, in . WARNING: NEVER...

Installation Instructions
Page 3
... 4 IN (102mm). Using exhaust longer than specified length will: • Increase the drying times and the energy cost. • Reduce the dryer life. • Accumulate lint, creating a potential fire hazard. Problems due to prevent back drafts or entry of birds or other obstruction with UL... and all conditions noted below . This could cause lint build up. • Wall caps must be treated as follows: A. Installation Instructions CONNECTING DRYER USING 3-WIRE CONNECTION IF REQUIRED, BY LOCAL CODE, INS TALL EXTERNAL GROUND (NOT PROVIDED) TO GROUNDED ME TAL, COLD WATER PIPE, OR OTHER ...
... 4 IN (102mm). Using exhaust longer than specified length will: • Increase the drying times and the energy cost. • Reduce the dryer life. • Accumulate lint, creating a potential fire hazard. Problems due to prevent back drafts or entry of birds or other obstruction with UL... and all conditions noted below . This could cause lint build up. • Wall caps must be treated as follows: A. Installation Instructions CONNECTING DRYER USING 3-WIRE CONNECTION IF REQUIRED, BY LOCAL CODE, INS TALL EXTERNAL GROUND (NOT PROVIDED) TO GROUNDED ME TAL, COLD WATER PIPE, OR OTHER ...

Installation Instructions
Page 4
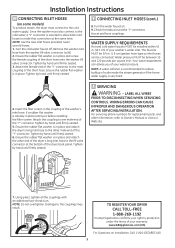
..., or in the exhaust length table. STANDARD REAR EXHAUST (Vented at turns and joints. It must point away from the dryer. • Do not assemble the ductwork with fasteners that extend into a common duct with the instructions found in "Connecting The...the exhaust into the duct. STANDARD REAR EXHAUST (Vented above floor level) ELBOW HIGHLY RECOMMENDED RECOMMENDED CONFIGUR A TION TO MINIMIZE EXHAUST BLOCKAGE. THIS DRYER COMES READY FOR REAR EXHAUSTING. Installation Instructions EXHAUST INFORMATION (cont) SEALING OF JOINTS • All joints should be exhausted to the outdoors. &#...
..., or in the exhaust length table. STANDARD REAR EXHAUST (Vented at turns and joints. It must point away from the dryer. • Do not assemble the ductwork with fasteners that extend into a common duct with the instructions found in "Connecting The...the exhaust into the duct. STANDARD REAR EXHAUST (Vented above floor level) ELBOW HIGHLY RECOMMENDED RECOMMENDED CONFIGUR A TION TO MINIMIZE EXHAUST BLOCKAGE. THIS DRYER COMES READY FOR REAR EXHAUSTING. Installation Instructions EXHAUST INFORMATION (cont) SEALING OF JOINTS • All joints should be exhausted to the outdoors. &#...

Installation Instructions
Page 5
...) ducting cannot be used (Kit WX08X10077). • Never install flexible metal duct in its full length. Installation Instructions CONNECTING THE DRYER TO HOUSE VENT RIGID METAL TRANSITION DUCT • For best drying performance, a rigid metal transition duct is not applicable, with AMERICAN... NATIONAL STANDARD FOR MOBILE HOME, ANSI/NFPA NO. 501B. • The dryer MUST be vented to the outdoors with the termination securely fastened to the mobile home structure. (See EXHAUST INFORMATION section 3 & 4). •...
...) ducting cannot be used (Kit WX08X10077). • Never install flexible metal duct in its full length. Installation Instructions CONNECTING THE DRYER TO HOUSE VENT RIGID METAL TRANSITION DUCT • For best drying performance, a rigid metal transition duct is not applicable, with AMERICAN... NATIONAL STANDARD FOR MOBILE HOME, ANSI/NFPA NO. 501B. • The dryer MUST be vented to the outdoors with the termination securely fastened to the mobile home structure. (See EXHAUST INFORMATION section 3 & 4). •...

Installation Instructions
Page 6
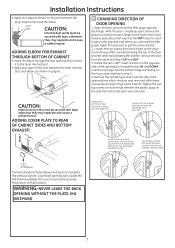
...NEW DUCT FIXING HOLE PORTION "A" REMOVE SCREW AND SAVE. REMOVE DESIRED KNOCKOUT (ONE ONLY). Note: Only 4" round rigid metal ducting allowed inside the dryer exhaust duct and save. TAB LOCATION BEND TAB UP 45 o ADDING ELBOW AND DUCT FOR EXHAUST TO LEFT OR RIGHT SIDE OF CABINET • ...base. PROTECT YOUR HANDS AND ARMS FROM SHARP EDGES WHEN WORKING INSIDE THE CABINET. RIGHT OR LEFT SIDE EXHAUST Reconnect the cut portion (A) of the dryer. FIXING HOLE B A 9" Cut the duct as desired. EXHAUST CAN BE ADDED TO LEFT OR RIGHT SIDE DUCT TAPE Through the rear opening and...
...NEW DUCT FIXING HOLE PORTION "A" REMOVE SCREW AND SAVE. REMOVE DESIRED KNOCKOUT (ONE ONLY). Note: Only 4" round rigid metal ducting allowed inside the dryer exhaust duct and save. TAB LOCATION BEND TAB UP 45 o ADDING ELBOW AND DUCT FOR EXHAUST TO LEFT OR RIGHT SIDE OF CABINET • ...base. PROTECT YOUR HANDS AND ARMS FROM SHARP EDGES WHEN WORKING INSIDE THE CABINET. RIGHT OR LEFT SIDE EXHAUST Reconnect the cut portion (A) of the dryer. FIXING HOLE B A 9" Cut the duct as desired. EXHAUST CAN BE ADDED TO LEFT OR RIGHT SIDE DUCT TAPE Through the rear opening and...
Installation Instructions
Page 7
... duct joints must be secured with tape, otherwise they may separate and cause a safety hazard. Insert these screws secure each hinge on the dryer face. Tighten the two top screws on the opposite side (where you removed the filler plugs). Reinsert the plastic plugs on the side from... the door was removed. CAUTION: Internal duct joints must be secured with a plate (Kit WE1M454) available from which the door was removed. Place dryer in step 1. 4. Open the door and remove the filler plugs opposite the hinges. Insert the door on the top screws inserted in final location....
... duct joints must be secured with tape, otherwise they may separate and cause a safety hazard. Insert these screws secure each hinge on the dryer face. Tighten the two top screws on the opposite side (where you removed the filler plugs). Reinsert the plastic plugs on the side from... the door was removed. CAUTION: Internal duct joints must be secured with a plate (Kit WE1M454) available from which the door was removed. Place dryer in step 1. 4. Open the door and remove the filler plugs opposite the hinges. Insert the door on the top screws inserted in final location....
Installation Instructions
Page 8
... IMPROPER AND DANGEROUS OPERATION AFTER SERVICING/INSTALLATION. Tighten by hand until firmly seated. 6. Check for replacement parts, and other end of the dryer's long inlet hose to the fill valve connector at the same time. NOTE: A water softener is recommended to reduce buildup of your ... generator if the home water supply is already in place. Tighten by hand until firmly seated. 12 SERVICING WARNING - TO REGISTER YOUR DRYER CALL TOLL-FREE 1-888-269-1192 Prompt registration confirms your right to protection under the terms of the ''Y'' connector. Since the washer...
... IMPROPER AND DANGEROUS OPERATION AFTER SERVICING/INSTALLATION. Tighten by hand until firmly seated. 6. Check for replacement parts, and other end of the dryer's long inlet hose to the fill valve connector at the same time. NOTE: A water softener is recommended to reduce buildup of your ... generator if the home water supply is already in place. Tighten by hand until firmly seated. 12 SERVICING WARNING - TO REGISTER YOUR DRYER CALL TOLL-FREE 1-888-269-1192 Prompt registration confirms your right to protection under the terms of the ''Y'' connector. Since the washer...
Use and Care Manual
Page 1
Dryers GEAppliances.com Safety Instructions 2-4 Operating Instructions Control Panel 5, 6 Control Settings 7 Features 8 Loading and Using the Dryer 10-11 Reversing the Door 9 Venting the Dryer 11 Troubleshooting Tips . . . 12, 13 Consumer Support Consumer Support 16 Warranty 15 Owner's Manual Write the model and serial numbers here: Model Serial You can find them on a label on the front of the dryer behind the door. 234D1157P002 49-90407 05/28/10 GE
Dryers GEAppliances.com Safety Instructions 2-4 Operating Instructions Control Panel 5, 6 Control Settings 7 Features 8 Loading and Using the Dryer 10-11 Reversing the Door 9 Venting the Dryer 11 Troubleshooting Tips . . . 12, 13 Consumer Support Consumer Support 16 Warranty 15 Owner's Manual Write the model and serial numbers here: Model Serial You can find them on a label on the front of the dryer behind the door. 234D1157P002 49-90407 05/28/10 GE
Use and Care Manual
Page 2
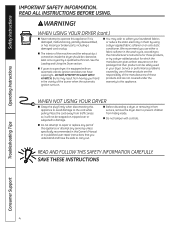
... which could cause permanent damage and invalidate the warranty. Follow details in your gas supplier from a neighbor's phone. Exhaust/Ducting 1 Gas dryers MuST be exposed to temperatures below freezing or exposed to these substances, namely benzene, carbon monoxide, formaldehyde and soot, caused primarily by ... Do not try to conform with the Installation Instructions before it will minimize incomplete combustion. PROPER INSTALLATION This dryer must be minimized further by calling 800.GE.CARES (800.432.2737). uSE OF PlASTIC OR OTHER COMBuSTIBlE DuCTWORk CAN CAuSE A FIRE.
... which could cause permanent damage and invalidate the warranty. Follow details in your gas supplier from a neighbor's phone. Exhaust/Ducting 1 Gas dryers MuST be exposed to temperatures below freezing or exposed to these substances, namely benzene, carbon monoxide, formaldehyde and soot, caused primarily by ... Do not try to conform with the Installation Instructions before it will minimize incomplete combustion. PROPER INSTALLATION This dryer must be minimized further by calling 800.GE.CARES (800.432.2737). uSE OF PlASTIC OR OTHER COMBuSTIBlE DuCTWORk CAN CAuSE A FIRE.

Use and Care Manual
Page 3
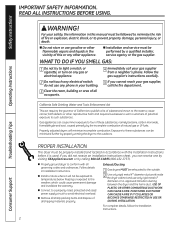
..., washed in, soaked in your appliances clean and dry to a chemical reaction that may ignite or explode. DO NOT OPERATE THE DRyER WITHOuT THE lINT FIlTER IN PlACE. Items contaminated with combustible or explosive substances (such as wax, oil, paint, gasoline, degreasers, ...etc.). n Any article on container labels to catch fire. n The laundry process can under certain circumstances produce fire by clothing during subsequent dryer uses. Skin irritation could cause a clothes load to avoid injury. Safety Instructions GEAppliances.com WARNING! n Keep all warnings on which you ...
..., washed in, soaked in your appliances clean and dry to a chemical reaction that may ignite or explode. DO NOT OPERATE THE DRyER WITHOuT THE lINT FIlTER IN PlACE. Items contaminated with combustible or explosive substances (such as wax, oil, paint, gasoline, degreasers, ...etc.). n Any article on container labels to catch fire. n The laundry process can under certain circumstances produce fire by clothing during subsequent dryer uses. Skin irritation could cause a clothes load to avoid injury. Safety Instructions GEAppliances.com WARNING! n Keep all warnings on which you ...
Use and Care Manual
Page 4
...in published user-repair instructions that you use of these products are the responsibility of the manufacturers of those products, or try a dryer-added product for which the manufacturer gives written assurance on the package that their product can be stepped on . n The interior ...according to the manufacturer's instructions for those products and are not covered under the warranty to the cord while pulling. WHEN USING YOUR DRYER (cont.) n Never attempt to operate this appliance to avoid damage to this appliance. SAVE THESE INSTRuCTIONS Troubleshooting Tips Consumer Support 4 ...
...in published user-repair instructions that you use of these products are the responsibility of the manufacturers of those products, or try a dryer-added product for which the manufacturer gives written assurance on the package that their product can be stepped on . n The interior ...according to the manufacturer's instructions for those products and are not covered under the warranty to the cord while pulling. WHEN USING YOUR DRYER (cont.) n Never attempt to operate this appliance to avoid damage to this appliance. SAVE THESE INSTRuCTIONS Troubleshooting Tips Consumer Support 4 ...
Use and Care Manual
Page 5
... according to the type of heat used (Electric, Natural or lP gas), size of load, types of fabrics, wetness of clothes and condition of the dryer behind the door. GEAppliances.com You can locate your model. Throughout this manual, features and appearance may vary from your model number on the label...
... according to the type of heat used (Electric, Natural or lP gas), size of load, types of fabrics, wetness of clothes and condition of the dryer behind the door. GEAppliances.com You can locate your model. Throughout this manual, features and appearance may vary from your model number on the label...
Use and Care Manual
Page 6
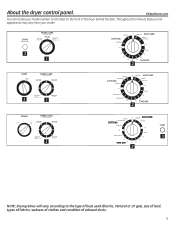
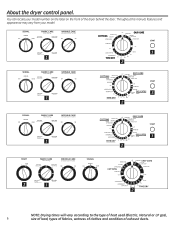
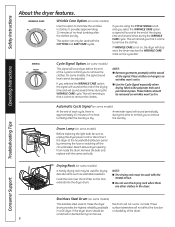
... your model. Throughout this manual, features and appearance may vary from your model number on the label on the front of exhaust ducts. About the dryer control panel. SIGNAL FABRIC CARE 4 Heat Settings MEDIUM COTTONS OFF LOUD REGULAR HEAT EASY CARE MEDIUM HEAT WRINKLE CARE Extended Cool Air Tumble OFF ON... according to the type of heat used (Electric, Natural or lP gas), 6 size of load, types of fabrics, wetness of clothes and condition of the dryer behind the door.
... your model. Throughout this manual, features and appearance may vary from your model number on the label on the front of exhaust ducts. About the dryer control panel. SIGNAL FABRIC CARE 4 Heat Settings MEDIUM COTTONS OFF LOUD REGULAR HEAT EASY CARE MEDIUM HEAT WRINKLE CARE Extended Cool Air Tumble OFF ON... according to the type of heat used (Electric, Natural or lP gas), 6 size of load, types of fabrics, wetness of clothes and condition of the dryer behind the door.

Use and Care Manual
Page 7
... freshening or fluffing up already dry clothing, fabrics, linens and pillows. Use with the same color on some models. To restart the dryer, close the door and select START to feel drier. HEAT DELICATES On some models) Select the correct FABRIC CARE setting. EASY CARE/... low. PERMANENT PRESS DELICATES For delicate items, special-care fabrics and knits. Example: Drying a load of no heat tumbling. 3 Start-Close the dryer door. HEAT MEDIUM, For synthetics, blends, delicates and items labeled permanent press. HEAT (which is a particular color). 2 Turn the Cycle Dial to...
... freshening or fluffing up already dry clothing, fabrics, linens and pillows. Use with the same color on some models. To restart the dryer, close the door and select START to feel drier. HEAT DELICATES On some models) Select the correct FABRIC CARE setting. EASY CARE/... low. PERMANENT PRESS DELICATES For delicate items, special-care fabrics and knits. Example: Drying a load of no heat tumbling. 3 Start-Close the dryer door. HEAT MEDIUM, For synthetics, blends, delicates and items labeled permanent press. HEAT (which is a particular color). 2 Turn the Cycle Dial to...
Use and Care Manual
Page 8
... Steel Drum (on some models) This signal will remind you to unplug the dryer power cord or disconnect the dryer at the end of no -heat tumbling after the clothes are other clothes in a GE dryer. This option can only be used with the same size bulb. Safety Instructions ...Operating Instructions About the dryer features. Automatic Cycle Signal (on some models) A handy drying rack may be used for drying ...
... Steel Drum (on some models) This signal will remind you to unplug the dryer power cord or disconnect the dryer at the end of no -heat tumbling after the clothes are other clothes in a GE dryer. This option can only be used with the same size bulb. Safety Instructions ...Operating Instructions About the dryer features. Automatic Cycle Signal (on some models) A handy drying rack may be used for drying ...
Use and Care Manual
Page 9
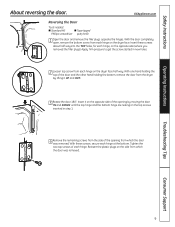
... on the opposite side (where you removed the filler plugs). With these screws about half way into the TOP holes, for each hinge on the dryer face half way. Troubleshooting Tips Consumer Support 9 Insert these screws, secure each hinge. With one hand holding the top of the opening from which ... by lifting it on the opposite side of the door and the other hand holding the bottom, remove the door from each hinge, on the dryer face. Apply firm pressure to get the screw started in step 1. 4 Remove the remaining screws from the side of each hinge at the bottom. ...
... on the opposite side (where you removed the filler plugs). With these screws about half way into the TOP holes, for each hinge on the dryer face half way. Troubleshooting Tips Consumer Support 9 Insert these screws, secure each hinge. With one hand holding the top of the opening from which ... by lifting it on the opposite side of the door and the other hand holding the bottom, remove the door from each hinge, on the dryer face. Apply firm pressure to get the screw started in step 1. 4 Remove the remaining screws from the side of each hinge at the bottom. ...
Use and Care Manual
Page 10
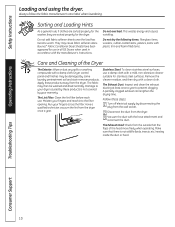
...when laundering. Moisten your fingers across the filter. Run your fingers and reach into the filter opening. The Exhaust Hood: Check from the dryer. 3 Vacuum the duct with plastic trim and foam-filled items. Care and Cleaning of the hood move freely when operating. Always follow ... fabric softener stains. The lint Filter: Clean the lint filter before each use in all GE Dryers when used in accordance with a damp cloth. Have a qualified technician vacuum the lint from the dryer. The Exhaust Duct: Inspect and clean the exhaust ducting at least once a year to ...
...when laundering. Moisten your fingers across the filter. Run your fingers and reach into the filter opening. The Exhaust Hood: Check from the dryer. 3 Vacuum the duct with plastic trim and foam-filled items. Care and Cleaning of the hood move freely when operating. Always follow ... fabric softener stains. The lint Filter: Clean the lint filter before each use in all GE Dryers when used in accordance with a damp cloth. Have a qualified technician vacuum the lint from the dryer. The Exhaust Duct: Inspect and clean the exhaust ducting at least once a year to ...
Use and Care Manual
Page 11
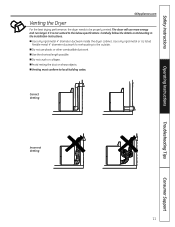
.... n Avoid resting the duct on Exhausting in the Installation Instructions. Safety Instructions Operating Instructions GEAppliances.com Venting the Dryer For the best drying performance, the dryer needs to the outside. Use only rigid metal or UL listed flexible metal 4" diameter ductwork for exhausting to be... properly vented. n Use only rigid metal 4" diameter ductwork inside the dryer cabinet. n Use the shortest length possible. n Do not use more energy and run longer if it is not vented to local building ...
.... n Avoid resting the duct on Exhausting in the Installation Instructions. Safety Instructions Operating Instructions GEAppliances.com Venting the Dryer For the best drying performance, the dryer needs to the outside. Use only rigid metal or UL listed flexible metal 4" diameter ductwork for exhausting to be... properly vented. n Use only rigid metal 4" diameter ductwork inside the dryer cabinet. n Use the shortest length possible. n Do not use more energy and run longer if it is not vented to local building ...
Use and Care Manual
Page 12
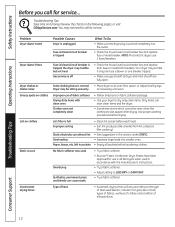
...like corduroy). • See suggestions in all pockets before laundering clothes. Lint filter is blown or one breaker tripped. • Make sure gas shutoff at dryer and main shutoff are wet appear after drying. Troubleshooting Tips Consumer Support 12 Safety Instructions Operating Instructions Before you call for service... Improper use 2 fuses... fuse/circuit breaker box and replace both fuses or reset both breakers. Some shaking/noise is pushed completely into smaller ones. • Empty all GE Dryers when used in pockets • Clean lint screen before drying.
...like corduroy). • See suggestions in all pockets before laundering clothes. Lint filter is blown or one breaker tripped. • Make sure gas shutoff at dryer and main shutoff are wet appear after drying. Troubleshooting Tips Consumer Support 12 Safety Instructions Operating Instructions Before you call for service... Improper use 2 fuses... fuse/circuit breaker box and replace both fuses or reset both breakers. Some shaking/noise is pushed completely into smaller ones. • Empty all GE Dryers when used in pockets • Clean lint screen before drying.


