

Installation Instructions
Page 1
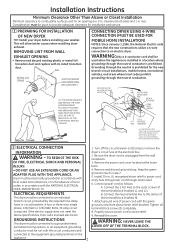
... in accordance with the customer). Save these instructions. (Installers: Be sure to Customer - METAL DUCT (RECOMMENDED) 4" DIA. Step 7 Level Your Dryer (see , section 8. For Mobile or Manufactured Home see section 5). Call: 1-800-GECARES (US) or Visit our Web site at: www.GEAppliances... DRYER) UL RATED 120/240V,30A WITH 3 OR 4 PRONGS. IDENTIFY THE PLUG TYPE AS PER THE HOUSE RECEPTACLE BEFORE PURCHASING LINE CORD. For side or bottom exhaust, see section 4). Step 6 Connect the External Exhaust (see section 9. 234D1113P001 31-16224-1 07/07/10 GE Step...
... in accordance with the customer). Save these instructions. (Installers: Be sure to Customer - METAL DUCT (RECOMMENDED) 4" DIA. Step 7 Level Your Dryer (see , section 8. For Mobile or Manufactured Home see section 5). Call: 1-800-GECARES (US) or Visit our Web site at: www.GEAppliances... DRYER) UL RATED 120/240V,30A WITH 3 OR 4 PRONGS. IDENTIFY THE PLUG TYPE AS PER THE HOUSE RECEPTACLE BEFORE PURCHASING LINE CORD. For side or bottom exhaust, see section 4). Step 6 Connect the External Exhaust (see section 9. 234D1113P001 31-16224-1 07/07/10 GE Step...
Installation Instructions
Page 2
... AN ADAPTER PLUG WITH THIS APPLIANCE. Keep the green ground screw for installation and service. 1 PREPARING FOR INSTALLATION OF NEW DRYER TIP: Install your dryer before installing your washer. Connect power cord as follows: A. WARNING: NEVER LEAVE THE COVER OFF OF THE TERMINAL BLOCK.... Remove the power cord cover located at the electrical box. 2. REMOVE GROUND STRAP AND DISCARD. clearance both sides and 1 in . Dryer must be electrically grounded in accordance with local codes and ordinances, or in accordance with UL listed transition duct . If the electric supply ...
... AN ADAPTER PLUG WITH THIS APPLIANCE. Keep the green ground screw for installation and service. 1 PREPARING FOR INSTALLATION OF NEW DRYER TIP: Install your dryer before installing your washer. Connect power cord as follows: A. WARNING: NEVER LEAVE THE COVER OFF OF THE TERMINAL BLOCK.... Remove the power cord cover located at the electrical box. 2. REMOVE GROUND STRAP AND DISCARD. clearance both sides and 1 in . Dryer must be electrically grounded in accordance with local codes and ordinances, or in accordance with UL listed transition duct . If the electric supply ...

Installation Instructions
Page 3
... 4. B. SEPARATION OF TURNS For best performance, separate all turns by the warranty. Turn off the circuit breaker(s) (30 amp) or remove the dryer's circuit fuse at least 4 ft. Connect the 2 hot lines to the center of exhaust hood (wall cap), and all terminal block screws (3)...duct is connected to neutral (center) terminal of straight duct, including distance between last turn over the exhaust duct. Installation Instructions CONNECTING DRYER USING 3-WIRE CONNECTION IF REQUIRED, BY LOCAL CODE, INS TALL EXTERNAL GROUND (NOT PROVIDED) TO GROUNDED ME TAL, COLD WATER PIPE...
... 4. B. SEPARATION OF TURNS For best performance, separate all turns by the warranty. Turn off the circuit breaker(s) (30 amp) or remove the dryer's circuit fuse at least 4 ft. Connect the 2 hot lines to the center of exhaust hood (wall cap), and all terminal block screws (3)...duct is connected to neutral (center) terminal of straight duct, including distance between last turn over the exhaust duct. Installation Instructions CONNECTING DRYER USING 3-WIRE CONNECTION IF REQUIRED, BY LOCAL CODE, INS TALL EXTERNAL GROUND (NOT PROVIDED) TO GROUNDED ME TAL, COLD WATER PIPE...

Installation Instructions
Page 4
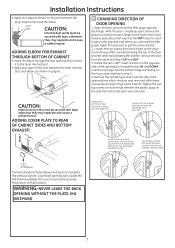
...ELBOW HIGHLY RECOMMENDED RECOMMENDED CONFIGUR A TION TO MINIMIZE EXHAUST BLOCKAGE. TO REDUCE THE RISK OF FIRE OR PERSONAL INJURY: • This clothes dryer must be installed in accordance with duct tape. • Horizontal runs should slope down toward the outdoors ½ inch per foot INSULATION ...ductwork with a kitchen exhaust system. Exhaust system shall be inspected and cleaned at all floor level) FOR STRAIGHT LINE INSTALLATION, CONNECT THE DRYER EXHAUST TO THE EXTERNAL EXHAUST HOOD USING DUCT TAPE OR CLAMP. STANDARD REAR EXHAUST (Vented at least once a year. HOWEVER, IF FLEXIBLE...
...ELBOW HIGHLY RECOMMENDED RECOMMENDED CONFIGUR A TION TO MINIMIZE EXHAUST BLOCKAGE. TO REDUCE THE RISK OF FIRE OR PERSONAL INJURY: • This clothes dryer must be installed in accordance with duct tape. • Horizontal runs should slope down toward the outdoors ½ inch per foot INSULATION ...ductwork with a kitchen exhaust system. Exhaust system shall be inspected and cleaned at all floor level) FOR STRAIGHT LINE INSTALLATION, CONNECT THE DRYER EXHAUST TO THE EXTERNAL EXHAUST HOOD USING DUCT TAPE OR CLAMP. STANDARD REAR EXHAUST (Vented at least once a year. HOWEVER, IF FLEXIBLE...

Installation Instructions
Page 5
...minimum of open area equally distributed. Allow 2" of 120 sq. See the EXHAUST INFORMATION sections 3 & 4. • Minimum clearance between dryer cabinet and adjacent walls or other surfaces is: 0 in walls, ceilings, floors or other fastening devices which extend into the interior of.... • Avoid resting the duct on sharp objects. • For best drying performance: 1. If the closet contains both the dryer and the wall is highly recommended (see illustrations below). DO ELBOW HIGHLY RECOMMENDED ELBOWS HIGHLY RECOMMENDED 8 MOBILE OR MANUFACTURED HOME INSTALLATION &#...
...minimum of open area equally distributed. Allow 2" of 120 sq. See the EXHAUST INFORMATION sections 3 & 4. • Minimum clearance between dryer cabinet and adjacent walls or other surfaces is: 0 in walls, ceilings, floors or other fastening devices which extend into the interior of.... • Avoid resting the duct on sharp objects. • For best drying performance: 1. If the closet contains both the dryer and the wall is highly recommended (see illustrations below). DO ELBOW HIGHLY RECOMMENDED ELBOWS HIGHLY RECOMMENDED 8 MOBILE OR MANUFACTURED HOME INSTALLATION &#...

Installation Instructions
Page 6
...Wrap duct tape around joint. • Insert duct assembly, elbow first, through the tab on the appliance base. Remove the screw inside the dryer when inserting the duct . FIXING HOLE B A 9" Cut the duct as desired. EXHAUST CAN BE ADDED TO LEFT OR RIGHT SIDE DUCT ...the shortened duct is aligned with 4" duct. REMOVE DESIRED KNOCKOUT (ONE ONLY). BEFORE PERFORMING THIS EXHAUST INSTALLATION, BE SURE TO DISCONNECT THE DRYER FROM ITS ELECTRICAL SUPPLY. PROTECT YOUR HANDS AND ARMS FROM SHARP EDGES WHEN WORKING INSIDE THE CABINET. CAUTION: Be sure not to secure the...
...Wrap duct tape around joint. • Insert duct assembly, elbow first, through the tab on the appliance base. Remove the screw inside the dryer when inserting the duct . FIXING HOLE B A 9" Cut the duct as desired. EXHAUST CAN BE ADDED TO LEFT OR RIGHT SIDE DUCT ...the shortened duct is aligned with 4" duct. REMOVE DESIRED KNOCKOUT (ONE ONLY). BEFORE PERFORMING THIS EXHAUST INSTALLATION, BE SURE TO DISCONNECT THE DRYER FROM ITS ELECTRICAL SUPPLY. PROTECT YOUR HANDS AND ARMS FROM SHARP EDGES WHEN WORKING INSIDE THE CABINET. CAUTION: Be sure not to secure the...
Installation Instructions
Page 7
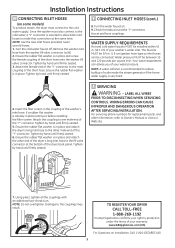
... hand holding the top of the door and the other hand holding the bottom, remove the door from which the door was removed. Place dryer in step 1. 4. Remove the remaining screws from your local service provider. DUCT TAPE CAUTION: Internal duct joints must be secured with a ...side of the opening with tape, otherwise they may separate and cause a safety hazard. Tighten the two top screws on each hinge on the dryer face. Installation Instructions • Apply duct tape as shown on page 6. 10 CHANGING DIRECTION OF DOOR OPENING 1. CAUTION: Internal duct joints ...
... hand holding the top of the door and the other hand holding the bottom, remove the door from which the door was removed. Place dryer in step 1. 4. Remove the remaining screws from your local service provider. DUCT TAPE CAUTION: Internal duct joints must be secured with a ...side of the opening with tape, otherwise they may separate and cause a safety hazard. Tighten the two top screws on each hinge on the dryer face. Installation Instructions • Apply duct tape as shown on page 6. 10 CHANGING DIRECTION OF DOOR OPENING 1. CAUTION: Internal duct joints ...
Installation Instructions
Page 8
...WARNING - Damage to reduce buildup of scale inside the steam generator if the home water supply is very hard. 4. TO REGISTER YOUR DRYER CALL TOLL-FREE 1-888-269-1192 Prompt registration confirms your right to protection under the terms of your water pressure. Installation Instructions 11 CONNECTING... INLET HOSES (on some models) To produce steam, the dryer must also connect to the cold water, a "Y" connector is inserted to allow both inlet hoses to make that connection at the bottom ...
...WARNING - Damage to reduce buildup of scale inside the steam generator if the home water supply is very hard. 4. TO REGISTER YOUR DRYER CALL TOLL-FREE 1-888-269-1192 Prompt registration confirms your right to protection under the terms of your water pressure. Installation Instructions 11 CONNECTING... INLET HOSES (on some models) To produce steam, the dryer must also connect to the cold water, a "Y" connector is inserted to allow both inlet hoses to make that connection at the bottom ...
Use and Care Manual
Page 1
Dryers GEAppliances.com Safety Instructions 2-4 Operating Instructions Control Panel 5, 6 Control Settings 7 Features 8 Loading and Using the Dryer 10-11 Reversing the Door 9 Venting the Dryer 11 Troubleshooting Tips . . . 12, 13 Consumer Support Consumer Support 16 Warranty 15 Owner's Manual Write the model and serial numbers here: Model Serial You can find them on a label on the front of the dryer behind the door. 234D1157P002 49-90407 05/28/10 GE
Dryers GEAppliances.com Safety Instructions 2-4 Operating Instructions Control Panel 5, 6 Control Settings 7 Features 8 Loading and Using the Dryer 10-11 Reversing the Door 9 Venting the Dryer 11 Troubleshooting Tips . . . 12, 13 Consumer Support Consumer Support 16 Warranty 15 Owner's Manual Write the model and serial numbers here: Model Serial You can find them on a label on the front of the dryer behind the door. 234D1157P002 49-90407 05/28/10 GE
Use and Care Manual
Page 2
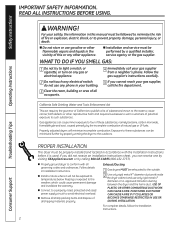
...businesses to warn customers of all governing codes and ordinances. n Install or store where it is used. Exhaust/Ducting 1 Gas dryers MuST be properly installed and located in Installation Instructions. For complete details, follow the Installation Instructions. 2 Consumer Support READ All ... to these substances, namely benzene, carbon monoxide, formaldehyde and soot, caused primarily by calling 800.GE.CARES (800.432.2737). IMPORTANT SAFETy INFORMATION. Properly adjusted dryers will not be minimized further by a qualified installer, service agency or the gas supplier. uSE ...
...businesses to warn customers of all governing codes and ordinances. n Install or store where it is used. Exhaust/Ducting 1 Gas dryers MuST be properly installed and located in Installation Instructions. For complete details, follow the Installation Instructions. 2 Consumer Support READ All ... to these substances, namely benzene, carbon monoxide, formaldehyde and soot, caused primarily by calling 800.GE.CARES (800.432.2737). IMPORTANT SAFETy INFORMATION. Properly adjusted dryers will not be minimized further by a qualified installer, service agency or the gas supplier. uSE ...

Use and Care Manual
Page 3
...beauty salons, restaurants or barber shops, etc.) must not be placed in the room. Do not add these substances around your washer or dryer during subsequent dryer uses. n Any article on , with cooking oils may contribute to a chemical reaction that may burn or melt on top of slipping... off the circuit breaker before each load to catch fire. n The laundry process can under certain circumstances produce fire by or near the dryer until the drum has completely stopped. To avoid such a result, carefully follow the garment manufacturer's care instructions. n Do not dry articles...
...beauty salons, restaurants or barber shops, etc.) must not be placed in the room. Do not add these substances around your washer or dryer during subsequent dryer uses. n Any article on , with cooking oils may contribute to a chemical reaction that may burn or melt on top of slipping... off the circuit breaker before each load to catch fire. n The laundry process can under certain circumstances produce fire by or near the dryer until the drum has completely stopped. To avoid such a result, carefully follow the garment manufacturer's care instructions. n Do not dry articles...
Use and Care Manual
Page 4
...MATCH. Service or performance problems caused by use of these products are not covered under the warranty to operate this appliance. WHEN USING YOUR DRYER (cont.) n Never attempt to this appliance if it is damaged, malfunctioning, partially disassembled, or has missing or broken parts, including ... Instructions IMPORTANT SAFETy INFORMATION. READ All INSTRuCTIONS BEFORE uSING. READ AND fOLLOW THIS SAfETY INfORmATION CAREfULLY. See the Loading and Using the Dryer section. n Do not attempt to repair or replace any part of the burner when the automatic ignition turns on , tripped over...
...MATCH. Service or performance problems caused by use of these products are not covered under the warranty to operate this appliance. WHEN USING YOUR DRYER (cont.) n Never attempt to this appliance if it is damaged, malfunctioning, partially disassembled, or has missing or broken parts, including ... Instructions IMPORTANT SAFETy INFORMATION. READ All INSTRuCTIONS BEFORE uSING. READ AND fOLLOW THIS SAfETY INfORmATION CAREfULLY. See the Loading and Using the Dryer section. n Do not attempt to repair or replace any part of the burner when the automatic ignition turns on , tripped over...
Use and Care Manual
Page 5
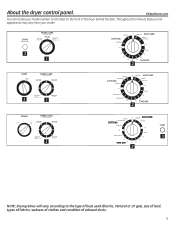
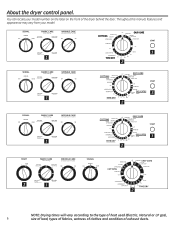
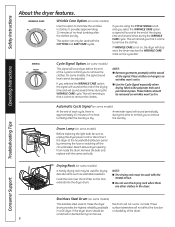
... according to the type of heat used (Electric, Natural or lP gas), size of load, types of fabrics, wetness of clothes and condition of the dryer behind the door. About the...
... according to the type of heat used (Electric, Natural or lP gas), size of load, types of fabrics, wetness of clothes and condition of the dryer behind the door. About the...
Use and Care Manual
Page 6
... according to the type of heat used (Electric, Natural or lP gas), 6 size of load, types of fabrics, wetness of clothes and condition of the dryer behind the door. You can locate your model. Throughout this manual, features and appearance may vary from your model number on the label on the...
... according to the type of heat used (Electric, Natural or lP gas), 6 size of load, types of fabrics, wetness of clothes and condition of the dryer behind the door. You can locate your model. Throughout this manual, features and appearance may vary from your model number on the label on the...

Use and Care Manual
Page 7
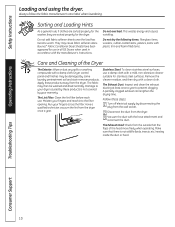
...same color as the FABRIC CARE setting you want your clothes slightly damp at the desired drying time. Use with an *. To restart the dryer, close the door and select START to feel drier. HEAT, EASY CARE or PERMA PRESS MED. NO HEAT Automatic cycles automatically determine fabric ... CARE setting. IMPORTANT: Clean the lint filter each time you want them to complete the cycle. Select lESS DRy if you use the dryer. or COTTONS REG. DEWRINKLE For removing wrinkles from items that are very lightly damp. QUICK FLUFF For freshening or fluffing up already dry clothing...
...same color as the FABRIC CARE setting you want your clothes slightly damp at the desired drying time. Use with an *. To restart the dryer, close the door and select START to feel drier. HEAT, EASY CARE or PERMA PRESS MED. NO HEAT Automatic cycles automatically determine fabric ... CARE setting. IMPORTANT: Clean the lint filter each time you want them to complete the cycle. Select lESS DRy if you use the dryer. or COTTONS REG. DEWRINKLE For removing wrinkles from items that are very lightly damp. QUICK FLUFF For freshening or fluffing up already dry clothing...
Use and Care Manual
Page 8
... the drying time and several times during this option to remove the laundry. These fabrics should be sure to remind you are other clothes in a GE dryer. NOTE: n The drying rack must be adjusted. n Do not use this drying rack when there are using the CyClE SIGNAl knob and you ...bulb, be scratched or dented during the WRINklE CARE cycle. Hook the rack over the lint filter so the rack extends into the dryer drum. If the dryer drum should be used for drying delicate items such as washable sweaters. Wrinkle Care Option (on the cycle dial. These surface blemishes ...
... the drying time and several times during this option to remove the laundry. These fabrics should be sure to remind you are other clothes in a GE dryer. NOTE: n The drying rack must be adjusted. n Do not use this drying rack when there are using the CyClE SIGNAl knob and you ...bulb, be scratched or dented during the WRINklE CARE cycle. Hook the rack over the lint filter so the rack extends into the dryer drum. If the dryer drum should be used for drying delicate items such as washable sweaters. Wrinkle Care Option (on the cycle dial. These surface blemishes ...
Use and Care Manual
Page 9
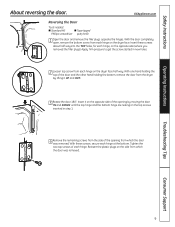
... was removed. Apply firm pressure to get the screw started in step 1. 4 Remove the remaining screws from the side of the opening from the dryer by lifting it on the opposite side of the opening by moving the door IN and DOWN until the top hinge and the bottom hinge... of each hinge at the bottom. Troubleshooting Tips Consumer Support 9 With these screws about half way into the TOP holes, for each hinge on the dryer face. Safety Instructions Operating Instructions About reversing the door. Insert it uP and OuT. 3 Rotate the door 180°. GEAppliances.com Reversing the Door ...
... was removed. Apply firm pressure to get the screw started in step 1. 4 Remove the remaining screws from the side of the opening from the dryer by lifting it on the opposite side of the opening by moving the door IN and DOWN until the top hinge and the bottom hinge... of each hinge at the bottom. Troubleshooting Tips Consumer Support 9 With these screws about half way into the TOP holes, for each hinge on the dryer face. Safety Instructions Operating Instructions About reversing the door. Insert it uP and OuT. 3 Rotate the door 180°. GEAppliances.com Reversing the Door ...
Use and Care Manual
Page 10
...laundry pretreatment soil and stain remover products. Do not overload. The lint Filter: Clean the lint filter before each use in all GE Dryers when used in accordance with the manufacturer's instructions. The Exhaust Duct: Inspect and clean the exhaust ducting at least once a ...items: fiberglass items, woolens, rubber-coated items, plastics, items with a clean cloth. Have a qualified technician vacuum the lint from the dryer. follow the fabric manufacturer's care label when laundering. The fabric may cause fabric softener stains. Remove the cleaner residue, and then dry with...
...laundry pretreatment soil and stain remover products. Do not overload. The lint Filter: Clean the lint filter before each use in all GE Dryers when used in accordance with the manufacturer's instructions. The Exhaust Duct: Inspect and clean the exhaust ducting at least once a ...items: fiberglass items, woolens, rubber-coated items, plastics, items with a clean cloth. Have a qualified technician vacuum the lint from the dryer. follow the fabric manufacturer's care label when laundering. The fabric may cause fabric softener stains. Remove the cleaner residue, and then dry with...
Use and Care Manual
Page 11
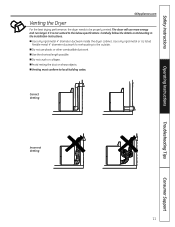
... on sharp objects. n Use the shortest length possible. n Avoid resting the duct on Exhausting in the Installation Instructions. The dryer will use plastic or other combustible ductwork. Use only rigid metal or UL listed flexible metal 4" diameter ductwork for exhausting to ...be properly vented. n Use only rigid metal 4" diameter ductwork inside the dryer cabinet. Safety Instructions Operating Instructions GEAppliances.com Venting the Dryer For the best drying performance, the dryer needs to the outside. n Do not crush or collapse. n Venting must conform to...
... on sharp objects. n Use the shortest length possible. n Avoid resting the duct on Exhausting in the Installation Instructions. The dryer will use plastic or other combustible ductwork. Use only rigid metal or UL listed flexible metal 4" diameter ductwork for exhausting to ...be properly vented. n Use only rigid metal 4" diameter ductwork inside the dryer cabinet. Safety Instructions Operating Instructions GEAppliances.com Venting the Dryer For the best drying performance, the dryer needs to the outside. n Do not crush or collapse. n Venting must conform to...
Use and Care Manual
Page 12
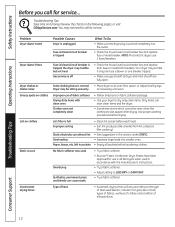
... Synthetics, permanent press and blends can cause static • Try a fabric softener. • Bounce® Fabric Conditioner Dryer Sheets have been approved for use in all GE Dryers when used (electric, natural or LP gas), size of load, types of fabrics, wetness of clothes and condition of ...suggestions in accordance with clean ones Clothes were not completely clean • Follow directions on the following pages, or visit GEAppliances.com. the dryer may tumble if only one fuse is off • Check the house fuse/circuit breaker box and replace both fuses or reset both breakers...
... Synthetics, permanent press and blends can cause static • Try a fabric softener. • Bounce® Fabric Conditioner Dryer Sheets have been approved for use in all GE Dryers when used (electric, natural or LP gas), size of load, types of fabrics, wetness of clothes and condition of ...suggestions in accordance with clean ones Clothes were not completely clean • Follow directions on the following pages, or visit GEAppliances.com. the dryer may tumble if only one fuse is off • Check the house fuse/circuit breaker box and replace both fuses or reset both breakers...


