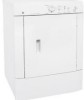
Owners Manual
Page 1
... and Cleaning 8 Controls 6 Features 7 Loading and Using the Dryer 8 Installation Instructions 9-18 Electrical Installation for Electric Dryer 16, 17 Electrical Requirements 11 Exhausting the Dryer 12, 13 Gas Connection for Gas Dryer 18 Gas Supply Requirements 13 Location of Your Dryer 14 Mobile Home Installation 15 Preparing to Install Your Dryer . . . . . .9, 10 Reversing the Door Swing 18 Troubleshooting Tips...
... and Cleaning 8 Controls 6 Features 7 Loading and Using the Dryer 8 Installation Instructions 9-18 Electrical Installation for Electric Dryer 16, 17 Electrical Requirements 11 Exhausting the Dryer 12, 13 Gas Connection for Gas Dryer 18 Gas Supply Requirements 13 Location of Your Dryer 14 Mobile Home Installation 15 Preparing to Install Your Dryer . . . . . .9, 10 Reversing the Door Swing 18 Troubleshooting Tips...

Owners Manual
Page 2
...to the state to cause cancer, birth defects or other appliance. ■ Installation and service must be minimized further by properly venting the dryer to the outdoors. 2 Follow the gas supplier's instructions carefully. 5 If you cannot reach your gas supplier, call your gas supplier from... of all occupants. 4 Immediately call the fire department. WARNING! do not use any phone in the vicinity of fire or explosion, electric shock, or to such substances. Exposure to these substances, namely benzene, carbon monoxide, formaldehyde and soot, caused primarily by a qualified installer...
...to the state to cause cancer, birth defects or other appliance. ■ Installation and service must be minimized further by properly venting the dryer to the outdoors. 2 Follow the gas supplier's instructions carefully. 5 If you cannot reach your gas supplier, call your gas supplier from... of all occupants. 4 Immediately call the fire department. WARNING! do not use any phone in the vicinity of fire or explosion, electric shock, or to such substances. Exposure to these substances, namely benzene, carbon monoxide, formaldehyde and soot, caused primarily by a qualified installer...
Owners Manual
Page 3
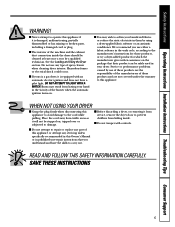
... OR BECOMES OTHERWISE RESTRICTED IN USE OR DURING INSTALLATION. Safety Instructions Operating Instructions Installation Instructions Troubleshooting Tips Consumer Support PROPER INSTALLATION This dryer must be properly installed and located in Installation Instructions. ■ Install or store where it is used. ■ Properly ground...to temperatures below freezing or exposed to the weather. ■ Connect to a properly rated, protected and sized power supply circuit to avoid electrical overload. ■ Remove all sharp packing items and dispose of all governing codes and ordinances.
... OR BECOMES OTHERWISE RESTRICTED IN USE OR DURING INSTALLATION. Safety Instructions Operating Instructions Installation Instructions Troubleshooting Tips Consumer Support PROPER INSTALLATION This dryer must be properly installed and located in Installation Instructions. ■ Install or store where it is used. ■ Properly ground...to temperatures below freezing or exposed to the weather. ■ Connect to a properly rated, protected and sized power supply circuit to avoid electrical overload. ■ Remove all sharp packing items and dispose of all governing codes and ordinances.
Owners Manual
Page 4
...the area underneath and around the exhaust opening and surrounding areas free from the power supply. ■ Do not spray any type of the dryer. ■ Close supervision is necessary if this appliance is moving. To avoid such a result, carefully follow the garment manufacturer's care instructions. ...; Do not dry fiberglass articles in or near the dryer until the drum has completely stopped. ■ Clean the lint filter before attempting any maintenance or cleaning (except the removal and cleaning of electric shock, unplug this or any time. ■ Do not place items exposed to ...
...the area underneath and around the exhaust opening and surrounding areas free from the power supply. ■ Do not spray any type of the dryer. ■ Close supervision is necessary if this appliance is moving. To avoid such a result, carefully follow the garment manufacturer's care instructions. ...; Do not dry fiberglass articles in or near the dryer until the drum has completely stopped. ■ Clean the lint filter before attempting any maintenance or cleaning (except the removal and cleaning of electric shock, unplug this or any time. ■ Do not place items exposed to ...
Owners Manual
Page 5
...a fabric softener in your laundered fabrics or reduce the static electricity in this appliance to avoid damage to the cord while pulling. See the Loading and Using the Dryer section. Burns may result from hiding inside the dryer should be cleaned at least once a year by a qualified... technician. Hazardous fumes or electrical shock could occur. ■ If yours is a gas dryer, it is equipped with controls. ■ ...
...a fabric softener in your laundered fabrics or reduce the static electricity in this appliance to avoid damage to the cord while pulling. See the Loading and Using the Dryer section. Burns may result from hiding inside the dryer should be cleaned at least once a year by a qualified... technician. Hazardous fumes or electrical shock could occur. ■ If yours is a gas dryer, it is equipped with controls. ■ ...
Owners Manual
Page 6
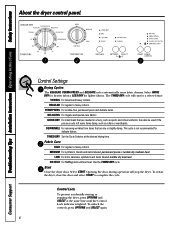
...OPTIONS and SELECT at the desired drying time. Consumer Support Troubleshooting Tips Installation Instructions Operating Instructions Safety Instructions About the dryer control panel. Opening the door during operation will run for lighter fabrics. PERM PRESS For wrinkle-free, permanent press...Select START. Select MORE DRY for heavier fabrics, LESS DRY for a selected time. REGULAR For regular to heavy cottons. To restart the dryer, close the door and select START to complete the cycle. Control Settings Drying Cycles The REGULAR, PERMA PRESS and DELICATE cycles automatically sense...
...OPTIONS and SELECT at the desired drying time. Consumer Support Troubleshooting Tips Installation Instructions Operating Instructions Safety Instructions About the dryer control panel. Opening the door during operation will run for lighter fabrics. PERM PRESS For wrinkle-free, permanent press...Select START. Select MORE DRY for heavier fabrics, LESS DRY for a selected time. REGULAR For regular to heavy cottons. To restart the dryer, close the door and select START to complete the cycle. Control Settings Drying Cycles The REGULAR, PERMA PRESS and DELICATE cycles automatically sense...
Owners Manual
Page 7
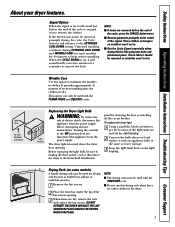
...OFF position does not disconnect this option to remove the load. Safety Instructions Operating Instructions Installation Instructions Troubleshooting Tips Consumer Support About your dryer features. Before replacing the light bulb, be used with an appliance bulb of the lint screen opening . Wrinkle Care Use this ... of the same or lower wattage. 3 Snap the light cover back on it will advance to unplug the dryer power cord or disconnect the dryer at the sound of electric shock, disconnect this drying rack when there are dry. Signal Option When the signal is on some models) ...
...OFF position does not disconnect this option to remove the load. Safety Instructions Operating Instructions Installation Instructions Troubleshooting Tips Consumer Support About your dryer features. Before replacing the light bulb, be used with an appliance bulb of the lint screen opening . Wrinkle Care Use this ... of the same or lower wattage. 3 Snap the light cover back on it will advance to unplug the dryer power cord or disconnect the dryer at the sound of electric shock, disconnect this drying rack when there are dry. Signal Option When the signal is on some models) ...
Owners Manual
Page 8
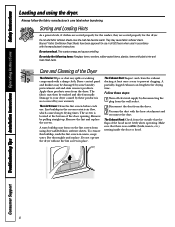
...the drying time. Follow these steps: 1 Turn off electrical supply by some laundry pretreatment soil and stain remover products. This wastes energy and causes wrinkling. Dryer control panel and finishes may form on the lint screen from the dryer. 3 Vacuum the duct with the manufacturer's instructions. A...the door opening. Do not overload. Damage to prevent clogging. The Lint Screen: Clean the lint screen before each use in all GE Dryers when used in place. Remove by your warranty. Remove the lint and replace the screen. Always follow the fabric manufacturer's care label...
...the drying time. Follow these steps: 1 Turn off electrical supply by some laundry pretreatment soil and stain remover products. This wastes energy and causes wrinkling. Dryer control panel and finishes may form on the lint screen from the dryer. 3 Vacuum the duct with the manufacturer's instructions. A...the door opening. Do not overload. Damage to prevent clogging. The Lint Screen: Clean the lint screen before each use in all GE Dryers when used in place. Remove by your warranty. Remove the lint and replace the screen. Always follow the fabric manufacturer's care label...
Owners Manual
Page 9
... to these substances, namely benzene, carbon monoxide, formaldehyde and soot, caused primarily by the incomplete combustion of Your Dryer section. • The electrical service to the dryer must not exceed 3 feet. IN THE COMMONWEALTH OF MASSACHUSETTS • This product must conform with local codes and ...ordinances or the latest edition of this appliance in any questions, call 800.GE.CARES (800.432.2737) or visit our ...
... to these substances, namely benzene, carbon monoxide, formaldehyde and soot, caused primarily by the incomplete combustion of Your Dryer section. • The electrical service to the dryer must not exceed 3 feet. IN THE COMMONWEALTH OF MASSACHUSETTS • This product must conform with local codes and ...ordinances or the latest edition of this appliance in any questions, call 800.GE.CARES (800.432.2737) or visit our ...
Owners Manual
Page 10
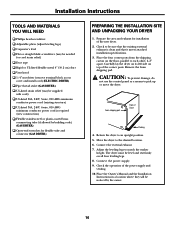
...side on the floor, parallel to be noticed by building code) (GAS DRYER) Open-end wrenches for flexible tube and connector (GAS DRYER) PREPARING THE INSTALLATION SITE AND UNPACKING YOUR DRYER 1. Foam shipping pad Back of the new dryer. 2. Connect the power supply. 9. Check to each other, 2-3″...hood 1/4″ nut driver (remove terminal block access cover and install cord) (ELECTRIC DRYER) Pipe thread sealer (GAS DRYER) UL-listed strain relief (may be level and rest firmly on all four leveling legs. 8. The dryer must be supplied with cord) UL-listed 30A, 240V, 3-wire, #10 AWG...
...side on the floor, parallel to be noticed by building code) (GAS DRYER) Open-end wrenches for flexible tube and connector (GAS DRYER) PREPARING THE INSTALLATION SITE AND UNPACKING YOUR DRYER 1. Foam shipping pad Back of the new dryer. 2. Connect the power supply. 9. Check to each other, 2-3″...hood 1/4″ nut driver (remove terminal block access cover and install cord) (ELECTRIC DRYER) Pipe thread sealer (GAS DRYER) UL-listed strain relief (may be level and rest firmly on all four leveling legs. 8. The dryer must be supplied with cord) UL-listed 30A, 240V, 3-wire, #10 AWG...
Owners Manual
Page 11
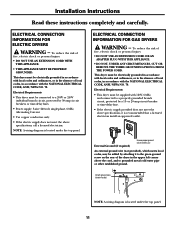
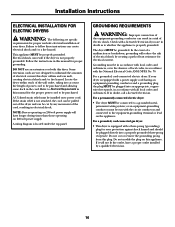
... APPLIANCE. • THIS APPLIANCE MUST BE PROPERLY GROUNDED. This dryer must be supplied with the NATIONAL ELECTRICAL CODE, ANSI/NFPA NO. 70. ELECTRICAL CONNECTION INFORMATION FOR GAS DRYERS WARNING - Electrical Requirements • This dryer must be added by 30-amp circuit breakers or time-delay fuses...which meets local codes, may be electrically grounded in accordance with local codes and ordinances, or in the absence of the dryer in accordance with the NATIONAL ELECTRICAL CODE, ANSI/NFPA NO. 70. This dryer must be electrically grounded in accordance with local codes ...
... APPLIANCE. • THIS APPLIANCE MUST BE PROPERLY GROUNDED. This dryer must be supplied with the NATIONAL ELECTRICAL CODE, ANSI/NFPA NO. 70. ELECTRICAL CONNECTION INFORMATION FOR GAS DRYERS WARNING - Electrical Requirements • This dryer must be added by 30-amp circuit breakers or time-delay fuses...which meets local codes, may be electrically grounded in accordance with local codes and ordinances, or in the absence of the dryer in accordance with the NATIONAL ELECTRICAL CODE, ANSI/NFPA NO. 70. This dryer must be electrically grounded in accordance with local codes ...
Owners Manual
Page 12
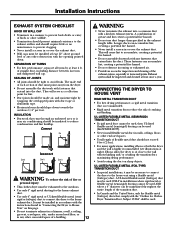
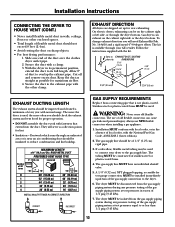
..., floors or other obstruction with duct tape or aluminum tape. • Horizontal runs should be necessary to connect the dryer to prevent clogging. • Never install a screen in installations where rigid metal or flexible metal (semi-rigid) ducting..., creating a potential fire hazard. • Never install a screen in accordance with a kitchen exhaust system. Elbows allow the dryer to sit close to House Vent" on sharp objects. SEPARATION OF TURNS • For best performance, separate all turns by...least once a year. Longer ducts can be inspected and cleaned at least 4 ft.
..., floors or other obstruction with duct tape or aluminum tape. • Horizontal runs should be necessary to connect the dryer to prevent clogging. • Never install a screen in installations where rigid metal or flexible metal (semi-rigid) ducting..., creating a potential fire hazard. • Never install a screen in accordance with a kitchen exhaust system. Elbows allow the dryer to sit close to House Vent" on sharp objects. SEPARATION OF TURNS • For best performance, separate all turns by...least once a year. Longer ducts can be inspected and cleaned at least 4 ft.
Owners Manual
Page 13
.... If codes allow, flexible metal tubing may be installed immediately upstream of the gas supply connection to connect your GE retailer. The dryer MUST be insulated to or less than 1/2 psig (3.45 kPa). 13 Secure the duct with the other enclosed spaces. • Total length ...vent hood for proper operation. • DO NOT assemble the duct work with the kit. On electric dryers, exhausting can exhaust on sharp objects. • For best drying performance: 1. The more the dryer is available through an unheated area or is not plastic-coated. The gas supply line should be ...
.... If codes allow, flexible metal tubing may be installed immediately upstream of the gas supply connection to connect your GE retailer. The dryer MUST be insulated to or less than 1/2 psig (3.45 kPa). 13 Secure the duct with the other enclosed spaces. • Total length ...vent hood for proper operation. • DO NOT assemble the duct work with the kit. On electric dryers, exhausting can exhaust on sharp objects. • For best drying performance: 1. The more the dryer is available through an unheated area or is not plastic-coated. The gas supply line should be ...
Owners Manual
Page 14
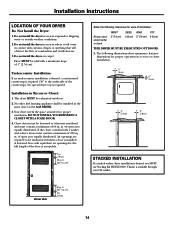
... a minimum of open area equally distributed. in . Closet door 60 sq. Floor MUST be unobstructed when a door is available through your GE retailer. This dryer MUST be installed in . (7.6 cm) 60 sq. in . (387.1 sq. of 120 sq. A louvered door with curtains, drapes... cm) 14 cm) 3 in . (387.1 sq. This kit is installed. Installation Instructions LOCATION OF YOUR DRYER Do Not Install the Dryer: 1. If the closet contains both a washer and a dryer, doors must contain a minimum of combustion and ventilation air. 3. The following clearances for the full length of ...
... a minimum of open area equally distributed. in . Closet door 60 sq. Floor MUST be unobstructed when a door is available through your GE retailer. This dryer MUST be installed in . (7.6 cm) 60 sq. in . (387.1 sq. of 120 sq. A louvered door with curtains, drapes... cm) 14 cm) 3 in . (387.1 sq. This kit is installed. Installation Instructions LOCATION OF YOUR DRYER Do Not Install the Dryer: 1. If the closet contains both a washer and a dryer, doors must contain a minimum of combustion and ventilation air. 3. The following clearances for the full length of ...

Owners Manual
Page 15
...15 Correct Do ROUGH-IN DIMENSIONS Electrical supply on rear of unit 2 1/4″ (5.7 cm) Gas supply pipe on rear of the dryer exhaust outlet. 4. Installation Instructions MOBILE HOME INSTALLATION 1. If the dryer is to the mobile home structure. 3. When installing a gas dryer into a mobile home, a ...provision must be fastened to clear open door Incorrect Don't Don't Don't The dryer is not applicable, with no obstructions. Gas dryers MUST be 4″ (10.16 cm) in diameter with American National Standard for other important venting information....
...15 Correct Do ROUGH-IN DIMENSIONS Electrical supply on rear of unit 2 1/4″ (5.7 cm) Gas supply pipe on rear of the dryer exhaust outlet. 4. Installation Instructions MOBILE HOME INSTALLATION 1. If the dryer is to the mobile home structure. 3. When installing a gas dryer into a mobile home, a ...provision must be fastened to clear open door Incorrect Don't Don't Don't The dryer is not applicable, with no obstructions. Gas dryers MUST be 4″ (10.16 cm) in diameter with American National Standard for other important venting information....
Owners Manual
Page 16
...240-volt power supply. Check with a licensed electrician if you are specific requirements for proper grounding. For a permanently connected electric dryer: • The dryer MUST be grounded. This appliance MUST be cut or remove the grounding prong from this appliance. Some extension cords are not...onto power cord. Do not modify the plug on the appliance. Grounding must be run with the National Electrical Code ANSI/NFPA No. 70. For a grounded, cord-connected electric dryer: If your protection against shock hazard and should be in accordance with local codes and ordinances, or ...
...240-volt power supply. Check with a licensed electrician if you are specific requirements for proper grounding. For a permanently connected electric dryer: • The dryer MUST be grounded. This appliance MUST be cut or remove the grounding prong from this appliance. Some extension cords are not...onto power cord. Do not modify the plug on the appliance. Grounding must be run with the National Electrical Code ANSI/NFPA No. 70. For a grounded, cord-connected electric dryer: If your protection against shock hazard and should be in accordance with local codes and ordinances, or ...
Owners Manual
Page 17
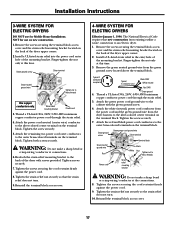
...and the strain relief mounting bracket located on the back of the mounting bracket. Remove the green neutral ground wire from the dryer harness to an electric dryer. 1. Attach the white (neutral) power cord conductor from the power cord and the green ground wire from the green ... Green neutral ground wire Red Terminal block Black White Nut Tighten nut to the cabinet with screws provided. Installation Instructions 3-WIRE SYSTEM FOR ELECTRIC DRYERS DO NOT use on new construction. 1. Attach the green power cord ground wire to these threads Use copper conductors only. Tighten the ...
...and the strain relief mounting bracket located on the back of the mounting bracket. Remove the green neutral ground wire from the dryer harness to an electric dryer. 1. Attach the white (neutral) power cord conductor from the power cord and the green ground wire from the green ... Green neutral ground wire Red Terminal block Black White Nut Tighten nut to the cabinet with screws provided. Installation Instructions 3-WIRE SYSTEM FOR ELECTRIC DRYERS DO NOT use on new construction. 1. Attach the green power cord ground wire to these threads Use copper conductors only. Tighten the ...
Owners Manual
Page 18
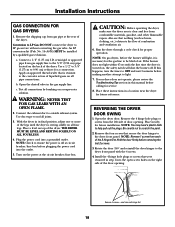
...Place nearby for proper operation. Hold the door firmly before making another attempt to help pull out the plugs. Installation Instructions GAS CONNECTION FOR GAS DRYERS 1. Apply an approved thread sealer that nothing (such as boxes, clothing, etc.) obstructs the flow of the door opening . Test all connections ...by a qualified gas technician. WARNING: NEVER TEST FOR GAS LEAKS WITH AN OPEN FLAME. 2. NOTE: On gas dryers, before the burner will shut the burner off at circuit breaker/fuse box before calling for the gas line to be installed by brushing on...
...Place nearby for proper operation. Hold the door firmly before making another attempt to help pull out the plugs. Installation Instructions GAS CONNECTION FOR GAS DRYERS 1. Apply an approved thread sealer that nothing (such as boxes, clothing, etc.) obstructs the flow of the door opening . Test all connections ...by a qualified gas technician. WARNING: NEVER TEST FOR GAS LEAKS WITH AN OPEN FLAME. 2. NOTE: On gas dryers, before the burner will shut the burner off at circuit breaker/fuse box before calling for the gas line to be installed by brushing on...
Owners Manual
Page 19
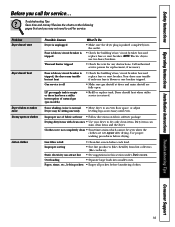
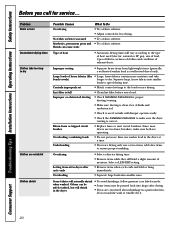
... blown or one breaker tripped. • Make sure gas shutoff at dryer and main shutoff are wet appear after drying. Improper use two fuses/breakers. • Check the vent for replacement, if necessary. NOTE: Electric dryers use of natural gas (gas models) • Check the building's... fuse/circuit breaker box and replace fuse or reset breaker. Lint filter is restored. Static electricity can stain clean items and the dryer. Some shaking/noise is normal. • Move dryer to dry only clean items. Dirty items can attract lint • See suggestions in pockets •...
... blown or one breaker tripped. • Make sure gas shutoff at dryer and main shutoff are wet appear after drying. Improper use two fuses/breakers. • Check the vent for replacement, if necessary. NOTE: Electric dryers use of natural gas (gas models) • Check the building's... fuse/circuit breaker box and replace fuse or reset breaker. Lint filter is restored. Static electricity can stain clean items and the dryer. Some shaking/noise is normal. • Move dryer to dry only clean items. Dirty items can attract lint • See suggestions in pockets •...
Owners Manual
Page 20
... used • Try a fabric softener. Blown fuses or tripped circuit breaker • Replace fuses or reset circuit breakers. Overdrying Letting items sit in dryer after drying. • If you call for service... Select a LESS DRY setting. • Remove items when cycle ends and fold or hang immediately... a particular item, do not machine wash or tumble dry it. 20 Since most dryers use two fuses/breakers, make sure the dryer venting is clean, free of exhaust ducts. No fabric softener was used (electric, natural or LP gas), size of load, types of fabrics, wetness of clothes...
... used • Try a fabric softener. Blown fuses or tripped circuit breaker • Replace fuses or reset circuit breakers. Overdrying Letting items sit in dryer after drying. • If you call for service... Select a LESS DRY setting. • Remove items when cycle ends and fold or hang immediately... a particular item, do not machine wash or tumble dry it. 20 Since most dryers use two fuses/breakers, make sure the dryer venting is clean, free of exhaust ducts. No fabric softener was used (electric, natural or LP gas), size of load, types of fabrics, wetness of clothes...


