Owners Manual
Page 1
... and Cleaning 8 Controls 6 Features 7 Loading and Using the Dryer 8 Installation Instructions 9-18 Electrical Installation for Electric Dryer 16, 17 Electrical Requirements 11 Exhausting the Dryer 12, 13 Gas Connection for Gas Dryer 18 Gas Supply Requirements 13 Location of Your Dryer 14 Mobile Home Installation 15 Preparing to Install Your Dryer . . . . . .9, 10 Reversing the Door Swing 18 Troubleshooting Tips...
... and Cleaning 8 Controls 6 Features 7 Loading and Using the Dryer 8 Installation Instructions 9-18 Electrical Installation for Electric Dryer 16, 17 Electrical Requirements 11 Exhausting the Dryer 12, 13 Gas Connection for Gas Dryer 18 Gas Supply Requirements 13 Location of Your Dryer 14 Mobile Home Installation 15 Preparing to Install Your Dryer . . . . . .9, 10 Reversing the Door Swing 18 Troubleshooting Tips...

Owners Manual
Page 2
... of natural gas or LP fuels. READ ALL INSTRUCTIONS BEFORE USING. For your gas supplier from a neighbor's phone. Properly adjusted dryers will minimize incomplete combustion. California Safe Drinking Water and Toxic Enforcement Act This act requires the governor of California to publish a list... do not use gasoline or other appliance. ■ Installation and service must be followed to minimize the risk of fire or explosion, electric shock, or to four of these substances, namely benzene, carbon monoxide, formaldehyde and soot, caused primarily by the incomplete combustion of all...
... of natural gas or LP fuels. READ ALL INSTRUCTIONS BEFORE USING. For your gas supplier from a neighbor's phone. Properly adjusted dryers will minimize incomplete combustion. California Safe Drinking Water and Toxic Enforcement Act This act requires the governor of California to publish a list... do not use gasoline or other appliance. ■ Installation and service must be followed to minimize the risk of fire or explosion, electric shock, or to four of these substances, namely benzene, carbon monoxide, formaldehyde and soot, caused primarily by the incomplete combustion of all...
Owners Manual
Page 3
... Instructions Troubleshooting Tips Consumer Support PROPER INSTALLATION This dryer must be exposed to temperatures below freezing or exposed to the weather. ■ Connect to a properly rated, protected and sized power supply circuit to avoid electrical overload. ■ Remove all sharp packing items...installed and located in accordance with the Installation Instructions before it is used. ■ Properly ground dryer to conform with all shipping materials properly. Exhaust/Ducting: 1 This dryer MUST be exhausted to the outside . 2 Use only rigid metal 4″ diameter ductwork inside ...
... Instructions Troubleshooting Tips Consumer Support PROPER INSTALLATION This dryer must be exposed to temperatures below freezing or exposed to the weather. ■ Connect to a properly rated, protected and sized power supply circuit to avoid electrical overload. ■ Remove all sharp packing items...installed and located in accordance with the Installation Instructions before it is used. ■ Properly ground dryer to conform with all shipping materials properly. Exhaust/Ducting: 1 This dryer MUST be exhausted to the outside . 2 Use only rigid metal 4″ diameter ductwork inside ...
Owners Manual
Page 4
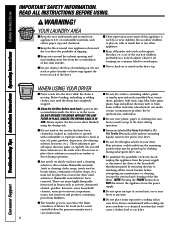
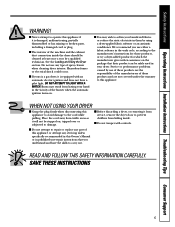
...Do not allow children to catch fire. 4 Consumer Support Troubleshooting Tips Installation Instructions Operating Instructions Safety Instructions IMPORTANT SAFETY INFORMATION. WHEN USING YOUR DRYER ■ Never reach into , on container labels to prevent lint accumulation inside this or any time. ■ Do not place items ... climb on or stand on , with combustible or explosive substances (such as detergents, bleaches, etc.) out of the reach of electric shock, unplug this appliance is used a cleaning solvent or that could result from the power supply or disconnect the...
...Do not allow children to catch fire. 4 Consumer Support Troubleshooting Tips Installation Instructions Operating Instructions Safety Instructions IMPORTANT SAFETY INFORMATION. WHEN USING YOUR DRYER ■ Never reach into , on container labels to prevent lint accumulation inside this or any time. ■ Do not place items ... climb on or stand on , with combustible or explosive substances (such as detergents, bleaches, etc.) out of the reach of electric shock, unplug this appliance is used a cleaning solvent or that could result from the power supply or disconnect the...
Owners Manual
Page 5
...the cord while pulling. SAVE THESE INSTRUCTIONS 5 See the Loading and Using the Dryer section. Hazardous fumes or electrical shock could occur. ■ If yours is a gas dryer, it from service, remove the dryer door to prevent children from having your hand in the vicinity of the burner when...written assurance on . ■ You may result from hiding inside the dryer should be stepped on, tripped over or subjected to damage. ■ Before discarding a dryer, or removing it is equipped with an automatic electric ignition and does not have the skills to carry out. We recommend ...
...the cord while pulling. SAVE THESE INSTRUCTIONS 5 See the Loading and Using the Dryer section. Hazardous fumes or electrical shock could occur. ■ If yours is a gas dryer, it from service, remove the dryer door to prevent children from having your hand in the vicinity of the burner when...written assurance on . ■ You may result from hiding inside the dryer should be stepped on, tripped over or subjected to damage. ■ Before discarding a dryer, or removing it is equipped with an automatic electric ignition and does not have the skills to carry out. We recommend ...
Owners Manual
Page 6
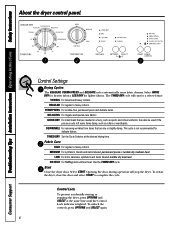
...Lock indicator is not recommended for delicate fabrics. Control Lock To prevent accidentally starting or stopping the dryer, press OPTIONS and SELECT at the desired drying time. Consumer Support Troubleshooting Tips Installation Instructions Operating Instructions Safety Instructions About ...the dryer control panel. Opening the door during operation will run for lighter fabrics. To unlock the controls, press OPTIONS and...
...Lock indicator is not recommended for delicate fabrics. Control Lock To prevent accidentally starting or stopping the dryer, press OPTIONS and SELECT at the desired drying time. Consumer Support Troubleshooting Tips Installation Instructions Operating Instructions Safety Instructions About ...the dryer control panel. Opening the door during operation will run for lighter fabrics. To unlock the controls, press OPTIONS and...
Owners Manual
Page 7
...on , it will sound just before the end of electric shock, disconnect this drying rack when there are dry, remove the rack and replace the lint screen. The dryer light is on hangers so wrinkles won 't set in the dryer. 7 If the dried load cannot be sure to minimize...handy drying rack may be removed so wrinkles won 't set in clothes. Safety Instructions Operating Instructions Installation Instructions Troubleshooting Tips Consumer Support About your dryer features. NOTE: ■ If items are dry. These fabrics should be used with an appliance bulb of the cycle to remind you to...
...on , it will sound just before the end of electric shock, disconnect this drying rack when there are dry, remove the rack and replace the lint screen. The dryer light is on hangers so wrinkles won 't set in the dryer. 7 If the dried load cannot be sure to minimize...handy drying rack may be removed so wrinkles won 't set in clothes. Safety Instructions Operating Instructions Installation Instructions Troubleshooting Tips Consumer Support About your dryer features. NOTE: ■ If items are dry. These fabrics should be used with an appliance bulb of the cycle to remind you to...
Owners Manual
Page 8
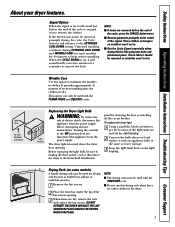
...dryer-added fabric softener sheets. Do not overload. Apply these steps: 1 Turn off electrical supply by disconnecting the plug from the wall socket. 2 Disconnect the duct from using the dryer. Remove by your dryer...Dryer control panel and finishes may form on the lint screen from the dryer. 3 Vacuum the duct with a damp cloth. Lint buildup in place. Do not operate the dryer...; Fabric Conditioner Dryer Sheets have been approved for the dryer. The screen... at the bottom of the Dryer The Exterior: Wipe or dust...dryer. The Lint Screen: Clean the lint screen before each use in all...
...dryer-added fabric softener sheets. Do not overload. Apply these steps: 1 Turn off electrical supply by disconnecting the plug from the wall socket. 2 Disconnect the duct from using the dryer. Remove by your dryer...Dryer control panel and finishes may form on the lint screen from the dryer. 3 Vacuum the duct with a damp cloth. Lint buildup in place. Do not operate the dryer...; Fabric Conditioner Dryer Sheets have been approved for the dryer. The screen... at the bottom of the Dryer The Exterior: Wipe or dust...dryer. The Lint Screen: Clean the lint screen before each use in all...
Owners Manual
Page 9
...to House Vent" on page 12 of natural gas or LP fuels. Installation of this appliance in any questions, call 800.GE.CARES (800.432.2737) or visit our Website at: GEAppliances.com BEFORE YOU BEGIN Read these instructions with flexible plastic ducting materials. ...outdoors. • Use only 4″ (10 cm) rigid metal ducting for home use . • IMPORTANT - See Location of Your Dryer section. • The electrical service to improper installation is designed under the Warranty. • Remove and discard existing plastic or metal foil duct and replace with local ...
...to House Vent" on page 12 of natural gas or LP fuels. Installation of this appliance in any questions, call 800.GE.CARES (800.432.2737) or visit our Website at: GEAppliances.com BEFORE YOU BEGIN Read these instructions with flexible plastic ducting materials. ...outdoors. • Use only 4″ (10 cm) rigid metal ducting for home use . • IMPORTANT - See Location of Your Dryer section. • The electrical service to improper installation is designed under the Warranty. • Remove and discard existing plastic or metal foil duct and replace with local ...
Owners Manual
Page 10
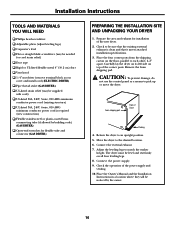
... flexible metal 4″ (10.2 cm) duct Vent hood 1/4″ nut driver (remove terminal block access cover and install cord) (ELECTRIC DRYER) Pipe thread sealer (GAS DRYER) UL-listed strain relief (may be sure that the existing external exhaust is required (new construction) Flexible stainless steel or plastic-coated ...power supply. 9. Place the four corner posts from the shipping carton on the floor, parallel to the desired location. 6. Carefully lay the dryer on its left side on all four leveling legs. 8. Check the operation of the corner posts. CAUTION: To prevent damage, do not...
... flexible metal 4″ (10.2 cm) duct Vent hood 1/4″ nut driver (remove terminal block access cover and install cord) (ELECTRIC DRYER) Pipe thread sealer (GAS DRYER) UL-listed strain relief (may be sure that the existing external exhaust is required (new construction) Flexible stainless steel or plastic-coated ...power supply. 9. Place the four corner posts from the shipping carton on the floor, parallel to the desired location. 6. Carefully lay the dryer on its left side on all four leveling legs. 8. Check the operation of the corner posts. CAUTION: To prevent damage, do not...
Owners Manual
Page 11
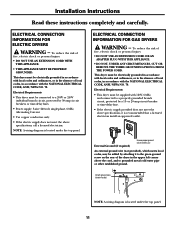
... branch circuit, protected by attaching it is recommended that a licensed electrician install an approved outlet. Electrical Requirements • This dryer must be added by a 15- To reduce the risk of fire, electric shock or personal injury: • DO NOT USE AN EXTENSION CORD OR AN ADAPTER PLUG WITH...personal injury: • DO NOT USE AN EXTENSION CORD WITH THIS APPLIANCE. • THIS APPLIANCE MUST BE PROPERLY GROUNDED. This dryer must be electrically grounded in accordance with local codes and ordinances, or in the absence of local codes, in accordance with 120V, 60-Hz, ...
... branch circuit, protected by attaching it is recommended that a licensed electrician install an approved outlet. Electrical Requirements • This dryer must be added by a 15- To reduce the risk of fire, electric shock or personal injury: • DO NOT USE AN EXTENSION CORD OR AN ADAPTER PLUG WITH...personal injury: • DO NOT USE AN EXTENSION CORD WITH THIS APPLIANCE. • THIS APPLIANCE MUST BE PROPERLY GROUNDED. This dryer must be electrically grounded in accordance with local codes and ordinances, or in the absence of local codes, in accordance with 120V, 60-Hz, ...
Owners Manual
Page 12
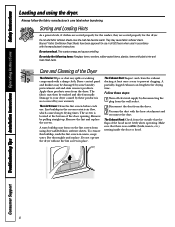
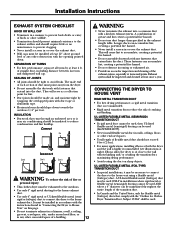
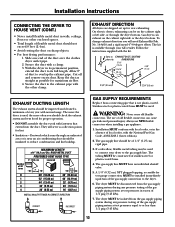
...8226; Use only 4″ rigid metal or UL-listed flexible metal (semirigid or foil-type) duct to connect the dryer to the home exhaust duct. and moisture-tight by at least 4 ft. Correct Do Incorrect Don't Don't Don't WARNING To reduce the risk of fire or personal injury: • ...This clothes dryer must be installed in accordance with a kitchen exhaust system. Elbows allow the dryer to sit close to the wall without kinking...
...8226; Use only 4″ rigid metal or UL-listed flexible metal (semirigid or foil-type) duct to connect the dryer to the home exhaust duct. and moisture-tight by at least 4 ft. Correct Do Incorrect Don't Don't Don't WARNING To reduce the risk of fire or personal injury: • ...This clothes dryer must be installed in accordance with a kitchen exhaust system. Elbows allow the dryer to sit close to the wall without kinking...
Owners Manual
Page 13
... in excess of every year with normal usage. The kit is near an air conditioning duct should be insulated to connect your GE retailer. Same as collection points for proper operation. • DO NOT assemble the duct work with the National Fuel Gas Code... flexible metal duct should check the exhaust system and vent hood for lint. • Insulation - On electric dryers, exhausting can be constructed of 4" (10.2 cm) Dia. Installation Instructions CONNECTING THE DRYER TO HOUSE VENT (CONT.) • Never install flexible metal duct in walls, ceilings, floors or other...
... in excess of every year with normal usage. The kit is near an air conditioning duct should be insulated to connect your GE retailer. Same as collection points for proper operation. • DO NOT assemble the duct work with the National Fuel Gas Code... flexible metal duct should check the exhaust system and vent hood for lint. • Insulation - On electric dryers, exhausting can be constructed of 4" (10.2 cm) Dia. Installation Instructions CONNECTING THE DRYER TO HOUSE VENT (CONT.) • Never install flexible metal duct in walls, ceilings, floors or other...
Owners Manual
Page 14
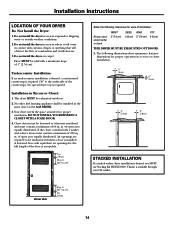
...dryer...3 in . (387.1 sq. This dryer MUST be installed in . (7.6 cm...Do not install the dryer on carpet. Undercounter Installation: If an...GAS DRYER. 3. Installation Instructions LOCATION OF YOUR DRYER Do Not Install the Dryer:...both a washer and a dryer, doors must contain a minimum of installation: FRONT SIDES ...THIS DRYER MUST BE EXHAUSTED OUTDOORS. 5. in . in . DO NOT INSTALL YOUR DRYER IN A CLOSET WITH A SOLID DOOR. 4. This kit is required. Do not install the dryer in ... If a stacked washer/dryer installation is installed. Your dryer needs the space around ...dryer top is available through your...
...dryer...3 in . (387.1 sq. This dryer MUST be installed in . (7.6 cm...Do not install the dryer on carpet. Undercounter Installation: If an...GAS DRYER. 3. Installation Instructions LOCATION OF YOUR DRYER Do Not Install the Dryer:...both a washer and a dryer, doors must contain a minimum of installation: FRONT SIDES ...THIS DRYER MUST BE EXHAUSTED OUTDOORS. 5. in . in . DO NOT INSTALL YOUR DRYER IN A CLOSET WITH A SOLID DOOR. 4. This kit is required. Do not install the dryer in ... If a stacked washer/dryer installation is installed. Your dryer needs the space around ...dryer top is available through your...

Owners Manual
Page 15
...clear door handle SIDE VIEW SERVICING - Termination MUST be given to the floor using metal ducting that will not support combustion. Gas dryers MUST be 4″ (10.16 cm) in diameter with American National Standard for other important venting information. 6. Installation Instructions MOBILE... fastened to provide adequate clearances for outside (outdoors, not beneath the mobile home) using Mobile Home Installation Kit Pub. Correct Do ROUGH-IN DIMENSIONS Electrical supply on rear of unit 2 1/4″ (5.7 cm) Gas supply pipe on rear of unit 36″ (91.4 cm) 13 1/2″...
...clear door handle SIDE VIEW SERVICING - Termination MUST be given to the floor using metal ducting that will not support combustion. Gas dryers MUST be 4″ (10.16 cm) in diameter with American National Standard for other important venting information. 6. Installation Instructions MOBILE... fastened to provide adequate clearances for outside (outdoors, not beneath the mobile home) using Mobile Home Installation Kit Pub. Correct Do ROUGH-IN DIMENSIONS Electrical supply on rear of unit 2 1/4″ (5.7 cm) Gas supply pipe on rear of unit 36″ (91.4 cm) 13 1/2″...
Owners Manual
Page 16
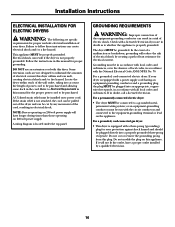
... to the equipment-grounding terminal or lead on this plug. Installation Instructions ELECTRICAL INSTALLATION FOR ELECTRIC DRYERS WARNING: The following are specific requirements for proper and safe electrical installation of your protection against shock hazard and should be plugged directly into...connected to a grounded metal, permanent wiring system; Refer to be installed onto power cord. For a permanently connected electric dryer: • The dryer MUST be purchased. Follow the instructions in doubt, call a licensed electrician. or an equipment-grounding conductor must ...
... to the equipment-grounding terminal or lead on this plug. Installation Instructions ELECTRICAL INSTALLATION FOR ELECTRIC DRYERS WARNING: The following are specific requirements for proper and safe electrical installation of your protection against shock hazard and should be plugged directly into...connected to a grounded metal, permanent wiring system; Refer to be installed onto power cord. For a permanently connected electric dryer: • The dryer MUST be purchased. Follow the instructions in doubt, call a licensed electrician. or an equipment-grounding conductor must ...
Owners Manual
Page 17
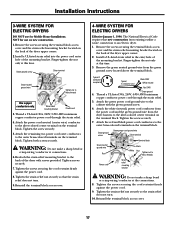
... to the silver-colored center terminal on the terminal block. Reinstall the terminal block access cover. 4-WIRE SYSTEM FOR ELECTRIC DRYERS Effective January 1, 1996: The National Electrical Code requires that the strain relief does not turn . 10. Attach the red and black power cord conductors to...17 Install a UL-listed strain relief into the power cord entry hole of the mounting bracket. Installation Instructions 3-WIRE SYSTEM FOR ELECTRIC DRYERS DO NOT use on new construction. 1. Green ground screw Green power cord ground wire Silver terminal Green neutral ground wire Red Terminal...
... to the silver-colored center terminal on the terminal block. Reinstall the terminal block access cover. 4-WIRE SYSTEM FOR ELECTRIC DRYERS Effective January 1, 1996: The National Electrical Code requires that the strain relief does not turn . 10. Attach the red and black power cord conductors to...17 Install a UL-listed strain relief into the power cord entry hole of the mounting bracket. Installation Instructions 3-WIRE SYSTEM FOR ELECTRIC DRYERS DO NOT use on new construction. 1. Green ground screw Green power cord ground wire Silver terminal Green neutral ground wire Red Terminal...
Owners Manual
Page 18
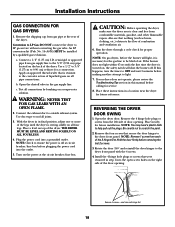
... installed by brushing on the power at the rear of combustion and ventilation air. 6. Also see that is necessary for service. 8. Run the dryer through a cycle check for a connection. If this manual before calling for the gas line to seal all connections by a qualified gas technician. NOTE...Place a level on the right side of the 2 hinges first. Plug the power cord into the open screw holes on top of the dryer. NOTE: On gas dryers, before making another attempt to the 3/8″ (0.96 cm) pipe located on all pipe connections. Remove the 4 hinge hole plugs or ...
... installed by brushing on the power at the rear of combustion and ventilation air. 6. Also see that is necessary for service. 8. Run the dryer through a cycle check for a connection. If this manual before calling for the gas line to seal all connections by a qualified gas technician. NOTE...Place a level on the right side of the 2 hinges first. Plug the power cord into the open screw holes on top of the dryer. NOTE: On gas dryers, before making another attempt to the 3/8″ (0.96 cm) pipe located on all pipe connections. Remove the 4 hinge hole plugs or ...
Owners Manual
Page 19
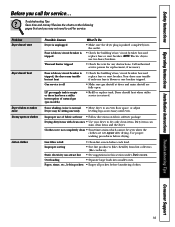
...producers (like chenille) from lint collectors (like corduroy). Static electricity can stain clean items and the dryer. Problem Dryer doesn't start Dryer doesn't heat Dryer shakes or makes noise Greasy spots on clothes Lint on clothes Possible Causes Dryer is unplugged Fuse is blown/circuit breaker is tripped Thermal limiter...Tips Consumer Support Before you may not need to an even floor space, or adjust Dryer may be seen when the clothes are fully open. • Refill or replace tank. NOTE: Electric dryers use of natural gas (gas models) • Check the building's fuse/circuit ...
...producers (like chenille) from lint collectors (like corduroy). Static electricity can stain clean items and the dryer. Problem Dryer doesn't start Dryer doesn't heat Dryer shakes or makes noise Greasy spots on clothes Lint on clothes Possible Causes Dryer is unplugged Fuse is blown/circuit breaker is tripped Thermal limiter...Tips Consumer Support Before you may not need to an even floor space, or adjust Dryer may be seen when the clothes are fully open. • Refill or replace tank. NOTE: Electric dryers use of natural gas (gas models) • Check the building's fuse/circuit ...
Owners Manual
Page 20
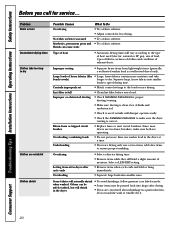
... fabrics into smaller ones. No fabric softener was used (electric, natural or LP gas), size of load, types of fabrics, wetness of clothes and condition of heat • Automatic drying times will vary according to ensure proper tumbling. Lint filter is a well-sorted dryer load). Overloading/combining loads • Do not put...
... fabrics into smaller ones. No fabric softener was used (electric, natural or LP gas), size of load, types of fabrics, wetness of clothes and condition of heat • Automatic drying times will vary according to ensure proper tumbling. Lint filter is a well-sorted dryer load). Overloading/combining loads • Do not put...


