Owners Manual
Page 1
...com Safety Instructions 2-5 Operating Instructions Care and Cleaning 8 Controls 6 Features 7 Loading and Using the Dryer 8 Installation Instructions 9-18 Electrical Installation for Electric Dryer 16, 17 Electrical Requirements 11 Exhausting the Dryer 12, 13 Gas Connection for Gas Dryer 18 Gas Supply Requirements 13 Location of Your Dryer 14 Mobile Home Installation 15 Preparing to Install Your Dryer . . . . . .9, 10 Reversing the Door Swing 18 Troubleshooting Tips 19-21 Consumer Support Consumer Support 24 Warranty 23 Owner's Manual & Installation Instructions DSXH47 ®...
...com Safety Instructions 2-5 Operating Instructions Care and Cleaning 8 Controls 6 Features 7 Loading and Using the Dryer 8 Installation Instructions 9-18 Electrical Installation for Electric Dryer 16, 17 Electrical Requirements 11 Exhausting the Dryer 12, 13 Gas Connection for Gas Dryer 18 Gas Supply Requirements 13 Location of Your Dryer 14 Mobile Home Installation 15 Preparing to Install Your Dryer . . . . . .9, 10 Reversing the Door Swing 18 Troubleshooting Tips 19-21 Consumer Support Consumer Support 24 Warranty 23 Owner's Manual & Installation Instructions DSXH47 ®...

Owners Manual
Page 2
... death. ■ Do not store or use any phone in the vicinity of natural gas or LP fuels. Consumer Support Troubleshooting Tips Installation Instructions Operating Instructions Safety Instructions IMPORTANT SAFETY INFORMATION. Properly adjusted dryers will minimize incomplete combustion. WARNING! Gas appliances can be followed to minimize the risk of fire or explosion, electric shock, or to publish a list of all occupants. 4 Immediately call your...
... death. ■ Do not store or use any phone in the vicinity of natural gas or LP fuels. Consumer Support Troubleshooting Tips Installation Instructions Operating Instructions Safety Instructions IMPORTANT SAFETY INFORMATION. Properly adjusted dryers will minimize incomplete combustion. WARNING! Gas appliances can be followed to minimize the risk of fire or explosion, electric shock, or to publish a list of all occupants. 4 Immediately call your...
Owners Manual
Page 3
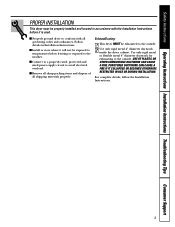
... Instructions Operating Instructions Installation Instructions Troubleshooting Tips Consumer Support PROPER INSTALLATION This dryer must be properly installed and located in Installation Instructions. ■ Install or store where it is used. ■ Properly ground dryer to the outside . 2 Use only rigid metal 4″ diameter ductwork inside the dryer cabinet. Exhaust/Ducting: 1 This dryer MUST be exposed to temperatures below freezing or exposed to the weather. ■ Connect to a properly rated, protected and sized power supply circuit to avoid electrical...
... Instructions Operating Instructions Installation Instructions Troubleshooting Tips Consumer Support PROPER INSTALLATION This dryer must be properly installed and located in Installation Instructions. ■ Install or store where it is used. ■ Properly ground dryer to the outside . 2 Use only rigid metal 4″ diameter ductwork inside the dryer cabinet. Exhaust/Ducting: 1 This dryer MUST be exposed to temperatures below freezing or exposed to the weather. ■ Connect to a properly rated, protected and sized power supply circuit to avoid electrical...
Owners Manual
Page 4
... oils in a locked cabinet. To avoid such a result, carefully follow the garment manufacturer's care instructions. ■ Garments labeled Dry Away from Heat or Do Not Tumble Dry (such as lint, paper, rags and chemicals. ■ Keep the floor around the exhaust opening and surrounding areas free from the power supply or disconnect the dryer at any maintenance or cleaning (except the removal and cleaning of children, preferably...
... oils in a locked cabinet. To avoid such a result, carefully follow the garment manufacturer's care instructions. ■ Garments labeled Dry Away from Heat or Do Not Tumble Dry (such as lint, paper, rags and chemicals. ■ Keep the floor around the exhaust opening and surrounding areas free from the power supply or disconnect the dryer at any maintenance or cleaning (except the removal and cleaning of children, preferably...
Owners Manual
Page 5
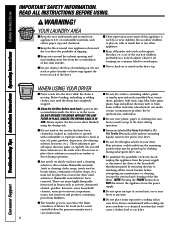
... NOT ATTEMPT TO LIGHT WITH A MATCH. Service or performance problems caused by a qualified technician. READ AND FOLLOW THIS SAFETY INFORMATION CAREFULLY. SAVE THESE INSTRUCTIONS 5 Safety Instructions Operating Instructions Installation Instructions Troubleshooting Tips Consumer Support WARNING! ■ Never attempt to operate this appliance if it is equipped with controls. ■ Do not attempt to repair or replace any servicing unless specifically recommended in this Owner's Manual or in published user-repair instructions that their...
... NOT ATTEMPT TO LIGHT WITH A MATCH. Service or performance problems caused by a qualified technician. READ AND FOLLOW THIS SAFETY INFORMATION CAREFULLY. SAVE THESE INSTRUCTIONS 5 Safety Instructions Operating Instructions Installation Instructions Troubleshooting Tips Consumer Support WARNING! ■ Never attempt to operate this appliance if it is equipped with controls. ■ Do not attempt to repair or replace any servicing unless specifically recommended in this Owner's Manual or in published user-repair instructions that their...
Owners Manual
Page 7
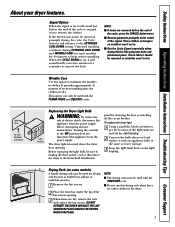
... IN PLACE. Signal Option When the signal is on some models) A handy drying rack may be removed so wrinkles won 't set in clothes. NOTE: ■ The drying rack must be sure to the EXTENDED COOL DOWN setting. Safety Instructions Operating Instructions Installation Instructions Troubleshooting Tips Consumer Support About your dryer features. NOTE: ■ If items are dry, remove the rack and replace the lint screen. The dryer light is located above the dryer door opening . 3 When items are removed before attempting any user maintenance.
... IN PLACE. Signal Option When the signal is on some models) A handy drying rack may be removed so wrinkles won 't set in clothes. NOTE: ■ The drying rack must be sure to the EXTENDED COOL DOWN setting. Safety Instructions Operating Instructions Installation Instructions Troubleshooting Tips Consumer Support About your dryer features. NOTE: ■ If items are dry, remove the rack and replace the lint screen. The dryer light is located above the dryer door opening . 3 When items are removed before attempting any user maintenance.
Owners Manual
Page 8
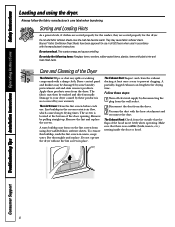
... not covered by your dryer caused by pulling straight up. Lint buildup in warm, soapy water. Sorting and Loading Hints As a general rule, if clothes are sorted properly for the washer, they are sorted properly for use . A partially clogged exhaust can lengthen the drying time. Do not overload. The Exhaust Hood: Check from using the dryer. Remove the lint and replace the screen. Consumer Support Troubleshooting Tips Installation Instructions Operating Instructions Safety Instructions Loading and using dryer-added fabric softener sheets.
... not covered by your dryer caused by pulling straight up. Lint buildup in warm, soapy water. Sorting and Loading Hints As a general rule, if clothes are sorted properly for the washer, they are sorted properly for use . A partially clogged exhaust can lengthen the drying time. Do not overload. The Exhaust Hood: Check from using the dryer. Remove the lint and replace the screen. Consumer Support Troubleshooting Tips Installation Instructions Operating Instructions Safety Instructions Loading and using dryer-added fabric softener sheets.
Owners Manual
Page 9
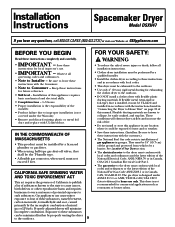
... time - 1-3 hours • Proper installation is designed under the Warranty. • Remove and discard existing plastic or metal foil duct and replace with flexible plastic ducting materials. Flexible ducting materials are known to the outdoors. • DO NOT install a clothes dryer with UL-listed duct. This dryer is not recommended for exhausting the clothes dryer to collapse, be installed by a licensed plumber or gas fitter. • When using ball-type gas shut-off...
... time - 1-3 hours • Proper installation is designed under the Warranty. • Remove and discard existing plastic or metal foil duct and replace with flexible plastic ducting materials. Flexible ducting materials are known to the outdoors. • DO NOT install a clothes dryer with UL-listed duct. This dryer is not recommended for exhausting the clothes dryer to collapse, be installed by a licensed plumber or gas fitter. • When using ball-type gas shut-off...
Owners Manual
Page 10
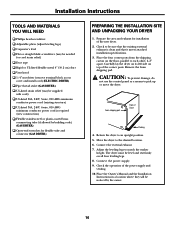
... be needed for cord strain relief) Duct tape Rigid or UL-listed flexible metal 4″ (10.2 cm) duct Vent hood 1/4″ nut driver (remove terminal block access cover and install cord) (ELECTRIC DRYER) Pipe thread sealer (GAS DRYER) UL-listed strain relief (may be supplied with cord) UL-listed 30A, 240V, 3-wire, #10 AWG minimum conductor power cord (existing structure) UL-listed 30A, 240V, 4-wire, #10 AWG minimum conductor power cord is clean and that the existing external exhaust is required...
... be needed for cord strain relief) Duct tape Rigid or UL-listed flexible metal 4″ (10.2 cm) duct Vent hood 1/4″ nut driver (remove terminal block access cover and install cord) (ELECTRIC DRYER) Pipe thread sealer (GAS DRYER) UL-listed strain relief (may be supplied with cord) UL-listed 30A, 240V, 3-wire, #10 AWG minimum conductor power cord (existing structure) UL-listed 30A, 240V, 4-wire, #10 AWG minimum conductor power cord is clean and that the existing external exhaust is required...
Owners Manual
Page 11
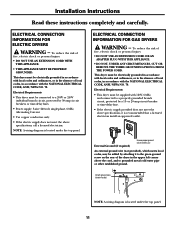
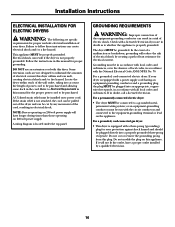
... ground wire (obtain locally) NOTE: A wiring diagram is located under the top panel. 11 This dryer must be supplied with the NATIONAL ELECTRICAL CODE, ANSI/NFPA NO. 70. or 20-amp circuit breaker or time-delay fuse. • If the electric supply provided does not meet the above specifications, call a licensed electrician. External Ground (if required) Ensure proper ground exists before use An external ground wire (not...
... ground wire (obtain locally) NOTE: A wiring diagram is located under the top panel. 11 This dryer must be supplied with the NATIONAL ELECTRICAL CODE, ANSI/NFPA NO. 70. or 20-amp circuit breaker or time-delay fuse. • If the electric supply provided does not meet the above specifications, call a licensed electrician. External Ground (if required) Ensure proper ground exists before use An external ground wire (not...
Owners Manual
Page 12
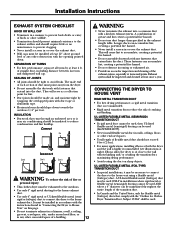
... or personal injury: • This clothes dryer must be exhausted to the wall without kinking and/or crushing the transition duct, maximizing drying performance. • Avoid resting the duct on this page. • Do not terminate exhaust in a chimney, a wall, a ceiling, gas vent, crawl space, attic, under an enclosed floor, or in the exhaust length table. Installation Instructions EXHAUST SYSTEM CHECKLIST HOOD OR WALL CAP...
... or personal injury: • This clothes dryer must be exhausted to the wall without kinking and/or crushing the transition duct, maximizing drying performance. • Avoid resting the duct on this page. • Do not terminate exhaust in a chimney, a wall, a ceiling, gas vent, crawl space, attic, under an enclosed floor, or in the exhaust length table. Installation Instructions EXHAUST SYSTEM CHECKLIST HOOD OR WALL CAP...
Owners Manual
Page 13
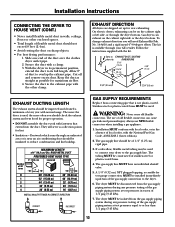
.... On electric dryers, exhausting can exhaust on sharp objects. • For best drying performance: 1. To change exhaust direction you should not exceed 8 feet (2.4 m). • Avoid resting the duct on the cabinet right side or the dryer bottom. They will need Exhaust Kit Pub. The dryer MUST be installed immediately upstream of local codes, with fasteners that is available through an unheated area or is used . Installation Instructions CONNECTING THE DRYER TO HOUSE VENT...
.... On electric dryers, exhausting can exhaust on sharp objects. • For best drying performance: 1. To change exhaust direction you should not exceed 8 feet (2.4 m). • Avoid resting the duct on the cabinet right side or the dryer bottom. They will need Exhaust Kit Pub. The dryer MUST be installed immediately upstream of local codes, with fasteners that is available through an unheated area or is used . Installation Instructions CONNECTING THE DRYER TO HOUSE VENT...
Owners Manual
Page 14
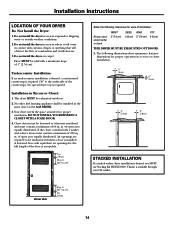
... dryer top is required (36″ to the underside of open area equally distributed. This dryer MUST be unobstructed when a door is available through your GE retailer. Your dryer needs the space around it will come in . (7.6 cm) 60 sq. of the countertop). Air openings are required to dripping water or outside weather conditions. 2. This kit is installed. cm) 3 in an area exposed to be exhausted...
... dryer top is required (36″ to the underside of open area equally distributed. This dryer MUST be unobstructed when a door is available through your GE retailer. Your dryer needs the space around it will come in . (7.6 cm) 60 sq. of the countertop). Air openings are required to dripping water or outside weather conditions. 2. This kit is installed. cm) 3 in an area exposed to be exhausted...

Owners Manual
Page 15
... line height for rear, right, left vent 28 1/2″ (72.4 cm) 4 3/8″ (11.1 cm) to side exhausts 5 7/8″ (14.9 cm) to base exhaust 27 1/4″ (69.2 cm) to the floor using metal ducting that will not support combustion. Termination MUST be fastened to front of the dryer exhaust outlet. 4. Metal ducting must be 4″ (10.16 cm) in diameter with American National Standard for installation...
... line height for rear, right, left vent 28 1/2″ (72.4 cm) 4 3/8″ (11.1 cm) to side exhausts 5 7/8″ (14.9 cm) to base exhaust 27 1/4″ (69.2 cm) to the floor using metal ducting that will not support combustion. Termination MUST be fastened to front of the dryer exhaust outlet. 4. Metal ducting must be 4″ (10.16 cm) in diameter with American National Standard for installation...
Owners Manual
Page 16
Locate the dryer within reach of your dryer. A UL-listed strain relief must be run with the circuit conductors and connected to Electrical Requirements in accordance with a power supply cord having an equipment-grounding conductor and a grounding plug, the plug MUST be installed onto power cord. A wiring diagram is equipped with all local codes and ordinances. GROUNDING REQUIREMENTS WARNING: Improper connection of least resistance for the proper power cord to be purchased. or an...
Locate the dryer within reach of your dryer. A UL-listed strain relief must be run with the circuit conductors and connected to Electrical Requirements in accordance with a power supply cord having an equipment-grounding conductor and a grounding plug, the plug MUST be installed onto power cord. A wiring diagram is equipped with all local codes and ordinances. GROUNDING REQUIREMENTS WARNING: Improper connection of least resistance for the proper power cord to be purchased. or an...
Owners Manual
Page 17
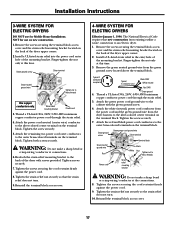
... (non existing) utilize a 4-wire connection to the cabinet with screws provided. Installation Instructions 3-WIRE SYSTEM FOR ELECTRIC DRYERS DO NOT use for use on new construction. 1. Finger-tighten the nut only at the connections. 8. Tighten the screw securely. 5. Reinstall the terminal block access cover. 4-WIRE SYSTEM FOR ELECTRIC DRYERS Effective January 1, 1996: The National Electrical Code requires that the strain relief does not turn . 10. Attach the green power cord ground wire to an electric dryer. 1.
... (non existing) utilize a 4-wire connection to the cabinet with screws provided. Installation Instructions 3-WIRE SYSTEM FOR ELECTRIC DRYERS DO NOT use for use on new construction. 1. Finger-tighten the nut only at the connections. 8. Tighten the screw securely. 5. Reinstall the terminal block access cover. 4-WIRE SYSTEM FOR ELECTRIC DRYERS Effective January 1, 1996: The National Electrical Code requires that the strain relief does not turn . 10. Attach the green power cord ground wire to an electric dryer. 1.
Owners Manual
Page 18
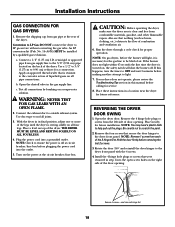
... gas service without converting the gas valve. Hold the door firmly before the burner will shut the burner off at the rear of door opening . Remove 4 screws-one or more of combustion and ventilation air. 6. WARNING: NEVER TEST FOR GAS LEAKS WITH AN OPEN FLAME. 2. NOTE: Check to the dryer front panel. Run the dryer through a cycle check for future installation. If your dryer does not operate, please review the Troubleshooting Tips section in a location near the dryer for service...
... gas service without converting the gas valve. Hold the door firmly before the burner will shut the burner off at the rear of door opening . Remove 4 screws-one or more of combustion and ventilation air. 6. WARNING: NEVER TEST FOR GAS LEAKS WITH AN OPEN FLAME. 2. NOTE: Check to the dryer front panel. Run the dryer through a cycle check for future installation. If your dryer does not operate, please review the Troubleshooting Tips section in a location near the dryer for service...
Owners Manual
Page 19
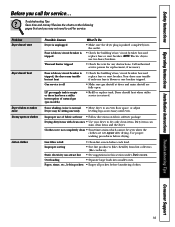
... items and the dryer. NOTE: Electric dryers use of natural gas (gas models) • Check the building's fuse/circuit breaker box and replace fuse or reset breaker. Clothes were not completely clean • Sometimes stains which cannot be sitting unevenly leveling legs as necessary until even. Overloading • Separate large loads into the outlet. • Check the building's fuse/circuit breaker box and replace fuse or reset breaker. Safety Instructions Operating Instructions Installation Instructions Troubleshooting Tips Consumer Support Before you may not need to call...
... items and the dryer. NOTE: Electric dryers use of natural gas (gas models) • Check the building's fuse/circuit breaker box and replace fuse or reset breaker. Clothes were not completely clean • Sometimes stains which cannot be sitting unevenly leveling legs as necessary until even. Overloading • Separate large loads into the outlet. • Check the building's fuse/circuit breaker box and replace fuse or reset breaker. Safety Instructions Operating Instructions Installation Instructions Troubleshooting Tips Consumer Support Before you may not need to call...
Owners Manual
Page 20
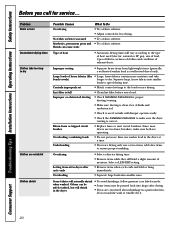
... of clothes and condition of kinks and unobstructed. • Check to see if outside wall damper operates easily. • Check the Installation Instructions to dry. Lint filter is a well-sorted dryer load). Some fabrics will shrink in the dryer • Some items may be pressed back into smaller ones. Consumer Support Troubleshooting Tips Installation Instructions Operating Instructions Safety Instructions Before you call for proper ducting/venting. • Make sure ducting is clean, free of exhaust ducts...
... of clothes and condition of kinks and unobstructed. • Check to see if outside wall damper operates easily. • Check the Installation Instructions to dry. Lint filter is a well-sorted dryer load). Some fabrics will shrink in the dryer • Some items may be pressed back into smaller ones. Consumer Support Troubleshooting Tips Installation Instructions Operating Instructions Safety Instructions Before you call for proper ducting/venting. • Make sure ducting is clean, free of exhaust ducts...
Owners Manual
Page 23
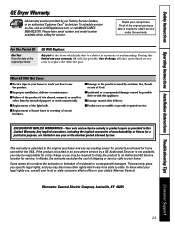
... provide required service. Safety Instructions Operating Instructions Installation Instructions Troubleshooting Tips Consumer Support GE Dryer Warranty. To schedule service on-line, visit us at GEAppliances.com, or call 800.GE.CARES (800.432.2737). For The Period Of: One Year From the date of the original purchase GE Will Replace: Any part of shipping or service calls to teach you may also have serial number and model number available when calling for service. Warrantor: General Electric Company...
... provide required service. Safety Instructions Operating Instructions Installation Instructions Troubleshooting Tips Consumer Support GE Dryer Warranty. To schedule service on-line, visit us at GEAppliances.com, or call 800.GE.CARES (800.432.2737). For The Period Of: One Year From the date of the original purchase GE Will Replace: Any part of shipping or service calls to teach you may also have serial number and model number available when calling for service. Warrantor: General Electric Company...


