
User Manual
Page 4
You acknowledge that you and GE Security, and supersedes any proposal or prior agreement, oral or written, and any ... been tested and found to part 15 of this agreement is provided with the limits for a Class A digital device, pursuant to comply with restricted rights. The Licensed Product is the complete and exclusive statement of the ...For the latest product information, contact your local supplier or visit us online at DFARS 252.227-7018. iv Digia II User Manual Intended use , modify, reproduce, release, perform, display, or disclose the Software also are restricted as provided ...
You acknowledge that you and GE Security, and supersedes any proposal or prior agreement, oral or written, and any ... been tested and found to part 15 of this agreement is provided with the limits for a Class A digital device, pursuant to comply with restricted rights. The Licensed Product is the complete and exclusive statement of the ...For the latest product information, contact your local supplier or visit us online at DFARS 252.227-7018. iv Digia II User Manual Intended use , modify, reproduce, release, perform, display, or disclose the Software also are restricted as provided ...
User Manual
Page 7
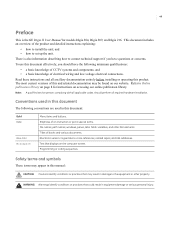
... and all applicable codes, should have questions or concerns. WARNING: Warnings identify conditions or practices that could result in this manual: CAUTION: Cautions identify conditions or practices that displays on our website. Emphasis of this document The following minimum qualifications: &#... effectively, you have the following conventions are used in this product. There is the GE Digia II User Manual for instructions on page 8 for models Digia 204, Digia 209, and Digia 216. Safety terms and symbols These terms may appear in equipment damage or serious personal...
... and all applicable codes, should have questions or concerns. WARNING: Warnings identify conditions or practices that could result in this manual: CAUTION: Cautions identify conditions or practices that displays on our website. Emphasis of this document The following minimum qualifications: &#... effectively, you have the following conventions are used in this product. There is the GE Digia II User Manual for instructions on page 8 for models Digia 204, Digia 209, and Digia 216. Safety terms and symbols These terms may appear in equipment damage or serious personal...

User Manual
Page 10
... digital video recording, is simple to install, and operates similar to start the search functionality. Press this to pause the playback of video. D PLAY. Press this to fast forward video or start or increase forward slow motion. Press this to rewind video or start or increase reverse slow motion . Press this to playback video. 2 Digia II User Manual Product overview Digia II...
... digital video recording, is simple to install, and operates similar to start the search functionality. Press this to pause the playback of video. D PLAY. Press this to fast forward video or start or increase forward slow motion. Press this to rewind video or start or increase reverse slow motion . Press this to playback video. 2 Digia II User Manual Product overview Digia II...
User Manual
Page 12
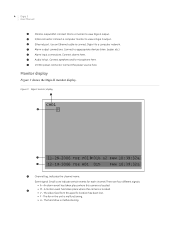
...I 19 VDC power connector. The video feed from this to a monitor to a computer network. Connect a computer monitor to apprpopriate devices (siren, buzzer, etc.). E Ethernet port. The hard drive is located. • V - Connect to view a Digia II output. Figure 3. A motion event.... • H - Use an Ethernet cable to connect Digia II to view Digia II output. F Alarm output connections. An alarm event has taken place where this camera is malfunctioning. 4 Digia II User Manual C Monitor output BNC. Digia II monitor display A CH01 B M C 11-28-2006 TUE...
...I 19 VDC power connector. The video feed from this to a monitor to a computer network. Connect a computer monitor to apprpopriate devices (siren, buzzer, etc.). E Ethernet port. The hard drive is located. • V - Connect to view a Digia II output. Figure 3. A motion event.... • H - Use an Ethernet cable to connect Digia II to view Digia II output. F Alarm output connections. An alarm event has taken place where this camera is malfunctioning. 4 Digia II User Manual C Monitor output BNC. Digia II monitor display A CH01 B M C 11-28-2006 TUE...

User Manual
Page 16
To install Digia II, do the following: 1. Connect an Ethernet cable from water, heat, dust, dirt, and other substances that secure, away from a computer network to the audio input connector. 3. When the contact is closed, an alarm is triggered from 1 to 60 seconds in ...in an open state. Connect any one of the unit. 4. Connect speakers or another audio input device to the LAN port. 5. 8 Digia II User Manual Installation Be sure to install your Digia II in relay offering three modes: • ALM-COM (common) • ALM-NO (normally open state. Connect a microphone or another ...
To install Digia II, do the following: 1. Connect an Ethernet cable from water, heat, dust, dirt, and other substances that secure, away from a computer network to the audio input connector. 3. When the contact is closed, an alarm is triggered from 1 to 60 seconds in ...in an open state. Connect any one of the unit. 4. Connect speakers or another audio input device to the LAN port. 5. 8 Digia II User Manual Installation Be sure to install your Digia II in relay offering three modes: • ALM-COM (common) • ALM-NO (normally open state. Connect a microphone or another ...
User Manual
Page 18
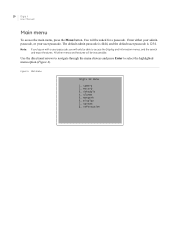
... search and export features. Enter either your admin passcode, or your user passcode. Main menu Digia II Menu 1. Information Note: If you log on with a user passcode, you will only be asked for a passcode. Record 3. Alarms 5. System 8. 10 Digia II User Manual Main menu To access the main menu, press the Menu button. Figure 4. Display 7. The...
... search and export features. Enter either your admin passcode, or your user passcode. Main menu Digia II Menu 1. Information Note: If you log on with a user passcode, you will only be asked for a passcode. Record 3. Alarms 5. System 8. 10 Digia II User Manual Main menu To access the main menu, press the Menu button. Figure 4. Display 7. The...
User Manual
Page 20
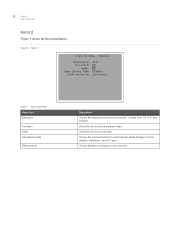
12 Digia II User Manual Record Figure 6 shows the Record submenu. Check this box to record prealarm video. Choose from CIF, 2CIF, and D1/4CIF. Check this box to record audio. Record Resolution Pre-Alarm Audio Auto Delete Mode Disk Overwrite 2CIF Disable Continuous Table 2. Choose between 1 and 255 days. Choose disable or between continuous or no overwrite. Record submenu Menu...
12 Digia II User Manual Record Figure 6 shows the Record submenu. Check this box to record prealarm video. Choose from CIF, 2CIF, and D1/4CIF. Check this box to record audio. Record Resolution Pre-Alarm Audio Auto Delete Mode Disk Overwrite 2CIF Disable Continuous Table 2. Choose between 1 and 255 days. Choose disable or between continuous or no overwrite. Record submenu Menu...
User Manual
Page 22
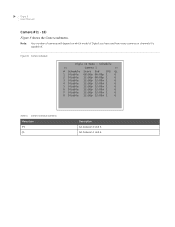
... 4. Set between 0 and 3. Camera schedule submenu Menu item IPS QL Description Set between 1 and 6. Note: Your number of cameras will depend on which model of Digia II you have and how many cameras or channels it is capable of. Figure 8. Camera schedule Digia II Menu - 14 Digia II User Manual Camera # (1 - 16) Figure 8 shows the Camera submenu.
... 4. Set between 0 and 3. Camera schedule submenu Menu item IPS QL Description Set between 1 and 6. Note: Your number of cameras will depend on which model of Digia II you have and how many cameras or channels it is capable of. Figure 8. Camera schedule Digia II Menu - 14 Digia II User Manual Camera # (1 - 16) Figure 8 shows the Camera submenu.

User Manual
Page 24
...left or right arrows to move to another position and repeat to the IP, subnet, gateway, and DNS server values automatically. 16 Digia II User Manual Network The Network submenu has three of its own submenus. If you choose static as a network type, you can set the ...the IP address. Figure 10. Choose between 10 and 8192 KB. They are Network configuration, Network email, and Network DDNS. Network configuration Digia II Menu - Network configuration Figure 10 shows the Network configuration submenu. Default is 01600. Default is 00554. If you choose static as you ...
...left or right arrows to move to another position and repeat to the IP, subnet, gateway, and DNS server values automatically. 16 Digia II User Manual Network The Network submenu has three of its own submenus. If you choose static as a network type, you can set the ...the IP address. Figure 10. Choose between 10 and 8192 KB. They are Network configuration, Network email, and Network DDNS. Network configuration Digia II Menu - Network configuration Figure 10 shows the Network configuration submenu. Default is 01600. Default is 00554. If you choose static as you ...
User Manual
Page 26
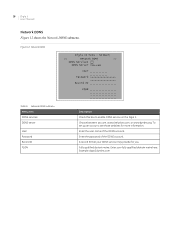
Network DDNS submenu Menu item DDNS services DDNS server User Password Record ID FQDN Description Check this box to enable DDNS service on the Digia II. Enter your DDNS service may provide for more information. 18 Digia II User Manual Network DDNS Figure 12 shows the Network DDNS submenu. Enter the password of ...com, or www.dyndns.org. Enter the user name of the DDNS account. Network > DDNS Services DDNS Server tzo.com User Password Record ID FQDN Table 8. Network DDNS Digia II Menu - A record ID that your fully qualified domain name here. Figure 12.
Network DDNS submenu Menu item DDNS services DDNS server User Password Record ID FQDN Description Check this box to enable DDNS service on the Digia II. Enter your DDNS service may provide for more information. 18 Digia II User Manual Network DDNS Figure 12 shows the Network DDNS submenu. Enter the password of ...com, or www.dyndns.org. Enter the user name of the DDNS account. Network > DDNS Services DDNS Server tzo.com User Password Record ID FQDN Table 8. Network DDNS Digia II Menu - A record ID that your fully qualified domain name here. Figure 12.

User Manual
Page 28
System date&time Digia II Menu - Set the hour and minute at which you would like the time to change, and set the hour and minute you want the time ... would like the time to 02:00a Time Synchronize Time Server Time Zone Time Update by 220.130.158.052 GMT DAY Table 10. 20 Digia II User Manual System The System submenu has two submenus of its own.
System date&time Digia II Menu - Set the hour and minute at which you would like the time to change, and set the hour and minute you want the time ... would like the time to 02:00a Time Synchronize Time Server Time Zone Time Update by 220.130.158.052 GMT DAY Table 10. 20 Digia II User Manual System The System submenu has two submenus of its own.
User Manual
Page 30
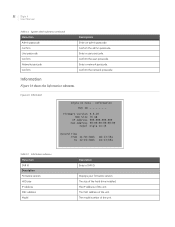
... DVR ID _ _ _ _ _ _ Firmware Version HDD Size IP Address MAC Address Model 0.9.28 76 GB 000.000.000.000 00:00:00:00:00:00 Digia II-16 Record Time From 11-30-2006 To 12-19-2006 06:33:58a 03:13:04a Table 12. Confirm the admin passcode. Information Figure 16 shows...
... DVR ID _ _ _ _ _ _ Firmware Version HDD Size IP Address MAC Address Model 0.9.28 76 GB 000.000.000.000 00:00:00:00:00:00 Digia II-16 Record Time From 11-30-2006 To 12-19-2006 06:33:58a 03:13:04a Table 12. Confirm the admin passcode. Information Figure 16 shows...

User Manual
Page 32
... your recorded video by a multitude of the lists results. Search Digia II Menu - This will be set to navigate through entries on page 26 for video that has alarms, motion, video loss, or a system event associated with the export start time set the choice. 24 Digia II User Manual Search Digia II allows... you to the event selected. Press Export to Start 3. See Export on a page. 10. Press the Search button on a new page labeled Event list. 8. Search Available Video Start 11-30-2006 06:33:58a...
... your recorded video by a multitude of the lists results. Search Digia II Menu - This will be set to navigate through entries on page 26 for video that has alarms, motion, video loss, or a system event associated with the export start time set the choice. 24 Digia II User Manual Search Digia II allows... you to the event selected. Press Export to Start 3. See Export on a page. 10. Press the Search button on a new page labeled Event list. 8. Search Available Video Start 11-30-2006 06:33:58a...
User Manual
Page 34
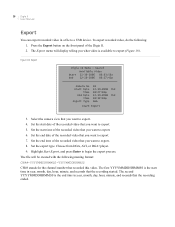
... Start Export 3. Set the start date of the Digia II. 2. Choose from DGA, AVI, or DGA+player. 9. To export recorded video, do the following naming format: CH##-YYYYMMDDHHMMSS-YYYYMMDDHHMMSS CH## stands for the channel number that you want to export. 7. 26 Digia II User Manual Export You can export recorded video in year, month, day, hour, minute, and seconds...
... Start Export 3. Set the start date of the Digia II. 2. Choose from DGA, AVI, or DGA+player. 9. To export recorded video, do the following naming format: CH##-YYYYMMDDHHMMSS-YYYYMMDDHHMMSS CH## stands for the channel number that you want to export. 7. 26 Digia II User Manual Export You can export recorded video in year, month, day, hour, minute, and seconds...

User Manual
Page 36
... with the channel buttons. 2. Press Enter again to freeze your customized views for all displays (2x2, 3x3, or 4x4). The unit will remember your live video (Figure 22 on page 29). Shuffled view CH02 CH01 Select CH03 CH03 12-19-2006 TUE R01 01% FAN 10:39:32a 5. When you want... 3. Repeat steps 3 and 4 above to customize the display as much as you are finished, press Enter again. Press Display until you 'd like to unfreeze the video and zoom in on live video display or zoom in on live video, do the following: 1. 28 Digia II User Manual Figure 20. Figure 21.
... with the channel buttons. 2. Press Enter again to freeze your customized views for all displays (2x2, 3x3, or 4x4). The unit will remember your live video (Figure 22 on page 29). Shuffled view CH02 CH01 Select CH03 CH03 12-19-2006 TUE R01 01% FAN 10:39:32a 5. When you want... 3. Repeat steps 3 and 4 above to customize the display as much as you are finished, press Enter again. Press Display until you 'd like to unfreeze the video and zoom in on live video display or zoom in on live video, do the following: 1. 28 Digia II User Manual Figure 20. Figure 21.
User Manual
Page 40
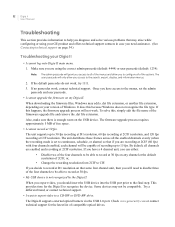
... channels evenly (when the recording mode is set the admin passcode and user passcode. • I cannot log onto Digia II main menu. 1. When you export video, you should insert the USB device into the USB port prior to CIF. 32 Digia II User Manual Troubleshooting This section provides information... channels enabled, each channel will need assistance. (See Contacting technical support on page 34.) Troubleshooting your GE product and offers technical support contacts in case you are enabled and recording at 30 fps on the USB device. If no passcodes work , try 1111. 3. or, •...
... channels evenly (when the recording mode is set the admin passcode and user passcode. • I cannot log onto Digia II main menu. 1. When you export video, you should insert the USB device into the USB port prior to CIF. 32 Digia II User Manual Troubleshooting This section provides information... channels enabled, each channel will need assistance. (See Contacting technical support on page 34.) Troubleshooting your GE product and offers technical support contacts in case you are enabled and recording at 30 fps on the USB device. If no passcodes work , try 1111. 3. or, •...
User Manual
Page 42
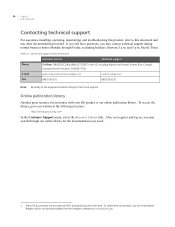
...read these documents, you need Adobe Reader, which can be downloaded free from Adobe's website at www.adobe.com. Many GE documents are provided as PDFs (portable document format). Outside the toll-free area: 503.885.5700. E-mail gesecurity.customerservice...before calling for assistance with your GE product is our online publication library. After you register and log on, you may contact technical support during normal business hours (Monday through our online library for the documentation you will need .1 1. 34 Digia II User Manual Contacting technical support For assistance ...
...read these documents, you need Adobe Reader, which can be downloaded free from Adobe's website at www.adobe.com. Many GE documents are provided as PDFs (portable document format). Outside the toll-free area: 503.885.5700. E-mail gesecurity.customerservice...before calling for assistance with your GE product is our online publication library. After you register and log on, you may contact technical support during normal business hours (Monday through our online library for the documentation you will need .1 1. 34 Digia II User Manual Contacting technical support For assistance ...
User Manual
Page 44
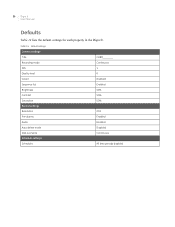
Default settings Camera settings T itle Recording mode FPS Quality level Covert Sequence list Brightness Contrast Saturation Record settings Resolution Pre-alarms Audio Auto delete mode Disk overwrite Schedule settings Schedules CH##________ Continuous 1 6 Disabled Enabled 50% 50% 50% 2CIF Enabled Enabled Disabled Continuous All time periods disabled 36 Digia II User Manual Defaults Table 14 lists the default settings for each property in the Digia II. Table 14.
Default settings Camera settings T itle Recording mode FPS Quality level Covert Sequence list Brightness Contrast Saturation Record settings Resolution Pre-alarms Audio Auto delete mode Disk overwrite Schedule settings Schedules CH##________ Continuous 1 6 Disabled Enabled 50% 50% 50% 2CIF Enabled Enabled Disabled Continuous All time periods disabled 36 Digia II User Manual Defaults Table 14 lists the default settings for each property in the Digia II. Table 14.