Use and Care Manual
Page 10
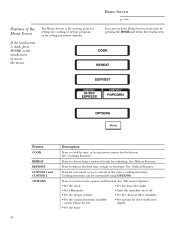
... or for reheating. The Home Screen is dark, press HOME or the touchscreen to defrost foods by microwave sensor food selection. Home Screen ge.com You can be customized using OPTIONS. See "Defrost Features." Feature COOK REHEAT DEFROST CUSTOM 1 and CUSTOM 2 OPTIONS Description Press to set... microwave options and features. Press to cook by time, or by time, weight or food type. Press to choose from a variety of foods for setting microwave options. Press for the touchscreen display • Set the timer...
... or for reheating. The Home Screen is dark, press HOME or the touchscreen to defrost foods by microwave sensor food selection. Home Screen ge.com You can be customized using OPTIONS. See "Defrost Features." Feature COOK REHEAT DEFROST CUSTOM 1 and CUSTOM 2 OPTIONS Description Press to set... microwave options and features. Press to cook by time, or by time, weight or food type. Press to choose from a variety of foods for setting microwave options. Press for the touchscreen display • Set the timer...

Use and Care Manual
Page 12
Starts immediately! Food type, food weight/ quantity (some food types) Beverage type-Starts immediately! Cooking Features ge.com Features of day to microwave by time or with the sensor features. Food type. Amount of cooking time and power level for first and ... done/Less done 12 Press EXPRESS TIME COOK SELECT FOOD SELECT BEVERAGES SOFTEN MELT TIME COOK 1 & 2 DELAY Enter Amount of cooking time. Food type, food weight. The Cook Screen allows you to choose from a variety of functions to start.
Starts immediately! Food type, food weight/ quantity (some food types) Beverage type-Starts immediately! Cooking Features ge.com Features of day to microwave by time or with the sensor features. Food type. Amount of cooking time and power level for first and ... done/Less done 12 Press EXPRESS TIME COOK SELECT FOOD SELECT BEVERAGES SOFTEN MELT TIME COOK 1 & 2 DELAY Enter Amount of cooking time. Food type, food weight. The Cook Screen allows you to choose from a variety of functions to start.
Use and Care Manual
Page 16
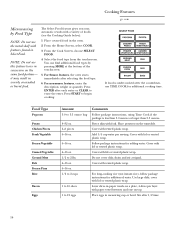
... or bowl. Follow package instructions for addition of water. Stir after selecting the food type. 6 For non-sensor features, enter the description, weight or quantity. You can find additional food types by Food Type NOTE: Do not use the metal shelf with a variety of foods (see ... with fork. Place eggs in severely overcooked or burnt food. NOTE: Do not use TIME COOK for additional cooking time. Cooking Features ge.com Microwaving by pressing MORE at signal. Press START to 12 eggs Comments Follow package instructions, using Time Cook if the package is ...
... or bowl. Follow package instructions for addition of water. Stir after selecting the food type. 6 For non-sensor features, enter the description, weight or quantity. You can find additional food types by Food Type NOTE: Do not use the metal shelf with a variety of foods (see ... with fork. Place eggs in severely overcooked or burnt food. NOTE: Do not use TIME COOK for additional cooking time. Cooking Features ge.com Microwaving by pressing MORE at signal. Press START to 12 eggs Comments Follow package instructions, using Time Cook if the package is ...
Use and Care Manual
Page 18
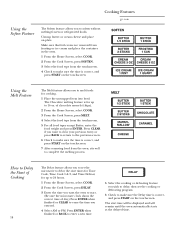
... ENTER when finished or CLEAR to erase the time you to make sure the time is correct, and press START on plate. Cooking Features ge.com Using the Soften Feature The Soften feature allows you entered. 4 Select AM or PM. Make sure that foil covers are removed from frosting...select COOK. 2 From the Cook Screen, press SOFTEN. 3 Select the food type from the touchscreen. 5 For all food types except Butter, enter the food weight and press ENTER. Press ENTER when finished or BACK to start. (Be sure the microwave clock shows the correct time of chocolate morsels (chips). 2 From...
... ENTER when finished or CLEAR to erase the time you to make sure the time is correct, and press START on plate. Cooking Features ge.com Using the Soften Feature The Soften feature allows you entered. 4 Select AM or PM. Make sure that foil covers are removed from frosting...select COOK. 2 From the Cook Screen, press SOFTEN. 3 Select the food type from the touchscreen. 5 For all food types except Butter, enter the food weight and press ENTER. Press ENTER when finished or BACK to start. (Be sure the microwave clock shows the correct time of chocolate morsels (chips). 2 From...

Use and Care Manual
Page 20
...countdown time, use this feature twice in temperature. Reheated foods may have wide variations in succession on food type, enter the food description, weight or quantity. Reheated foods may have wide variations in severely overcooked or burnt food. If food is opened, close it may be extremely... to reheat: • Plate of food. NOTE: Do not use Time Cook to reheat: • Pizza • Casserole • Rice Reheating Features ge.com 1 From the Home Screen, select REHEAT. 2 From the Reheat Screen, select the food type. 3 Depending on the same food portion- Use the...
...countdown time, use this feature twice in temperature. Reheated foods may have wide variations in succession on food type, enter the food description, weight or quantity. Reheated foods may have wide variations in severely overcooked or burnt food. If food is opened, close it may be extremely... to reheat: • Plate of food. NOTE: Do not use Time Cook to reheat: • Pizza • Casserole • Rice Reheating Features ge.com 1 From the Home Screen, select REHEAT. 2 From the Reheat Screen, select the food type. 3 Depending on the same food portion- Use the...

Use and Care Manual
Page 21
Press BY TIME BY WEIGHT BY FOOD 1 LB. QUICK DEFROST SOFTEN MELT DELAY Enter Amount of cooking time Food weight Food type, food weight Starts immediately! Food type Food type, food weight Cooking or defrosting function and time of day to defrost by time, by weight or by food type. Defrosting Features ge.com Features of the DEFROST Screen The Defrost Screen allows you to choose from a variety of functions to start. 21
Press BY TIME BY WEIGHT BY FOOD 1 LB. QUICK DEFROST SOFTEN MELT DELAY Enter Amount of cooking time Food weight Food type, food weight Starts immediately! Food type Food type, food weight Cooking or defrosting function and time of day to defrost by time, by weight or by food type. Defrosting Features ge.com Features of the DEFROST Screen The Defrost Screen allows you to choose from a variety of functions to start. 21

Use and Care Manual
Page 24
...Quick Defrost 1 Lb. Large roasts should stand for 1.2 pounds (1 pound, 3 ounces). Press ENTER when finished or CLEAR to erase the weight you don't open the door and turn the food over and break apart or rearrange pieces for more even defrosting. Quick Defrost automatically sets ...dish. 1 From the Home Screen, select DEFROST. 2 From the Defrost Screen, select 1 LB QUICK DEFROST. Defrosting by Weight Defrosting Features ge.com Defrosting by Weight automatically sets the defrosting times and power levels to give even defrosting results for foods weighing one pound. • Remove meat...
...Quick Defrost 1 Lb. Large roasts should stand for 1.2 pounds (1 pound, 3 ounces). Press ENTER when finished or CLEAR to erase the weight you don't open the door and turn the food over and break apart or rearrange pieces for more even defrosting. Quick Defrost automatically sets ...dish. 1 From the Home Screen, select DEFROST. 2 From the Defrost Screen, select 1 LB QUICK DEFROST. Defrosting by Weight Defrosting Features ge.com Defrosting by Weight automatically sets the defrosting times and power levels to give even defrosting results for foods weighing one pound. • Remove meat...

Use and Care Manual
Page 25
... the food type and time are defrosting and automatically sets the defrosting times and power levels to complete defrosting. Defrosting by Food Defrosting Features ge.com Defrosting by Food allows you to specify the food you are correct, and press START on the touchscreen. • Remove meat from... the touchscreen. 4 Using the Conversion Guide at right, enter the food weight using the numbers on microwave-safe dish. • If the oven signals "TURN FOOD OVER," turn the food over and break apart or rearrange pieces...
... the food type and time are defrosting and automatically sets the defrosting times and power levels to complete defrosting. Defrosting by Food Defrosting Features ge.com Defrosting by Food allows you to specify the food you are correct, and press START on the touchscreen. • Remove meat from... the touchscreen. 4 Using the Conversion Guide at right, enter the food weight using the numbers on microwave-safe dish. • If the oven signals "TURN FOOD OVER," turn the food over and break apart or rearrange pieces...

Use and Care Manual
Page 26
... cheese and place on the touchscreen. The Chocolate melting feature is for cooking. 1 Place the unwrapped item into bowl. Using the Soften Feature Defrosting Features ge.com The Soften feature allows you want to clear your previous entry, or press BACK to return to the previous screen. 6 Check to make sure... Screen, select DEFROST. 2 From the Cook Screen, press SOFTEN. 3 Select the food type from the touchscreen. 5 For all food types except Butter, enter the food weight and press ENTER.
... cheese and place on the touchscreen. The Chocolate melting feature is for cooking. 1 Place the unwrapped item into bowl. Using the Soften Feature Defrosting Features ge.com The Soften feature allows you want to clear your previous entry, or press BACK to return to the previous screen. 6 Check to make sure... Screen, select DEFROST. 2 From the Cook Screen, press SOFTEN. 3 Select the food type from the touchscreen. 5 For all food types except Butter, enter the food weight and press ENTER.

Installation Instructions
Page 3
...important to a supply circuit of 113-135 pounds. This product must be capable of supporting the cabinet load, in addition to the added weight of up to insure that two people install this product. to BOTH a top cabinet AND a wall. CAUTION: For personal safety, the...box and supply circuit should be installed by a qualified electrician. Ensure proper ground exists before beginning the installation to 50 pounds or a total weight of the proper voltage and frequency. CAUTION: For personal safety, this appliance. NOTE: For easier installation and personal safety, it is properly ...
...important to a supply circuit of 113-135 pounds. This product must be capable of supporting the cabinet load, in addition to the added weight of up to insure that two people install this product. to BOTH a top cabinet AND a wall. CAUTION: For personal safety, the...box and supply circuit should be installed by a qualified electrician. Ensure proper ground exists before beginning the installation to 50 pounds or a total weight of the proper voltage and frequency. CAUTION: For personal safety, this appliance. NOTE: For easier installation and personal safety, it is properly ...

Installation Instructions
Page 10
... cabinet or the level line drawn in Step C for the rear wall. If there is in a stud, find a stud somewhere in a stud to support the weight of Top Cabinet Hole B CAUTION: Wear gloves to use at least one hand, draw circles on the wall at holes A, B, C and D (see illustration above/actual...
... cabinet or the level line drawn in Step C for the rear wall. If there is in a stud, find a stud somewhere in a stud to support the weight of Top Cabinet Hole B CAUTION: Wear gloves to use at least one hand, draw circles on the wall at holes A, B, C and D (see illustration above/actual...