Quick Specs
Page 1
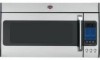
...; appliance questions, visit our website at ge.com or call GE Answer Center® service, 800.626.2000. Ft. Before installing, consult installation instructions packed with the Spacemaker microwave oven. Important Information: When installing the Spacemaker microwave oven over a range, allow for removal of 2" from floor 30" MIN. CVM2072SMSS GE Café 2.0 Cu. No additional wiring, venting...
...; appliance questions, visit our website at ge.com or call GE Answer Center® service, 800.626.2000. Ft. Before installing, consult installation instructions packed with the Spacemaker microwave oven. Important Information: When installing the Spacemaker microwave oven over a range, allow for removal of 2" from floor 30" MIN. CVM2072SMSS GE Café 2.0 Cu. No additional wiring, venting...
Quick Specs
Page 2
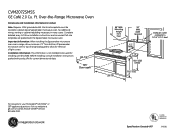
CVM2072SMSS GE Café 2.0 Cu. Read the following carefully. Stainless Steel Decorative Panel Kit When replacing a Hi/Low range with a microwave/ convection oven or Spacemaker over a range model, this kit fills in the additional width to provide a custom built-in the area between cabinets only; For installation...exceed 140 equivalent feet. JX22SS - The chart below shows the approximate feet of equivalent length of -cabinet installation. not for a 42" opening. G. Exhaust Connection: The hood exhaust has been designed to accommodate exhaust...
CVM2072SMSS GE Café 2.0 Cu. Read the following carefully. Stainless Steel Decorative Panel Kit When replacing a Hi/Low range with a microwave/ convection oven or Spacemaker over a range model, this kit fills in the additional width to provide a custom built-in the area between cabinets only; For installation...exceed 140 equivalent feet. JX22SS - The chart below shows the approximate feet of equivalent length of -cabinet installation. not for a 42" opening. G. Exhaust Connection: The hood exhaust has been designed to accommodate exhaust...
Use and Care Manual
Page 3
...or vapors in this manual. • This appliance should be followed, including the following: • This microwave oven is UL listed for installation over electric and gas ranges. • This microwave oven is damaged, it has been damaged or dropped. Do not overcook food. If...to heat, dry or cook food, and is specifically designed to properly grounded outlet. See the Grounding Instructions section on page 7. • Install or locate this appliance only in accordance with any openings on page 2. • This appliance must be replaced by General Electric Service or an...
...or vapors in this manual. • This appliance should be followed, including the following: • This microwave oven is UL listed for installation over electric and gas ranges. • This microwave oven is damaged, it has been damaged or dropped. Do not overcook food. If...to heat, dry or cook food, and is specifically designed to properly grounded outlet. See the Grounding Instructions section on page 7. • Install or locate this appliance only in accordance with any openings on page 2. • This appliance must be replaced by General Electric Service or an...

Use and Care Manual
Page 4
... arcing, press the OFF pad and correct the problem. Arcing is in use high heat on the surface unit by : • The metal shelf not installed correctly so it touches the microwave wall. • Metal or foil touching the side of the microwave often. Do not allow grease to food (upturned...
... arcing, press the OFF pad and correct the problem. Arcing is in use high heat on the surface unit by : • The metal shelf not installed correctly so it touches the microwave wall. • Metal or foil touching the side of the microwave often. Do not allow grease to food (upturned...
Use and Care Manual
Page 7
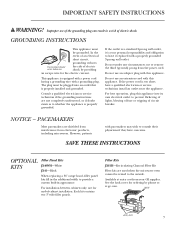
However, patients with a properly grounded 3-prong wall outlet. Available at ge.com. Improper use an adapter plug with a grounding plug. the risk of -cabinet installation. Consult a qualified electrician or service technician if the grounding instructions are used when the microwave oven cannot be... width to consult their physicians if they have a qualified electrician or service technician install an outlet near the appliance. If the outlet is a standard 2-prong wall outlet, it is your GE supplier. Do not under any circumstances cut or remove the third (ground) prong...
However, patients with a properly grounded 3-prong wall outlet. Available at ge.com. Improper use an adapter plug with a grounding plug. the risk of -cabinet installation. Consult a qualified electrician or service technician if the grounding instructions are used when the microwave oven cannot be... width to consult their physicians if they have a qualified electrician or service technician install an outlet near the appliance. If the outlet is a standard 2-prong wall outlet, it is your GE supplier. Do not under any circumstances cut or remove the third (ground) prong...

Use and Care Manual
Page 36
When you cook with plastic wrap, you vent the plastic wrap by : • the metal shelf being installed incorrectly and touching the microwave walls. • metal or foil touching the side of the oven. • foil that a microwaved cake is not molded to ... excess steam can escape. 36 When microwaving, you shield chicken breasts or baked foods to escape. Term Arcing Covering Shielding Standing Time Venting Microwave Terms ge.com Definition Arcing is especially important in microwave cooking.
When you cook with plastic wrap, you vent the plastic wrap by : • the metal shelf being installed incorrectly and touching the microwave walls. • metal or foil touching the side of the oven. • foil that a microwaved cake is not molded to ... excess steam can escape. 36 When microwaving, you shield chicken breasts or baked foods to escape. Term Arcing Covering Shielding Standing Time Venting Microwave Terms ge.com Definition Arcing is especially important in microwave cooking.
Use and Care Manual
Page 39
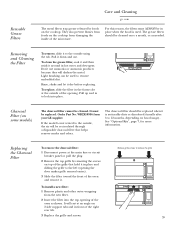
...out. Charcoal Filter (on hood usage). It will rest at an angle on the cooktop from your GE supplier. They also prevent flames from foods on 2 side support tabs and in front of the oven ...top opening . Order Part No. It must ALWAYS be replaced. Reusable Grease Filters Care and Cleaning ge.com The metal filters trap grease released by removing the screws on the cooktop. For this reason...and screws. See "Optional Kits", page 7, for more information. To install a new filter: 1 Remove plastic and other outer wrapping from the new filter. 2 Insert the filter into place...
...out. Charcoal Filter (on hood usage). It will rest at an angle on the cooktop from your GE supplier. They also prevent flames from foods on 2 side support tabs and in front of the oven ...top opening . Order Part No. It must ALWAYS be replaced. Reusable Grease Filters Care and Cleaning ge.com The metal filters trap grease released by removing the screws on the cooktop. For this reason...and screws. See "Optional Kits", page 7, for more information. To install a new filter: 1 Remove plastic and other outer wrapping from the new filter. 2 Insert the filter into place...

Use and Care Manual
Page 42
... Damage caused after delivery. To know what your home to teach you how to state. Louisville, KY 40225 42 Microwave Oven Warranty ge.com All warranty service provided by law. Proof of the product or damage to the product if it is extended to provide required service... this five-year limited warranty, you may also have serial and model numbers available when calling for home use the product. ■ Improper installation, delivery or maintenance. ■ Product not accessible to the original purchaser and any labor or related service costs. Warrantor: General Electric Company...
... Damage caused after delivery. To know what your home to teach you how to state. Louisville, KY 40225 42 Microwave Oven Warranty ge.com All warranty service provided by law. Proof of the product or damage to the product if it is extended to provide required service... this five-year limited warranty, you may also have serial and model numbers available when calling for home use the product. ■ Improper installation, delivery or maintenance. ■ Product not accessible to the original purchaser and any labor or related service costs. Warrantor: General Electric Company...
Installation Instructions
Page 1
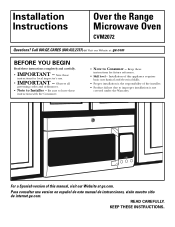
... manual, visit our Website at : ge.com BEFORE YOU BEGIN Read these instructions with the Consumer. • Note to improper installation is the responsibility of this appliance requires basic mechanical and electrical skills. • Proper installation is not covered under the Warranty. READ ...manual de instrucciones, visite nuestro sitio de internet ge.com. Call 800.GE.CARES (800.432.2737) or Visit our Website at ge.com. Observe all governing codes and ordinances. • Note to Installer - For a Spanish version of the installer. • Product failure due to Consumer -
... manual, visit our Website at : ge.com BEFORE YOU BEGIN Read these instructions with the Consumer. • Note to improper installation is the responsibility of this appliance requires basic mechanical and electrical skills. • Proper installation is not covered under the Warranty. READ ...manual de instrucciones, visite nuestro sitio de internet ge.com. Call 800.GE.CARES (800.432.2737) or Visit our Website at ge.com. Observe all governing codes and ordinances. • Note to Installer - For a Spanish version of the installer. • Product failure due to Consumer -
Installation Instructions
Page 2
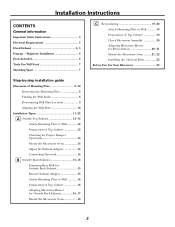
...Microwave Assembly 20 Adapting Microwave Blower for Recirculation 20, 21 Mount the Microwave Oven ..........21, 22 Installing the Charcoal Filter 22 Before You Use Your Microwave 23 Step-by-step installation guide Placement of Mounting Plate 8-10 Removing the Mounting Plate 8 Finding the Wall Studs 8 Determining... Wall Plate Location 9 Aligning the Wall Plate 10 Installation Types 11-22 A Outside Top Exhaust 12-14 Attach Mounting Plate to Wall 12 Preparation of Top Cabinet 13 Checking for Proper...
...Microwave Assembly 20 Adapting Microwave Blower for Recirculation 20, 21 Mount the Microwave Oven ..........21, 22 Installing the Charcoal Filter 22 Before You Use Your Microwave 23 Step-by-step installation guide Placement of Mounting Plate 8-10 Removing the Mounting Plate 8 Finding the Wall Studs 8 Determining... Wall Plate Location 9 Aligning the Wall Plate 10 Installation Types 11-22 A Outside Top Exhaust 12-14 Attach Mounting Plate to Wall 12 Preparation of Top Cabinet 13 Checking for Proper...

Installation Instructions
Page 3
...capable of supporting the cabinet load, in addition to the added weight of this kilowatt rating. Ensure proper ground exists before beginning the installation to a separate 15- CAUTION: For personal safety, the mounting surface must conform to make sure the receptacle is properly grounded. ... to BOTH a top cabinet AND a wall. It must perform a ground continuity check on the power outlet box before use 3 The installer must be employed to the National Electrical Code or the prevailing local code. IMPORTANT - FOR PERSONAL SAFETY, THIS APPLIANCE MUST BE PROPERLY GROUNDED...
...capable of supporting the cabinet load, in addition to the added weight of this kilowatt rating. Ensure proper ground exists before beginning the installation to a separate 15- CAUTION: For personal safety, the mounting surface must conform to make sure the receptacle is properly grounded. ... to BOTH a top cabinet AND a wall. It must perform a ground continuity check on the power outlet box before use 3 The installer must be employed to the National Electrical Code or the prevailing local code. IMPORTANT - FOR PERSONAL SAFETY, THIS APPLIANCE MUST BE PROPERLY GROUNDED...

Installation Instructions
Page 4
...taken to accommodate exhaust. 4 Straight Duct (6″ Round) 12 Ft. If you plan to vent your exhaust to page 6. Equivalent lengths of one possible ductwork installation. x (1) = 40 Ft. 3 Ft. Total Length = 63 Ft. Transition Adaptor* x (1) = 5 Ft. OUTSIDE BACK EXHAUST (EXAMPLE ONLY) The ... Duct 3 Ft. (31⁄4″ x 10″ Rectangular) x (1) = 3 Ft. 90° Elbow 10 Ft. x (2) = 20 Ft. Installation Instructions HOOD EXHAUST NOTE: Read these next two pages only if you plan to recirculate the air back into the room, proceed to the outside...
...taken to accommodate exhaust. 4 Straight Duct (6″ Round) 12 Ft. If you plan to vent your exhaust to page 6. Equivalent lengths of one possible ductwork installation. x (1) = 40 Ft. 3 Ft. Total Length = 63 Ft. Transition Adaptor* x (1) = 5 Ft. OUTSIDE BACK EXHAUST (EXAMPLE ONLY) The ... Duct 3 Ft. (31⁄4″ x 10″ Rectangular) x (1) = 3 Ft. 90° Elbow 10 Ft. x (2) = 20 Ft. Installation Instructions HOOD EXHAUST NOTE: Read these next two pages only if you plan to recirculate the air back into the room, proceed to the outside...

Installation Instructions
Page 5
... feet. When calculating the total duct length, add the equivalent lengths of all straight duct sections. The chart below shows you need to install ducts, note that venting be installed using the most direct route and with a standard 31⁄4″ x 10″ rectangular duct. x ( ) = Ft. x ( ) = Ft....the total duct length of 31⁄4″ x 10″ rectangular or 6″ diameter round duct should not exceed 140 equivalent feet. Installation Instructions NOTE: If you how to -round transition adaptor must be used , the bottom corners of the damper will have to be cut to...
... feet. When calculating the total duct length, add the equivalent lengths of all straight duct sections. The chart below shows you need to install ducts, note that venting be installed using the most direct route and with a standard 31⁄4″ x 10″ rectangular duct. x ( ) = Ft. x ( ) = Ft....the total duct length of 31⁄4″ x 10″ rectangular or 6″ diameter round duct should not exceed 140 equivalent feet. Installation Instructions NOTE: If you how to -round transition adaptor must be used , the bottom corners of the damper will have to be cut to...

Installation Instructions
Page 6
... Self-Aligning Machine 3 Screws (1⁄4″-28 x 31⁄4″) Nylon Grommet 2 (for metal cabinets) You will find the installation hardware contained in which it was bought for repair or replacement. • If the unit is damaged by the customer, repair or ...is damaged in shipment, return the unit to make sure you have all these parts. Installation Instructions DAMAGE - ADDITIONAL PARTS PART Top Cabinet Template QUANTITY 1 Rear Wall 1 Template Installation 1 Instructions Separately 2 Packed Grease Filters 6 Check to the store in a packet with...
... Self-Aligning Machine 3 Screws (1⁄4″-28 x 31⁄4″) Nylon Grommet 2 (for metal cabinets) You will find the installation hardware contained in which it was bought for repair or replacement. • If the unit is damaged by the customer, repair or ...is damaged in shipment, return the unit to make sure you have all these parts. Installation Instructions DAMAGE - ADDITIONAL PARTS PART Top Cabinet Template QUANTITY 1 Rear Wall 1 Template Installation 1 Instructions Separately 2 Packed Grease Filters 6 Check to the store in a packet with...
Installation Instructions
Page 7
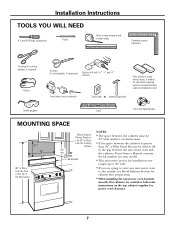
Your Owner's Manual contains the kit number for your microwave oven to the outside, see Hood Exhaust Section for power cord clearance. 7 Installation Instructions TOOLS YOU WILL NEED # 1 and #2 Phillips screwdriver Pencil Ruler or tape measure and straight edge Carpenter square (optional) Tin snips (for cutting...drill bits Filler blocks or scrap wood pieces, if needed for top cabinet spacing (used to fill in the gap between the cabinets is for installation over ranges up to 36″ wide. • If you are going to vent your model. • This microwave oven is greater than...
Your Owner's Manual contains the kit number for your microwave oven to the outside, see Hood Exhaust Section for power cord clearance. 7 Installation Instructions TOOLS YOU WILL NEED # 1 and #2 Phillips screwdriver Pencil Ruler or tape measure and straight edge Carpenter square (optional) Tin snips (for cutting...drill bits Filler blocks or scrap wood pieces, if needed for top cabinet spacing (used to fill in the gap between the cabinets is for installation over ranges up to 36″ wide. • If you are going to vent your model. • This microwave oven is greater than...

Installation Instructions
Page 8
OR B. Use a hammer to tap lightly across the mounting surface to find a solid sound. Installation Instructions 1 PLACEMENT OF THE MOUNTING PLATE A. B. The center of any adjacent studs should be used as the rear wall template and for mounting. THE ... the wall with a small nail to find the edges of the studs. REMOVING THE MICROWAVE OVEN FROM THE CARTON/ REMOVING THE MOUNTING PLATE 1 Remove the installation instructions, filters, glass tray and the small hardware bag. a magnetic device which locates nails. FINDING THE WALL STUDS Wall Studs Center Carton Styrofoam 3 Pull ...
OR B. Use a hammer to tap lightly across the mounting surface to find a solid sound. Installation Instructions 1 PLACEMENT OF THE MOUNTING PLATE A. B. The center of any adjacent studs should be used as the rear wall template and for mounting. THE ... the wall with a small nail to find the edges of the studs. REMOVING THE MICROWAVE OVEN FROM THE CARTON/ REMOVING THE MOUNTING PLATE 1 Remove the installation instructions, filters, glass tray and the small hardware bag. a magnetic device which locates nails. FINDING THE WALL STUDS Wall Studs Center Carton Styrofoam 3 Pull ...

Installation Instructions
Page 9
...on the back wall an equal distance below the cabinet bottom as the inside depth of the front overhang. 3 For this type of installation with front overhang only, align the mounting tabs with this horizontal line, not touching the cabinet bottom as the Front Overhang Depth 30″...; to make sure the cabinet bottom is level. beneath recessed bottom cabinet with front overhang Mounting Plate with the microwave installation. DETERMINING WALL PLATE LOCATION UNDER YOUR CABINET Plate position - If the cabinets have decorative trim that interferes with Tabs Below Cabinet Bottom ...
...on the back wall an equal distance below the cabinet bottom as the inside depth of the front overhang. 3 For this type of installation with front overhang only, align the mounting tabs with this horizontal line, not touching the cabinet bottom as the Front Overhang Depth 30″...; to make sure the cabinet bottom is level. beneath recessed bottom cabinet with front overhang Mounting Plate with the microwave installation. DETERMINING WALL PLATE LOCATION UNDER YOUR CABINET Plate position - If the cabinets have decorative trim that interferes with Tabs Below Cabinet Bottom ...

Installation Instructions
Page 10
... the 30″ wide space. 2 Use the mounting plate as the template for wood screws. NOTE: DO NOT MOUNT THE PLATE AT THIS TIME. 10 Installation Instructions D.
... the 30″ wide space. 2 Use the mounting plate as the template for wood screws. NOTE: DO NOT MOUNT THE PLATE AT THIS TIME. 10 Installation Instructions D.
Installation Instructions
Page 11
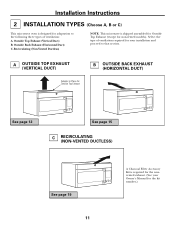
... page 12 See page 15 C RECIRCULATING (NON-VENTED DUCTLESS) See page 19 11 A Charcoal Filter Accessory Kit is required for the nonvented exhaust. (See your installation and proceed to the following three types of ventilation required for your Owner's Manual for the kit number.) Select the type of ventilation: A. Outside Back...
... page 12 See page 15 C RECIRCULATING (NON-VENTED DUCTLESS) See page 19 11 A Charcoal Filter Accessory Kit is required for the nonvented exhaust. (See your installation and proceed to the following three types of ventilation required for your Owner's Manual for the kit number.) Select the type of ventilation: A. Outside Back...

Installation Instructions
Page 12
... TOP EXHAUST (Vertical Duct) INSTALLATION OVERVIEW A1. Prepare Top Cabinet A3. At least one wood screw must be used to attach the plate to a wall stud. 1 Remove the toggle wings ...
... TOP EXHAUST (Vertical Duct) INSTALLATION OVERVIEW A1. Prepare Top Cabinet A3. At least one wood screw must be used to attach the plate to a wall stud. 1 Remove the toggle wings ...


