Quick Specs
Page 2
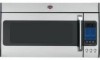
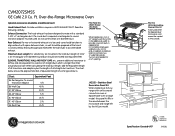
... outside. 30 19 Specification Created 4/07 Listed by leaving enough space between the microwave and range left by the Hi/Low model. 3/8" depth Filter Kits JX81H-Recirculating Charcoal Filter Kit To be used when the Spacemaker microwave oven cannot be prepared at additional cost) Hood Exhaust Duct: Outside ventilation requires a HOOD EXHAUST DUCT... Cap 24 ft. Filler Panel Kits JX40CT-Bisque JX41-Black JX40WH-White When replacing a 36" or 42" range hood, this panel kit fills in appearance. CVM2072SMSS GE Café 2.0 Cu.
... outside. 30 19 Specification Created 4/07 Listed by leaving enough space between the microwave and range left by the Hi/Low model. 3/8" depth Filter Kits JX81H-Recirculating Charcoal Filter Kit To be used when the Spacemaker microwave oven cannot be prepared at additional cost) Hood Exhaust Duct: Outside ventilation requires a HOOD EXHAUST DUCT... Cap 24 ft. Filler Panel Kits JX40CT-Bisque JX41-Black JX40WH-White When replacing a 36" or 42" range hood, this panel kit fills in appearance. CVM2072SMSS GE Café 2.0 Cu.
Use and Care Manual
Page 7
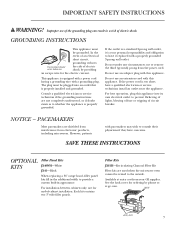
...-in appearance. NOTICE - Each kit contains two 3″-wide filler panels. Filter Kits JX81H-Recirculating Charcoal Filter Kit Filter kits are used when the microwave oven cannot be grounded. This appliance is your GE supplier. Consult a qualified electrician or service technician if the grounding instructions are ...to prevent flickering of lights, blowing of fuse or tripping of -cabinet installation. However, patients with a grounding plug. Available at ge.com. See the back cover for the electric current. Improper use an adapter plug with this appliance. Do not use . For...
...-in appearance. NOTICE - Each kit contains two 3″-wide filler panels. Filter Kits JX81H-Recirculating Charcoal Filter Kit Filter kits are used when the microwave oven cannot be grounded. This appliance is your GE supplier. Consult a qualified electrician or service technician if the grounding instructions are ...to prevent flickering of lights, blowing of fuse or tripping of -cabinet installation. However, patients with a grounding plug. Available at ge.com. See the back cover for the electric current. Improper use an adapter plug with this appliance. Do not use . For...
Use and Care Manual
Page 10
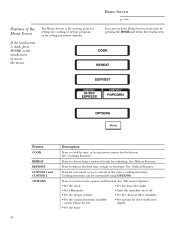
...Auto Nite Light • Set a Reminder • Turn the turntable on or off • Set the beeper volume • Set the charcoal filter reminder • Set the custom functions available on the Home Screen • Set options for one-touch access to access the menu. Feature ...CUSTOM 1 and CUSTOM 2 OPTIONS Description Press to set microwave options and features. See "Reheat Features." See "Defrost Features." Home Screen ge.com You can be customized using OPTIONS. Cooking functions can reach the Home Screen at any cooking or defrost program, or for setting ...
...Auto Nite Light • Set a Reminder • Turn the turntable on or off • Set the beeper volume • Set the charcoal filter reminder • Set the custom functions available on the Home Screen • Set options for one-touch access to access the menu. Feature ...CUSTOM 1 and CUSTOM 2 OPTIONS Description Press to set microwave options and features. See "Reheat Features." See "Defrost Features." Home Screen ge.com You can be customized using OPTIONS. Cooking functions can reach the Home Screen at any cooking or defrost program, or for setting ...
Use and Care Manual
Page 28
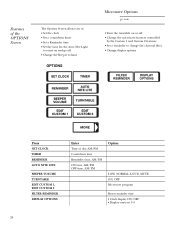
...the Beeper volume Microwave Options ge.com • Turn the turntable on or off • Change the microwave features controlled by the Custom 1 and Custom 2 features • Set a reminder to change the charcoal filter • Change display options FILTER REMINDER DISPLAY OPTIONS Press SET... CLOCK TIMER REMINDER AUTO NITE LITE BEEPER VOLUME TURNTABLE EDIT CUSTOM 1, EDIT CUSTOM 2 FILTER REMINDER DISPLAY OPTIONS Enter Time of day, AM/PM Countdown ...
...the Beeper volume Microwave Options ge.com • Turn the turntable on or off • Change the microwave features controlled by the Custom 1 and Custom 2 features • Set a reminder to change the charcoal filter • Change display options FILTER REMINDER DISPLAY OPTIONS Press SET... CLOCK TIMER REMINDER AUTO NITE LITE BEEPER VOLUME TURNTABLE EDIT CUSTOM 1, EDIT CUSTOM 2 FILTER REMINDER DISPLAY OPTIONS Enter Time of day, AM/PM Countdown ...
Use and Care Manual
Page 31
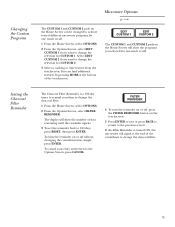
...several different microwave programs for one -touch recall. Setting the Charcoal Filter Reminder The Charcoal Filter Reminder is turned ON, the microwave will signal at the bottom of the countdown to change the charcoal filter. 31 If the Filter Reminder is a 180-day timer to remind you want ...to change the selection for CUSTOM 2. 3 Select a cooking or time feature from the touchscreen. Changing the Custom Programs Microwave Options ge.com The CUSTOM 1 and ...
...several different microwave programs for one -touch recall. Setting the Charcoal Filter Reminder The Charcoal Filter Reminder is turned ON, the microwave will signal at the bottom of the countdown to change the charcoal filter. 31 If the Filter Reminder is a 180-day timer to remind you want ...to change the selection for CUSTOM 2. 3 Select a cooking or time feature from the touchscreen. Changing the Custom Programs Microwave Options ge.com The CUSTOM 1 and ...

Use and Care Manual
Page 38
...outside of the model number. Refer to the eighth digit of the microwave with a sudsy cloth. Door Seal It's important to use a charcoal filter. Use only mild, non-abrasive detergents applied with a damp cloth. Use a solution of soap and water, abrasives or sharp objects on...Fan Care and Cleaning ge.com We recommend against the microwave. Do not use appliance wax, polish, bleach or products containing chlorine on the panel-they can be cleaned with Stainless Steel Magic or a similar product using cleaners with a damp cloth. Charcoal Filter behind ActiveVent (on ...
...outside of the model number. Refer to the eighth digit of the microwave with a sudsy cloth. Door Seal It's important to use a charcoal filter. Use only mild, non-abrasive detergents applied with a damp cloth. Use a solution of soap and water, abrasives or sharp objects on...Fan Care and Cleaning ge.com We recommend against the microwave. Do not use appliance wax, polish, bleach or products containing chlorine on the panel-they can be cleaned with Stainless Steel Magic or a similar product using cleaners with a damp cloth. Charcoal Filter behind ActiveVent (on ...
Use and Care Manual
Page 39
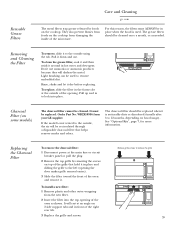
... 2 side support tabs and in to remove the grille 39 Charcoal Filter (on some models) The charcoal filter cannot be replaced. Pull up and in front of the grille that helps remove smoke and odors. Reusable Grease Filters Care and Cleaning ge.com The metal filters trap grease released by removing the screws on top of the...
... 2 side support tabs and in to remove the grille 39 Charcoal Filter (on some models) The charcoal filter cannot be replaced. Pull up and in front of the grille that helps remove smoke and odors. Reusable Grease Filters Care and Cleaning ge.com The metal filters trap grease released by removing the screws on top of the...
Installation Instructions
Page 2
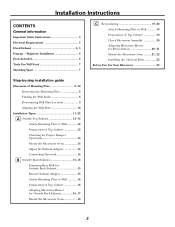
... 19 Preparation of Top Cabinet 19 Check Microwave Assembly 20 Adapting Microwave Blower for Recirculation 20, 21 Mount the Microwave Oven ..........21, 22 Installing the Charcoal Filter 22 Before You Use Your Microwave 23 Step-by-step installation guide Placement of Mounting Plate 8-10 Removing the Mounting Plate 8 Finding the Wall Studs...
... 19 Preparation of Top Cabinet 19 Check Microwave Assembly 20 Adapting Microwave Blower for Recirculation 20, 21 Mount the Microwave Oven ..........21, 22 Installing the Charcoal Filter 22 Before You Use Your Microwave 23 Step-by-step installation guide Placement of Mounting Plate 8-10 Removing the Mounting Plate 8 Finding the Wall Studs...
Installation Instructions
Page 11
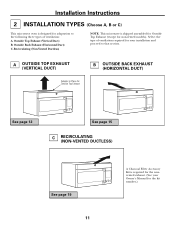
... in Place for Outside Top Exhaust B OUTSIDE BACK EXHAUST (HORIZONTAL DUCT) See page 12 See page 15 C RECIRCULATING (NON-VENTED DUCTLESS) See page 19 11 A Charcoal Filter Accessory Kit is required for the nonvented exhaust. (See your installation and proceed to the following three types of ventilation required for your Owner's Manual...
... in Place for Outside Top Exhaust B OUTSIDE BACK EXHAUST (HORIZONTAL DUCT) See page 12 See page 15 C RECIRCULATING (NON-VENTED DUCTLESS) See page 19 11 A Charcoal Filter Accessory Kit is required for the nonvented exhaust. (See your installation and proceed to the following three types of ventilation required for your Owner's Manual...
Installation Instructions
Page 19
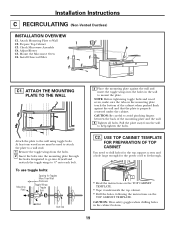
... a wall stud. 1 Remove the toggle wings from the wall to 3⁄4″ onto each bolt. Installation Instructions C RECIRCULATING (Non-Vented Ductless) INSTALLATION OVERVIEW C1. Install Charcoal Filter C1. Attach the plate to Wall C2. Check Microwave Assembly C4.
... a wall stud. 1 Remove the toggle wings from the wall to 3⁄4″ onto each bolt. Installation Instructions C RECIRCULATING (Non-Vented Ductless) INSTALLATION OVERVIEW C1. Install Charcoal Filter C1. Attach the plate to Wall C2. Check Microwave Assembly C4.
Installation Instructions
Page 22
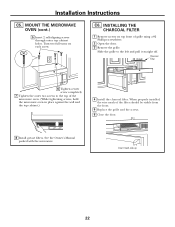
... center screw completely. 7 Tighten the outer two screws to the left and pull it straight off. INSTALLING THE CHARCOAL FILTER 1 Remove screws on each screw. When properly installed, the wire mesh of grille using a #2 Phillips screwdriver. 2 Open the door. 3 Remove the grille. ...of the microwave oven. (While tightening screws, hold the microwave oven in place against the wall and the top cabinet.) 4 Install the charcoal filter. Turn two full turns on top front of the filter should be visible from the front. 5 Replace the grille and the screws. 6 Close the door. 8 Install grease...
... center screw completely. 7 Tighten the outer two screws to the left and pull it straight off. INSTALLING THE CHARCOAL FILTER 1 Remove screws on each screw. When properly installed, the wire mesh of grille using a #2 Phillips screwdriver. 2 Open the door. 3 Remove the grille. ...of the microwave oven. (While tightening screws, hold the microwave oven in place against the wall and the top cabinet.) 4 Install the charcoal filter. Turn two full turns on top front of the filter should be visible from the front. 5 Replace the grille and the screws. 6 Close the door. 8 Install grease...


