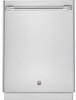
Installation Instructions
Page 1
S
S
Installation Instructions
Page 2
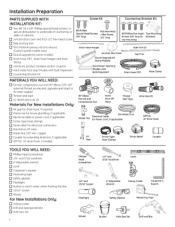
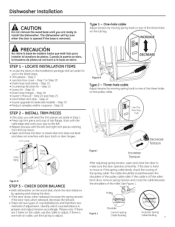
...Drain Hose Hanger Junction Box C°ver'__ ound UpgradeKit Side Trim (2) Top Trim __ [E ..(SomeModels) • Hard Water Test Strip lJ (Models with Bulk Dispenser) _O:___ :3:_ Drain Hose (78") HoseClamp MATERIALS YOU WILL NEED: [] Ferrule, compression nut and 90 ° Elbow (3/8" NPT... Hole Saw Set Drill and Bits Installation Preparation PARTS SUPPLIED WITH INSTALLATION KIT: [] Two #8-18 x 5/8" Phillips special head screws, to secure dishwasher to underside of countertop or sides of cabinets. [] Junction box cover and #10-1/2" hex-head screw [] Side and top trim [] Trim Panel...
...Drain Hose Hanger Junction Box C°ver'__ ound UpgradeKit Side Trim (2) Top Trim __ [E ..(SomeModels) • Hard Water Test Strip lJ (Models with Bulk Dispenser) _O:___ :3:_ Drain Hose (78") HoseClamp MATERIALS YOU WILL NEED: [] Ferrule, compression nut and 90 ° Elbow (3/8" NPT... Hole Saw Set Drill and Bits Installation Preparation PARTS SUPPLIED WITH INSTALLATION KIT: [] Two #8-18 x 5/8" Phillips special head screws, to secure dishwasher to underside of countertop or sides of cabinets. [] Junction box cover and #10-1/2" hex-head screw [] Side and top trim [] Trim Panel...
Installation Instructions
Page 5
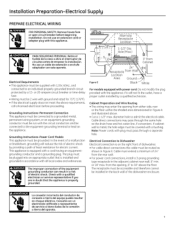
...some hole as shown in Figure A and illustrated above the floor. Grounding Instructions-Power Cord Models This appliance must be grounded. In the event of a malfunction or breakdown, grounding will... not fit the outlet, have a proper outlet installed by providing a path of 24" from either side, rear or the floor within the shaded area dimensioned in Figure E.... For power cord connections, install a 3-prong grounding type receptacle in a risk of the dishwasher enclosure. No use an extension cord or adapter plug with the appliance; Installation Preparation-Electrical ...
...some hole as shown in Figure A and illustrated above the floor. Grounding Instructions-Power Cord Models This appliance must be grounded. In the event of a malfunction or breakdown, grounding will... not fit the outlet, have a proper outlet installed by providing a path of 24" from either side, rear or the floor within the shaded area dimensioned in Figure E.... For power cord connections, install a 3-prong grounding type receptacle in a risk of the dishwasher enclosure. No use an extension cord or adapter plug with the appliance; Installation Preparation-Electrical ...
Installation Instructions
Page 7
...-sioOnneb-yhomleovincgasbplering hook to make sure the door operates smoothly. Step 2 • Junction box cover - CHECK DOOR BALANCE • With dishwasher on the tub leg. Identify which counterbalance is removed. Pulle__ Figure J Shoulder Correct Spring Cqble Routing Incorrect Spring CQbleRouting 7 STEP 1 -...the listed steps. • Trim pieces - Step 25 D AS Figure H Tgpe 2 - Step 22 • Sound upgrade kit (selected models) - Three-hole cable Adjust tension by opening and closing the door. • If the door drops when released, increase the spring tension...
...-sioOnneb-yhomleovincgasbplering hook to make sure the door operates smoothly. Step 2 • Junction box cover - CHECK DOOR BALANCE • With dishwasher on the tub leg. Identify which counterbalance is removed. Pulle__ Figure J Shoulder Correct Spring Cqble Routing Incorrect Spring CQbleRouting 7 STEP 1 -...the listed steps. • Trim pieces - Step 25 D AS Figure H Tgpe 2 - Step 22 • Sound upgrade kit (selected models) - Three-hole cable Adjust tension by opening and closing the door. • If the door drops when released, increase the spring tension...

Installation Instructions
Page 8
... Step 24. Be sure wires are not color-coded, connect the ribbed power cord wire to the white dishwasher wire, the smooth power cord wire to the black dishwasher wire and the ground to the house electrical system. In this step if your model does... have a sound upgrade kit. i / / S White 7 Figure K • Screw leveling legs back into the dishwasher frame approximately Z/8" from an authorized GE Appliance Dealer, meets these requirements. Figure L Remove 2 Toekick Screws STEP 6 - Dishwasher Installation STEP 4 - The power cord...
... Step 24. Be sure wires are not color-coded, connect the ribbed power cord wire to the white dishwasher wire, the smooth power cord wire to the black dishwasher wire and the ground to the house electrical system. In this step if your model does... have a sound upgrade kit. i / / S White 7 Figure K • Screw leveling legs back into the dishwasher frame approximately Z/8" from an authorized GE Appliance Dealer, meets these requirements. Figure L Remove 2 Toekick Screws STEP 6 - Dishwasher Installation STEP 4 - The power cord...
Installation Instructions
Page 11
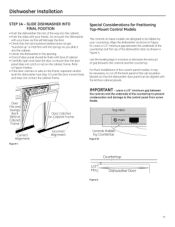
... PORTANT- J Controls Hidden_--_ by your countertop. Use the leveling legs to Figure V below. • If the door catches or rubs on these models are designed to the control panel from screw heads. Leave a 1/2" minimum gap between the underside of the countertop (]nd the top of the countertop ...cobinet. • Push the sides with the kitchen c(]binet p(]nels. Special Considerations for Positioning Top-Mount Control Models The controls on the frame, reposition and/or level the dishwasher (see Step 15) until the door moves freely (]nd does not cont(]ct the cobinet frome. For ...
... PORTANT- J Controls Hidden_--_ by your countertop. Use the leveling legs to Figure V below. • If the door catches or rubs on these models are designed to the control panel from screw heads. Leave a 1/2" minimum gap between the underside of the countertop (]nd the top of the countertop ...cobinet. • Push the sides with the kitchen c(]binet p(]nels. Special Considerations for Positioning Top-Mount Control Models The controls on the frame, reposition and/or level the dishwasher (see Step 15) until the door moves freely (]nd does not cont(]ct the cobinet frome. For ...
Installation Instructions
Page 12
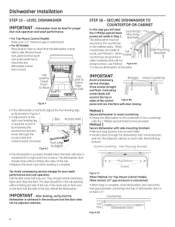
... at the sides. Figure CC Either Method-For Top-Mount Control Models. Drive screws straight ,_to-Side and flush. to Adjust // Figure Z Method i Secure dishwasher to wood countertop • Fasten the dishwasher to side. The dishwasher door should close the door. SECURE DISHWASHER TO I right-rear leveling leg is centered in the tub opening without...
... at the sides. Figure CC Either Method-For Top-Mount Control Models. Drive screws straight ,_to-Side and flush. to Adjust // Figure Z Method i Secure dishwasher to wood countertop • Fasten the dishwasher to side. The dishwasher door should close the door. SECURE DISHWASHER TO I right-rear leveling leg is centered in the tub opening without...
Installation Instructions
Page 15
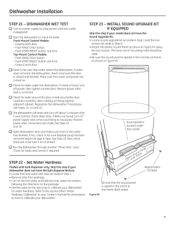
... be sure disposer plug has been removed and/or air gap is not kinked. [] Run the dishwasher through another "Rinse Only" cycle. Close & latch door [] Check to calibrate your model does not have the bulk dispense feature. • Locate the hard water test strip set of ...Owner's Manual for water hardness. The lower set aside in your dishwasher for information on frame as necessary. DISHWASHER WET TEST [] Turn on . [] Check for leaks. Close & latch door - Push START/RESEbTutton one time Top-Mount Control Models: - Make sure that the sound panel is seated in the frame...
... be sure disposer plug has been removed and/or air gap is not kinked. [] Run the dishwasher through another "Rinse Only" cycle. Close & latch door [] Check to calibrate your model does not have the bulk dispense feature. • Locate the hard water test strip set of ...Owner's Manual for water hardness. The lower set aside in your dishwasher for information on frame as necessary. DISHWASHER WET TEST [] Turn on . [] Check for leaks. Close & latch door - Push START/RESEbTutton one time Top-Mount Control Models: - Make sure that the sound panel is seated in the frame...


