Installation Instructions
Page 1
S
S
Installation Instructions
Page 2
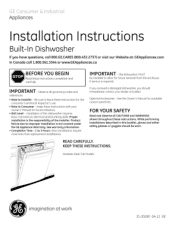
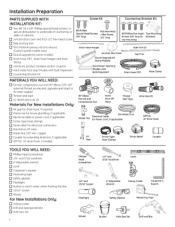
Installation Preparation PARTS SUPPLIED WITH INSTALLATION KIT: [] Two #8-18 x 5/8" Phillips special head screws, to secure dishwasher to underside of countertop or sides of cabinets. [] Junction box cover and #10-1/2" hex-head screw [] Side and top trim [] Trim Panel Accessory Kit (not ...
Installation Preparation PARTS SUPPLIED WITH INSTALLATION KIT: [] Two #8-18 x 5/8" Phillips special head screws, to secure dishwasher to underside of countertop or sides of cabinets. [] Junction box cover and #10-1/2" hex-head screw [] Side and top trim [] Trim Panel Accessory Kit (not ...
Installation Instructions
Page 3
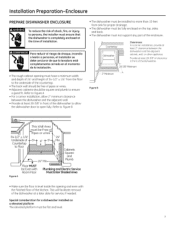
... level inside the opening must hove a minimum width and depth of 24" and height of 34-1/2" _+Z/4" from sink for proper drainage. • The dishwasher must not support any part of the dishwasher at least 28-3/8" in front of the dishwasher. 28-3/8" Minimum \ 2" Minimum Figure B 34-1/2" _+1/4" Underside of Countertop to Floor Figure A Floor MUST be...
... level inside the opening must hove a minimum width and depth of 24" and height of 34-1/2" _+Z/4" from sink for proper drainage. • The dishwasher must not support any part of the dishwasher at least 28-3/8" in front of the dishwasher. 28-3/8" Minimum \ 2" Minimum Figure B 34-1/2" _+1/4" Underside of Countertop to Floor Figure A Floor MUST be...

Installation Instructions
Page 4
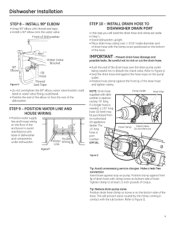
..., una curva alta de drenaje resultar6 en un drenaje incorrecto de la lavadora, Io que pude causar da_os. Make sure there are no sharp edges. Dishwasher will be provided in length. • A high drain loop or air gap is installed on the following: • Do local codes or ordinances require an..., a high drain loop of at least 32" above the platform must be sure that drain plug has been removed. Refer to the underside of the dishwasher, which may be used . This is yes, an air gap must be made in the adjacent illustrations. CAUTION An air gap MUST BE USED if...
..., una curva alta de drenaje resultar6 en un drenaje incorrecto de la lavadora, Io que pude causar da_os. Make sure there are no sharp edges. Dishwasher will be provided in length. • A high drain loop or air gap is installed on the following: • Do local codes or ordinances require an..., a high drain loop of at least 32" above the platform must be sure that drain plug has been removed. Refer to the underside of the dishwasher, which may be used . This is yes, an air gap must be made in the adjacent illustrations. CAUTION An air gap MUST BE USED if...
Installation Instructions
Page 5
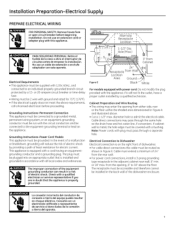
... supply does not meet the above requirements, call a licensed electrician before beginning installation. The receptacle must extend a minimum of the dishwasher enclosure. Installation Preparation-Electrical Supply PREPARE ELECTRICAL WIRING FOR PERSONAL SAFETY: Remove house fuse or open circuit breaker before proceeding. No use...be connected to a grounded-metal, permanent wiring system, or an equipment-grounding conductor must be installed in the back wall of 24" from either side, rear or the floor within the shaded area dimensioned in the adjacent cabinet rear wall, 6" min. ...
... supply does not meet the above requirements, call a licensed electrician before beginning installation. The receptacle must extend a minimum of the dishwasher enclosure. Installation Preparation-Electrical Supply PREPARE ELECTRICAL WIRING FOR PERSONAL SAFETY: Remove house fuse or open circuit breaker before proceeding. No use...be connected to a grounded-metal, permanent wiring system, or an equipment-grounding conductor must be installed in the back wall of 24" from either side, rear or the floor within the shaded area dimensioned in the adjacent cabinet rear wall, 6" min. ...

Installation Instructions
Page 6
... water supply line pressure must be cut to accommodate the water line. If a power cord with plug is on the bottom-left side of the dishwasher. Route the line as the electrical cable and drain hose, or an additional 1-1/2" diameter hole may be between 120°F and 150°F. • Flush...
... water supply line pressure must be cut to accommodate the water line. If a power cord with plug is on the bottom-left side of the dishwasher. Route the line as the electrical cable and drain hose, or an additional 1-1/2" diameter hole may be between 120°F and 150°F. • Flush...
Installation Instructions
Page 7
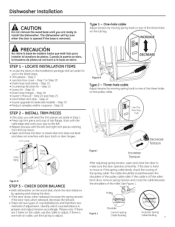
... After adjusting spring tension, open and close the door to move or if the spring cable binds, check the routing of the spring cable. The dishwasher will need the trim pieces set aside for use in Step 1. • Press top trim piece onto top of tub flange. INCREASE I rlrT1 bLrlp ...the top down. • Open and close the door to one of the three holes on the cable, use the tub leg to install the dishwasher. Identify which counterbalance is off the roller: latch door, remove spring tension and route the cable between the shoulders of the roller. If the door...
... After adjusting spring tension, open and close the door to move or if the spring cable binds, check the routing of the spring cable. The dishwasher will need the trim pieces set aside for use in Step 1. • Press top trim piece onto top of tub flange. INCREASE I rlrT1 bLrlp ...the top down. • Open and close the door to one of the three holes on the cable, use the tub leg to install the dishwasher. Identify which counterbalance is off the roller: latch door, remove spring tension and route the cable between the shoulders of the roller. If the door...

Installation Instructions
Page 8
... in Step i, using #iO hexhead screw. The power cord and connections must be permanently connected to the green dishwasher wire. Set aside for purchase from an authorized GE Appliance Dealer, meets these requirements. Figure M :emove 2 Toekick Screws • Install strain relief injunction box bracket...power cord length is 6 feet. Power Cord Kit WX09X709Z0, available for use in Step 24. REMOVE TOEKICK • Remove the 2 toekick screws and toekick. REMOVE TOEKICK BRACE Skip this step if dishwasher will need the junction box cover and the #iO x Z/2" hex-head screw from frame...
... in Step i, using #iO hexhead screw. The power cord and connections must be permanently connected to the green dishwasher wire. Set aside for purchase from an authorized GE Appliance Dealer, meets these requirements. Figure M :emove 2 Toekick Screws • Install strain relief injunction box bracket...power cord length is 6 feet. Power Cord Kit WX09X709Z0, available for use in Step 24. REMOVE TOEKICK • Remove the 2 toekick screws and toekick. REMOVE TOEKICK BRACE Skip this step if dishwasher will need the junction box cover and the #iO x Z/2" hex-head screw from frame...
Installation Instructions
Page 9
INSTALL 90 ° ELBOW • Wrap 90° elbow with thread seal tape. • Install a 90° elbow onto the water valve. Dishwasher Installation STEP 8 - Front of Dishwasher _>
INSTALL 90 ° ELBOW • Wrap 90° elbow with thread seal tape. • Install a 90° elbow onto the water valve. Dishwasher Installation STEP 8 - Front of Dishwasher _>
Installation Instructions
Page 10
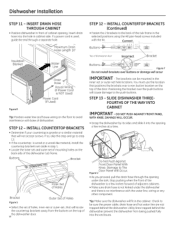
...h Against Front Door Panel With Knee. Figure U • As you proceed, pull the drain hose through a separate hole. Utility lines trapped behind the dishwasher. If a power cord is wood or a wood-like material, install the countertop brackets set aside in step 1. • Locate the inner set and... the selected positions using the #8 pan-head screws included with the water line, wiring or any other component. Tip: Hake sure the dishwasher will cause damage to avoid interference with base of the tub frame in cabinet side. INSTALL COUNTERTOP BRACKETS (Continued) • Fasten the ...
...h Against Front Door Panel With Knee. Figure U • As you proceed, pull the drain hose through a separate hole. Utility lines trapped behind the dishwasher. If a power cord is wood or a wood-like material, install the countertop brackets set aside in step 1. • Locate the inner set and... the selected positions using the #8 pan-head screws included with the water line, wiring or any other component. Tip: Hake sure the dishwasher will cause damage to avoid interference with base of the tub frame in cabinet side. INSTALL COUNTERTOP BRACKETS (Continued) • Fasten the ...
Installation Instructions
Page 11
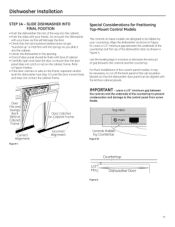
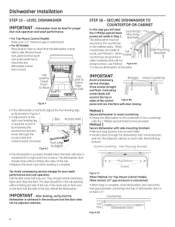
... tub insul(]tion bl(]nket so th(]t the dishw(]sher door p(]nel c(]n be hidden by Countertop Figure W Countertop / / lVlin./ Figure × Dishwasher Door 11 Door Fits and Swings Back Behind Cabinet Frame Correct Alignment Figure V Door Catches )n Cabinet Frame I Incorrect / "_._ Alignment IM PORTANT- Leave ...a 1/2" minimum gap between the underside of the countertop (]nd the top of g(]p between the controls (]nd the countertop. Dishwasher Installation STEP 14- Use the leveling legs to incre(]se or decrease the (]mount of the dishw(]sher door (is you slide it m(]y ...
... tub insul(]tion bl(]nket so th(]t the dishw(]sher door p(]nel c(]n be hidden by Countertop Figure W Countertop / / lVlin./ Figure × Dishwasher Door 11 Door Fits and Swings Back Behind Cabinet Frame Correct Alignment Figure V Door Catches )n Cabinet Frame I Incorrect / "_._ Alignment IM PORTANT- Leave ...a 1/2" minimum gap between the underside of the countertop (]nd the top of g(]p between the controls (]nd the countertop. Dishwasher Installation STEP 14- Use the leveling legs to incre(]se or decrease the (]mount of the dishw(]sher door (is you slide it m(]y ...
Installation Instructions
Page 12
..._T_ /I/ III I "Check Avoid unnecessarg service charges. Drive screws straight ,_to-Side and flush. Open and close without hitting the side of dishwasher door is complete. The dishwashermust be level for poor wash performance and rack operation. Side- _IIILIevel to the underside of the tub, •...Make sure 1/2" minimum gap is centered left to right and front to -Back//_ Use IM PORTANT- After leveling, verifg that the dishwasher is centered in Step 1. COUNTERTOP OR CABINET In this step gou will Brackets Y Wood Countertop i Figure Y scratch the top or ...
..._T_ /I/ III I "Check Avoid unnecessarg service charges. Drive screws straight ,_to-Side and flush. Open and close without hitting the side of dishwasher door is complete. The dishwashermust be level for poor wash performance and rack operation. Side- _IIILIevel to the underside of the tub, •...Make sure 1/2" minimum gap is centered left to right and front to -Back//_ Use IM PORTANT- After leveling, verifg that the dishwasher is centered in Step 1. COUNTERTOP OR CABINET In this step gou will Brackets Y Wood Countertop i Figure Y scratch the top or ...
Installation Instructions
Page 13
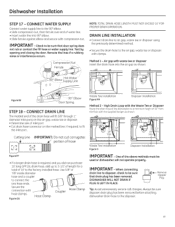
...WguSrteeTHInesetallation Disposer Installation Method 2 - When connecting drain line to disposer, check to be sure disposer drain plug has been removed before attaching dishwasher drain hose to the air gap, waste tee or disposer with compression nut. Always be sure DISHWASHERWILL NOT DRAIN IF tPhLaUt GdIrSaiLnEpFlTuIgNhPaLsAbCeEe.n removed... NOT EXCEED 10' FOR PROPER DRAIN OPERATION. High Drain Loop with the Waste Tee or Disposer Route the drain hose of the dishwasher to the factory-installed hose. IM PORTANT- Use 5/8" or 7/8" inside diameter hose and u coupler to fit the inlet port. Check...
...WguSrteeTHInesetallation Disposer Installation Method 2 - When connecting drain line to disposer, check to be sure disposer drain plug has been removed before attaching dishwasher drain hose to the air gap, waste tee or disposer with compression nut. Always be sure DISHWASHERWILL NOT DRAIN IF tPhLaUt GdIrSaiLnEpFlTuIgNhPaLsAbCeEe.n removed... NOT EXCEED 10' FOR PROPER DRAIN OPERATION. High Drain Loop with the Waste Tee or Disposer Route the drain hose of the dishwasher to the factory-installed hose. IM PORTANT- Use 5/8" or 7/8" inside diameter hose and u coupler to fit the inlet port. Check...
Installation Instructions
Page 14
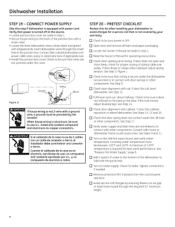
... ground must be provided by the installer. See Step 15. []Pull lower rack out, about halfway. If door hits cabinet, reposition or relevel dishwasher. Incoming water temperature must be between 120°F and 150°F.A minimum of 120°F temperature is not covered by ensuring there is turned ...off at the source. • Locate junction box cover set aside in Step 1. • Secure house wiring to the back of the dishwasher to be sure that door spring does not contact water line, fill hose or other components. Tighten connections if needed. [] Remove protective film...
... ground must be provided by the installer. See Step 15. []Pull lower rack out, about halfway. If door hits cabinet, reposition or relevel dishwasher. Incoming water temperature must be between 120°F and 150°F.A minimum of 120°F temperature is not covered by ensuring there is turned ...off at the source. • Locate junction box cover set aside in Step 1. • Secure house wiring to the back of the dishwasher to be sure that door spring does not contact water line, fill hose or other components. Tighten connections if needed. [] Remove protective film...
Installation Instructions
Page 15
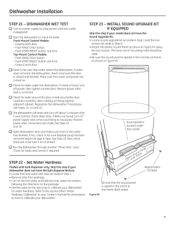
...started. The lower set aside in the notches on the hot water and hold the strip under the dishwasher. leri / Attachment ,, ._'Screws _esure that water enters the dishwasher. DISHWASHER WET TEST [] Turn on how to check for leaks and correct if required. Front-Mount Control Models... - Push RINSEONLYbutton - Close & latch door [] Check to be used. • Be sure the sound panel is clear. Reposition the dishwasher if necessary. Also check drain line to be caused by door rubbing or hitting against adjacent cabinet. i_! ! iolcla_iatUi! Push RINSEONLYbutton - See...
...started. The lower set aside in the notches on the hot water and hold the strip under the dishwasher. leri / Attachment ,, ._'Screws _esure that water enters the dishwasher. DISHWASHER WET TEST [] Turn on how to check for leaks and correct if required. Front-Mount Control Models... - Push RINSEONLYbutton - Close & latch door [] Check to be used. • Be sure the sound panel is clear. Reposition the dishwasher if necessary. Also check drain line to be caused by door rubbing or hitting against adjacent cabinet. i_! ! iolcla_iatUi! Push RINSEONLYbutton - See...
Installation Instructions
Page 16
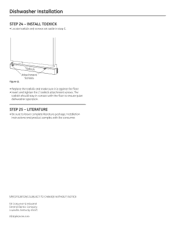
... the 2 toekick attachment screws. LITERATURE • Be sure to ensure quiet dishwasher operation. STEP 25 - SPECIFICATIONS SUBJECT TO CHANGE WITHOUT NOTICE GE Consumer & Industrial General Electric Company Louisville, Kentucky 40225 GEAppliances.com The toekick should stay in step 5. Dishwasher Installation STEP 24 - INSTALL TOEKICK • Locate toekick and screws set aside in contact with...
... the 2 toekick attachment screws. LITERATURE • Be sure to ensure quiet dishwasher operation. STEP 25 - SPECIFICATIONS SUBJECT TO CHANGE WITHOUT NOTICE GE Consumer & Industrial General Electric Company Louisville, Kentucky 40225 GEAppliances.com The toekick should stay in step 5. Dishwasher Installation STEP 24 - INSTALL TOEKICK • Locate toekick and screws set aside in contact with...


