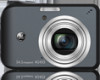
User Manual (English (7.82 MB))
Page 2
...electric shock. This symbol [crossed-out wheeled bin WEEE Annex IV] indicates separate collection of Conformity Model Name: A1255 / A1455 / J1455 / Q1455 Trade Name: GE Responsible Party: General Imaging Co. Tested To Comply With FCC Standards FOR HOME OR OFFICE USE FCC Statement This device ...complies with the European requirements for sales in the U.S.A. WARNING Do not expose the camera battery pack or other accessories to...
User Manual (English (7.82 MB))
Page 3
... to recognize or misinterpret the original folder or file in dry environment. If you wait for which may cause irrepairable faults. In cold locations, battery performance deteriorates and the time for a while before using a new memory card, or a memory card has been initialized by this camera are ...suddenly from a cold location to a warm place, moisture may cause them into a fire. • Do not attempt to deform, disassemble or modify the batteries. To edit image data, copy the image data to high temperature, e.g. The photos taken by a PC, be sure to format the card with the...
User Manual (English (7.82 MB))
Page 4
...in dusty, dirty, or sandy areas, as moisture, or extreme temperatures, which may shorten the life of your camera or damage the batteries. • Do not use or store the camera in a safe place for future reference. Copyright © Copyright 2010 General Imaging Company... All rights reserved. Safety information Please read this GE digital camera. Improper handling may be reproduced, transmitted, transcribed, stored in a retrieval system, or translated into any means, without the ...
User Manual (English (7.82 MB))
Page 5
... to be taken while operating the camera. Every effort has been made to ensure that the contents of time. • Do not use your GE digital camera. About this manual This manual provides you with a slightly damp soft cloth. • Do not expose the lens to direct sunlight for ...extended periods. • Download all pictures and remove the batteries from the camera if you are going to store the camera for long periods of this manual, the following symbols are accurate, however General Imaging...
User Manual (English (7.82 MB))
Page 6
... 2 Symbols used in this manual 2 CONTENTS 3 GETTING READY 7 Unpacking 7 Camera Views: A Series 8 Camera Views: J Series 10 Charging the Battery (J Series 12 Insert the Battery and SD/SDHC Card (Not included) (A Series 13 Insert the Battery and SD/SDHC Card (Not included) (J Series 17 Turning On and Off 17 Using the Mode Dial 18...
User Manual (English (7.82 MB))
Page 10
GETTING READY Unpacking Your package should contain the camera model you purchased along with the following items. If anything is missing or appears to be damaged, please contact your vendor. AA-size Alkaline Batteries (A Series only) Warranty Card CD-ROM Wrist Strap USB Cable Rechargeable Lithium-ion battery (Except A Series) Battery charger (Except A Series)
User Manual (English (7.82 MB))
Page 12
Top View Bottom View 17 20 19 18 22 21 Left View 15 1 AF Assist/Timer Indicator 2 Flash Lamp 3 Lens 4 Speaker 5 Microphone 6 LCD Screen 7 Zoom Button 8 Playback Button 9 Menu Button 10 Disp/Up Button 11 Flash Mode/Right Button 12 Delete Button/Down Button 13 Face Detection/Left button 14 Function/OK Button 15 USB/AV Port 16 Wrist Strap 17 Mode Dial 18 Shutter Button 19 Status Indicator 20 Power Button 21 Card Slot/Battery Compartment 22 Tripod Socket
User Manual (English (7.82 MB))
Page 14
Top View Bottom View Left View 16 17 20 19 18 22 21 1 Flash Lamp 2 AF Assist/Timer Indicator 3 Lens 4 Speaker 5 Microphone 6 LCD Screen 7 Status Indicator 8 Mode Dial 9 Playback Button 10 Menu Button 11 Disp/Up Button 12 Flash Mode/Right Button 13 Delete Button/Down Button 14 Face Detection/Left button 15 Function/OK Button 16 USB/AV Port 17 Wrist Strap 18 Zoom Wheel 19 Shutter Button 20 Power Button 21 Card Slot/Battery Compartment 22 Tripod Socket 11
User Manual (English (7.82 MB))
Page 15
Charging the Battery (J Series) 1. Plug the one end of the connecting cable into the charger base (the plug adapter may vary in different countries, please subject to charge until the charger light turns green. (To maximize battery life, the first charge should be at least 4 hours) The charger is for indoor use only. 12 Plug the other end of the connecting cable (plug adapter) into a the wall outlet. 1 2 Leave the battery to the actual object). 3. Place the battery into the charger as shown. 2.
User Manual (English (7.82 MB))
Page 16
Open the battery compartment. 2. Insert the Battery and SD/SDHC Card (Not included) (A Series) 1. Insert the enclosed batteries into the battery slot in the correct direction. 13
User Manual (English (7.82 MB))
Page 17
3. Close the battery compartment. 14 Insert an SD/SDHC card (not included) into the memory card slot as shown. 4.
User Manual (English (7.82 MB))
Page 18
Use the side of battery to press down the stopper as shown, allowing the battery lock into place properly. 15 Insert the battery while observing the correct polarity. Open the battery compartment. 2. Insert the Battery and SD/SDHC Card (Not included) (J Series) 1.
User Manual (English (7.82 MB))
Page 19
3. Insert an SD/SDHC card (not included) into the memory card slot as shown. 4. Close the battery compartment. 16
User Manual (English (7.82 MB))
Page 20
... on, it . The J Series models operate similarly. Power Button When the camera is recommended for details. 17 To remove the SD/SDHC card, open the battery compartment and gently push the card to turn off the camera, press the Power button again. Optional SD/SDHC cards are not included.
User Manual (English (7.82 MB))
Page 33
6 Remaining number of pictures 7 Memory card/built-in memory 8 Battery Status 9 WT Ratio (Displayed only when zoom is activated) 10 Zoom 11 Exposure 12 ISO Value (Adjustable only in M Manual Mode) 13 Histogram 14 Focus ...
User Manual (English (7.82 MB))
Page 34
... highest 5.7x digital zoom is recommended that the SD card be picture jitter and noise. If you shoot videos with the limited built-in Memory 9 Battery Status 10 WT Ratio (Displayed only when zoom is activated) 11 Zoom 12 Exposure 13 Recording Status Icon Recording standby Recording For optimal video shooting...
User Manual (English (7.82 MB))
Page 35
Picture Number 5. Image Zoom 8. Recording Date and Time 12. DPOF file 32 Picture File 3. The current display area 9. Play Mode icon 2. Battery Status 7. Affecting regional 10. File protection 4. Playback mode display Mode: 1 23 4 56 12 7 8 9 11 10 1. Memory Card/Built-in Memory 6. Memory Space (this picture/Total number of pictures) 11.
User Manual (English (7.82 MB))
Page 70
... the LCD screen while you are overseas. 1. Both items have the following options: 67 This feature enables you to display the local time on your battery. Power Saver This setting allows you to save power and get the maximum possible running time for the screen and camera and press the Right...
User Manual (English (7.82 MB))
Page 86
... x (24.1~27.1) mm Approx. 140g (Body only) 83 Model name Internal Flash (Shooting Range) Recording Media Other Features Jacks Power Shooting Capability (Battery Performance) Operation Environment Dimensions (W x H x D) Mass A1255 A1455 Auto/Red-Eye Reduction/Forced Flash/No Flash/Slow Synchro/Red-Eye Reduction+Slow Synchro Gno. 5.0 EV (ISO 100) Shooting Range Wide...
User Manual (English (7.82 MB))
Page 90
Internal Flash (Shooting Range) Recording Media Other Features Jacks Power Shooting Capability (Battery Performance) Operation Environment Dimensions (W x H x D) Mass Auto/Red-Eye Reduction/Forced Flash/No Flash/Slow Synchro/Red-Eye Reduction+Slow Synchro Gno. 5.0 EV (...: 18MB SD Card/SDHC Card (Up to 16GB support) PictBridge, ExifPrint Support, Multi-language Sup port USB2.0/AV-OUT (Integrated Proprietary Connector) Rechargeable Lithium-ion Battery GB-10 (D016), 3.7V 700mAh Approx. 180 shots (based on CIPA Standards) o Temperature: 0~40 C, Humidity: 0~90% 96.4mm x 61mm x (20.5~22.5) mm Approx...