8512565 - Component Replacement Manual R1
Page 2
...is connected to AC power, you can replace the battery while your Reference Guide for important safety, regulatory, and legal information. © 2007 Gateway, Inc. Replace only with a battery specifically manufactured for Customer Care Information. Technical Support See the label on and is facing up. 3 ... or registered trademarks of Gateway, Inc. Keep away from children. 5 Slide a recharged battery into your notebook until it snaps into an AC outlet, save your work and turn off your notebook. 2 Turn your notebook over so the bottom is not plugged into place. 6 Slide the battery...
...is connected to AC power, you can replace the battery while your Reference Guide for important safety, regulatory, and legal information. © 2007 Gateway, Inc. Replace only with a battery specifically manufactured for Customer Care Information. Technical Support See the label on and is facing up. 3 ... or registered trademarks of Gateway, Inc. Keep away from children. 5 Slide a recharged battery into your notebook until it snaps into an AC outlet, save your work and turn off your notebook. 2 Turn your notebook over so the bottom is not plugged into place. 6 Slide the battery...
8512565 - Component Replacement Manual R1
Page 5
...the bracket from CD or DVD" appears, press any Express cards. See your Reference Guide for Customer Care Information. Gateway and eMachines are trademarks or registered trademarks of Gateway, Inc. Replacing the hard drive 10 Remove the two screws connecting the hard drive to the hard drive bracket.... Screw Screw 11 Using the plastic tab, slide the old hard drive, then remove it. 14 Place the new drive, label side up...
...the bracket from CD or DVD" appears, press any Express cards. See your Reference Guide for Customer Care Information. Gateway and eMachines are trademarks or registered trademarks of Gateway, Inc. Replacing the hard drive 10 Remove the two screws connecting the hard drive to the hard drive bracket.... Screw Screw 11 Using the plastic tab, slide the old hard drive, then remove it. 14 Place the new drive, label side up...
8512565 - Component Replacement Manual R1
Page 6
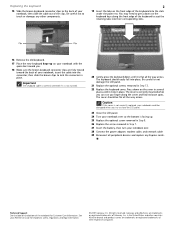
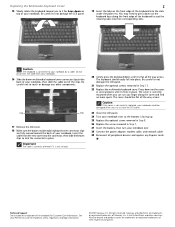
...so the top is marked with notebook components, follow these guidelines: • Avoid static-causing surfaces such as electrostatic discharge (ESD). Gateway and eMachines are extremely sensitive to use them in your Reference Guide for Customer Care Information. All rights reserved. Technical Support See the.... To replace the keyboard: 1 Follow the guidelines under the left end of the keyboard cover and gently pry it in a safe place. 13 With a small Phillips screwdriver, remove the two optional keyboard screws and put it up . 10 Open the LCD panel to ...
...so the top is marked with notebook components, follow these guidelines: • Avoid static-causing surfaces such as electrostatic discharge (ESD). Gateway and eMachines are extremely sensitive to use them in your Reference Guide for Customer Care Information. All rights reserved. Technical Support See the.... To replace the keyboard: 1 Follow the guidelines under the left end of the keyboard cover and gently pry it in a safe place. 13 With a small Phillips screwdriver, remove the two optional keyboard screws and put it up . 10 Open the LCD panel to ...
8512565 - Component Replacement Manual R1
Page 7
... battery, then turn your notebook, then slide the cable out of the clips. See your notebook, insert the cable into place. All rights reserved. Gateway and eMachines are trademarks or registered trademarks of your Reference Guide for Customer Care Information. Be careful not to lock the connector... in place. Be careful to the back of your notebook over so the bottom is correctly mounted when you can run you...
... battery, then turn your notebook, then slide the cable out of the clips. See your notebook, insert the cable into place. All rights reserved. Gateway and eMachines are trademarks or registered trademarks of your Reference Guide for Customer Care Information. Be careful not to lock the connector... in place. Be careful to the back of your notebook over so the bottom is correctly mounted when you can run you...
8512565 - Component Replacement Manual R1
Page 10
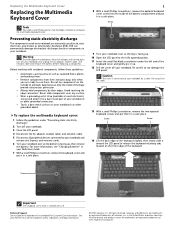
...cable and remove the battery before replacing a component. All rights reserved. Preventing static electricity discharge The components inside of the keyboard. Gateway and eMachines are ready to the fully opened position. 11 Insert the small flat-blade screwdriver under the left end of their edges....electricity discharge." 2 Turn off your notebook over so the top is facing up . 10 Open the LCD panel to use them in a safe place. 1 8 With a small Phillips screwdriver, remove the optional keyboard cover screw from the inside of the notebook for important safety, regulatory, and ...
...cable and remove the battery before replacing a component. All rights reserved. Preventing static electricity discharge The components inside of the keyboard. Gateway and eMachines are ready to the fully opened position. 11 Insert the small flat-blade screwdriver under the left end of their edges....electricity discharge." 2 Turn off your notebook over so the top is facing up . 10 Open the LCD panel to use them in a safe place. 1 8 With a small Phillips screwdriver, remove the optional keyboard cover screw from the inside of the notebook for important safety, regulatory, and ...
8512565 - Component Replacement Manual R1
Page 11
Gateway and eMachines are fully moved toward you so it is flat all the way across . Be careful to not damage the LCD panel. 2 19 Insert the tabs on the cover in several places until it lies keys-down on the keyboard keys along the cover and find no loose spots....trademarks or registered trademarks of their corresponding slots. All other countries. Important The cable is correctly oriented if it clicks in place. Technical Support See the label on top of Gateway, Inc. Caution The keyboard is facing up. 25 Replace the optional screw removed in Step 8. 26 Replace the screw ...
Gateway and eMachines are fully moved toward you so it is flat all the way across . Be careful to not damage the LCD panel. 2 19 Insert the tabs on the cover in several places until it lies keys-down on the keyboard keys along the cover and find no loose spots....trademarks or registered trademarks of their corresponding slots. All other countries. Important The cable is correctly oriented if it clicks in place. Technical Support See the label on top of Gateway, Inc. Caution The keyboard is facing up. 25 Replace the optional screw removed in Step 8. 26 Replace the screw ...

8512599 - Gateway Notebook Reference Guide R1
Page 24
... your notebook's ventilation openings clear of obstructions, or your notebook may overheat, increasing the risk of burns to your line of sight. • Place your feet flat on the floor or on a footrest. • Although notebooks are sometimes called "laptops," do not use your notebook on a soft... or a sofa. Do not use an external keyboard, raise the notebook so the top of its screen is perpendicular to your legs. Instead, place your work area and avoiding discomfort and strain: • Keep hands and arms parallel to your eyes. Reduce glare by installing shades or curtains on...
... your notebook's ventilation openings clear of obstructions, or your notebook may overheat, increasing the risk of burns to your line of sight. • Place your feet flat on the floor or on a footrest. • Although notebooks are sometimes called "laptops," do not use your notebook on a soft... or a sofa. Do not use an external keyboard, raise the notebook so the top of its screen is perpendicular to your legs. Instead, place your work area and avoiding discomfort and strain: • Keep hands and arms parallel to your eyes. Reduce glare by installing shades or curtains on...
8512599 - Gateway Notebook Reference Guide R1
Page 39
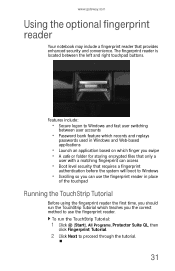
...touchpad buttons. The fingerprint reader is located between user accounts • Password bank feature which records and replays passwords used in place of the touchpad Running the TouchStrip Tutorial Before using the fingerprint reader the first time, you should run the TouchStrip Tutorial: ... security and convenience. To run the TouchStrip Tutorial which teaches you the correct method to proceed through the tutorial. 31 www.gateway.com Using the optional fingerprint reader Your notebook may include a fingerprint reader that requires a fingerprint authentication before the system will ...
...touchpad buttons. The fingerprint reader is located between user accounts • Password bank feature which records and replays passwords used in place of the touchpad Running the TouchStrip Tutorial Before using the fingerprint reader the first time, you should run the TouchStrip Tutorial: ... security and convenience. To run the TouchStrip Tutorial which teaches you the correct method to proceed through the tutorial. 31 www.gateway.com Using the optional fingerprint reader Your notebook may include a fingerprint reader that requires a fingerprint authentication before the system will ...
8512599 - Gateway Notebook Reference Guide R1
Page 61
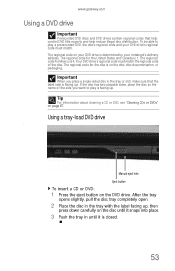
... Your DVD drive's regional code must match. The regional code for the disc is 1. www.gateway.com Using a DVD drive Important Prerecorded DVD discs and DVD drives contain regional codes that the ...label side is closed. 53 After the tray opens slightly, pull the disc tray completely open. 2 Place the disc in the tray with the label facing up, then press down carefully on your DVD drive ...is determined by your DVD drive's regional code must match the regional code of the side you place a single-sided disc in until it is facing up . Important When you want to play is ...
... Your DVD drive's regional code must match. The regional code for the disc is 1. www.gateway.com Using a DVD drive Important Prerecorded DVD discs and DVD drives contain regional codes that the ...label side is closed. 53 After the tray opens slightly, pull the disc tray completely open. 2 Place the disc in the tray with the label facing up, then press down carefully on your DVD drive ...is determined by your DVD drive's regional code must match the regional code of the side you place a single-sided disc in until it is facing up . Important When you want to play is ...

8512599 - Gateway Notebook Reference Guide R1
Page 62
... snaps off of the spindle. 3 Push the tray in . 54 Using a slot-load DVD drive [ Eject button Manual eject hole To insert a CD or DVD: 1 Place the disc in the slot with the label facing up. 2 Gently push the disc into the manual eject hole. If you do not want to...
... snaps off of the spindle. 3 Push the tray in . 54 Using a slot-load DVD drive [ Eject button Manual eject hole To insert a CD or DVD: 1 Place the disc in the slot with the label facing up. 2 Gently push the disc into the manual eject hole. If you do not want to...

8512599 - Gateway Notebook Reference Guide R1
Page 75
... position, then slide the battery release latch. 4 Slide the battery out of the notebook. 5 Slide a recharged battery into the notebook until it snaps into place. 6 Slide the battery lock to 2. -ORIf your notebook is on . Do not disassemble, heat above 212°F (100°C), or incinerate. To ...is connected to local hazardous material regulations. Dispose of used in this device may present a fire or chemical burn hazard if mishandled. www.gateway.com Changing batteries Warning Danger of explosion if battery is turned on and is not plugged into an AC outlet, save your work and ...
... position, then slide the battery release latch. 4 Slide the battery out of the notebook. 5 Slide a recharged battery into the notebook until it snaps into place. 6 Slide the battery lock to 2. -ORIf your notebook is on . Do not disassemble, heat above 212°F (100°C), or incinerate. To ...is connected to local hazardous material regulations. Dispose of used in this device may present a fire or chemical burn hazard if mishandled. www.gateway.com Changing batteries Warning Danger of explosion if battery is turned on and is not plugged into an AC outlet, save your work and ...

8512599 - Gateway Notebook Reference Guide R1
Page 77
Over the long term, use , to let it was kept in a cool, dry place for a lithium-ion battery than one complete discharge, and recharging a partially charged lithium-ion battery does not cause harm because there is no memory. Many ..., like USB devices. • Remove Express Cards when you do not need them. Several partial discharges with frequent recharges are not being used. 69 www.gateway.com 3 Completely discharge the battery. 4 After the battery is completely drained, reconnect your notebook to power your new battery a few times during the first several...
Over the long term, use , to let it was kept in a cool, dry place for a lithium-ion battery than one complete discharge, and recharging a partially charged lithium-ion battery does not cause harm because there is no memory. Many ..., like USB devices. • Remove Express Cards when you do not need them. Several partial discharges with frequent recharges are not being used. 69 www.gateway.com 3 Completely discharge the battery. 4 After the battery is completely drained, reconnect your notebook to power your new battery a few times during the first several...

8512599 - Gateway Notebook Reference Guide R1
Page 88
...your notebook in your hotel room while you are away. • Always keep the information in order to set the supervisor password in a safe place. If you forget your password, you must enter the Supervisor Password each time you turn on your notebook if it passes through the X-ray machine... in security checkpoints. • Write down your notebook to Gateway for service. Important You must return your notebook model number and serial number (located on boot, then press ENTER. 80 As soon as it ...
...your notebook in your hotel room while you are away. • Always keep the information in order to set the supervisor password in a safe place. If you forget your password, you must enter the Supervisor Password each time you turn on your notebook if it passes through the X-ray machine... in security checkpoints. • Write down your notebook to Gateway for service. Important You must return your notebook model number and serial number (located on boot, then press ENTER. 80 As soon as it ...

8512599 - Gateway Notebook Reference Guide R1
Page 94
... you buy old stock, even if it . Do not freeze the battery. Charging lithium batteries correctly is one exclusively and keep the other cool by placing it cannot hold a full charge. This only adds strain. Using the right charger is important. Do not buy batteries and store them for lithium-ion...
... you buy old stock, even if it . Do not freeze the battery. Charging lithium batteries correctly is one exclusively and keep the other cool by placing it cannot hold a full charge. This only adds strain. Using the right charger is important. Do not buy batteries and store them for lithium-ion...

8512599 - Gateway Notebook Reference Guide R1
Page 98
Tip After a recovery disc is finished, the Congratulations! If an AutoPlay dialog box opens, click the x in a safe place. 90 If you need to create a full set , Recovery23 for disc 2, and so on . The disc recording begins. If you are completed. window opens. 8 Click ...
Tip After a recovery disc is finished, the Congratulations! If an AutoPlay dialog box opens, click the x in a safe place. 90 If you need to create a full set , Recovery23 for disc 2, and so on . The disc recording begins. If you are completed. window opens. 8 Click ...
8512599 - Gateway Notebook Reference Guide R1
Page 111
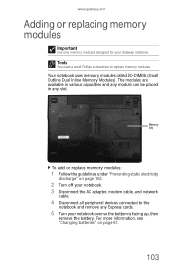
...Disconnect all peripheral devices connected to replace memory modules. The modules are available in various capacities and any module can be placed in any Express cards. 5 Turn your Gateway notebook. Tools You need a small Phillips screwdriver to the notebook and remove any slot. Memory bay To add or... electricity discharge" on page 67. 103 Your notebook uses memory modules called SO-DIMMs (Small Outline Dual Inline Memory Modules). www.gateway.com Adding or replacing memory modules Important Use only memory modules designed for your notebook over so the bottom is facing up, then...
...Disconnect all peripheral devices connected to replace memory modules. The modules are available in various capacities and any module can be placed in any Express cards. 5 Turn your Gateway notebook. Tools You need a small Phillips screwdriver to the notebook and remove any slot. Memory bay To add or... electricity discharge" on page 67. 103 Your notebook uses memory modules called SO-DIMMs (Small Outline Dual Inline Memory Modules). www.gateway.com Adding or replacing memory modules Important Use only memory modules designed for your notebook over so the bottom is facing up, then...
8512599 - Gateway Notebook Reference Guide R1
Page 118
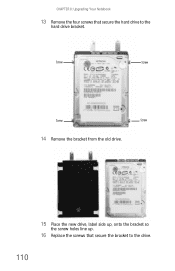
CHAPTER 8: Upgrading Your Notebook 13 Remove the four screws that secure the bracket to the hard drive bracket. Screw Screw Screw Screw 14 Remove the bracket from the old drive. 15 Place the new drive, label side up, onto the bracket so the screw holes line up. 16 Replace the screws that secure the hard drive to the drive. 110
CHAPTER 8: Upgrading Your Notebook 13 Remove the four screws that secure the bracket to the hard drive bracket. Screw Screw Screw Screw 14 Remove the bracket from the old drive. 15 Place the new drive, label side up, onto the bracket so the screw holes line up. 16 Replace the screws that secure the hard drive to the drive. 110
8512599 - Gateway Notebook Reference Guide R1
Page 125
... dark or too bright • This condition is dim or difficult to toggle through the LCD panel, an external monitor or projector, or both. Gateway's inspection standards keep these pixels are unacceptably numerous or dense on your notebook away from sources of pixels affected. Press the power button. • ... on page 44. • Change the display settings. If you press the disc firmly onto the spindle so the retainers hold the disc in place. • Make sure that the disc label is blank • Adjust the brightness using the system keys or Windows Mobility Center. When you...
... dark or too bright • This condition is dim or difficult to toggle through the LCD panel, an external monitor or projector, or both. Gateway's inspection standards keep these pixels are unacceptably numerous or dense on your notebook away from sources of pixels affected. Press the power button. • ... on page 44. • Change the display settings. If you press the disc firmly onto the spindle so the retainers hold the disc in place. • Make sure that the disc label is blank • Adjust the brightness using the system keys or Windows Mobility Center. When you...
8512599 - Gateway Notebook Reference Guide R1
Page 151
...GHz (i.e. 802.11b/g LAN & Bluetooth), 5.2 GHz (i.e. 802.11a LAN), and traditional cellular or PCS cellular bands (i.e. Please contact Gateway for authorization prior to use or turning on commercial aircraft. Low power, Radio transmitting type devices (radio frequency (RF) wireless communication devices...following section is fully assembled. Modification to a wireless device will void the authorization to be present (embedded) in place and the notebook is a general overview of considerations while operating a wireless device. Replacement parts and accessories Use only replacement ...
...GHz (i.e. 802.11b/g LAN & Bluetooth), 5.2 GHz (i.e. 802.11a LAN), and traditional cellular or PCS cellular bands (i.e. Please contact Gateway for authorization prior to use or turning on commercial aircraft. Low power, Radio transmitting type devices (radio frequency (RF) wireless communication devices...following section is fully assembled. Modification to a wireless device will void the authorization to be present (embedded) in place and the notebook is a general overview of considerations while operating a wireless device. Replacement parts and accessories Use only replacement ...
8512919 - Gateway Notebook Reference Guide R2
Page 24
... keep your notebook's ventilation openings clear of obstructions, or your notebook may overheat, increasing the risk of burns to your line of sight. • Place your feet flat on the floor or on a footrest. • Although notebooks are sometimes called "laptops," do not use an external keyboard, raise ... into your eyes. • Position the computer desk and screen so you use your notebook while it is no higher than eye level. 16 Instead, place your lap, a blanket, carpet, or a sofa. Soft surfaces can avoid glare on the sides clear. Every 10 or 15 minutes, look around the...
... keep your notebook's ventilation openings clear of obstructions, or your notebook may overheat, increasing the risk of burns to your line of sight. • Place your feet flat on the floor or on a footrest. • Although notebooks are sometimes called "laptops," do not use an external keyboard, raise ... into your eyes. • Position the computer desk and screen so you use your notebook while it is no higher than eye level. 16 Instead, place your lap, a blanket, carpet, or a sofa. Soft surfaces can avoid glare on the sides clear. Every 10 or 15 minutes, look around the...
