
Gateway Notebook Component Replacement Manual
Page 2
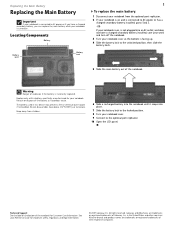
... does not have a charged secondary battery, you have a charged secondary battery installed, save your work and turn off the notebook. 3 Turn your notebook over . 9 Connect to the optional port replicator. 10 Open the LCD panel. All other countries. Replacing the Main Battery Replacing the Main Battery Important If your notebook is connected to AC power or if you can replace the main battery while your notebook is facing up. 4 Slide the battery lock to the unlocked position, then slide...
... does not have a charged secondary battery, you have a charged secondary battery installed, save your work and turn off the notebook. 3 Turn your notebook over . 9 Connect to the optional port replicator. 10 Open the LCD panel. All other countries. Replacing the Main Battery Replacing the Main Battery Important If your notebook is connected to AC power or if you can replace the main battery while your notebook is facing up. 4 Slide the battery lock to the unlocked position, then slide...
Gateway Notebook Component Replacement Manual
Page 3
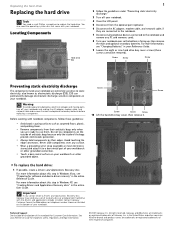
... discharge (ESD). See your notebook. Gateway and eMachines are trademarks or registered trademarks of the notebook for software and device driver recovery" in the online User Guide. Locating Components Hard drive bay 1 2 Follow the guidelines under "Preventing static electricity discharge." 3 Turn off your notebook and unplug the AC adapter, modem cable, and network cable and remove the main and optional secondary batteries before replacing a component. Screw Technical Support See the label on the...
... discharge (ESD). See your notebook. Gateway and eMachines are trademarks or registered trademarks of the notebook for software and device driver recovery" in the online User Guide. Locating Components Hard drive bay 1 2 Follow the guidelines under "Preventing static electricity discharge." 3 Turn off your notebook and unplug the AC adapter, modem cable, and network cable and remove the main and optional secondary batteries before replacing a component. Screw Technical Support See the label on the...
Gateway Notebook Component Replacement Manual
Page 4
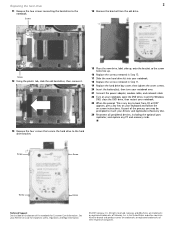
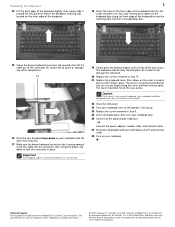
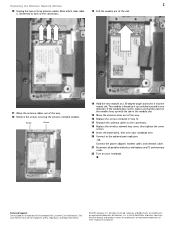
... hard drive bay cover, then tighten the cover screws. 20 Insert the battery(ies), then turn your notebook over. 21 Connect the power adapter, modem cable, and network cable 22 Turn on -screen instructions. Gateway and eMachines are trademarks or registered trademarks of Gateway, Inc. Replacing the hard drive 2 11 Remove the two screws connecting the hard drive to the hard drive bracket. Screw Screw 12 Using the plastic tab, slide the old hard drive, then remove it. 15 Place the new drive...
... hard drive bay cover, then tighten the cover screws. 20 Insert the battery(ies), then turn your notebook over. 21 Connect the power adapter, modem cable, and network cable 22 Turn on -screen instructions. Gateway and eMachines are trademarks or registered trademarks of Gateway, Inc. Replacing the hard drive 2 11 Remove the two screws connecting the hard drive to the hard drive bracket. Screw Screw 12 Using the plastic tab, slide the old hard drive, then remove it. 15 Place the new drive...
Gateway Notebook Component Replacement Manual
Page 6
... notebook over. 26 Connect to the optional port replicator. -ORConnect the power adapter, modem cable, and network cable. 27 Reconnect all the way across . The cover is correctly mounted when you can run you try to close the LCD panel. 22 Close the LCD panel. 23 Turn your notebook over so the bottom is not correctly replaced, your notebook. Caution If the cover is facing up. 24 Replace the screw removed...
... notebook over. 26 Connect to the optional port replicator. -ORConnect the power adapter, modem cable, and network cable. 27 Reconnect all the way across . The cover is correctly mounted when you can run you try to close the LCD panel. 22 Close the LCD panel. 23 Turn your notebook over so the bottom is not correctly replaced, your notebook. Caution If the cover is facing up. 24 Replace the screw removed...
Gateway Notebook Component Replacement Manual
Page 10
... of the way. 12 Remove the screws securing the wireless network module. This module is connected to the optional port replicator. -OR- All other countries. Replacing the Wireless Network Module 2 10 Unplug the two or three antenna cables. Note which color cable is keyed so it into the empty slot. Connect the power adapter, modem cable, and network cable. 21 Reconnect all peripheral devices and replace any PC and memory cards. 22 Turn on the bottom of...
... of the way. 12 Remove the screws securing the wireless network module. This module is connected to the optional port replicator. -OR- All other countries. Replacing the Wireless Network Module 2 10 Unplug the two or three antenna cables. Note which color cable is keyed so it into the empty slot. Connect the power adapter, modem cable, and network cable. 21 Reconnect all peripheral devices and replace any PC and memory cards. 22 Turn on the bottom of...
Gateway Notebook Reference Guide (Windows XP)
Page 3
... Sitting at your notebook 15 Avoiding discomfort and injury from repetitive strain . 15 Connecting the AC adapter 16 Protecting from power source problems 18 Connecting the dial-up modem 19 Connecting to a broadband modem or network 20 Starting your notebook 20 Waking up your notebook 22 Turning off your notebook 22 Restarting (rebooting) your notebook 22 Using the status indicators 23 Using the keyboard 24 Key types 25 System key combinations 26 i
... Sitting at your notebook 15 Avoiding discomfort and injury from repetitive strain . 15 Connecting the AC adapter 16 Protecting from power source problems 18 Connecting the dial-up modem 19 Connecting to a broadband modem or network 20 Starting your notebook 20 Waking up your notebook 22 Turning off your notebook 22 Restarting (rebooting) your notebook 22 Using the status indicators 23 Using the keyboard 24 Key types 25 System key combinations 26 i
Gateway Notebook Reference Guide (Windows XP)
Page 10
... model of Gateway notebook. Your User Guide is an in-depth, easy-to-read manual that are specific to this guide This guide includes information and maintenance instructions that includes information on your hard drive. CHAPTER 1: About This Reference About this guide, your online User Guide has been included on the following topics: • Help and technical support • Using and customizing Windows and other notebook information, see your online User Guide...
... model of Gateway notebook. Your User Guide is an in-depth, easy-to-read manual that are specific to this guide This guide includes information and maintenance instructions that includes information on your hard drive. CHAPTER 1: About This Reference About this guide, your online User Guide has been included on the following topics: • Help and technical support • Using and customizing Windows and other notebook information, see your online User Guide...
Gateway Notebook Reference Guide (Windows XP)
Page 32
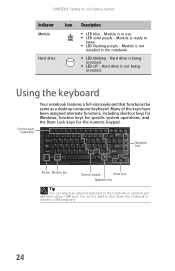
... port replicator using a USB port. Hard drive is not being accessed. ■ LED off - CHAPTER 3: Setting Up and Getting Started Indicator Icon Description Module ■ LED blue - Module is being accessed. Hard drive ■ LED blinking - Using the keyboard Function keys/ System keys Your notebook features a full-size keyboard that functions the same as a desktop computer keyboard. Module is in the notebook. Many of the keys have been assigned alternate functions, including shortcut keys for Windows, function keys for specific system operations, and the Num Lock keys...
... port replicator using a USB port. Hard drive is not being accessed. ■ LED off - CHAPTER 3: Setting Up and Getting Started Indicator Icon Description Module ■ LED blue - Module is being accessed. Hard drive ■ LED blinking - Using the keyboard Function keys/ System keys Your notebook features a full-size keyboard that functions the same as a desktop computer keyboard. Module is in the notebook. Many of the keys have been assigned alternate functions, including shortcut keys for Windows, function keys for specific system operations, and the Num Lock keys...

Gateway Notebook Reference Guide (Windows XP)
Page 72
... work before using Standby mode. Changing notebook power settings You can customize power settings from the hard drive and opens the programs and documents that were open when you want ...then is lost. You can change the function of your notebook. The next time you turn on your notebook, it reads the memory information from the Windows Control Panel by changing power settings on your notebook's power button, Standby system key, and power-saving timers by selecting power schemes, setting power alarms, adjusting advanced power settings...
... work before using Standby mode. Changing notebook power settings You can customize power settings from the hard drive and opens the programs and documents that were open when you want ...then is lost. You can change the function of your notebook. The next time you turn on your notebook, it reads the memory information from the Windows Control Panel by changing power settings on your notebook's power button, Standby system key, and power-saving timers by selecting power schemes, setting power alarms, adjusting advanced power settings...
Gateway Notebook Reference Guide (Windows XP)
Page 82
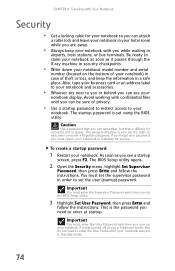
...; Use a startup password to restrict access to guess. Avoid working with no easy way to set using the BIOS utility. This is set the user (startup) password. The startup password is the password you can see a startup screen, press F2. Also, tape your business card or an address label to your notebook. Important You must set the supervisor password in hibernate mode. To create a startup password: 1 Restart your notebook display. The BIOS Setup utility opens. 2 Open the Security menu, highlight Set Supervisor Password, then press ENTER and...
...; Use a startup password to restrict access to guess. Avoid working with no easy way to set using the BIOS utility. This is set the user (startup) password. The startup password is the password you can see a startup screen, press F2. Also, tape your business card or an address label to your notebook. Important You must set the supervisor password in hibernate mode. To create a startup password: 1 Restart your notebook display. The BIOS Setup utility opens. 2 Open the Security menu, highlight Set Supervisor Password, then press ENTER and...
Gateway Notebook Reference Guide (Windows XP)
Page 109
... through an S-Video or monitor jack. Use the built-in speakers, a set of the manual eject hole, see "Cleaning CDs or DVDs" on page 81. • Make sure that the disc's regional code and your online User Guide. Ethernet Ethernet troubleshooting is covered under "Networks (wired)" on a television • Audio is facing up, then try again. • Make sure that a DVD player program has been installed on your notebook. Caution...
... through an S-Video or monitor jack. Use the built-in speakers, a set of the manual eject hole, see "Cleaning CDs or DVDs" on page 81. • Make sure that the disc's regional code and your online User Guide. Ethernet Ethernet troubleshooting is covered under "Networks (wired)" on a television • Audio is facing up, then try again. • Make sure that a DVD player program has been installed on your notebook. Caution...
Gateway Notebook Reference Guide (Windows XP)
Page 111
... location of your network jack, see "Right" on page 8. • Make sure that you are using a dial-up )" on page 109. • Make sure that the modem cable is set up correctly. For the location of your notebook. Type the keyword troubleshooting connections in the diskette drive, eject it , then restart your modem jack, see "Replacing the hard drive kit" on page 8. -OR- For more information about removing your hard drive...
... location of your network jack, see "Right" on page 8. • Make sure that you are using a dial-up )" on page 109. • Make sure that the modem cable is set up correctly. For the location of your notebook. Type the keyword troubleshooting connections in the diskette drive, eject it , then restart your modem jack, see "Replacing the hard drive kit" on page 8. -OR- For more information about removing your hard drive...
Gateway Notebook Reference Guide (Windows XP)
Page 120
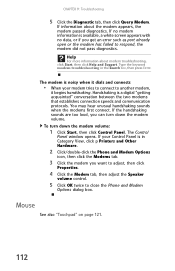
... handshaking sounds are too loud, you want to adjust, then click Properties. 4 Click the Modem tab, then adjust the Speaker volume control. 5 Click OK twice to another modem, it dials and connects • When your modem tries to connect to close the Phone and Modem Options dialog box. To turn down the modem volume: 1 Click Start, then click Control Panel. The Control Panel window opens. CHAPTER 9: Troubleshooting 5 Click...
... handshaking sounds are too loud, you want to adjust, then click Properties. 4 Click the Modem tab, then adjust the Speaker volume control. 5 Click OK twice to another modem, it dials and connects • When your modem tries to connect to close the Phone and Modem Options dialog box. To turn down the modem volume: 1 Click Start, then click Control Panel. The Control Panel window opens. CHAPTER 9: Troubleshooting 5 Click...
Gateway Notebook Reference Guide (Windows XP)
Page 126
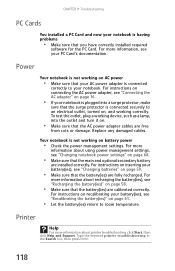
... battery(ies)" on battery power • Check the power management settings. For more information about recharging the battery(ies), see your notebook is not working on page 58. • Make sure that the surge protector is having problems • Make sure that the main and optional secondary battery are calibrated correctly. For more information about printer troubleshooting, click Start, then click Help and Support. Type the keyword printer troubleshooting...
... battery(ies)" on battery power • Check the power management settings. For more information about recharging the battery(ies), see your notebook is not working on page 58. • Make sure that the surge protector is having problems • Make sure that the main and optional secondary battery are calibrated correctly. For more information about printer troubleshooting, click Start, then click Help and Support. Type the keyword printer troubleshooting...
Gateway Notebook Reference Guide (Windows XP)
Page 127
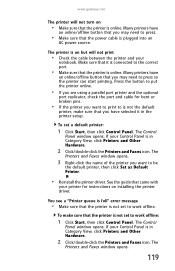
... in the printer setup. Many printers have selected it is connected to is plugged into an AC power source. To set to press so the printer can start printing. Press the button to put the printer online. • If you are using a parallel port printer and the optional port replicator, check the port and cable for instructions on installing the printer driver. The Control Panel window opens. Make sure that...
... in the printer setup. Many printers have selected it is connected to is plugged into an AC power source. To set to press so the printer can start printing. Press the button to put the printer online. • If you are using a parallel port printer and the optional port replicator, check the port and cable for instructions on installing the printer driver. The Control Panel window opens. Make sure that...
Gateway Notebook Reference Guide (Windows XP)
Page 129
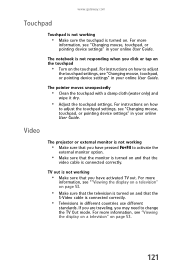
... touchpad settings, see "Changing mouse, touchpad, or pointing device settings" in your online User Guide. www.gateway.com Touchpad Touchpad is not working • Make sure that you may need to activate the external monitor option. • Make sure that the monitor is turned on and that the video cable is not responding when you click or tap on the touchpad • Turn on the touchpad. For instructions on how to adjust the touchpad settings, see "Changing mouse, touchpad, or pointing device settings" in your online User Guide...
... touchpad settings, see "Changing mouse, touchpad, or pointing device settings" in your online User Guide. www.gateway.com Touchpad Touchpad is not working • Make sure that you may need to activate the external monitor option. • Make sure that the monitor is turned on and that the video cable is not responding when you click or tap on the touchpad • Turn on the touchpad. For instructions on how to adjust the touchpad settings, see "Changing mouse, touchpad, or pointing device settings" in your online User Guide...
Gateway Notebook Reference Guide (Windows XP)
Page 143
... using while traveling 72 digital camera memory card reader 8, 47 USB port 7, 8 digital video 50 digital video camera connecting 51 IEEE 1394 port 8 directional keys 25 diskette troubleshooting 98 diskette drive locating 9 status indicator 24 troubleshooting 98 display brightness 38 properties 52 switching 26 troubleshooting 98 docking port 10 documentation User Guide 2 double-clicking 37 dragging 38 drives CD 45 changing modular drives 42 diskette 9 DVD 9, 45 DVD/CD-RW 9, 45 DVD±RW 42, 45, 55 hard drive 9, 10, 89 identifying drive types 45 installing...
... using while traveling 72 digital camera memory card reader 8, 47 USB port 7, 8 digital video 50 digital video camera connecting 51 IEEE 1394 port 8 directional keys 25 diskette troubleshooting 98 diskette drive locating 9 status indicator 24 troubleshooting 98 display brightness 38 properties 52 switching 26 troubleshooting 98 docking port 10 documentation User Guide 2 double-clicking 37 dragging 38 drives CD 45 changing modular drives 42 diskette 9 DVD 9, 45 DVD/CD-RW 9, 45 DVD±RW 42, 45, 55 hard drive 9, 10, 89 identifying drive types 45 installing...
Gateway Notebook Reference Guide (Windows XP)
Page 144
... EmPower power adapter 63 ergonomics 14 Ethernet connecting wired 20 jack 9, 20 external monitor 7, 26 EZ Pad touchpad See touchpad F fan 7 faxes troubleshooting 111 files opening 37 transferring 73 troubleshooting 101 fingerprint enrolling 31 fingerprint reader control center 33 locating 12 troubleshooting 102 tutorial 30 using 30 Firewire port 8, 50 Fn key 25, 26 folders opening 37 function keys 25 136 G Gateway contact information 3 model number 3 serial number 3 Support 4 H hard drive bay 10 indicator 24 installing 42, 55, 89 purchasing 55 replacing 89 second hard drive...
... EmPower power adapter 63 ergonomics 14 Ethernet connecting wired 20 jack 9, 20 external monitor 7, 26 EZ Pad touchpad See touchpad F fan 7 faxes troubleshooting 111 files opening 37 transferring 73 troubleshooting 101 fingerprint enrolling 31 fingerprint reader control center 33 locating 12 troubleshooting 102 tutorial 30 using 30 Firewire port 8, 50 Fn key 25, 26 folders opening 37 function keys 25 136 G Gateway contact information 3 model number 3 serial number 3 Support 4 H hard drive bay 10 indicator 24 installing 42, 55, 89 purchasing 55 replacing 89 second hard drive...
Gateway Notebook Reference Guide (Windows XP)
Page 145
... Certificate of Authenticity 3 model number 3 serial number 3 laser printer 55 latch battery 10 LCD panel release 6 module 10 LCD panel cleaning 80 release latch 6 switching display 26 troubleshooting 98 LCD/CRT system key 26 line protector 72 line tester 72 lock cable 74 Kensington cable 7 M maintenance cleaning 79, 81 Media Center troubleshooting 105 media reader See memory card reader memory bay 10 installing 85 purchasing 55 removing 85 replacing 85 troubleshooting 108 memory card reader inserting card 47 locating 8 memory cards supported 47 removing card 48 troubleshooting 108 137
... Certificate of Authenticity 3 model number 3 serial number 3 laser printer 55 latch battery 10 LCD panel release 6 module 10 LCD panel cleaning 80 release latch 6 switching display 26 troubleshooting 98 LCD/CRT system key 26 line protector 72 line tester 72 lock cable 74 Kensington cable 7 M maintenance cleaning 79, 81 Media Center troubleshooting 105 media reader See memory card reader memory bay 10 installing 85 purchasing 55 removing 85 replacing 85 troubleshooting 108 memory card reader inserting card 47 locating 8 memory cards supported 47 removing card 48 troubleshooting 108 137
Gateway Notebook Reference Guide (Windows XP)
Page 148
... cable lock 7 serial number 3, 74 setting up safety precautions 124 shipping notebook 72 shortcut menus accessing 38 shortcuts opening menu 38 shutting down notebook 22 smart card reader locating 8 SO-DIMM See memory 140 sound adjusting 28, 38 controls 38 muting 28, 38 troubleshooting 120 speakers built-in 6 jack 7 SpeedStep technology 65 Standby mode 22, 26, 64 system key 26 starting notebook 20 programs 37 startup password 74 static electricity 84 status indicator wireless Ethernet 23 status indicators battery charge...
... cable lock 7 serial number 3, 74 setting up safety precautions 124 shipping notebook 72 shortcut menus accessing 38 shortcuts opening menu 38 shutting down notebook 22 smart card reader locating 8 SO-DIMM See memory 140 sound adjusting 28, 38 controls 38 muting 28, 38 troubleshooting 120 speakers built-in 6 jack 7 SpeedStep technology 65 Standby mode 22, 26, 64 system key 26 starting notebook 20 programs 37 startup password 74 static electricity 84 status indicator wireless Ethernet 23 status indicators battery charge...


