
Gateway Notebook User's Guide - Canada/French
Page 105
www.gateway.com files 7 files across network 56 folders 9 programs 7 P parental controls 82 activity ...38 recovering files and folders 11 Recycle Bin 6 deleting files and folders 11 emptying 12 recovering files and folders 11 removing files and folders 6, 11, 12, 19, 90 renaming files and folders 19 restoring files and folders 11 router configuring...printer 56 shortcuts adding to desktop 8 closing programs 19 closing windows 19 copying 19 deleting files and folders 19 keyboard 19 pasting 19 renaming files and folders 19 selecting adjacent items in list 19 selecting items in list 19 switching...
www.gateway.com files 7 files across network 56 folders 9 programs 7 P parental controls 82 activity ...38 recovering files and folders 11 Recycle Bin 6 deleting files and folders 11 emptying 12 recovering files and folders 11 removing files and folders 6, 11, 12, 19, 90 renaming files and folders 19 restoring files and folders 11 router configuring...printer 56 shortcuts adding to desktop 8 closing programs 19 closing windows 19 copying 19 deleting files and folders 19 keyboard 19 pasting 19 renaming files and folders 19 selecting adjacent items in list 19 selecting items in list 19 switching...
Gateway Notebook User's Guide - English
Page 105
www.gateway.com files 7 files across network 56 folders 9 programs 7 P parental controls 82 activity ...38 recovering files and folders 11 Recycle Bin 6 deleting files and folders 11 emptying 12 recovering files and folders 11 removing files and folders 6, 11, 12, 19, 90 renaming files and folders 19 restoring files and folders 11 router configuring...printer 56 shortcuts adding to desktop 8 closing programs 19 closing windows 19 copying 19 deleting files and folders 19 keyboard 19 pasting 19 renaming files and folders 19 selecting adjacent items in list 19 selecting items in list 19 switching...
www.gateway.com files 7 files across network 56 folders 9 programs 7 P parental controls 82 activity ...38 recovering files and folders 11 Recycle Bin 6 deleting files and folders 11 emptying 12 recovering files and folders 11 removing files and folders 6, 11, 12, 19, 90 renaming files and folders 19 restoring files and folders 11 router configuring...printer 56 shortcuts adding to desktop 8 closing programs 19 closing windows 19 copying 19 deleting files and folders 19 keyboard 19 pasting 19 renaming files and folders 19 selecting adjacent items in list 19 selecting items in list 19 switching...
Gateway Quick Start Guide for Windows 7
Page 11
...aka FireWire™ or i.LINK) allows you to connect high-speed digital devices to your computer (for example, see Removing a card from the computer (for example: keyboard, printer, scanner). Battery Precautions and Disposal ✓ Batteries contain a mix of explosion if the battery is a danger...it is the result of your connection cables; Precautions ✓ Before you contact a qualified technician who may be removed from an External Card Reader on Gateway computers. Modem - The network port is on the computer you have purchased, please check InfoCentre. It's best ...
...aka FireWire™ or i.LINK) allows you to connect high-speed digital devices to your computer (for example, see Removing a card from the computer (for example: keyboard, printer, scanner). Battery Precautions and Disposal ✓ Batteries contain a mix of explosion if the battery is a danger...it is the result of your connection cables; Precautions ✓ Before you contact a qualified technician who may be removed from an External Card Reader on Gateway computers. Modem - The network port is on the computer you have purchased, please check InfoCentre. It's best ...

Gateway Quick Start Guide for Windows 7
Page 36
...system settings that you have entered the last time you are asked to do so by a qualified technician. 1. Disconnect or remove additional devices. When the Gateway logo appears, press F8 to lose data that were in Safe Mode to restart your computer using one of checks. The ... the Windows logo displays During the start-up . If it first performs a test of your keyboard to highlight Last Known Good Configuration and press Enter. 36 - This may freeze when the Gateway logo displays. Set the BIOS to display some details. Quick Start & Troubleshooting Guide Check InfoCentre...
...system settings that you have entered the last time you are asked to do so by a qualified technician. 1. Disconnect or remove additional devices. When the Gateway logo appears, press F8 to lose data that were in Safe Mode to restart your computer using one of checks. The ... the Windows logo displays During the start-up . If it first performs a test of your keyboard to highlight Last Known Good Configuration and press Enter. 36 - This may freeze when the Gateway logo displays. Set the BIOS to display some details. Quick Start & Troubleshooting Guide Check InfoCentre...
Gateway Quick Start Guide for Windows 7
Page 53
... committed to your retailer if you that batteries must be disposed of -life products are concerned, measures have removed any product, to limit their weight in Gateway products are correctly recycled by checking with screws being replaced by returning your local authority, or by clips. As far as ...Energy Star® on the Energy Star® web site: www.energystar.gov. Starting at www.eiae.org. ENERGY STAR® PARTNERSHIP Gateway is replaced by the US environmental Protection Agency in 1992 as keyboard, mouse, speakers, remote control, etc. Dispose of our products.
... committed to your retailer if you that batteries must be disposed of -life products are concerned, measures have removed any product, to limit their weight in Gateway products are correctly recycled by checking with screws being replaced by returning your local authority, or by clips. As far as ...Energy Star® on the Energy Star® web site: www.energystar.gov. Starting at www.eiae.org. ENERGY STAR® PARTNERSHIP Gateway is replaced by the US environmental Protection Agency in 1992 as keyboard, mouse, speakers, remote control, etc. Dispose of our products.
Gateway Quick Start Guide for Windows 7
Page 56
... Power supply 10 PowerDVD 19 Printer 42 R Recovery System Restore 27 Regulatory Information 48, 53 Remote control 8 Receiver 12 Removable media devices 9 Removing hardware 9 Removing software 26 Restore points 28 S Safe Computing 25 Safe mode 36 Safety precautions 4 Screen saver 35 Security Antivirus 29 Updates...Disk Defragmenter 25 Error checking 25 Windows System Restore 27 T Task Manager 38 Touchpad 6, 38, 39 Troubleshooting Display 39 Internet 40 Keyboard 38 Printer 42 Sound 39 Top cases 34 Touchpad 38 TV tuner 12, 18 TV-Out 12 U Uninstalling hardware 9 Update ...
... Power supply 10 PowerDVD 19 Printer 42 R Recovery System Restore 27 Regulatory Information 48, 53 Remote control 8 Receiver 12 Removable media devices 9 Removing hardware 9 Removing software 26 Restore points 28 S Safe Computing 25 Safe mode 36 Safety precautions 4 Screen saver 35 Security Antivirus 29 Updates...Disk Defragmenter 25 Error checking 25 Windows System Restore 27 T Task Manager 38 Touchpad 6, 38, 39 Troubleshooting Display 39 Internet 40 Keyboard 38 Printer 42 Sound 39 Top cases 34 Touchpad 38 TV tuner 12, 18 TV-Out 12 U Uninstalling hardware 9 Update ...
Service Guide
Page 7
... Hot Keys 14 Hardware Specifications and Configurations 16 System Utilities 23 BIOS Setup Utility 23 Navigating the BIOS Utility 23 Gateway NV59C BIOS 24 Information 24 Main 25 Security 26 Boot 29 Exit 30 BIOS Flash Utilities 31 DOS Flash Utility 32...Removing the DIMM Module 53 Removing the WLAN Module 54 Removing the Hard Disk Drive Module 56 Main Unit Disassembly Process 58 Main Unit Disassembly Flowchart 58 Removing the Keyboard 60 Removing the Upper Cover 62 Removing the Left Speaker Module 66 Removing the Right Speaker Module 67 Removing the Power Board 69 Removing...
... Hot Keys 14 Hardware Specifications and Configurations 16 System Utilities 23 BIOS Setup Utility 23 Navigating the BIOS Utility 23 Gateway NV59C BIOS 24 Information 24 Main 25 Security 26 Boot 29 Exit 30 BIOS Flash Utilities 31 DOS Flash Utility 32...Removing the DIMM Module 53 Removing the WLAN Module 54 Removing the Hard Disk Drive Module 56 Main Unit Disassembly Process 58 Main Unit Disassembly Flowchart 58 Removing the Keyboard 60 Removing the Upper Cover 62 Removing the Left Speaker Module 66 Removing the Right Speaker Module 67 Removing the Power Board 69 Removing...

Service Guide
Page 8
... 84 LCD Module Disassembly Flowchart 84 Removing the LCD Assembly 85 Removing the LCD Bezel 88 Removing the Camera Module 89 Removing the Inverter Board 90 Removing the LCD Panel 92 Removing the LCD Brackets and FPC Cable 94 Removing the Microphone Cable 96 Removing the Antennas 98 LCD Module Reassembly ... Power Board 122 Replacing the Right Speaker Module 123 Replacing the Left Speaker Module 124 Replacing the Upper Cover 125 Replacing the Keyboard 128 Replacing the Hard Disk Drive Module 129 Replacing the WLAN Module 130 Replacing the DIMM Modules 131 Replacing the 3G Module...
... 84 LCD Module Disassembly Flowchart 84 Removing the LCD Assembly 85 Removing the LCD Bezel 88 Removing the Camera Module 89 Removing the Inverter Board 90 Removing the LCD Panel 92 Removing the LCD Brackets and FPC Cable 94 Removing the Microphone Cable 96 Removing the Antennas 98 LCD Module Reassembly ... Power Board 122 Replacing the Right Speaker Module 123 Replacing the Left Speaker Module 124 Replacing the Upper Cover 125 Replacing the Keyboard 128 Replacing the Hard Disk Drive Module 129 Replacing the WLAN Module 130 Replacing the DIMM Modules 131 Replacing the 3G Module...
Service Guide
Page 17
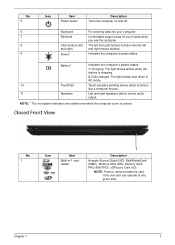
... Stick PRO (MS PRO), xDPicture Card (xD). Battery1 Indicates the computer's battery status. 1. No. 5 Icon Item Power button Description Turns the computer on and off. 6 Keyboard For entering data into your computer. 7 Palmrest Comfortable support area for your hands when you use the computer. 8 Click buttons (left The left and right...
... Stick PRO (MS PRO), xDPicture Card (xD). Battery1 Indicates the computer's battery status. 1. No. 5 Icon Item Power button Description Turns the computer on and off. 6 Keyboard For entering data into your computer. 7 Palmrest Comfortable support area for your hands when you use the computer. 8 Click buttons (left The left and right...
Service Guide
Page 53
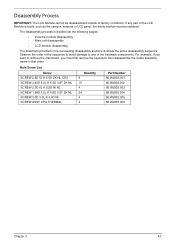
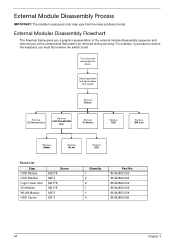
Observe the order of the sequence to avoid damage to remove the mainboard, you want to any part of the LCD Module is divided into the following stages: • External module disassembly • Main unit disassembly &#... be disassembled outside of the hardware components. The disassembly process is faulty, such as the camera, antenna or LCD panel, the whole module must first remove the keyboard, then disassemble the inside assembly frame in the succeeding disassembly sections illustrate the entire disassembly sequence. Main Screw List Screw SCREW 2.5D 5L K 5.5D...
Observe the order of the sequence to avoid damage to remove the mainboard, you want to any part of the LCD Module is divided into the following stages: • External module disassembly • Main unit disassembly &#... be disassembled outside of the hardware components. The disassembly process is faulty, such as the camera, antenna or LCD panel, the whole module must first remove the keyboard, then disassemble the inside assembly frame in the succeeding disassembly sections illustrate the entire disassembly sequence. Main Screw List Screw SCREW 2.5D 5L K 5.5D...
Service Guide
Page 54
... 86.WJ802.002 86.WJ802.002 86.WJ802.004 86.WJ802.005 44 Chapter 3 For example, if you want to remove the keyboard, you on the components that need to be removed during servicing. Turn off system and peripherals power Disconnect power and signal cables from the mass produced model. External Modules Disassembly...
... 86.WJ802.002 86.WJ802.002 86.WJ802.004 86.WJ802.005 44 Chapter 3 For example, if you want to remove the keyboard, you on the components that need to be removed during servicing. Turn off system and peripherals power Disconnect power and signal cables from the mass produced model. External Modules Disassembly...
Service Guide
Page 68
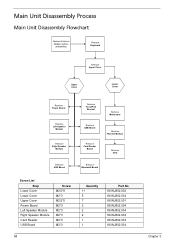
Main Unit Disassembly Process Main Unit Disassembly Flowchart Remove External Modules before proceeding Remove Keyboard Remove Upper Cover Upper Cover Lower Cover Remove Power Board Remove Left Speaker Module Remove Right Speaker Module Remove USB Board Remove TouchPad Bracket Remove USB Board Remove Card Reader Board Remove Mainboard Remove Thermal Module Remove CPU Remove Bluetooth Board Screw List Step Lower Cover Lower Cover Upper Cover Power...
Main Unit Disassembly Process Main Unit Disassembly Flowchart Remove External Modules before proceeding Remove Keyboard Remove Upper Cover Upper Cover Lower Cover Remove Power Board Remove Left Speaker Module Remove Right Speaker Module Remove USB Board Remove TouchPad Bracket Remove USB Board Remove Card Reader Board Remove Mainboard Remove Thermal Module Remove CPU Remove Bluetooth Board Screw List Step Lower Cover Lower Cover Upper Cover Power...

Service Guide
Page 70
Turn the keyboard over on to the TouchPad area to expose the FPC connector. 60 Chapter 3 Pry up the centre of the Keyboard and rotate it upward away from the Upper Cover. 3. Removing the Keyboard 1. Unlock the six (6) keyboard locks. 2.
Turn the keyboard over on to the TouchPad area to expose the FPC connector. 60 Chapter 3 Pry up the centre of the Keyboard and rotate it upward away from the Upper Cover. 3. Removing the Keyboard 1. Unlock the six (6) keyboard locks. 2.

Service Guide
Page 219
...and Exit 30 Security 26 System Security 30 Board Layout Top View 159 C Camera Module Removing 89, 90 Replacing 103, 105, 106, 107, 109 Common Problems 140 computer on indicator 10 CPU Removing 83 Replacing 112 D DIMM Modules Replacing 131 Display 5 display hotkeys 14 Index E ... 165 H Hard Disk Drive Removing 56 Replacing 129 HDTV Switch Failure 151 Hibernation mode hotkey 14 Hot Keys 12 I Indicators 10 Intermittent Problems 152 Internal Microphone Failure 145 Internal Speaker Failure 144 J Jumper and Connector Locations 159 K Keyboard Removing 60 Replacing 128 Keyboard Failure 143 L LCD Bezel ...
...and Exit 30 Security 26 System Security 30 Board Layout Top View 159 C Camera Module Removing 89, 90 Replacing 103, 105, 106, 107, 109 Common Problems 140 computer on indicator 10 CPU Removing 83 Replacing 112 D DIMM Modules Replacing 131 Display 5 display hotkeys 14 Index E ... 165 H Hard Disk Drive Removing 56 Replacing 129 HDTV Switch Failure 151 Hibernation mode hotkey 14 Hot Keys 12 I Indicators 10 Intermittent Problems 152 Internal Microphone Failure 145 Internal Speaker Failure 144 J Jumper and Connector Locations 159 K Keyboard Removing 60 Replacing 128 Keyboard Failure 143 L LCD Bezel ...


