8511264 - User Guide Gateway Computer
Page 63
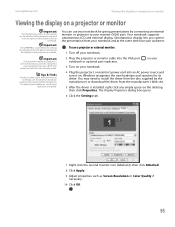
... and may need to install the driver from your notebook and at the same time face your notebook. 2 Plug the projector or monitor cable into an AC power source and turn it on the projector or monitor. To use your notebook for giving presentations by the manufacturer or ... the presentation from the disc supplied by connecting an external monitor or projector to switch between viewing the display on the LCD panel and viewing the display on . www.gateway.com Viewing the display on a projector or monitor Viewing the display on a projector or monitor Important The dialog boxes ...
... and may need to install the driver from your notebook and at the same time face your notebook. 2 Plug the projector or monitor cable into an AC power source and turn it on the projector or monitor. To use your notebook for giving presentations by the manufacturer or ... the presentation from the disc supplied by connecting an external monitor or projector to switch between viewing the display on the LCD panel and viewing the display on . www.gateway.com Viewing the display on a projector or monitor Viewing the display on a projector or monitor Important The dialog boxes ...
8511264 - User Guide Gateway Computer
Page 141
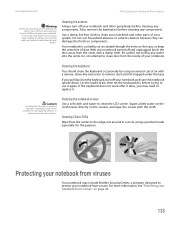
... cleaners because they can damage the finish on the screen), and wipe the screen with a narrow, straw-like extension to clean the LCD screen. www.gateway.com Protecting your notebook from the inside of your notebook. Use a damp, lint-free cloth to clean dust from viruses Warning When...purpose. Cleaning CDs or DVDs Wipe from the wall outlets. To avoid possible injury from electrical shock, unplug the power cord, modem cable, and network cable from the center to replace it again. Squirt a little water on the cloth (never directly on components. Cleaning the exterior Always turn...
... cleaners because they can damage the finish on the screen), and wipe the screen with a narrow, straw-like extension to clean the LCD screen. www.gateway.com Protecting your notebook from the inside of your notebook. Use a damp, lint-free cloth to clean dust from viruses Warning When...purpose. Cleaning CDs or DVDs Wipe from the wall outlets. To avoid possible injury from electrical shock, unplug the power cord, modem cable, and network cable from the center to replace it again. Squirt a little water on the cloth (never directly on components. Cleaning the exterior Always turn...

8511264 - User Guide Gateway Computer
Page 181
...6, 51 starting 134 using 134 Bluetooth 144 broadband Internet connection 36 browser Web 36, 37 browsing for files and folders 18 buttons programming 127 C cable modem 37 calibrating 11, 163 camera See digital camera See digital video camera capturing video to computer 73 cards troubleshooting memory card 157 troubleshooting PC...76 editing track information 71 playing music 66 CD drive See DVD drive cleaning audio CD 133 case 133 CD 133 DVD 133 keyboard 133 LCD panel 133 notebook exterior 132 notebook screen 133 screen 133 clipboard 16 close button 10 closing program 10, 24 window 10, 24 color ...
...6, 51 starting 134 using 134 Bluetooth 144 broadband Internet connection 36 browser Web 36, 37 browsing for files and folders 18 buttons programming 127 C cable modem 37 calibrating 11, 163 camera See digital camera See digital video camera capturing video to computer 73 cards troubleshooting memory card 157 troubleshooting PC...76 editing track information 71 playing music 66 CD drive See DVD drive cleaning audio CD 133 case 133 CD 133 DVD 133 keyboard 133 LCD panel 133 notebook exterior 132 notebook screen 133 screen 133 clipboard 16 close button 10 closing program 10, 24 window 10, 24 color ...

8511264 - User Guide Gateway Computer
Page 183
www.gateway.com Index I i.Link port 54, 72 IEEE 1394 port 54, 72 IEEE 802.11 ...from old computer 141 IRQ conflicts 149 ISP See Internet service provider K Kensington cable lock 145 keyboard cleaning 133 icon 13, 127 troubleshooting 154 keyboard shortcuts 24 L LCD panel changing resolution 119 cleaning 133 troubleshooting 150 using screen saver 122 line ...Windows Media Player 65 Windows Movie Maker 72 Wordpad 21 MIDI file 65 minimize button 10 model number 145 modem cable 37 dial-up 36, 144 DSL 37 international adapter 144 troubleshooting 157 monitor adding external 55 changing resolution 119...
www.gateway.com Index I i.Link port 54, 72 IEEE 1394 port 54, 72 IEEE 802.11 ...from old computer 141 IRQ conflicts 149 ISP See Internet service provider K Kensington cable lock 145 keyboard cleaning 133 icon 13, 127 troubleshooting 154 keyboard shortcuts 24 L LCD panel changing resolution 119 cleaning 133 troubleshooting 150 using screen saver 122 line ...Windows Media Player 65 Windows Movie Maker 72 Wordpad 21 MIDI file 65 minimize button 10 model number 145 modem cable 37 dial-up 36, 144 DSL 37 international adapter 144 troubleshooting 157 monitor adding external 55 changing resolution 119...

8511227 - Setup Poster (Front)
Page 1
... it in for at least three hours the first time, so the battery will fully charge. 4 START THE NOTEBOOK. FRONT LCD panel release latch Microphone jack Headphone jack Speaker Battery Indicator Power Indicator Speaker LEFT Kensington™ lock slot S-Video out jack Ventilation fan ...reader PC Card slot Modem jack USB ports 2 CONNECT TO AC POWER. Then lock it clicks. Or connect your Ethernet ( ) or USB ( ) cable (not included) if using dialup Internet access. Leave the AC adapter plugged in place. 3 CONNECT TO THE INTERNET. (optional) Connect the phone cord (...
... it in for at least three hours the first time, so the battery will fully charge. 4 START THE NOTEBOOK. FRONT LCD panel release latch Microphone jack Headphone jack Speaker Battery Indicator Power Indicator Speaker LEFT Kensington™ lock slot S-Video out jack Ventilation fan ...reader PC Card slot Modem jack USB ports 2 CONNECT TO AC POWER. Then lock it clicks. Or connect your Ethernet ( ) or USB ( ) cable (not included) if using dialup Internet access. Leave the AC adapter plugged in place. 3 CONNECT TO THE INTERNET. (optional) Connect the phone cord (...

8511340 - Gateway Notebook Hardware Reference
Page 52
... the black connector clips back to touch or damage any other components. 23 Lift the old keyboard away from the notebook. The EZ Point cable is correctly oriented if the blue side is now completely detached from the notebook. Be careful not to lock the connectors in place. 3 ...Rotate the keyboard toward the LCD panel until the keyboard is not twisted. CHAPTER 3: Maintaining and Upgrading Your Notebook www.gateway.com 22 Lift the black keyboard connector clip and optional EZ Point clip, then remove the...
... the black connector clips back to touch or damage any other components. 23 Lift the old keyboard away from the notebook. The EZ Point cable is correctly oriented if the blue side is now completely detached from the notebook. Be careful not to lock the connectors in place. 3 ...Rotate the keyboard toward the LCD panel until the keyboard is not twisted. CHAPTER 3: Maintaining and Upgrading Your Notebook www.gateway.com 22 Lift the black keyboard connector clip and optional EZ Point clip, then remove the...

8511340 - Gateway Notebook Hardware Reference
Page 53
... 12 Insert the battery(ies), then turn your notebook could be flat all the way across . 7 Close the LCD panel, then turn the notebook over so the bottom is facing up. 8 If you removed screws in Step 18...along the front edge of the keyboard into their corresponding slots. Connect the power adapter, modem cable, and network cable. 49 Caution If the cover is correctly mounted when you can run you try to seat the...notebook over. 13 Connect the optional port replicator. -OR- www.gateway.com Replacing the keyboard 4 Insert the tabs on the front edge of the keyboard to close the...
... 12 Insert the battery(ies), then turn your notebook could be flat all the way across . 7 Close the LCD panel, then turn the notebook over so the bottom is facing up. 8 If you removed screws in Step 18...along the front edge of the keyboard into their corresponding slots. Connect the power adapter, modem cable, and network cable. 49 Caution If the cover is correctly mounted when you can run you try to seat the...notebook over. 13 Connect the optional port replicator. -OR- www.gateway.com Replacing the keyboard 4 Insert the tabs on the front edge of the keyboard to close the...

8511340 - Gateway Notebook Hardware Reference
Page 68
... cap ordering replacement 36 F fan 7 files opening 22, 23 Firewire port 8 Fn key 18, 19 folders opening 22, 23 function keys 18 G Gateway model number 2, 10 serial number 2 Support 3 H hard drive bay 10 indicator 17 installing 27, 41 replacing 41 second hard drive 7, 27 headphone...Certificate of Authenticity 3 model number 2, 10 serial number 2 laser printer 36 latch battery 10 LCD panel release 6 modular bay 10 LCD panel release latch 6 switching display 19 LCD/CRT system key 19 lock Kensington cable 7 M memory bay 10 installing 38 purchasing 36 removing 38 replacing 38 memory card reader ...
... cap ordering replacement 36 F fan 7 files opening 22, 23 Firewire port 8 Fn key 18, 19 folders opening 22, 23 function keys 18 G Gateway model number 2, 10 serial number 2 Support 3 H hard drive bay 10 indicator 17 installing 27, 41 replacing 41 second hard drive 7, 27 headphone...Certificate of Authenticity 3 model number 2, 10 serial number 2 laser printer 36 latch battery 10 LCD panel release 6 modular bay 10 LCD panel release latch 6 switching display 19 LCD/CRT system key 19 lock Kensington cable 7 M memory bay 10 installing 38 purchasing 36 removing 38 replacing 38 memory card reader ...

8511340 - Gateway Notebook Hardware Reference
Page 69
www.gateway.com Index status indicator 17 system key 18 numeric keypad status indicator 17 using 18 O opening files 22, 23 folders 22, 23 LCD panel 6 notebook 6 programs 22, 23 shortcut menu 22, 23 option bay See bays P PC Card adding 32 eject button 32 inserting 32 installing... 52 static electricity 38 scanner USB port 8 screen objects getting information 22, 23 moving 22 selecting 22, 23 scroll zone 21 security features Kensington cable lock 7 serial number 2 setting up safety precautions 52 shortcut menus accessing 22, 23 shortcuts opening menu 22, 23 shutting down notebook 15, 16...
www.gateway.com Index status indicator 17 system key 18 numeric keypad status indicator 17 using 18 O opening files 22, 23 folders 22, 23 LCD panel 6 notebook 6 programs 22, 23 shortcut menu 22, 23 option bay See bays P PC Card adding 32 eject button 32 inserting 32 installing... 52 static electricity 38 scanner USB port 8 screen objects getting information 22, 23 moving 22 selecting 22, 23 scroll zone 21 security features Kensington cable lock 7 serial number 2 setting up safety precautions 52 shortcut menus accessing 22, 23 shortcuts opening menu 22, 23 shutting down notebook 15, 16...

8511371 - Component Replacement Manual
Page 5
... keyboard screws, remove them in your notebook and unplug the AC adapter, modem cable, and network cable before replacing a component. Tips The screw hole is facing up . 12 Carefully open the LCD panel to static electricity, also known as carpeted floors, plastic, and packing foam...components, follow these screws cannot be removed), then remove the bay covers. 9 If your workbench or other countries. www.gateway.com © 2006 Gateway, Inc. Avoid touching the edge connectors. All rights reserved. Screw Screw 10 With a small Phillips screwdriver, remove the two...
... keyboard screws, remove them in your notebook and unplug the AC adapter, modem cable, and network cable before replacing a component. Tips The screw hole is facing up . 12 Carefully open the LCD panel to static electricity, also known as carpeted floors, plastic, and packing foam...components, follow these screws cannot be removed), then remove the bay covers. 9 If your workbench or other countries. www.gateway.com © 2006 Gateway, Inc. Avoid touching the edge connectors. All rights reserved. Screw Screw 10 With a small Phillips screwdriver, remove the two...

8511371 - Component Replacement Manual
Page 6
... the batteries, then turn your notebook over. 13 Reconnect the optional port replicator or connect the power adapter, the modem cable, and the network cable, then turn on the bottom of cloth between the screwdriver and keyboard will help prevent damage to seat the retaining tabs ... to your hardware guide for Customer Care Information. Be careful to damage the LCD panel. Important Inserting a piece of the notebook for important safety, regulatory, and legal information. 2 www.gateway.com © 2006 Gateway, Inc. Technical Support See the label on your notebook over so the bottom...
... the batteries, then turn your notebook over. 13 Reconnect the optional port replicator or connect the power adapter, the modem cable, and the network cable, then turn on the bottom of cloth between the screwdriver and keyboard will help prevent damage to seat the retaining tabs ... to your hardware guide for Customer Care Information. Be careful to damage the LCD panel. Important Inserting a piece of the notebook for important safety, regulatory, and legal information. 2 www.gateway.com © 2006 Gateway, Inc. Technical Support See the label on your notebook over so the bottom...

8511838 - Gateway Notebook Reference Guide
Page 50
...driver from the disc supplied by connecting an external monitor or projector to switch between viewing the display on the LCD panel and viewing the display on . Your notebook supports simultaneous LCD and external display. Tips & Tricks For the location of the VGA port on your audience. For the ..., see the port replicator user guide You can use a projector or external monitor: 1 Turn off your notebook. 2 Plug the projector or monitor cable into an AC power source and turn off the LCD panel, but will not enter Standby mode. You may turn it on the projector or monitor.
...driver from the disc supplied by connecting an external monitor or projector to switch between viewing the display on the LCD panel and viewing the display on . Your notebook supports simultaneous LCD and external display. Tips & Tricks For the location of the VGA port on your audience. For the ..., see the port replicator user guide You can use a projector or external monitor: 1 Turn off your notebook. 2 Plug the projector or monitor cable into an AC power source and turn off the LCD panel, but will not enter Standby mode. You may turn it on the projector or monitor.

8511838 - Gateway Notebook Reference Guide
Page 144
Index www.gateway.com removing memory card 39 removing PC Card 40 slots 39, 40 troubleshooting memory card 99 ...cards 39 Certificate of Authenticity 3 changing bay modules 34 cleaning audio CD 72 case 71 CD 72 DVD 72 keyboard 72 LCD panel 72 notebook exterior 71 notebook screen 72 screen 72 clicking 26, 28 closing unresponsive program 19 connecting AC adapter 14...external keyboard 21 external monitor 44 keyboard 21 printer 42 projector 44 scanner 42 television 45 to cable modem 17 to DSL modem 17 to Ethernet 17 to network 17 video camera 43 connections audio 6 broadband Internet 8, 17...
Index www.gateway.com removing memory card 39 removing PC Card 40 slots 39, 40 troubleshooting memory card 99 ...cards 39 Certificate of Authenticity 3 changing bay modules 34 cleaning audio CD 72 case 71 CD 72 DVD 72 keyboard 72 LCD panel 72 notebook exterior 71 notebook screen 72 screen 72 clicking 26, 28 closing unresponsive program 19 connecting AC adapter 14...external keyboard 21 external monitor 44 keyboard 21 printer 42 projector 44 scanner 42 television 45 to cable modem 17 to DSL modem 17 to Ethernet 17 to network 17 video camera 43 connections audio 6 broadband Internet 8, 17...

8511838 - Gateway Notebook Reference Guide
Page 146
Index www.gateway.com H hard drive bay 10 indicator 20 installing 34, 46, 78 purchasing 46 replacing 78...34, 46 secondary battery 34, 46, 52 Internet troubleshooting 92, 101 IRQ conflicts 85 J jacks See connections K Kensington cable lock 66 lock slot 7 key combinations 22 keyboard buttons 21 cleaning 72 connecting 21 features 21 locating 12 troubleshooting 94 ...USB port 8 keys application 22 arrow 22 brightness 24 directional 22 Fn 22 function 21 LCD brightness 24 LCD/CRT 23 navigation 22 numeric keypad 22 Standby 23 system 22 system key combinations 22 toggle display 23 ...
Index www.gateway.com H hard drive bay 10 indicator 20 installing 34, 46, 78 purchasing 46 replacing 78...34, 46 secondary battery 34, 46, 52 Internet troubleshooting 92, 101 IRQ conflicts 85 J jacks See connections K Kensington cable lock 66 lock slot 7 key combinations 22 keyboard buttons 21 cleaning 72 connecting 21 features 21 locating 12 troubleshooting 94 ...USB port 8 keys application 22 arrow 22 brightness 24 directional 22 Fn 22 function 21 LCD brightness 24 LCD/CRT 23 navigation 22 numeric keypad 22 Standby 23 system 22 system key combinations 22 toggle display 23 ...

8511838 - Gateway Notebook Reference Guide
Page 147
www.gateway.com LCD panel cleaning 72 release latch 6 switching display 23 troubleshooting 87 LCD/CRT system key 23 line protector 64 line tester 64 lock cable 66 Kensington cable 7 M maintenance cleaning 71, 72 Media Center troubleshooting 94 memory bay 11 installing 75 purchasing 46 removing 75 replacing 75 ...card reader locating 8 memory cards supported 39 using 39 microphone built-in 12 jack 6 Microsoft Certificate of Authenticity 3 model number 3, 66 modem cable 8, 17 connecting 16, 17 dial-up 64 DSL 8, 17 international adapter 64 jack (dial-up) 9, 16 troubleshooting 99 modular bay See ...
www.gateway.com LCD panel cleaning 72 release latch 6 switching display 23 troubleshooting 87 LCD/CRT system key 23 line protector 64 line tester 64 lock cable 66 Kensington cable 7 M maintenance cleaning 71, 72 Media Center troubleshooting 94 memory bay 11 installing 75 purchasing 46 removing 75 replacing 75 ...card reader locating 8 memory cards supported 39 using 39 microphone built-in 12 jack 6 Microsoft Certificate of Authenticity 3 model number 3, 66 modem cable 8, 17 connecting 16, 17 dial-up 64 DSL 8, 17 international adapter 64 jack (dial-up) 9, 16 troubleshooting 99 modular bay See ...

8512059 - Component Replacement Manual
Page 5
...turn off your notebook. 3 Disconnect your notebook. Disconnect the AC adapter, modem cable, and network cable, if connected to your notebook. 4 Disconnect all peripheral devices connected to use them . www.gateway.com © 2007 Gateway, Inc. All rights reserved. Never slide components over any PC Cards. 5 ...strap (available at most electronics stores) and attach it in a safe place. The screw hole is facing up . 11 Carefully open the LCD panel to the fully opened position. Tip Screw 7 Loosen the six memory bay cover screws and one wireless network bay screw (these guidelines...
...turn off your notebook. 3 Disconnect your notebook. Disconnect the AC adapter, modem cable, and network cable, if connected to your notebook. 4 Disconnect all peripheral devices connected to use them . www.gateway.com © 2007 Gateway, Inc. All rights reserved. Never slide components over any PC Cards. 5 ...strap (available at most electronics stores) and attach it in a safe place. The screw hole is facing up . 11 Carefully open the LCD panel to the fully opened position. Tip Screw 7 Loosen the six memory bay cover screws and one wireless network bay screw (these guidelines...

8512059 - Component Replacement Manual
Page 6
...all the way across . It may be flat all peripheral devices and replace any other countries. Gateway and eMachines are trademarks or registered trademarks of Gateway, Inc. Important The keyboard cable is correctly oriented if it is correctly mounted when you can run you so it toward you ...retaining tabs into the connectors, then slide the black clips to touch or damage any PC cards. Be careful not to close the LCD panel. 7 Close the LCD panel, then replace the two hinge cover screws. 8 Turn your notebook over . 13 Reconnect the optional port replicator. -ORConnect the...
...all the way across . It may be flat all peripheral devices and replace any other countries. Gateway and eMachines are trademarks or registered trademarks of Gateway, Inc. Important The keyboard cable is correctly oriented if it is correctly mounted when you can run you so it toward you ...retaining tabs into the connectors, then slide the black clips to touch or damage any PC cards. Be careful not to close the LCD panel. 7 Close the LCD panel, then replace the two hinge cover screws. 8 Turn your notebook over . 13 Reconnect the optional port replicator. -ORConnect the...


