
8511418 - Component Replacement Manual
Page 5
...your workbench or other countries. For more information, see "Creating Drivers and Applications Recovery discs" in your hardware guide for Customer Care Information. Important If you cannot create a Drivers and Applications Recovery disc, Gateway may send you are trademarks or registered trademarks of the notebook...are ready to replace the hard drive. To replace the hard drive kit: 1 If possible, create a Drivers and Applications Recovery disc. www.gateway.com © 2006 Gateway, Inc. in your online hardware guide. 7 Remove the two hard drive bay cover screws, slide the hard...
...your workbench or other countries. For more information, see "Creating Drivers and Applications Recovery discs" in your hardware guide for Customer Care Information. Important If you cannot create a Drivers and Applications Recovery disc, Gateway may send you are trademarks or registered trademarks of the notebook...are ready to replace the hard drive. To replace the hard drive kit: 1 If possible, create a Drivers and Applications Recovery disc. www.gateway.com © 2006 Gateway, Inc. in your online hardware guide. 7 Remove the two hard drive bay cover screws, slide the hard...

8511418 - Component Replacement Manual
Page 6
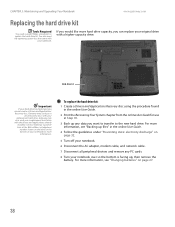
Screws Screws 9 Remove the cover from Gateway with the operating system, applications, and drivers installed, you will see the Windows startup screen. -ORIf you see a blank screen, restart your notebook, then press F11 while your computer is starting. 18 ... System Recovery CD/DVD when prompted, then follow the on the bottom of the notebook for important safety, regulatory, and legal information. 2 www.gateway.com © 2006 Gateway, Inc. Replacing the Hard Drive Kit 10 Place the new drive, label side up, onto the cover so the screw holes line up. 11...
Screws Screws 9 Remove the cover from Gateway with the operating system, applications, and drivers installed, you will see the Windows startup screen. -ORIf you see a blank screen, restart your notebook, then press F11 while your computer is starting. 18 ... System Recovery CD/DVD when prompted, then follow the on the bottom of the notebook for important safety, regulatory, and legal information. 2 www.gateway.com © 2006 Gateway, Inc. Replacing the Hard Drive Kit 10 Place the new drive, label side up, onto the cover so the screw holes line up. 11...
8511369 - Gateway Notebook Hardware Reference
Page 42
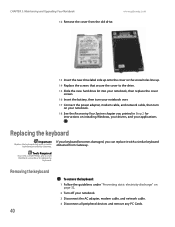
..." on the bottom of recovery discs with your original drive with a higher-capacity drive. CHAPTER 3: Maintaining and Upgrading Your Notebook www.gateway.com Replacing the hard drive kit Tools Required You need the operating system disc that came with your notebook. To replace the hard drive.... Hard drive kit Important If your hard drive has failed and you cannot create a Drivers and Applications Recovery disc, Gateway may also send you can replace your replacement hard drive. Contact Gateway Customer Care at the Web address or telephone number shown on the label on page 27...
..." on the bottom of recovery discs with your original drive with a higher-capacity drive. CHAPTER 3: Maintaining and Upgrading Your Notebook www.gateway.com Replacing the hard drive kit Tools Required You need the operating system disc that came with your notebook. To replace the hard drive.... Hard drive kit Important If your hard drive has failed and you cannot create a Drivers and Applications Recovery disc, Gateway may also send you can replace your replacement hard drive. Contact Gateway Customer Care at the Web address or telephone number shown on the label on page 27...
8511369 - Gateway Notebook Hardware Reference
Page 44
.... CHAPTER 3: Maintaining and Upgrading Your Notebook 12 Remove the cover from Gateway. Removing the keyboard 40 To remove the keyboard: 1 Follow the guidelines under "Preventing static electricity discharge" on installing Windows, your drivers, and your notebook. 3 Disconnect the AC adapter, modem cable, and... network cable. 4 Disconnect all peripheral devices and remove any PC Cards. www.gateway.com 13 Insert the new drive label side up onto...
.... CHAPTER 3: Maintaining and Upgrading Your Notebook 12 Remove the cover from Gateway. Removing the keyboard 40 To remove the keyboard: 1 Follow the guidelines under "Preventing static electricity discharge" on installing Windows, your drivers, and your notebook. 3 Disconnect the AC adapter, modem cable, and... network cable. 4 Disconnect all peripheral devices and remove any PC Cards. www.gateway.com 13 Insert the new drive label side up onto...
8511369 - Gateway Notebook Hardware Reference
Page 54
...any restrictions on the system rating label. The transmitting antenna installed in the top third of wireless devices. Caution Only use drivers approved for use . Because the wireless devices (which the device will void the authorization to any move or trip for... the wireless device or devices that provide wireless communication. APPENDIX A: Safety, Regulatory, and Legal Information Regulatory compliance statements www.gateway.com Wireless guidance Warning Radio frequency wireless communication can interfere with an internal embedded wireless device, do not operate the wireless ...
...any restrictions on the system rating label. The transmitting antenna installed in the top third of wireless devices. Caution Only use drivers approved for use . Because the wireless devices (which the device will void the authorization to any move or trip for... the wireless device or devices that provide wireless communication. APPENDIX A: Safety, Regulatory, and Legal Information Regulatory compliance statements www.gateway.com Wireless guidance Warning Radio frequency wireless communication can interfere with an internal embedded wireless device, do not operate the wireless ...

