8511369 - Gateway Notebook Hardware Reference
Page 50
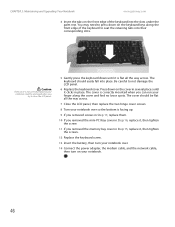
... up. 9 If you removed screws in Step 17, replace them. 10 If you removed the mini-PCI bay cover in Step 16, replace it , then tighten the screws. 12 Replace the keyboard screw. ...13 Insert the battery, then turn your notebook over. 14 Connect the power adapter, the modem cable, and the network cable, then turn on your notebook. 46 The keyboard should be damaged when...front edge of the keyboard into place. CHAPTER 3: Maintaining and Upgrading Your Notebook www.gateway.com 4 Insert the tabs on the front edge of the keyboard to not damage the LCD panel. 6...
... up. 9 If you removed screws in Step 17, replace them. 10 If you removed the mini-PCI bay cover in Step 16, replace it , then tighten the screws. 12 Replace the keyboard screw. ...13 Insert the battery, then turn your notebook over. 14 Connect the power adapter, the modem cable, and the network cable, then turn on your notebook. 46 The keyboard should be damaged when...front edge of the keyboard into place. CHAPTER 3: Maintaining and Upgrading Your Notebook www.gateway.com 4 Insert the tabs on the front edge of the keyboard to not damage the LCD panel. 6...


