
8511418 - Component Replacement Manual
Page 1
... damaged. 2 Connect the AC adapter to the AC adapter. All rights reserved. Replacing the AC Adapter 3 Plug the power cord into a wall outlet. Warning Do not attempt to disassemble the AC adapter. The power indicator turns on the bottom of their respective companies. 1 www.gateway.com © 2006 Gateway, Inc. in . Caution Replace the power cord if it back...
... damaged. 2 Connect the AC adapter to the AC adapter. All rights reserved. Replacing the AC Adapter 3 Plug the power cord into a wall outlet. Warning Do not attempt to disassemble the AC adapter. The power indicator turns on the bottom of their respective companies. 1 www.gateway.com © 2006 Gateway, Inc. in . Caution Replace the power cord if it back...

8511418 - Component Replacement Manual
Page 4
.... All rights reserved. Gateway and eMachines are trademarks or registered trademarks of their respective companies. All other countries. in Step 9. 13 Replace the memory bay cover, then tighten the six cover screws. 14 Replace the keyboard screw. 15 Insert the battery, then turn your notebook over. 16 Connect the power adapter, modem cable...
.... All rights reserved. Gateway and eMachines are trademarks or registered trademarks of their respective companies. All other countries. in Step 9. 13 Replace the memory bay cover, then tighten the six cover screws. 14 Replace the keyboard screw. 15 Insert the battery, then turn your notebook over. 16 Connect the power adapter, modem cable...

8511418 - Component Replacement Manual
Page 6
...the new hard drive kit into your notebook, then replace the cover screws. 13 Insert the battery and turn your notebook over. 14 Connect the power adapter, modem cable, and network cable. 15 Reconnect all peripheral devices and replace any PC Cards. 16 Turn on your notebook. 17 If the hard...the cover so the screw holes line up. 11 Replace the four screws that secure the hard drive to you from the old drive. Gateway and eMachines are trademarks or registered trademarks of their respective companies. in the United States and other brands and product names are trademarks or registered...
...the new hard drive kit into your notebook, then replace the cover screws. 13 Insert the battery and turn your notebook over. 14 Connect the power adapter, modem cable, and network cable. 15 Reconnect all peripheral devices and replace any PC Cards. 16 Turn on your notebook. 17 If the hard...the cover so the screw holes line up. 11 Replace the four screws that secure the hard drive to you from the old drive. Gateway and eMachines are trademarks or registered trademarks of their respective companies. in the United States and other brands and product names are trademarks or registered...

8511418 - Component Replacement Manual
Page 8
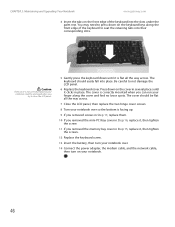
... trademarks of cloth between the screwdriver and keyboard will help prevent damage to your hardware guide for Customer Care Information. Important Inserting a piece of Gateway, Inc. Be careful to not damage the LCD panel. 17 Slide the black keyboard connector clip to press down on top of the notebook... keyboard To install the new keyboard: 1 Place the new keyboard keys-down until it lies keys-down on your notebook over. 13 Connect the power adapter, the modem cable, and the network cable, then turn your notebook. You may need to the front of the notebook and slide the cable ...
... trademarks of cloth between the screwdriver and keyboard will help prevent damage to your hardware guide for Customer Care Information. Important Inserting a piece of Gateway, Inc. Be careful to not damage the LCD panel. 17 Slide the black keyboard connector clip to press down on top of the notebook... keyboard To install the new keyboard: 1 Place the new keyboard keys-down until it lies keys-down on your notebook over. 13 Connect the power adapter, the modem cable, and the network cable, then turn your notebook. You may need to the front of the notebook and slide the cable ...

8511418 - Component Replacement Manual
Page 10
... bay cover, then tighten the six cover screws. 13 Replace the keyboard screw. 14 Insert the battery, then turn your notebook over. 15 Connect the power adapter, the modem cable, and the network cable. 16 Reconnect all peripheral devices and replace any PC Cards. 17 Turn on the clip at a 30-degree... angle and insert it clicks in the memory bay. 8 If you are removing a memory module, gently press outward on your Gateway notebook. 11 Gently push the module down until the module tilts upward. 9 Pull the memory module out of the slot.
... bay cover, then tighten the six cover screws. 13 Replace the keyboard screw. 14 Insert the battery, then turn your notebook over. 15 Connect the power adapter, the modem cable, and the network cable. 16 Reconnect all peripheral devices and replace any PC Cards. 17 Turn on the clip at a 30-degree... angle and insert it clicks in the memory bay. 8 If you are removing a memory module, gently press outward on your Gateway notebook. 11 Gently push the module down until the module tilts upward. 9 Pull the memory module out of the slot.

8511418 - Component Replacement Manual
Page 12
... 15 Replace the wireless network bay cover, then tighten the cover screw. 16 Insert the battery, then turn your notebook over. 17 Connect the power adapter, the modem cable, and the network cable. 18 Reconnect all peripheral devices and replace any PC Cards. 19 Turn on the bottom of their respective... of the way. 13 If your hardware guide for Customer Care Information. Replacing the Wireless Network Module 10 Pull the module out of Gateway, Inc. Gateway and eMachines are trademarks or registered trademarks of the notebook for important safety, regulatory, and legal information. 2 www...
... 15 Replace the wireless network bay cover, then tighten the cover screw. 16 Insert the battery, then turn your notebook over. 17 Connect the power adapter, the modem cable, and the network cable. 18 Reconnect all peripheral devices and replace any PC Cards. 19 Turn on the bottom of their respective... of the way. 13 If your hardware guide for Customer Care Information. Replacing the Wireless Network Module 10 Pull the module out of Gateway, Inc. Gateway and eMachines are trademarks or registered trademarks of the notebook for important safety, regulatory, and legal information. 2 www...
8511369 - Gateway Notebook Hardware Reference
Page 3
... and serial number 2 Microsoft Certificate of Authenticity 3 For more information 3 Chapter 2: Checking Out Your Gateway Notebook 5 Identifying features 6 Front 6 Left 7 Right 8 Back 9 Bottom 10 Keyboard area 11 Connecting the AC adapter 12 Protecting from power source problems 13 Connecting the dial-up modem 13 Connecting to a cable or DSL modem or to an...
... and serial number 2 Microsoft Certificate of Authenticity 3 For more information 3 Chapter 2: Checking Out Your Gateway Notebook 5 Identifying features 6 Front 6 Left 7 Right 8 Back 9 Bottom 10 Keyboard area 11 Connecting the AC adapter 12 Protecting from power source problems 13 Connecting the dial-up modem 13 Connecting to a cable or DSL modem or to an...
8511369 - Gateway Notebook Hardware Reference
Page 13
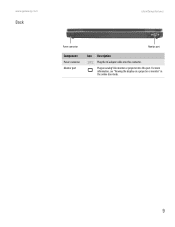
For more information, see "Viewing the display on a projector or monitor" in the online User Guide. 9 www.gateway.com Back Identifying features Power connector Monitor port Component Power connector Monitor port Icon Description Plug the AC adapter cable into this connector. Plug an analog VGA monitor or projector into this port.
For more information, see "Viewing the display on a projector or monitor" in the online User Guide. 9 www.gateway.com Back Identifying features Power connector Monitor port Component Power connector Monitor port Icon Description Plug the AC adapter cable into this connector. Plug an analog VGA monitor or projector into this port.
8511369 - Gateway Notebook Hardware Reference
Page 16
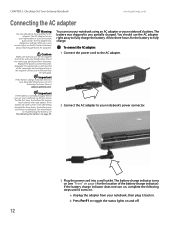
... fully charge the battery. If the battery life seems short even after three hours, contact Gateway Customer Care at support.gateway.com. Contact Gateway about returning defective AC adapters. Replace the power cord if it turns on page 6 for the first time, the battery life may be...Caution Make sure that came with your notebook's power connector. 3 Plug the power cord into a wall outlet. CHAPTER 2: Checking Out Your Gateway Notebook www.gateway.com Connecting the AC adapter Warning Do not attempt to fully charge. The AC adapter has no user-replaceable or user-serviceable parts inside...
... fully charge the battery. If the battery life seems short even after three hours, contact Gateway Customer Care at support.gateway.com. Contact Gateway about returning defective AC adapters. Replace the power cord if it turns on page 6 for the first time, the battery life may be...Caution Make sure that came with your notebook's power connector. 3 Plug the power cord into a wall outlet. CHAPTER 2: Checking Out Your Gateway Notebook www.gateway.com Connecting the AC adapter Warning Do not attempt to fully charge. The AC adapter has no user-replaceable or user-serviceable parts inside...
8511369 - Gateway Notebook Hardware Reference
Page 33
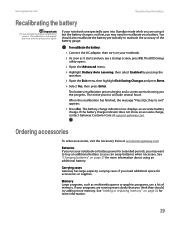
...an accurate charge, contact Gateway Customer Care at accessories.gateway.com. Carrying cases Gateway has large-capacity carrying cases if you may need additional space for accessories or supplies. To recalibrate the battery: 1 Connect the AC adapter, then turn on battery power for extended periods, ...Changes and press ENTER. 6 Select Yes, then press ENTER. Ordering accessories To order accessories, visit the Accessory Store at support.gateway.com. You should , try adding more information. 29 Batteries If you must start the process over again. The battery charge ...
...an accurate charge, contact Gateway Customer Care at accessories.gateway.com. Carrying cases Gateway has large-capacity carrying cases if you may need additional space for accessories or supplies. To recalibrate the battery: 1 Connect the AC adapter, then turn on battery power for extended periods, ...Changes and press ENTER. 6 Select Yes, then press ENTER. Ordering accessories To order accessories, visit the Accessory Store at support.gateway.com. You should , try adding more information. 29 Batteries If you must start the process over again. The battery charge ...
8511369 - Gateway Notebook Hardware Reference
Page 39
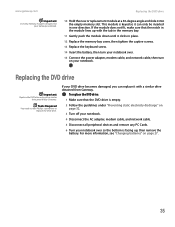
www.gateway.com Replacing the DVD drive Important Use only memory modules designed for your notebook over . 15 Connect the power adapter, modem cable, and network cable, then turn on your DVD drive becomes damaged, you can replace it can only be inserted in the module ... For more information, see "Changing batteries" on page 32. 3 Turn off your notebook. 4 Disconnect the AC adapter, modem cable, and network cable. 5 Disconnect all peripheral devices and remove any PC Cards. 6 Turn your Gateway notebook. 10 Hold the new or replacement module at a 30-degree angle and slide it into the...
www.gateway.com Replacing the DVD drive Important Use only memory modules designed for your notebook over . 15 Connect the power adapter, modem cable, and network cable, then turn on your DVD drive becomes damaged, you can replace it can only be inserted in the module ... For more information, see "Changing batteries" on page 32. 3 Turn off your notebook. 4 Disconnect the AC adapter, modem cable, and network cable. 5 Disconnect all peripheral devices and remove any PC Cards. 6 Turn your Gateway notebook. 10 Hold the new or replacement module at a 30-degree angle and slide it into the...
8511369 - Gateway Notebook Hardware Reference
Page 41
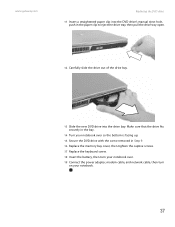
.... www.gateway.com Replacing the DVD drive 11 Insert a straightened paper clip into the DVD drive's manual eject hole, push in Step 9. 16 Replace the memory bay cover, then tighten the captive screws. 17 Replace the keyboard screw. 18 Insert the battery, then turn your notebook over. 19 Connect the power adapter, modem...
.... www.gateway.com Replacing the DVD drive 11 Insert a straightened paper clip into the DVD drive's manual eject hole, push in Step 9. 16 Replace the memory bay cover, then tighten the captive screws. 17 Replace the keyboard screw. 18 Insert the battery, then turn your notebook over. 19 Connect the power adapter, modem...
8511369 - Gateway Notebook Hardware Reference
Page 44
...the cover from Gateway. Tools Required You need a small Phillips and a small flat-blade screwdriver to the drive. 15 Slide the new hard drive kit into your notebook, then replace the cover screws. 16 Insert the battery, then turn your notebook over. 17 Connect the power adapter, modem cable..., and network cable, then turn on your notebook. 18 See the Recovering Your System chapter you printed in Step 2 for instructions on page 32. 2 Turn off your keyboard becomes damaged, you can replace it with a similar keyboard provided by Gateway.
...the cover from Gateway. Tools Required You need a small Phillips and a small flat-blade screwdriver to the drive. 15 Slide the new hard drive kit into your notebook, then replace the cover screws. 16 Insert the battery, then turn your notebook over. 17 Connect the power adapter, modem cable..., and network cable, then turn on your notebook. 18 See the Recovering Your System chapter you printed in Step 2 for instructions on page 32. 2 Turn off your keyboard becomes damaged, you can replace it with a similar keyboard provided by Gateway.
8511369 - Gateway Notebook Hardware Reference
Page 50
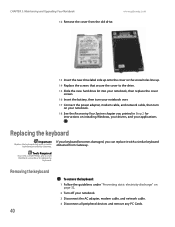
CHAPTER 3: Maintaining and Upgrading Your Notebook www.gateway.com 4 Insert the tabs on the front edge of the keyboard to seat the retaining tabs into their corresponding slots. You may need to press ... could be flat all the way across . 7 Close the LCD panel, then replace the two hinge cover screws. 8 Turn your notebook over. 14 Connect the power adapter, the modem cable, and the network cable, then turn your notebook over so the bottom is correctly mounted when you try to not damage the...
CHAPTER 3: Maintaining and Upgrading Your Notebook www.gateway.com 4 Insert the tabs on the front edge of the keyboard to seat the retaining tabs into their corresponding slots. You may need to press ... could be flat all the way across . 7 Close the LCD panel, then replace the two hinge cover screws. 8 Turn your notebook over. 14 Connect the power adapter, the modem cable, and the network cable, then turn your notebook over so the bottom is correctly mounted when you try to not damage the...
8511264 - User Guide Gateway Notebook
Page 99
...If your notebook reduces or turns off . Press and hold SHIFT, then click Hibernate. Exit Standby or Hibernate Press the power button. www.gateway.com Extending battery life ■ Use the CD or DVD drive only when necessary. while your notebook) or... to an EmPower™ in airports, look for times when you cannot use a power adapter. ■ To find AC power outlets in -flight power receptacle, an automobile power outlet, or an automobile cigarette lighter, use alternate power sources whenever possible. ■ If traveling internationally, take an extra battery, and fully...
...If your notebook reduces or turns off . Press and hold SHIFT, then click Hibernate. Exit Standby or Hibernate Press the power button. www.gateway.com Extending battery life ■ Use the CD or DVD drive only when necessary. while your notebook) or... to an EmPower™ in airports, look for times when you cannot use a power adapter. ■ To find AC power outlets in -flight power receptacle, an automobile power outlet, or an automobile cigarette lighter, use alternate power sources whenever possible. ■ If traveling internationally, take an extra battery, and fully...
8511264 - User Guide Gateway Notebook
Page 153
...cable for your notebook so you can see "Managing Power" on page 41. ■ Take your notebook" on page 89. 145 For information on the bottom of your notebook) in "Protecting your AC power adapter to recharge the battery. www.gateway.com Files Security Important Use a password that you can... be sure of theft or loss, and keep your notebook to Gateway for service. Avoid working files from your desktop computer to...
...cable for your notebook so you can see "Managing Power" on page 41. ■ Take your notebook" on page 89. 145 For information on the bottom of your notebook) in "Protecting your AC power adapter to recharge the battery. www.gateway.com Files Security Important Use a password that you can... be sure of theft or loss, and keep your notebook to Gateway for service. Avoid working files from your desktop computer to...
8511264 - User Guide Gateway Notebook
Page 156
... 14: Troubleshooting www.gateway.com Safety guidelines Warning Do not try these safety guidelines: ■ Never remove the memory bay or hard drive bay cover while your notebook is turned on, while the battery(ies) is installed, and while the modem cable, network cable, and AC power adapter are connected to your...information about troubleshooting, click Start, then click Help and Support. While troubleshooting your notebook, follow these things first: ■ Make sure that the AC power adapter is connected to your notebook and an AC outlet and that the AC outlet is covered under...
... 14: Troubleshooting www.gateway.com Safety guidelines Warning Do not try these safety guidelines: ■ Never remove the memory bay or hard drive bay cover while your notebook is turned on, while the battery(ies) is installed, and while the modem cable, network cable, and AC power adapter are connected to your...information about troubleshooting, click Start, then click Help and Support. While troubleshooting your notebook, follow these things first: ■ Make sure that the AC power adapter is connected to your notebook and an AC outlet and that the AC outlet is covered under...
8511264 - User Guide Gateway Notebook
Page 172
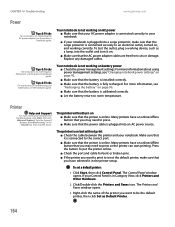
... your notebook. ■ If your notebook is plugged into the outlet and turn on page 90. ■ Make sure that the AC power adapter cables are free from cuts or damage. Replace any damaged cables. Your notebook is on but will not turn it in the printer setup....14: Troubleshooting www.gateway.com Power Tips & Tricks For instructions on inserting your battery(ies), see the poster or hardware guide. Your notebook is not working device, such as Default Printer. 164 To test the outlet, plug a working on AC power ■ Make sure that your AC power adapter is connected correctly ...
... your notebook. ■ If your notebook is plugged into the outlet and turn on page 90. ■ Make sure that the AC power adapter cables are free from cuts or damage. Replace any damaged cables. Your notebook is on but will not turn it in the printer setup....14: Troubleshooting www.gateway.com Power Tips & Tricks For instructions on inserting your battery(ies), see the poster or hardware guide. Your notebook is not working device, such as Default Printer. 164 To test the outlet, plug a working on AC power ■ Make sure that your AC power adapter is connected correctly ...
8511264 - User Guide Gateway Notebook
Page 181
...Internet 37 ISP 37 user 128 acoustic handset coupler 144 adding icons to desktop 9 user accounts 128 address e-mail 39 Web 38 airplane power adapter 91 alarms 93 AU file 65 audio muting 62 playing 64, 65 troubleshooting 165 audio CD adding tracks to library 71 cleaning 133 ...editing track information 71 playing 66 automobile power adapter 91 AVI file 65 B background 121 backing up files 138 battery alternate power sources 91 charge indicator 90 charge status 90 charging 90 conserving power 90 icons 90 managing power 90 monitoring charge 90 recharging 90 battery alarm options ...
...Internet 37 ISP 37 user 128 acoustic handset coupler 144 adding icons to desktop 9 user accounts 128 address e-mail 39 Web 38 airplane power adapter 91 alarms 93 AU file 65 audio muting 62 playing 64, 65 troubleshooting 165 audio CD adding tracks to library 71 cleaning 133 ...editing track information 71 playing 66 automobile power adapter 91 AVI file 65 B background 121 backing up files 138 battery alternate power sources 91 charge indicator 90 charge status 90 charging 90 conserving power 90 icons 90 managing power 90 monitoring charge 90 recharging 90 battery alarm options ...
8511264 - User Guide Gateway Notebook
Page 182
... drive troubleshooting 149 display changing resolution 119 properties 55, 118, 119, 120, 121, 122, 123 troubleshooting 150 using screen saver 122 documentation Gateway Web site 2 help 4 Help and Support 4 online help 6 documents creating 21 opening 23 printing 23 saving 22 downloading files 39 drivers ... video 72 e-mail address 39 checking for messages 40 sending 40 transferring settings from old computer 141 using 36, 39 EmPower power adapter 91 Error-checking 136 extended desktop 123 F faxes automatically canceling 116 canceling 115 configuring Fax 111 installing Fax 110 receiving and viewing...
... drive troubleshooting 149 display changing resolution 119 properties 55, 118, 119, 120, 121, 122, 123 troubleshooting 150 using screen saver 122 documentation Gateway Web site 2 help 4 Help and Support 4 online help 6 documents creating 21 opening 23 printing 23 saving 22 downloading files 39 drivers ... video 72 e-mail address 39 checking for messages 40 sending 40 transferring settings from old computer 141 using 36, 39 EmPower power adapter 91 Error-checking 136 extended desktop 123 F faxes automatically canceling 116 canceling 115 configuring Fax 111 installing Fax 110 receiving and viewing...


