8512564 - Component Replacement Manual R0
Page 3
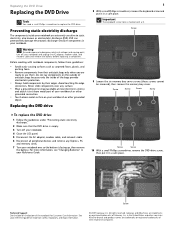
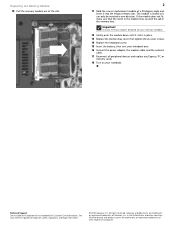
... battery. Screw Technical Support See the label on the bottom of the notebook for important safety, regulatory, and legal information. © 2007 Gateway, Inc. in a safe place. Before working with a K. Replacing the DVD drive 1 8 With a small Phillips screwdriver, remove the keyboard...Gateway, Inc. Important The keyboard screw hole is empty. 3 Turn off your workbench or other countries. Screw Screw 10 With a small Phillips screwdriver, remove the DVD drive screw, then put it in your notebook. Avoid touching the edge connectors. Screw 9 Loosen the six memory...
... battery. Screw Technical Support See the label on the bottom of the notebook for important safety, regulatory, and legal information. © 2007 Gateway, Inc. in a safe place. Before working with a K. Replacing the DVD drive 1 8 With a small Phillips screwdriver, remove the keyboard...Gateway, Inc. Important The keyboard screw hole is empty. 3 Turn off your workbench or other countries. Screw Screw 10 With a small Phillips screwdriver, remove the DVD drive screw, then put it in your notebook. Avoid touching the edge connectors. Screw 9 Loosen the six memory...
8512564 - Component Replacement Manual R0
Page 4
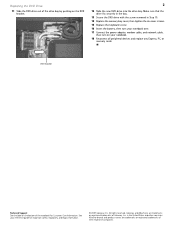
... bracket Technical Support See the label on the bottom of the notebook for important safety, regulatory, and legal information. © 2007 Gateway, Inc. in Step 10. 14 Replace the memory bay cover, then tighten the six cover screws. 15 Replace the keyboard screw. 16 Insert the battery, then turn your notebook over...
... bracket Technical Support See the label on the bottom of the notebook for important safety, regulatory, and legal information. © 2007 Gateway, Inc. in Step 10. 14 Replace the memory bay cover, then tighten the six cover screws. 15 Replace the keyboard screw. 16 Insert the battery, then turn your notebook over...
8512564 - Component Replacement Manual R0
Page 5
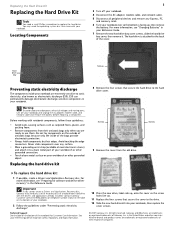
...Remove the four screws that secure the cover to the hard drive cover. Important If you cannot create a Drivers and Applications Recovery disc, Gateway may need a small Phillips screwdriver to dangerous electrical voltages and moving parts, turn off your notebook. 4 Disconnect the AC adapter, modem ...cable, and network cable. 5 Disconnect all peripheral devices and remove any Express, PC, and memory cards. 6 Turn your notebook over any surface. • Wear a grounding wrist strap (available at the Web address or telephone number shown on...
...Remove the four screws that secure the cover to the hard drive cover. Important If you cannot create a Drivers and Applications Recovery disc, Gateway may need a small Phillips screwdriver to dangerous electrical voltages and moving parts, turn off your notebook. 4 Disconnect the AC adapter, modem ...cable, and network cable. 5 Disconnect all peripheral devices and remove any Express, PC, and memory cards. 6 Turn your notebook over any surface. • Wear a grounding wrist strap (available at the Web address or telephone number shown on...
8512564 - Component Replacement Manual R0
Page 6
Go to insert your Drivers and Applications Recovery disc. 18 Reconnect all peripheral devices and replace any Express, PC, and memory cards. If you see the Windows startup screen. See your notebook. 17 Follow the on the bottom of their respective companies. in the United ...network cable. 15 Turn on your notebook. 16 If the hard drive was sent to you from Gateway with the operating system, applications, and drivers installed, you may be prompted to Step 18. -OR- Gateway and eMachines are trademarks or registered trademarks of the notebook for important safety, regulatory, and legal ...
Go to insert your Drivers and Applications Recovery disc. 18 Reconnect all peripheral devices and replace any Express, PC, and memory cards. If you see the Windows startup screen. See your notebook. 17 Follow the on the bottom of their respective companies. in the United ...network cable. 15 Turn on your notebook. 16 If the hard drive was sent to you from Gateway with the operating system, applications, and drivers installed, you may be prompted to Step 18. -OR- Gateway and eMachines are trademarks or registered trademarks of the notebook for important safety, regulatory, and legal ...
8512564 - Component Replacement Manual R0
Page 7
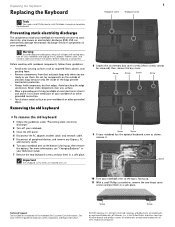
... eMachines are ready to a bare metal part of Gateway, Inc. Screw Screw Screw Screw Screw Screw 9 If your workbench or other grounded object. Never slide components over any Express, PC, and memory cards. 6 Turn your notebook over so the top is facing up . 11 With... the notebook for important safety, regulatory, and legal information. © 2007 Gateway, Inc. Warning To avoid exposure to replace the keyboard. Before working with a K. 1 Keyboard screw Keyboard screw 8 Loosen the six memory bay cover screws (these guidelines: • Avoid static-causing surfaces such as...
... eMachines are ready to a bare metal part of Gateway, Inc. Screw Screw Screw Screw Screw Screw 9 If your workbench or other grounded object. Never slide components over any Express, PC, and memory cards. 6 Turn your notebook over so the top is facing up . 11 With... the notebook for important safety, regulatory, and legal information. © 2007 Gateway, Inc. Warning To avoid exposure to replace the keyboard. Before working with a K. 1 Keyboard screw Keyboard screw 8 Loosen the six memory bay cover screws (these guidelines: • Avoid static-causing surfaces such as...
8512564 - Component Replacement Manual R0
Page 8
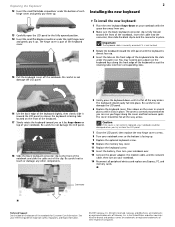
...the black keyboard connector clip is almost face-up . All other countries. Be careful not to touch or damage any Express, PC, and memory cards. Replacing the Keyboard 12 Insert the small flat-blade screwdriver under the bottom of each hinge cover and gently pry them up. 13 ...keyboard screw. 12 Insert the battery, then turn on the bottom of the notebook for important safety, regulatory, and legal information. © 2007 Gateway, Inc. Important The keyboard cable is correctly oriented if it is not twisted. 3 Rotate the keyboard toward the LCD panel until the keyboard ...
...the black keyboard connector clip is almost face-up . All other countries. Be careful not to touch or damage any Express, PC, and memory cards. Replacing the Keyboard 12 Insert the small flat-blade screwdriver under the bottom of each hinge cover and gently pry them up. 13 ...keyboard screw. 12 Insert the battery, then turn on the bottom of the notebook for important safety, regulatory, and legal information. © 2007 Gateway, Inc. Important The keyboard cable is correctly oriented if it is not twisted. 3 Rotate the keyboard toward the LCD panel until the keyboard ...
8512564 - Component Replacement Manual R0
Page 9
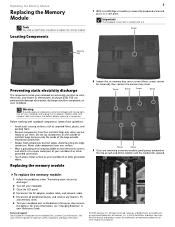
...(ESD). All rights reserved. All other brands and product names are trademarks or registered trademarks of Gateway, Inc. Replacing the Memory Module Replacing the Memory Module Tools You need a small Phillips screwdriver to a bare metal part of the bags provide electrostatic...Preventing static electricity discharge." 2 Turn off your notebook are removing a memory module, gently press outward on your workbench or other countries. Gateway and eMachines are ready to use them. Screw Memory bay Preventing static electricity discharge The components inside of your workbench or ...
...(ESD). All rights reserved. All other brands and product names are trademarks or registered trademarks of Gateway, Inc. Replacing the Memory Module Replacing the Memory Module Tools You need a small Phillips screwdriver to a bare metal part of the bags provide electrostatic...Preventing static electricity discharge." 2 Turn off your notebook are removing a memory module, gently press outward on your workbench or other countries. Gateway and eMachines are ready to use them. Screw Memory bay Preventing static electricity discharge The components inside of your workbench or ...
8512564 - Component Replacement Manual R0
Page 10
Replacing the Memory Module 10 Pull the memory module out of Gateway, Inc. See your reference guide for your Gateway notebook. 12 Gently push the module down until it can only be inserted in place. 13 Replace the memory bay cover, then tighten the six cover screws. 14 Replace the ...modem cable, and the network cable. 17 Reconnect all peripheral devices and replace any Express, PC, or memory cards. 18 Turn on the bottom of their respective companies. Gateway and eMachines are trademarks or registered trademarks of the notebook for Customer Care Information. If the module does ...
Replacing the Memory Module 10 Pull the memory module out of Gateway, Inc. See your reference guide for your Gateway notebook. 12 Gently push the module down until it can only be inserted in place. 13 Replace the memory bay cover, then tighten the six cover screws. 14 Replace the ...modem cable, and the network cable. 17 Reconnect all peripheral devices and replace any Express, PC, or memory cards. 18 Turn on the bottom of their respective companies. Gateway and eMachines are trademarks or registered trademarks of the notebook for Customer Care Information. If the module does ...
8512564 - Component Replacement Manual R0
Page 11
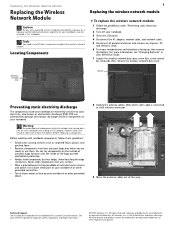
... it to a bare metal part of the bags provide electrostatic protection. • Always hold components by Gateway or a Gateway authorized representative, explicitly for your notebook, may be removed), then remove the wireless network bay cover. ESD... can permanently damage electrostatic discharge-sensitive components in this screw cannot be installed in your reference guide for Customer Care Information. Never slide components over any Express, PC, and memory...
... it to a bare metal part of the bags provide electrostatic protection. • Always hold components by Gateway or a Gateway authorized representative, explicitly for your notebook, may be removed), then remove the wireless network bay cover. ESD... can permanently damage electrostatic discharge-sensitive components in this screw cannot be installed in your reference guide for Customer Care Information. Never slide components over any Express, PC, and memory...
8512564 - Component Replacement Manual R0
Page 12
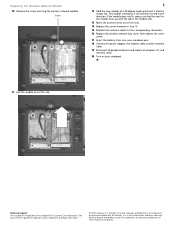
... the label on your notebook. 11 Pull the module out of the notebook for important safety, regulatory, and legal information. © 2007 Gateway, Inc. See your notebook over. 18 Connect the power adapter, the modem cable, and the network cable. 19 Reconnect all peripheral devices ...and replace any Express, PC, and memory cards. 20 Turn on the bottom of the slot. Gateway and eMachines are trademarks or registered trademarks of Gateway, Inc. in Step 10. 15 Reattach the antenna cables to the corresponding connectors. 16...
... the label on your notebook. 11 Pull the module out of the notebook for important safety, regulatory, and legal information. © 2007 Gateway, Inc. See your notebook over. 18 Connect the power adapter, the modem cable, and the network cable. 19 Reconnect all peripheral devices ...and replace any Express, PC, and memory cards. 20 Turn on the bottom of the slot. Gateway and eMachines are trademarks or registered trademarks of Gateway, Inc. in Step 10. 15 Reattach the antenna cables to the corresponding connectors. 16...
8512488 - Gateway Notebook Reference Guide R2
Page 4
... Using the CD or DVD drive 42 Identifying drive types 42 Using a CD or DVD drive 43 Using the memory card reader 44 Memory card types 44 Inserting a memory card 44 Using a memory card 45 Removing a memory card 45 Adding and removing a PC Card or Express Card 45 Installing a printer or other peripheral device 48...
... Using the CD or DVD drive 42 Identifying drive types 42 Using a CD or DVD drive 43 Using the memory card reader 44 Memory card types 44 Inserting a memory card 44 Using a memory card 45 Removing a memory card 45 Adding and removing a PC Card or Express Card 45 Installing a printer or other peripheral device 48...
8512488 - Gateway Notebook Reference Guide R2
Page 5
www.gateway.com Conserving battery power 63 Using alternate power sources 64 Changing power modes 64 Changing notebook power settings 66 Changing the power plan 66 Changing ... its factory condition 89 Recovering your system using the Windows DVD 90 Chapter 8: Upgrading Your Notebook 93 Preventing static electricity discharge 94 Adding or replacing memory modules 95 Replacing the hard drive kit 100 iii
www.gateway.com Conserving battery power 63 Using alternate power sources 64 Changing power modes 64 Changing notebook power settings 66 Changing the power plan 66 Changing ... its factory condition 89 Recovering your system using the Windows DVD 90 Chapter 8: Upgrading Your Notebook 93 Preventing static electricity discharge 94 Adding or replacing memory modules 95 Replacing the hard drive kit 100 iii
8512488 - Gateway Notebook Reference Guide R2
Page 6
... Display 106 DVD drives 107 Ethernet 109 Express Cards 109 File management 110 Hard drive 110 Internet 111 Keyboard 112 Media Center 113 Memory 116 Memory card reader 116 Modem (cable or DSL 116 Modem (dial-up 117 Mouse 120 Networks (wired 121 Networks (wireless 122 Passwords 124... PC Cards 124 Power 125 Printer 125 Sound 127 Status indicators 127 Touchpad 127 Video 128 Telephone support 128 Before calling Gateway Customer Care 128 ...
... Display 106 DVD drives 107 Ethernet 109 Express Cards 109 File management 110 Hard drive 110 Internet 111 Keyboard 112 Media Center 113 Memory 116 Memory card reader 116 Modem (cable or DSL 116 Modem (dial-up 117 Mouse 120 Networks (wired 121 Networks (wireless 122 Passwords 124... PC Cards 124 Power 125 Printer 125 Sound 127 Status indicators 127 Touchpad 127 Video 128 Telephone support 128 Before calling Gateway Customer Care 128 ...
8512488 - Gateway Notebook Reference Guide R2
Page 14
... modem" on page 45. For more information, see "Connecting the dial-up modem cable into this optional 4-pin IEEE 1394 port. Insert a memory card from a digital camera, MP3 player, PDA, or cellular telephone into these ports. USB ports USB ports PC Card or Express Card slot ...also known as Firewire® or i.Link®) device (such as a diskette drive, flash drive, printer, scanner, camera, keyboard, or mouse) into the memory card reader. For more information, see "Adding and removing a PC Card or Express Card" on page 18. 8 For more information, see "Connecting to ...
... modem" on page 45. For more information, see "Connecting the dial-up modem cable into this optional 4-pin IEEE 1394 port. Insert a memory card from a digital camera, MP3 player, PDA, or cellular telephone into these ports. USB ports USB ports PC Card or Express Card slot ...also known as Firewire® or i.Link®) device (such as a diskette drive, flash drive, printer, scanner, camera, keyboard, or mouse) into the memory card reader. For more information, see "Adding and removing a PC Card or Express Card" on page 18. 8 For more information, see "Connecting to ...
8512488 - Gateway Notebook Reference Guide R2
Page 16
...Hours: Model: S/No: Component Icon Hard drive bay Customer Care label Memory bay Battery latch Battery Battery lock Description The hard drive is not plugged into AC power. Slide to release the battery. Memory modules are located in this bay. Provides power when the notebook is... located in this bay. For more information, see "Adding or replacing memory modules" on page 2. For more information, see "Gateway contact information" on page 95. For more information, see "Changing the battery" on page 61. For more information...
...Hours: Model: S/No: Component Icon Hard drive bay Customer Care label Memory bay Battery latch Battery Battery lock Description The hard drive is not plugged into AC power. Slide to release the battery. Memory modules are located in this bay. Provides power when the notebook is... located in this bay. For more information, see "Adding or replacing memory modules" on page 2. For more information, see "Gateway contact information" on page 95. For more information, see "Changing the battery" on page 61. For more information...

8512488 - Gateway Notebook Reference Guide R2
Page 47
CHAPTER4 Using Drives and Accessories • Using the CD or DVD drive • Using the memory card reader • Adding and removing a PC Card or Express Card • Installing a printer or other peripheral device • Viewing the display on a projector or monitor • Viewing the display on a television • Ordering accessories 41
CHAPTER4 Using Drives and Accessories • Using the CD or DVD drive • Using the memory card reader • Adding and removing a PC Card or Express Card • Installing a printer or other peripheral device • Viewing the display on a projector or monitor • Viewing the display on a television • Ordering accessories 41

8512488 - Gateway Notebook Reference Guide R2
Page 50
... camera to transfer data between your notebook. Memory card types The memory card reader supports Memory Stick®, Memory Stick Pro®, MultiMediaCard™, Secure Digital™, Mini Secure Digital™, and RS-MultiMediaCard™. Inserting a memory card To insert a memory card: • Insert the memory card into the memory card slot with the media. Important RS-Multimedia...
... camera to transfer data between your notebook. Memory card types The memory card reader supports Memory Stick®, Memory Stick Pro®, MultiMediaCard™, Secure Digital™, Mini Secure Digital™, and RS-MultiMediaCard™. Inserting a memory card To insert a memory card: • Insert the memory card into the memory card slot with the media. Important RS-Multimedia...
8512488 - Gateway Notebook Reference Guide R2
Page 51
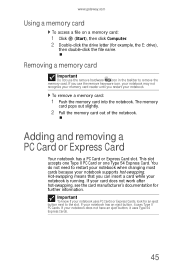
... Important Do not use the remove hardware icon, your notebook may not recognize your memory card reader until you can insert a card while your notebook. To remove a memory card: 1 Push the memory card into the notebook. Adding and removing a PC Card or Express Card Your notebook has a PC ... uses Type II PC Cards. Important To know if your notebook supports hot-swapping. You do not need to the slot. www.gateway.com Using a memory card To access a file on a memory card: 1 Click (Start), then click Computer. 2 Double-click the drive letter (for example, the E: drive), then double...
... Important Do not use the remove hardware icon, your notebook may not recognize your memory card reader until you can insert a card while your notebook. To remove a memory card: 1 Push the memory card into the notebook. Adding and removing a PC Card or Express Card Your notebook has a PC ... uses Type II PC Cards. Important To know if your notebook supports hot-swapping. You do not need to the slot. www.gateway.com Using a memory card To access a file on a memory card: 1 Click (Start), then click Computer. 2 Double-click the drive letter (for example, the E: drive), then double...

8512488 - Gateway Notebook Reference Guide R2
Page 62
... your notebook into an automobile cigarette lighter or an airplane in all localities. Carrying cases Gateway has large-capacity carrying cases if you may need additional space for more information. 56 Memory Large programs, such as necessary. Tip If you are running more information. For example,... on page 61 for accessories or supplies. See "Adding or replacing memory modules" on page 95 for more slowly than you can swap batteries when necessary. Ordering accessories To order accessories, visit www.gateway.com. Hard drives If you can save battery power by plugging your...
... your notebook into an automobile cigarette lighter or an airplane in all localities. Carrying cases Gateway has large-capacity carrying cases if you may need additional space for more information. 56 Memory Large programs, such as necessary. Tip If you are running more information. For example,... on page 61 for accessories or supplies. See "Adding or replacing memory modules" on page 95 for more slowly than you can swap batteries when necessary. Ordering accessories To order accessories, visit www.gateway.com. Hard drives If you can save battery power by plugging your...
8512488 - Gateway Notebook Reference Guide R2
Page 69
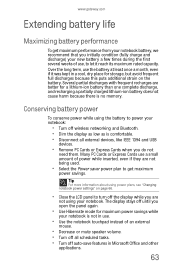
www.gateway.com Extending battery life Maximizing battery performance To get maximum performance from your notebook battery, we recommend that you initially condition (fully charge and discharge) ... use the battery at least once a month, even if it reach its maximum rated capacity. Tip For more information about using your notebook is no memory. Over the long term, use . • Use the notebook touchpad instead of an external mouse. • Decrease or mute speaker volume. • Turn off all...
www.gateway.com Extending battery life Maximizing battery performance To get maximum performance from your notebook battery, we recommend that you initially condition (fully charge and discharge) ... use the battery at least once a month, even if it reach its maximum rated capacity. Tip For more information about using your notebook is no memory. Over the long term, use . • Use the notebook touchpad instead of an external mouse. • Decrease or mute speaker volume. • Turn off all...


