8512564 - Component Replacement Manual R0
Page 7
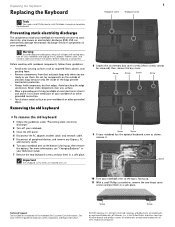
... under "Preventing static electricity discharge." 2 Turn off your reference guide for Customer Care Information. All rights reserved. in a safe place. Gateway and eMachines are marked with notebook components, follow these screws cannot be removed), then remove the bay cover. Screw Screw Screw Screw Screw Screw...memory cards. 6 Turn your notebook over so the top is facing up . 11 With a small Phillips screwdriver, remove the two hinge cover screws and put them in your Reference Guide. 7 Remove the two keyboard screws and put them in the United States and other...
... under "Preventing static electricity discharge." 2 Turn off your reference guide for Customer Care Information. All rights reserved. in a safe place. Gateway and eMachines are marked with notebook components, follow these screws cannot be removed), then remove the bay cover. Screw Screw Screw Screw Screw Screw...memory cards. 6 Turn your notebook over so the top is facing up . 11 With a small Phillips screwdriver, remove the two hinge cover screws and put them in your Reference Guide. 7 Remove the two keyboard screws and put them in the United States and other...
8512564 - Component Replacement Manual R0
Page 8
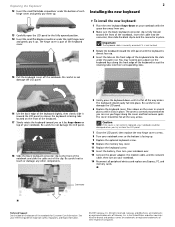
...Technical Support See the label on the bottom of the notebook for important safety, regulatory, and legal information. © 2007 Gateway, Inc. All rights reserved. The hinge cover is facing up. 9 Replace the optional keyboard screw. 10 Replace the memory bay cover. 11 Replace the keyboard screw...13 Connect the power adapter, the modem cable, and the network cable, then turn on your reference guide for Customer Care Information. Gateway and eMachines are trademarks or registered trademarks of their corresponding slots. 15 Pull the keyboard cover off the notebook. Replacing the Keyboard ...
...Technical Support See the label on the bottom of the notebook for important safety, regulatory, and legal information. © 2007 Gateway, Inc. All rights reserved. The hinge cover is facing up. 9 Replace the optional keyboard screw. 10 Replace the memory bay cover. 11 Replace the keyboard screw...13 Connect the power adapter, the modem cable, and the network cable, then turn on your reference guide for Customer Care Information. Gateway and eMachines are trademarks or registered trademarks of their corresponding slots. 15 Pull the keyboard cover off the notebook. Replacing the Keyboard ...

