8511725 - Gateway Service Guide
Page 25
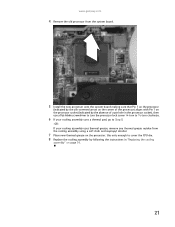
www.gateway.com 4 Remove the old processor from the system board. 5 Install the new processor onto the system board making sure that Pin 1 on the processor (indicated by the silk-screened arrow on the corner of the processor) aligns with Pin 1 on the processor socket (indicated by following the instructions in the processor...
www.gateway.com 4 Remove the old processor from the system board. 5 Install the new processor onto the system board making sure that Pin 1 on the processor (indicated by the silk-screened arrow on the corner of the processor) aligns with Pin 1 on the processor socket (indicated by following the instructions in the processor...

8512055 - Component Replacement Manual
Page 6
...Technical Support See the label on your notebook. 16 If the hard drive was sent to you from Gateway with the operating system, applications, and drivers installed, you will see a blank screen, insert the Windows DVD into your notebook, then replace the cover screws. 13 Insert the battery and...Screws Screws 9 Remove the cover from the old drive. If you see the Windows startup screen. Go to Step 20. -OR- All other countries. See your Reference Guide for Customer Care Information. A list of Gateway, Inc. 8 Remove the four screws that secure the cover to the drive. 12 Slide...
...Technical Support See the label on your notebook. 16 If the hard drive was sent to you from Gateway with the operating system, applications, and drivers installed, you will see a blank screen, insert the Windows DVD into your notebook, then replace the cover screws. 13 Insert the battery and...Screws Screws 9 Remove the cover from the old drive. If you see the Windows startup screen. Go to Step 20. -OR- All other countries. See your Reference Guide for Customer Care Information. A list of Gateway, Inc. 8 Remove the four screws that secure the cover to the drive. 12 Slide...
8512488 - Gateway Notebook Reference Guide R2
Page 5
www.gateway.com Conserving battery power 63 Using alternate power sources 64 Changing power modes 64 Changing notebook power settings 66 Changing the power plan 66 Changing ... Chapter 7: Maintaining Your Notebook . . . . . 75 Caring for your notebook 76 Cleaning your notebook 76 Cleaning the exterior 77 Cleaning the keyboard 77 Cleaning the notebook screen 77 Maintaining the battery 78 Storing batteries 78 Cleaning CDs or DVDs 79 Recovering your system 79 Recovering pre-installed software and drivers 80 Using...
www.gateway.com Conserving battery power 63 Using alternate power sources 64 Changing power modes 64 Changing notebook power settings 66 Changing the power plan 66 Changing ... Chapter 7: Maintaining Your Notebook . . . . . 75 Caring for your notebook 76 Cleaning your notebook 76 Cleaning the exterior 77 Cleaning the keyboard 77 Cleaning the notebook screen 77 Maintaining the battery 78 Storing batteries 78 Cleaning CDs or DVDs 79 Recovering your system 79 Recovering pre-installed software and drivers 80 Using...
8512488 - Gateway Notebook Reference Guide R2
Page 20
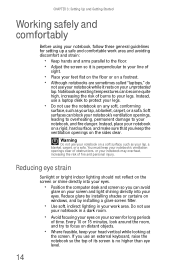
... a rigid, hard surface, and make sure that you keep the ventilation openings on any soft, conforming surface, such as your screen for setting up a safe and comfortable work area. Notebook operating temperatures can block your notebook's ventilation openings, leading to overheating, ...permanent damage to your notebook, and fire danger. Reduce glare by installing a glare screen filter. • Use soft, indirect lighting in a dark room. • Avoid focusing your eyes on distant objects. • Where feasible...
... a rigid, hard surface, and make sure that you keep the ventilation openings on any soft, conforming surface, such as your screen for setting up a safe and comfortable work area. Notebook operating temperatures can block your notebook's ventilation openings, leading to overheating, ...permanent damage to your notebook, and fire danger. Reduce glare by installing a glare screen filter. • Use soft, indirect lighting in a dark room. • Avoid focusing your eyes on distant objects. • Where feasible...

8512488 - Gateway Notebook Reference Guide R2
Page 26
... page 48. CHAPTER 3: Setting Up and Getting Started Starting your notebook Warning Do not work with each device for the first time, follow the on-screen instructions to select the language and time zone and to harm your notebook, then lift the LCD panel. 2 Press the power button located above the...
... page 48. CHAPTER 3: Setting Up and Getting Started Starting your notebook Warning Do not work with each device for the first time, follow the on-screen instructions to select the language and time zone and to harm your notebook, then lift the LCD panel. 2 Press the power button located above the...
8512488 - Gateway Notebook Reference Guide R2
Page 35
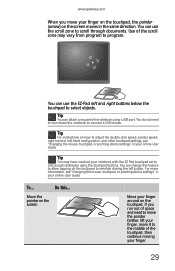
...If you move it to move the pointer farther, lift your finger, move your finger around on the touchpad. Tip You can change this ... www.gateway.com When you run out of the scroll zone may have received your online User Guide. You can attach a mouse to simulate clicking the left... button. Do this feature to allow tapping on the screen moves in your notebook with the EZ Pad touchpad set to scroll through documents. Move your finger on the touchpad, the pointer (arrow) on ...
...If you move it to move the pointer farther, lift your finger, move your finger around on the touchpad. Tip You can change this ... www.gateway.com When you run out of the scroll zone may have received your online User Guide. You can attach a mouse to simulate clicking the left... button. Do this feature to allow tapping on the screen moves in your notebook with the EZ Pad touchpad set to scroll through documents. Move your finger on the touchpad, the pointer (arrow) on ...

8512488 - Gateway Notebook Reference Guide R2
Page 36
...object. Quickly press and release the right button once. Position the pointer over the object. Release the button to the appropriate part of the screen. Start a program or open a file or folder. This action is called clicking. Press the left button once. Do this... Select an object... on the screen. Quickly press and release the left button twice in rapid succession. CHAPTER 3: Setting Up and Getting Started To... This action is called right-...
...object. Quickly press and release the right button once. Position the pointer over the object. Release the button to the appropriate part of the screen. Start a program or open a file or folder. This action is called clicking. Press the left button once. Do this... Select an object... on the screen. Quickly press and release the left button twice in rapid succession. CHAPTER 3: Setting Up and Getting Started To... This action is called right-...

8512488 - Gateway Notebook Reference Guide R2
Page 39
...Turns on the taskbar, then click Show Toolbar. Move your picture. www.gateway.com To use the webcam: 1 Click (Start), All Programs, Camera Assistant Software, then click Camera Assistant Software. Opens online help. Selects the position of the screen until the toolbar appears. 33 The Camera Assistant Toolbar opens. Modifies properties... the picture, video, or audio settings. The Camera Assistant Toolbar opens. -ORRight-click (Camera assistant software) on the camera and opens the preview screen. Important If you do not see the toolbar, the Auto Hide setting may be turned on.
...Turns on the taskbar, then click Show Toolbar. Move your picture. www.gateway.com To use the webcam: 1 Click (Start), All Programs, Camera Assistant Software, then click Camera Assistant Software. Opens online help. Selects the position of the screen until the toolbar appears. 33 The Camera Assistant Toolbar opens. Modifies properties... the picture, video, or audio settings. The Camera Assistant Toolbar opens. -ORRight-click (Camera assistant software) on the camera and opens the preview screen. Important If you do not see the toolbar, the Auto Hide setting may be turned on.

8512488 - Gateway Notebook Reference Guide R2
Page 40
Create a video recording. Change the size of what is currently in the preview screen. Audio recording Create an audio recording. Turn audio capture on or off. Add a decoration or border to your picture. 34 The Camera Assistant opens. 3 Click one of the following: Button Icon Snapshot Video recording Description Take a picture of the picture. CHAPTER 3: Setting Up and Getting Started 2 Click (Start camera). Functions Resolution Mute Effects Change a setting or access online help.
Create a video recording. Change the size of what is currently in the preview screen. Audio recording Create an audio recording. Turn audio capture on or off. Add a decoration or border to your picture. 34 The Camera Assistant opens. 3 Click one of the following: Button Icon Snapshot Video recording Description Take a picture of the picture. CHAPTER 3: Setting Up and Getting Started 2 Click (Start camera). Functions Resolution Mute Effects Change a setting or access online help.

8512488 - Gateway Notebook Reference Guide R2
Page 41
For more information, see "System key combinations" on the keyboard. Adjusting the brightness To adjust screen brightness: • Use the increase brightness and decrease brightness keys on page 26. -ORClick (Start), All Programs, Accessories, then click Windows Mobility Center... in the Camera Assistant Toolbar or click (Functions), then click Help in your online User Guide. 35 Slide the Brightness control to the desired screen brightness. The Windows Mobility Center window opens. Tip For more information about the Windows Mobility Center, see "Using the Windows Mobility Center" in ...
For more information, see "System key combinations" on the keyboard. Adjusting the brightness To adjust screen brightness: • Use the increase brightness and decrease brightness keys on page 26. -ORClick (Start), All Programs, Accessories, then click Windows Mobility Center... in the Camera Assistant Toolbar or click (Functions), then click Help in your online User Guide. 35 Slide the Brightness control to the desired screen brightness. The Windows Mobility Center window opens. Tip For more information about the Windows Mobility Center, see "Using the Windows Mobility Center" in ...
8512488 - Gateway Notebook Reference Guide R2
Page 59
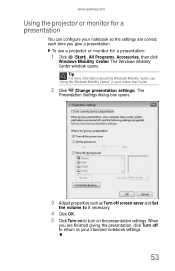
... settings. Tip For more information about the Windows Mobility Center, see "Using the Windows Mobility Center" in your standard notebook settings. 53 www.gateway.com Using the projector or monitor for a presentation: 1 Click (Start), All Programs, Accessories, then click Windows Mobility Center. When you are... a projector or monitor for a presentation You can configure your notebook so the settings are finished giving the presentation, click Turn off screen saver and Set the volume to if necessary. 4 Click OK. 5 Click Turn on to your online User Guide. 2 Click (Change presentation ...
... settings. Tip For more information about the Windows Mobility Center, see "Using the Windows Mobility Center" in your standard notebook settings. 53 www.gateway.com Using the projector or monitor for a presentation: 1 Click (Start), All Programs, Accessories, then click Windows Mobility Center. When you are... a projector or monitor for a presentation You can configure your notebook so the settings are finished giving the presentation, click Turn off screen saver and Set the volume to if necessary. 4 Click OK. 5 Click Turn on to your online User Guide. 2 Click (Change presentation ...

8512488 - Gateway Notebook Reference Guide R2
Page 60
... a VCR will be scrambled by default, connect the television (or other end of headphones or external powered speakers, or connect your notebook display on a television screen using the headphone jack to hear sound while playing a DVD.
... a VCR will be scrambled by default, connect the television (or other end of headphones or external powered speakers, or connect your notebook display on a television screen using the headphone jack to hear sound while playing a DVD.

8512488 - Gateway Notebook Reference Guide R2
Page 68
... your notebook over again. Important If, after completing this procedure, the battery charge indicator still does not show an accurate charge, contact Gateway Customer Care at the location shown on page 2. 62 The entire process takes several hours. If recalibration is not low, you may ... If your notebook unexpectedly goes into Sleep mode while you are using it starts and you see "Gateway contact information" on the Customer Care label. The battery recalibration process begins and a screen opens showing you must start the process over . 8 Open the LCD panel. CHAPTER 5: Managing ...
... your notebook over again. Important If, after completing this procedure, the battery charge indicator still does not show an accurate charge, contact Gateway Customer Care at the location shown on page 2. 62 The entire process takes several hours. If recalibration is not low, you may ... If your notebook unexpectedly goes into Sleep mode while you are using it starts and you see "Gateway contact information" on the Customer Care label. The battery recalibration process begins and a screen opens showing you must start the process over . 8 Open the LCD panel. CHAPTER 5: Managing ...

8512488 - Gateway Notebook Reference Guide R2
Page 74
... CHAPTER 5: Managing Power 2 Click (Change power settings). The top three settings are using. The Change settings for On battery and Plugged in front of the screen that you are not tied to a power plan. Help For more information about hybrid sleep, click Start, then click Help and Support. Type the keyword...
... CHAPTER 5: Managing Power 2 Click (Change power settings). The top three settings are using. The Change settings for On battery and Plugged in front of the screen that you are not tied to a power plan. Help For more information about hybrid sleep, click Start, then click Help and Support. Type the keyword...

8512488 - Gateway Notebook Reference Guide R2
Page 78
.... 3 Highlight Set User Password, then press ENTER and follow the instructions. If you forget your password, you must set the supervisor password in order to Gateway for service. Caution Use a password that you can remember, but that is set the user (startup) password. You do not need to guess. The ...Whoever sits next to claim your notebook as soon as you see your notebook display. Be ready to you or behind you can see a startup screen, press F2. Avoid working with confidential files until you can be sure of theft or loss, and keep your notebook with you while waiting in...
.... 3 Highlight Set User Password, then press ENTER and follow the instructions. If you forget your password, you must set the supervisor password in order to Gateway for service. Caution Use a password that you can remember, but that is set the user (startup) password. You do not need to guess. The ...Whoever sits next to claim your notebook as soon as you see your notebook display. Be ready to you or behind you can see a startup screen, press F2. Avoid working with confidential files until you can be sure of theft or loss, and keep your notebook with you while waiting in...
8512488 - Gateway Notebook Reference Guide R2
Page 83
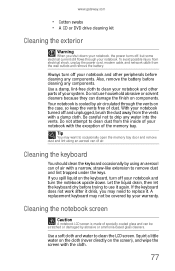
...remove the battery. Your notebook is made of specially coated glass and can of your notebook with the cloth. 77 Cleaning the notebook screen Caution A notebook LCD screen is cooled by your notebook and turn off , but some electrical current still flows through the vents on components. Also, remove ... the keyboard does not work after it again. Let the liquid drain, then let the keyboard dry before cleaning any water into the vents. www.gateway.com • Cotton swabs • A CD or DVD drive cleaning kit Cleaning the exterior Warning When you shut down . Do not use it...
...remove the battery. Your notebook is made of specially coated glass and can of your notebook with the cloth. 77 Cleaning the notebook screen Caution A notebook LCD screen is cooled by your notebook and turn off , but some electrical current still flows through the vents on components. Also, remove ... the keyboard does not work after it again. Let the liquid drain, then let the keyboard dry before cleaning any water into the vents. www.gateway.com • Cotton swabs • A CD or DVD drive cleaning kit Cleaning the exterior Warning When you shut down . Do not use it...
8512488 - Gateway Notebook Reference Guide R2
Page 95
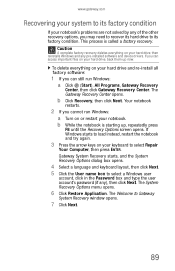
...Click Recovery, then click Next. Your notebook restarts. 2 If you cannot run Windows: a Click (Start), All Programs, Gateway Recovery Center, then click Gateway Recovery Center. To delete everything on or restart your notebook. b While the notebook is called a factory recovery. If Windows...important files on your hard drive, back them up , repeatedly press F8 until the Recovery Options screen opens. The System Recovery Options menu opens. 6 Click Restore Application. Gateway System Recovery starts, and the System Recovery Options dialog box opens. 4 Select a language and keyboard...
...Click Recovery, then click Next. Your notebook restarts. 2 If you cannot run Windows: a Click (Start), All Programs, Gateway Recovery Center, then click Gateway Recovery Center. To delete everything on or restart your notebook. b While the notebook is called a factory recovery. If Windows...important files on your hard drive, back them up , repeatedly press F8 until the Recovery Options screen opens. The System Recovery Options menu opens. 6 Click Restore Application. Gateway System Recovery starts, and the System Recovery Options dialog box opens. 4 Select a language and keyboard...

8512488 - Gateway Notebook Reference Guide R2
Page 97
A list of valid boot devices appears. 4 Press the arrow keys to select the drive containing the Windows DVD, then press ENTER and follow the on-screen instructions. 5 After Windows is completely re-installed, use the software and driver recovery discs you created to boot from CD or DVD" appears, press any key on page 84. 91 For instructions, see "Recovering pre-installed software and drivers using recovery discs" on your notebook's pre-installed software and device drivers. www.gateway.com 3 When the prompt "Press any key to recover your keyboard.
A list of valid boot devices appears. 4 Press the arrow keys to select the drive containing the Windows DVD, then press ENTER and follow the on-screen instructions. 5 After Windows is completely re-installed, use the software and driver recovery discs you created to boot from CD or DVD" appears, press any key on page 84. 91 For instructions, see "Recovering pre-installed software and drivers using recovery discs" on your notebook's pre-installed software and device drivers. www.gateway.com 3 When the prompt "Press any key to recover your keyboard.
8512488 - Gateway Notebook Reference Guide R2
Page 108
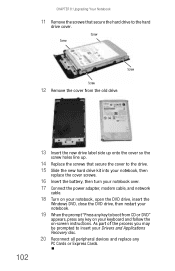
As part of the process you may be prompted to insert your keyboard and follow the on-screen instructions. CHAPTER 8: Upgrading Your Notebook 11 Remove the screws that secure the cover to the drive. 15 Slide the new hard drive kit into your ...
As part of the process you may be prompted to insert your keyboard and follow the on-screen instructions. CHAPTER 8: Upgrading Your Notebook 11 Remove the screws that secure the cover to the drive. 15 Slide the new hard drive kit into your ...
8512488 - Gateway Notebook Reference Guide R2
Page 111
... drive (external) The diskette drive is not recognized • Shut down and restart your hard drive is covered under "DVD drives" on the screen, write down the exact message. Troubleshooting Troubleshooting topics are secure. • Make sure that your notebook. • Disconnect the USB cable, then... reconnect it. 105 www.gateway.com • If the notebook will not turn on, try turning it on with the notebook plugged in and the battery removed, then ...
... drive (external) The diskette drive is not recognized • Shut down and restart your hard drive is covered under "DVD drives" on the screen, write down the exact message. Troubleshooting Troubleshooting topics are secure. • Make sure that your notebook. • Disconnect the USB cable, then... reconnect it. 105 www.gateway.com • If the notebook will not turn on, try turning it on with the notebook plugged in and the battery removed, then ...


