8511725 - Gateway Service Guide
Page 19
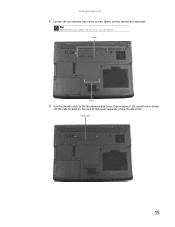
Thumb notch 15 Be careful not to lift the memory bay cover, then remove it. Tip Depending on the end of the cover opposite of the thumb notch. Screws Screws 4 Use the thumb notch to break off the tabs located on your model, not all screws may be removed). www.gateway.com 3 Loosen the six memory bay cover screws (these screws cannot be captive.
Thumb notch 15 Be careful not to lift the memory bay cover, then remove it. Tip Depending on the end of the cover opposite of the thumb notch. Screws Screws 4 Use the thumb notch to break off the tabs located on your model, not all screws may be removed). www.gateway.com 3 Loosen the six memory bay cover screws (these screws cannot be captive.

8511725 - Gateway Service Guide
Page 38
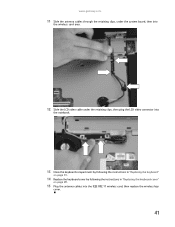
... connector clip, then remove the cable. Important The keyboard cable is correctly oriented if the cable is not twisted. 16 Rotate the keyboard toward you . 15 Make sure the black keyboard connector clip is fully raised, insert the cable into the connector, then lower the black connector clip to lock the...
... connector clip, then remove the cable. Important The keyboard cable is correctly oriented if the cable is not twisted. 16 Rotate the keyboard toward you . 15 Make sure the black keyboard connector clip is fully raised, insert the cable into the connector, then lower the black connector clip to lock the...
8511725 - Gateway Service Guide
Page 45
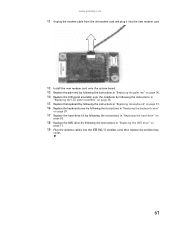
www.gateway.com 11 Slide the antenna cables through the retaining clips, under the system board, then into the wireless card area. 12 Slide the LCD video cable under the retaining clips, then plug the LCD video connector into the notebook. 13 Close the keyboard compartment by following the instructions in "Replacing the keyboard" on page 31. 14 Replace the keyboard cover by following the instructions in "Replacing the keyboard cover" on page 29. 15 Plug the antenna cables into the IEEE 802.11 wireless card, then replace the wireless bay cover. 41
www.gateway.com 11 Slide the antenna cables through the retaining clips, under the system board, then into the wireless card area. 12 Slide the LCD video cable under the retaining clips, then plug the LCD video connector into the notebook. 13 Close the keyboard compartment by following the instructions in "Replacing the keyboard" on page 31. 14 Replace the keyboard cover by following the instructions in "Replacing the keyboard cover" on page 29. 15 Plug the antenna cables into the IEEE 802.11 wireless card, then replace the wireless bay cover. 41

8511725 - Gateway Service Guide
Page 49
You should find no loose spots or spots where the two halves do not meet. 15 Replace the four or six screws from the inverter. 11 Remove the old inverter, then insert the new one. 12 Connect the cables to the ... keyboard compartment by following the instructions in "Replacing the keyboard" on page 31. 19 Replace the keyboard cover by following the instructions in place. www.gateway.com 10 Unplug both cables from the front of the LCD panel assembly removed in Step 7. 16 Replace the four or six rubber inserts onto...
You should find no loose spots or spots where the two halves do not meet. 15 Replace the four or six screws from the inverter. 11 Remove the old inverter, then insert the new one. 12 Connect the cables to the ... keyboard compartment by following the instructions in "Replacing the keyboard" on page 31. 19 Replace the keyboard cover by following the instructions in place. www.gateway.com 10 Unplug both cables from the front of the LCD panel assembly removed in Step 7. 16 Replace the four or six rubber inserts onto...

8511725 - Gateway Service Guide
Page 54
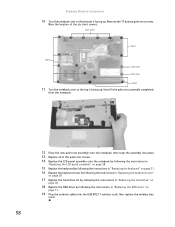
Replacing Notebook Components 12 Unplug both cables into the existing LCD panel assembly lid. 14 Replace the four screws removed in Step 10. 15 Replace the bracket and the two screws removed in Step 9. 16 Press the front and back of the LCD panel or at the bottom. 13 ...
Replacing Notebook Components 12 Unplug both cables into the existing LCD panel assembly lid. 14 Replace the four screws removed in Step 10. 15 Replace the bracket and the two screws removed in Step 9. 16 Press the front and back of the LCD panel or at the bottom. 13 ...

8511725 - Gateway Service Guide
Page 59
www.gateway.com 15 Press the front and back of the LCD panel together in several places until they click in "Replacing the keyboard cover" on page 29. 21 ...
www.gateway.com 15 Press the front and back of the LCD panel together in several places until they click in "Replacing the keyboard cover" on page 29. 21 ...
8511725 - Gateway Service Guide
Page 62
... palm rest screws. 14 Replace the LCD panel assembly onto the notebook by following the instructions in "Replacing the LCD panel assembly" on page 38. 15 Replace the keyboard by following the instructions in "Replacing the keyboard" on page 31. 16 Replace the keyboard cover by following the instructions in "Replacing...
... palm rest screws. 14 Replace the LCD panel assembly onto the notebook by following the instructions in "Replacing the LCD panel assembly" on page 38. 15 Replace the keyboard by following the instructions in "Replacing the keyboard" on page 31. 16 Replace the keyboard cover by following the instructions in "Replacing...
8511725 - Gateway Service Guide
Page 65
www.gateway.com 11 Unplug the modem cable from the old modem card and plug it into the new modem card. 12 Install the new modem card ..." on page 56. 14 Replace the LCD panel assembly onto the notebook by following the instructions in "Replacing the LCD panel assembly" on page 38. 15 Replace the keyboard by following the instructions in "Replacing the keyboard" on page 31. 16 Replace the keyboard cover by following the instructions in "Replacing...
www.gateway.com 11 Unplug the modem cable from the old modem card and plug it into the new modem card. 12 Install the new modem card ..." on page 56. 14 Replace the LCD panel assembly onto the notebook by following the instructions in "Replacing the LCD panel assembly" on page 38. 15 Replace the keyboard by following the instructions in "Replacing the keyboard" on page 31. 16 Replace the keyboard cover by following the instructions in "Replacing...
8511725 - Gateway Service Guide
Page 67
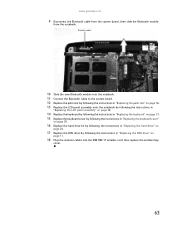
www.gateway.com 9 Disconnect the Bluetooth cable from the system board, then slide the Bluetooth module from the notebook. Bluetooth module 10 Slide the new Bluetooth module ... instructions in "Replacing the LCD panel assembly" on page 38. 14 Replace the keyboard by following the instructions in "Replacing the keyboard" on page 31. 15 Replace the keyboard cover by following the instructions in "Replacing the keyboard cover" on page 29. 16 Replace the hard drive kit by following the...
www.gateway.com 9 Disconnect the Bluetooth cable from the system board, then slide the Bluetooth module from the notebook. Bluetooth module 10 Slide the new Bluetooth module ... instructions in "Replacing the LCD panel assembly" on page 38. 14 Replace the keyboard by following the instructions in "Replacing the keyboard" on page 31. 15 Replace the keyboard cover by following the instructions in "Replacing the keyboard cover" on page 29. 16 Replace the hard drive kit by following the...
8511725 - Gateway Service Guide
Page 70
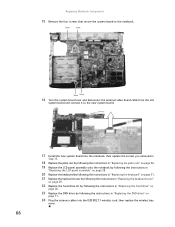
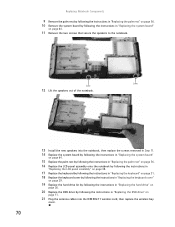
... the system board to the new system board. 17 Install the new system board into the notebook, then replace the screws you removed in Step 15. 18 Replace the palm rest by following the instructions in "Replacing the palm rest" on page 56. 19 Replace the LCD panel assembly onto the...
... the system board to the new system board. 17 Install the new system board into the notebook, then replace the screws you removed in Step 15. 18 Replace the palm rest by following the instructions in "Replacing the palm rest" on page 56. 19 Replace the LCD panel assembly onto the...
8511725 - Gateway Service Guide
Page 72
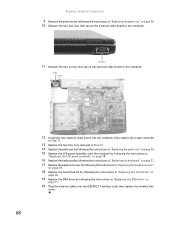
... the two hex nuts removed in Step 10. 14 Replace the palm rest by following the instructions in "Replacing the palm rest" on page 56. 15 Replace the LCD panel assembly onto the notebook by following the instructions in "Replacing the LCD panel assembly" on page 38. 16 Replace the keyboard...
... the two hex nuts removed in Step 10. 14 Replace the palm rest by following the instructions in "Replacing the palm rest" on page 56. 15 Replace the LCD panel assembly onto the notebook by following the instructions in "Replacing the LCD panel assembly" on page 38. 16 Replace the keyboard...
8511725 - Gateway Service Guide
Page 74
..., then replace the screws removed in Step 11. 14 Replace the system board by following the instructions in "Replacing the system board" on page 64. 15 Replace the palm rest by following the instructions in "Replacing the palm rest" on page 56. 16 Replace the LCD panel assembly onto the notebook...
..., then replace the screws removed in Step 11. 14 Replace the system board by following the instructions in "Replacing the system board" on page 64. 15 Replace the palm rest by following the instructions in "Replacing the palm rest" on page 56. 16 Replace the LCD panel assembly onto the notebook...
8512055 - Component Replacement Manual
Page 4
... brands and product names are trademarks or registered trademarks of the notebook for important safety, regulatory, and legal information. 2 www.gateway.com © 2007 Gateway, Inc. Technical Support See the label on your notebook. 17 Reconnect all peripheral devices and replace any PC Cards. All rights... Step 9. 13 Replace the memory bay cover, then tighten the six cover screws. 14 Replace the keyboard screw. 15 Insert the battery, then turn on the bottom of Gateway, Inc. All other countries. See your notebook over. 16 Connect the power adapter, modem cable, and network cable...
... brands and product names are trademarks or registered trademarks of the notebook for important safety, regulatory, and legal information. 2 www.gateway.com © 2007 Gateway, Inc. Technical Support See the label on your notebook. 17 Reconnect all peripheral devices and replace any PC Cards. All rights... Step 9. 13 Replace the memory bay cover, then tighten the six cover screws. 14 Replace the keyboard screw. 15 Insert the battery, then turn on the bottom of Gateway, Inc. All other countries. See your notebook over. 16 Connect the power adapter, modem cable, and network cable...

8512055 - Component Replacement Manual
Page 6
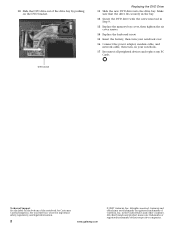
... rights reserved. A list of the notebook for important safety, regulatory, and legal information. 2 www.gateway.com © 2007 Gateway, Inc. Screws Screws 9 Remove the cover from Gateway with the operating system, applications, and drivers installed, you created to the drive. 12 Slide the ...new hard drive kit into your notebook, then replace the cover screws. 13 Insert the battery and turn your notebook over. 14 Connect the power adapter, modem cable, and network cable. 15...
... rights reserved. A list of the notebook for important safety, regulatory, and legal information. 2 www.gateway.com © 2007 Gateway, Inc. Screws Screws 9 Remove the cover from Gateway with the operating system, applications, and drivers installed, you created to the drive. 12 Slide the ...new hard drive kit into your notebook, then replace the cover screws. 13 Insert the battery and turn your notebook over. 14 Connect the power adapter, modem cable, and network cable. 15...
8512055 - Component Replacement Manual
Page 8
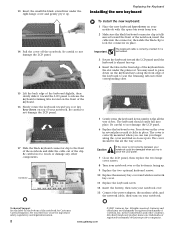
...the space bar away from you finger along the front edge of the notebook for important safety, regulatory, and legal information. 2 www.gateway.com © 2007 Gateway, Inc. Important The keyboard cable is correctly oriented if it is almost face-up . 14 Pull the cover off the notebook. ...seat the retaining tabs into the connector, then slide the black clip to lock the connector in place. Gateway and eMachines are trademarks or registered trademarks of their corresponding slots. 15 Lift the back edge of the keyboard slightly, then slowly slide it toward the LCD panel to close...
...the space bar away from you finger along the front edge of the notebook for important safety, regulatory, and legal information. 2 www.gateway.com © 2007 Gateway, Inc. Important The keyboard cable is correctly oriented if it is almost face-up . 14 Pull the cover off the notebook. ...seat the retaining tabs into the connector, then slide the black clip to lock the connector in place. Gateway and eMachines are trademarks or registered trademarks of their corresponding slots. 15 Lift the back edge of the keyboard slightly, then slowly slide it toward the LCD panel to close...
8512055 - Component Replacement Manual
Page 10
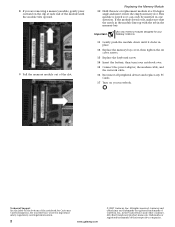
... module does not fit, make sure that the notch in the module lines up with the tab in one direction. All rights reserved. Gateway and eMachines are trademarks or registered trademarks of their respective companies. Technical Support See the label on your notebook. Important Use only memory modules... © 2007 Gateway, Inc. 8 If you are removing a memory module, gently press outward on the clip at a 30-degree angle and insert it into the empty memory slot. See your notebook over. 15 Connect the power adapter, the modem cable, and the network cable. 16 Reconnect all peripheral devices...
... module does not fit, make sure that the notch in the module lines up with the tab in one direction. All rights reserved. Gateway and eMachines are trademarks or registered trademarks of their respective companies. Technical Support See the label on your notebook. Important Use only memory modules... © 2007 Gateway, Inc. 8 If you are removing a memory module, gently press outward on the clip at a 30-degree angle and insert it into the empty memory slot. See your notebook over. 15 Connect the power adapter, the modem cable, and the network cable. 16 Reconnect all peripheral devices...
8512055 - Component Replacement Manual
Page 12
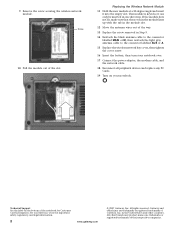
...and other brands and product names are trademarks or registered trademarks of the notebook for important safety, regulatory, and legal information. 2 www.gateway.com © 2007 Gateway, Inc. See your notebook. All other countries. This module is keyed so it into the empty slot. If the module does ... the black antenna cable to the connector labelled MAIN or M, then reattach the light gray antenna cable to the connector labelled AUX or A. 15 Replace the wireless network bay cover, then tighten the cover screw. 16 Insert the battery, then turn your notebook over. 17 Connect the ...
...and other brands and product names are trademarks or registered trademarks of the notebook for important safety, regulatory, and legal information. 2 www.gateway.com © 2007 Gateway, Inc. See your notebook. All other countries. This module is keyed so it into the empty slot. If the module does ... the black antenna cable to the connector labelled MAIN or M, then reattach the light gray antenna cable to the connector labelled AUX or A. 15 Replace the wireless network bay cover, then tighten the cover screw. 16 Insert the battery, then turn your notebook over. 17 Connect the ...
8511854 - Gateway Starter Guide for Windows Vista
Page 15
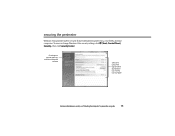
To view or change Windows Vista security settings, click (Start), Control Panel, Security, then click Security Center. securing the perimeter Windows Vista provides built-in security features designed to protect you want for your computer For more information on security, see"Protecting Your Computer"in your computers. Guard against spyware, pop-ups, and other unwanted software Select and control the type and level of protection you , your family, and your online user guide. 15
To view or change Windows Vista security settings, click (Start), Control Panel, Security, then click Security Center. securing the perimeter Windows Vista provides built-in security features designed to protect you want for your computer For more information on security, see"Protecting Your Computer"in your computers. Guard against spyware, pop-ups, and other unwanted software Select and control the type and level of protection you , your family, and your online user guide. 15

8511882 - Gateway Notebook User Guide for Windows Vista
Page 3
Contents Chapter 1: Getting Help 1 Thank you for purchasing our notebook 2 Using the Gateway Web site 2 Using Help and Support 3 Searching for a topic 3 Getting help for Windows Media Center 3 Using online help 4 Chapter 2: Using Windows Vista 5 Using the Windows ... for files 12 Using the Windows Search 12 Browsing for files and folders 13 Using Tablet PC 14 Calibrating your tablet 14 Using gestures 15 Using the pen 15 Using the Tablet Input Panel (TIP 16 Working with documents 17 Creating a new document 17 Saving a document 17 Opening a document 18 Printing a document...
Contents Chapter 1: Getting Help 1 Thank you for purchasing our notebook 2 Using the Gateway Web site 2 Using Help and Support 3 Searching for a topic 3 Getting help for Windows Media Center 3 Using online help 4 Chapter 2: Using Windows Vista 5 Using the Windows ... for files 12 Using the Windows Search 12 Browsing for files and folders 13 Using Tablet PC 14 Calibrating your tablet 14 Using gestures 15 Using the pen 15 Using the Tablet Input Panel (TIP 16 Working with documents 17 Creating a new document 17 Saving a document 17 Opening a document 18 Printing a document...
8511882 - Gateway Notebook User Guide for Windows Vista
Page 21
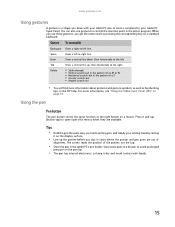
... a right-to open right-click menus when they are out of the pointer, not the tap. • Store the pen in the active program. www.gateway.com Using gestures A gesture is a shape you draw with your tablet PC pen to send a command to your writing hand by resting it dry and...
... a right-to open right-click menus when they are out of the pointer, not the tap. • Store the pen in the active program. www.gateway.com Using gestures A gesture is a shape you draw with your tablet PC pen to send a command to your writing hand by resting it dry and...
