8512055 - Component Replacement Manual
Page 1
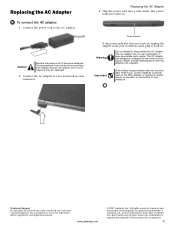
...the same type and voltage rating as the original cord or your notebook may be of Gateway, Inc. Replacing the AC Adapter 3 Plug the power cord into a wall outlet. Gateway and eMachines are trademarks or registered trademarks of their respective companies. 1 Technical Support See ...the label on . in . www.gateway.com © 2007 Gateway, Inc. Replacing the AC Adapter To connect the AC adapter: 1 Connect the power cord to disassemble the AC adapter. The power indicator turns on the bottom of your Reference Guide for...
...the same type and voltage rating as the original cord or your notebook may be of Gateway, Inc. Replacing the AC Adapter 3 Plug the power cord into a wall outlet. Gateway and eMachines are trademarks or registered trademarks of their respective companies. 1 Technical Support See ...the label on . in . www.gateway.com © 2007 Gateway, Inc. Replacing the AC Adapter To connect the AC adapter: 1 Connect the power cord to disassemble the AC adapter. The power indicator turns on the bottom of your Reference Guide for...
8512055 - Component Replacement Manual
Page 3
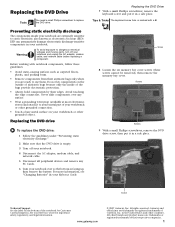
...(ESD). All rights reserved. Warning To avoid exposure to dangerous electrical voltages and moving parts, turn off your notebook. 4 Disconnect the AC adapter, modem cable, and network cable. 5 Disconnect all peripheral devices and remove any PC Cards. 6 Turn your notebook over any surface. ... screwdriver to use them. Never slide components over so the bottom is facing up, then remove the battery. www.gateway.com © 2007 Gateway, Inc. Gateway and eMachines are trademarks or registered trademarks of the bags provide electrostatic protection. • Always hold components by their ...
...(ESD). All rights reserved. Warning To avoid exposure to dangerous electrical voltages and moving parts, turn off your notebook. 4 Disconnect the AC adapter, modem cable, and network cable. 5 Disconnect all peripheral devices and remove any PC Cards. 6 Turn your notebook over any surface. ... screwdriver to use them. Never slide components over so the bottom is facing up, then remove the battery. www.gateway.com © 2007 Gateway, Inc. Gateway and eMachines are trademarks or registered trademarks of the bags provide electrostatic protection. • Always hold components by their ...
8512055 - Component Replacement Manual
Page 4
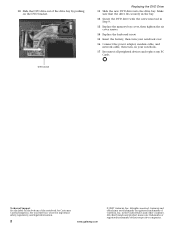
... their respective companies. Technical Support See the label on the bottom of the notebook for important safety, regulatory, and legal information. 2 www.gateway.com © 2007 Gateway, Inc. All other countries. Make sure that the drive fits securely in the bay. 12 Secure the DVD drive with the screw removed...then tighten the six cover screws. 14 Replace the keyboard screw. 15 Insert the battery, then turn your notebook over. 16 Connect the power adapter, modem cable, and network cable, then turn on the DVD bracket. DVD bracket Replacing the DVD Drive 11 Slide the new DVD drive into ...
... their respective companies. Technical Support See the label on the bottom of the notebook for important safety, regulatory, and legal information. 2 www.gateway.com © 2007 Gateway, Inc. All other countries. Make sure that the drive fits securely in the bay. 12 Secure the DVD drive with the screw removed...then tighten the six cover screws. 14 Replace the keyboard screw. 15 Insert the battery, then turn your notebook over. 16 Connect the power adapter, modem cable, and network cable, then turn on the DVD bracket. DVD bracket Replacing the DVD Drive 11 Slide the new DVD drive into ...
8512055 - Component Replacement Manual
Page 5
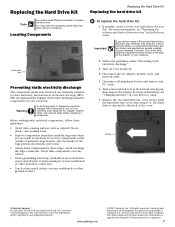
... © 2007 Gateway, Inc. Avoid touching the edge connectors. Locating Components Hard drive bay Preventing static electricity discharge The components inside of antistatic bags because only the inside your notebook and unplug the AC adapter, modem cable, and network cable before replacing a ...component. Replacing the Hard Drive Kit Replacing the Hard Drive Kit Replacing the hard drive kit Tools You need the operating system disc that came with the drivers and applications already installed. Contact Gateway ...
... © 2007 Gateway, Inc. Avoid touching the edge connectors. Locating Components Hard drive bay Preventing static electricity discharge The components inside of antistatic bags because only the inside your notebook and unplug the AC adapter, modem cable, and network cable before replacing a ...component. Replacing the Hard Drive Kit Replacing the Hard Drive Kit Replacing the hard drive kit Tools You need the operating system disc that came with the drivers and applications already installed. Contact Gateway ...

8512055 - Component Replacement Manual
Page 6
... 13 Insert the battery and turn your notebook over. 14 Connect the power adapter, modem cable, and network cable. 15 Turn on your notebook. 16 If the hard drive was sent to you from Gateway with the operating system, applications, and drivers installed, you created to boot ... and product names are trademarks or registered trademarks of the notebook for important safety, regulatory, and legal information. 2 www.gateway.com © 2007 Gateway, Inc. Gateway and eMachines are trademarks or registered trademarks of valid boot devices appears. 18 Press the arrow keys to select the drive ...
... 13 Insert the battery and turn your notebook over. 14 Connect the power adapter, modem cable, and network cable. 15 Turn on your notebook. 16 If the hard drive was sent to you from Gateway with the operating system, applications, and drivers installed, you created to boot ... and product names are trademarks or registered trademarks of the notebook for important safety, regulatory, and legal information. 2 www.gateway.com © 2007 Gateway, Inc. Gateway and eMachines are trademarks or registered trademarks of valid boot devices appears. 18 Press the arrow keys to select the drive ...
8512055 - Component Replacement Manual
Page 7
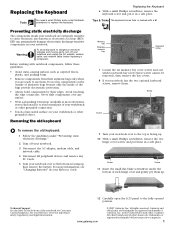
...rights reserved. Never slide components over any PC Cards. 5 Turn your notebook over so the bottom is facing up . www.gateway.com © 2007 Gateway, Inc. Memory bay Wireless network bay Keyboard screw 7 Loosen the six memory bay cover screws and one wireless network bay screw...need a small Phillips and a small flat-blade screwdriver to dangerous electrical voltages and moving parts, turn off your notebook. 3 Disconnect the AC adapter, modem cable, and network cable. 4 Disconnect all peripheral devices and remove any surface. • Wear a grounding wrist strap (available at most...
...rights reserved. Never slide components over any PC Cards. 5 Turn your notebook over so the bottom is facing up . www.gateway.com © 2007 Gateway, Inc. Memory bay Wireless network bay Keyboard screw 7 Loosen the six memory bay cover screws and one wireless network bay screw...need a small Phillips and a small flat-blade screwdriver to dangerous electrical voltages and moving parts, turn off your notebook. 3 Disconnect the AC adapter, modem cable, and network cable. 4 Disconnect all peripheral devices and remove any surface. • Wear a grounding wrist strap (available at most...
8512055 - Component Replacement Manual
Page 8
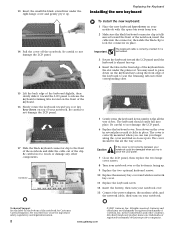
...169; 2007 Gateway, Inc. The keyboard should be damaged when you so it up . 9 Replace the two optional keyboard screws. 10 Replace the memory bay cover and wireless network bay cover. 11 Replace the keyboard screw. 12 Insert the battery, then turn your notebook over. 13 Connect the power adapter, the modem... cable, and the network cable, then turn on the bottom of the keyboard. 16 Slowly rotate the keyboard toward the LCD panel to the front of the notebook and slide the cable out of Gateway, Inc. The cover should easily fall ...
...169; 2007 Gateway, Inc. The keyboard should be damaged when you so it up . 9 Replace the two optional keyboard screws. 10 Replace the memory bay cover and wireless network bay cover. 11 Replace the keyboard screw. 12 Insert the battery, then turn your notebook over. 13 Connect the power adapter, the modem... cable, and the network cable, then turn on the bottom of the keyboard. 16 Slowly rotate the keyboard toward the LCD panel to the front of the notebook and slide the cable out of Gateway, Inc. The cover should easily fall ...
8512055 - Component Replacement Manual
Page 9
... dangerous electrical voltages and moving parts, turn off your notebook and unplug the AC adapter, modem cable, and network cable before replacing a component. ESD can permanently damage electrostatic discharge-sensitive components in the United States and other countries. Gateway and eMachines are ready to static electricity, also known as carpeted floors, plastic...
... dangerous electrical voltages and moving parts, turn off your notebook and unplug the AC adapter, modem cable, and network cable before replacing a component. ESD can permanently damage electrostatic discharge-sensitive components in the United States and other countries. Gateway and eMachines are ready to static electricity, also known as carpeted floors, plastic...
8512055 - Component Replacement Manual
Page 10
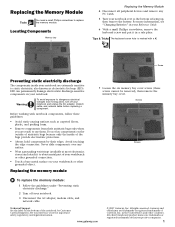
...the six cover screws. 13 Replace the keyboard screw. 14 Insert the battery, then turn your notebook over. 15 Connect the power adapter, the modem cable, and the network cable. 16 Reconnect all peripheral devices and replace any PC Cards. 17 Turn on the bottom... of their respective companies. Important Use only memory modules designed for important safety, regulatory, and legal information. 2 www.gateway.com © 2007 Gateway, Inc. Gateway and eMachines are trademarks or registered trademarks of the notebook for Customer Care Information. This module is keyed so it clicks ...
...the six cover screws. 13 Replace the keyboard screw. 14 Insert the battery, then turn your notebook over. 15 Connect the power adapter, the modem cable, and the network cable. 16 Reconnect all peripheral devices and replace any PC Cards. 17 Turn on the bottom... of their respective companies. Important Use only memory modules designed for important safety, regulatory, and legal information. 2 www.gateway.com © 2007 Gateway, Inc. Gateway and eMachines are trademarks or registered trademarks of the notebook for Customer Care Information. This module is keyed so it clicks ...
8512055 - Component Replacement Manual
Page 11
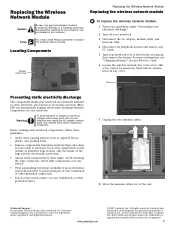
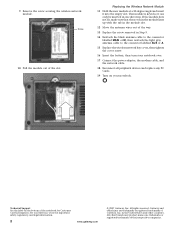
...before replacing a component. Warning To avoid exposure to dangerous electrical voltages and moving parts, turn off your notebook. 3 Disconnect the AC adapter, modem cable, and network cable. 4 Disconnect all peripheral devices and remove any surface. • Wear a grounding wrist strap (... two antenna cables. 8 Move the antenna cables out of the bags provide electrostatic protection. • Always hold components by Gateway or a Gateway authorized representative, explicitly for your Reference Guide. 6 Loosen the wireless network bay cover screw (this notebook. ESD can permanently ...
...before replacing a component. Warning To avoid exposure to dangerous electrical voltages and moving parts, turn off your notebook. 3 Disconnect the AC adapter, modem cable, and network cable. 4 Disconnect all peripheral devices and remove any surface. • Wear a grounding wrist strap (... two antenna cables. 8 Move the antenna cables out of the bags provide electrostatic protection. • Always hold components by Gateway or a Gateway authorized representative, explicitly for your Reference Guide. 6 Loosen the wireless network bay cover screw (this notebook. ESD can permanently ...
8512055 - Component Replacement Manual
Page 12
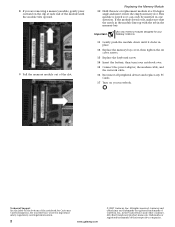
This module is keyed so it into the empty slot. Gateway and eMachines are trademarks or registered trademarks of their respective companies. All other countries. See your notebook over. 17 Connect the power adapter, the modem cable, and the network cable. 18 Reconnect all peripheral devices and replace... the module slot. 12 Move the antenna wires out of the notebook for important safety, regulatory, and legal information. 2 www.gateway.com © 2007 Gateway, Inc. Replacing the Wireless Network Module 11 Hold the new module at a 30-degree angle and insert it can only be ...
This module is keyed so it into the empty slot. Gateway and eMachines are trademarks or registered trademarks of their respective companies. All other countries. See your notebook over. 17 Connect the power adapter, the modem cable, and the network cable. 18 Reconnect all peripheral devices and replace... the module slot. 12 Move the antenna wires out of the notebook for important safety, regulatory, and legal information. 2 www.gateway.com © 2007 Gateway, Inc. Replacing the Wireless Network Module 11 Hold the new module at a 30-degree angle and insert it can only be ...

8511882 - Gateway Notebook User Guide for Windows Vista
Page 52
... task list on the left to right). Setting up a network for your computer's jack and the router or the cable or DSL modem at www.gateway.com. Connecting network cables We recommend using for instructions on installing the card and any network computer. The Ethernet device installed in two different types... use of a router. Plug your Ethernet cable into your network as well. 46 Category 5 cables are attached to the copper pins in front of Network adapters.
... task list on the left to right). Setting up a network for your computer's jack and the router or the cable or DSL modem at www.gateway.com. Connecting network cables We recommend using for instructions on installing the card and any network computer. The Ethernet device installed in two different types... use of a router. Plug your Ethernet cable into your network as well. 46 Category 5 cables are attached to the copper pins in front of Network adapters.
8511882 - Gateway Notebook User Guide for Windows Vista
Page 53
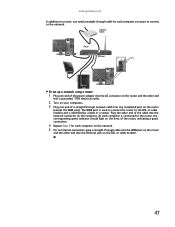
Cable/DSL modem Router WAN port To set up a network using a router: 1 Plug one end of the power adapter into the AC connector on the router and the other end into a grounded, 110V electrical outlet. 2 Turn on your computers. 3 Plug one end of the ... numbered port on the router (except the WAN port). Plug the other end into the Ethernet jack on the DSL or cable modem. 47 www.gateway.com In addition to a router, you want to connect to the network.
Cable/DSL modem Router WAN port To set up a network using a router: 1 Plug one end of the power adapter into the AC connector on the router and the other end into a grounded, 110V electrical outlet. 2 Turn on your computers. 3 Plug one end of the ... numbered port on the router (except the WAN port). Plug the other end into the Ethernet jack on the DSL or cable modem. 47 www.gateway.com In addition to a router, you want to connect to the network.

8511882 - Gateway Notebook User Guide for Windows Vista
Page 55
If one . To order wireless Ethernet PCI or PC cards, visit the Accessories Store at www.gateway.com. Use the documentation that comes with the competing IEEE 802.11a format. Check your network. Make sure that another computer outside your network... online banking information. If you are using for your network, you need to keep intruders out of Network adapters. www.gateway.com Tip When you buy , check out Gateway's accessory store at www.gateway.com. Setting up wireless Ethernet network hardware Installing wireless cards and drivers After you have them already installed. ...
If one . To order wireless Ethernet PCI or PC cards, visit the Accessories Store at www.gateway.com. Use the documentation that comes with the competing IEEE 802.11a format. Check your network. Make sure that another computer outside your network... online banking information. If you are using for your network, you need to keep intruders out of Network adapters. www.gateway.com Tip When you buy , check out Gateway's accessory store at www.gateway.com. Setting up wireless Ethernet network hardware Installing wireless cards and drivers After you have them already installed. ...
8511883 - Gateway Setup Poster for Windows Vista
Page 2
...critical updates for Microsoft Windows (click (Start), All Programs, then click Windows Update). • Use the security features provided in for at gateway.com. To ensure a high level of their respective companies. To access your notebook. USER GUIDE ® MANAGE YOUR BATTERY LIFE To get ...the on-screen instructions to . • Travel with an extra battery and fully charge batteries before traveling. • Use your AC power adapter whenever power is available. All other countries. Then lock it clicks. Online Support: Tech Support Phone: Hours: Model: S/No: Actual product ...
...critical updates for Microsoft Windows (click (Start), All Programs, then click Windows Update). • Use the security features provided in for at gateway.com. To ensure a high level of their respective companies. To access your notebook. USER GUIDE ® MANAGE YOUR BATTERY LIFE To get ...the on-screen instructions to . • Travel with an extra battery and fully charge batteries before traveling. • Use your AC power adapter whenever power is available. All other countries. Then lock it clicks. Online Support: Tech Support Phone: Hours: Model: S/No: Actual product ...
8511884 - Gateway Notebook Reference Guide for Windows Vista
Page 3
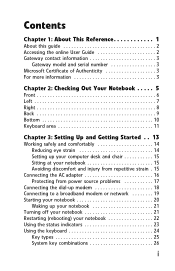
Contents Chapter 1: About This Reference 1 About this guide 2 Accessing the online User Guide 2 Gateway contact information 3 Gateway model and serial number 3 Microsoft Certificate of Authenticity 3 For more information 3 Chapter 2: Checking Out Your Notebook . . . . . 5 Front 6 Left 7 Right 8 Back ... your computer desk and chair 15 Sitting at your notebook 15 Avoiding discomfort and injury from repetitive strain . 15 Connecting the AC adapter 16 Protecting from power source problems 17 Connecting the dial-up modem 18 Connecting to a broadband modem or network 19 Starting your ...
Contents Chapter 1: About This Reference 1 About this guide 2 Accessing the online User Guide 2 Gateway contact information 3 Gateway model and serial number 3 Microsoft Certificate of Authenticity 3 For more information 3 Chapter 2: Checking Out Your Notebook . . . . . 5 Front 6 Left 7 Right 8 Back ... your computer desk and chair 15 Sitting at your notebook 15 Avoiding discomfort and injury from repetitive strain . 15 Connecting the AC adapter 16 Protecting from power source problems 17 Connecting the dial-up modem 18 Connecting to a broadband modem or network 19 Starting your ...

8511884 - Gateway Notebook Reference Guide for Windows Vista
Page 15
Back www.gateway.com Power connector Component Icon Power connector Monitor port Monitor port Description Plug the AC adapter cable into this connector. For more information, see "Viewing the display on a projector or monitor" on page 43. 9 Plug an analog VGA monitor or projector into this port.
Back www.gateway.com Power connector Component Icon Power connector Monitor port Monitor port Description Plug the AC adapter cable into this connector. For more information, see "Viewing the display on a projector or monitor" on page 43. 9 Plug an analog VGA monitor or projector into this port.
8511884 - Gateway Notebook Reference Guide for Windows Vista
Page 19
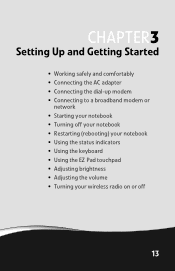
CHAPTER3 Setting Up and Getting Started • Working safely and comfortably • Connecting the AC adapter • Connecting the dial-up modem • Connecting to a broadband modem or network • Starting your notebook • Turning off your notebook • Restarting (rebooting) your notebook • Using the status indicators • Using the keyboard • Using the EZ Pad touchpad • Adjusting brightness • Adjusting the volume • Turning your wireless radio on or off 13
CHAPTER3 Setting Up and Getting Started • Working safely and comfortably • Connecting the AC adapter • Connecting the dial-up modem • Connecting to a broadband modem or network • Starting your notebook • Turning off your notebook • Restarting (rebooting) your notebook • Using the status indicators • Using the keyboard • Using the EZ Pad touchpad • Adjusting brightness • Adjusting the volume • Turning your wireless radio on or off 13

8511884 - Gateway Notebook Reference Guide for Windows Vista
Page 22
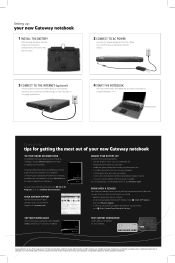
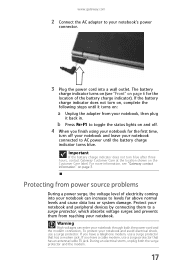
... battery power for the battery to you use the AC adapter that can run your notebook using an AC adapter or your notebook on page 52. To connect the AC adapter: 1 Connect the power cord to disassemble the AC adapter. Contact Gateway about returning defective AC adapters. Allow three hours for the first time, the battery...
... battery power for the battery to you use the AC adapter that can run your notebook using an AC adapter or your notebook on page 52. To connect the AC adapter: 1 Connect the power cord to disassemble the AC adapter. Contact Gateway about returning defective AC adapters. Allow three hours for the first time, the battery...
8511884 - Gateway Notebook Reference Guide for Windows Vista
Page 23
... voltage surges and prevents them to AC power until it turns on page 6 for the first time, turn blue after three hours, contact Gateway Customer Care at the location shown on page 3. During an electrical storm, unplug both the power cord and the modem connection. Important If ...modem, use a surge protector that has a modem jack. To protect your notebook through both the surge protector and the modem. 17 www.gateway.com 2 Connect the AC adapter to your notebook's power connector. 3 Plug the power cord into your notebook can enter your notebook and avoid electrical shock, use a ...
... voltage surges and prevents them to AC power until it turns on page 6 for the first time, turn blue after three hours, contact Gateway Customer Care at the location shown on page 3. During an electrical storm, unplug both the power cord and the modem connection. Important If ...modem, use a surge protector that has a modem jack. To protect your notebook through both the surge protector and the modem. 17 www.gateway.com 2 Connect the AC adapter to your notebook's power connector. 3 Plug the power cord into your notebook can enter your notebook and avoid electrical shock, use a ...


