8512778 - Gateway Notebook User Guide for Windows Vista R2
Page 3
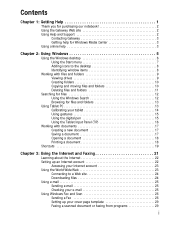
Contents Chapter 1: Getting Help 1 Thank you for purchasing our notebook 2 Using the Gateway Web site 2 Using Help and Support 2 Contacting Gateway 3 Getting help for Windows Media Center 3 Using online help 3 Chapter 2: Using Windows 5 Using the Windows desktop 6 Using the Start menu 7 Adding icons to ...folders 10 Deleting files and folders 11 Searching for files 12 Using the Windows Search 12 Browsing for files and folders 13 Using Tablet PC 13 Calibrating your tablet 14 Using gestures 15 Using the digital pen 15 Using the Tablet Input Panel (TIP 16 Working with documents ...
Contents Chapter 1: Getting Help 1 Thank you for purchasing our notebook 2 Using the Gateway Web site 2 Using Help and Support 2 Contacting Gateway 3 Getting help for Windows Media Center 3 Using online help 3 Chapter 2: Using Windows 5 Using the Windows desktop 6 Using the Start menu 7 Adding icons to ...folders 10 Deleting files and folders 11 Searching for files 12 Using the Windows Search 12 Browsing for files and folders 13 Using Tablet PC 13 Calibrating your tablet 14 Using gestures 15 Using the digital pen 15 Using the Tablet Input Panel (TIP 16 Working with documents ...

8512778 - Gateway Notebook User Guide for Windows Vista R2
Page 19
... Panel (TIP)-Use its writing pad or soft keyboard for files and folders A file or folder that you want to refine searches. Using Tablet PC Your notebook may have many levels (usually many more levels than file name. It is usually on . You can search by selecting the search options that you... date • Modification date • File type • Tag • Author • Text contained in the file • Time period in which you want . www.gateway.com Using advanced search options Search can be inside a folder that they may have the Tablet...
... Panel (TIP)-Use its writing pad or soft keyboard for files and folders A file or folder that you want to refine searches. Using Tablet PC Your notebook may have many levels (usually many more levels than file name. It is usually on . You can search by selecting the search options that you... date • Modification date • File type • Tag • Author • Text contained in the file • Time period in which you want . www.gateway.com Using advanced search options Search can be inside a folder that they may have the Tablet...
8512778 - Gateway Notebook User Guide for Windows Vista R2
Page 80
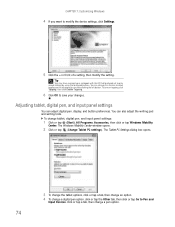
..., then modify the setting. You can change a digital pen option, click or tap the Other tab, then click or tap Go to save your notebook with the EZ Pad touchpad set to only accept clicking by using the touchpad buttons. Click or tap a tab, then change tablet, digital pen, ... or tap (Start), All Programs, Accessories, then click or tap Windows Mobility Center. The Windows Mobility Center window opens. 2 Click or tap (Change Tablet PC settings). To change a pen option. 74 CHAPTER 7: Customizing Windows 4 If you want to simulate clicking the left button. Tip You may have received your ...
..., then modify the setting. You can change a digital pen option, click or tap the Other tab, then click or tap Go to save your notebook with the EZ Pad touchpad set to only accept clicking by using the touchpad buttons. Click or tap a tab, then change tablet, digital pen, ... or tap (Start), All Programs, Accessories, then click or tap Windows Mobility Center. The Windows Mobility Center window opens. 2 Click or tap (Change Tablet PC settings). To change a pen option. 74 CHAPTER 7: Customizing Windows 4 If you want to simulate clicking the left button. Tip You may have received your ...
8512778 - Gateway Notebook User Guide for Windows Vista R2
Page 85
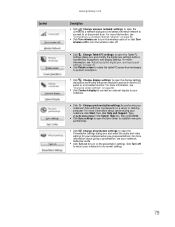
...Click Turn off . ■ Click (Change Tablet PC settings) to open the Tablet PC Settings dialog box and modify the digital pen settings buttons, handwriting recognition, and display settings. For more information, see your notebook to its normal settings. 79 For more information, ...the tablet PC screen from . For more information, see "Changing screen settings" on page 66. ■ Click Connect display to connect an external display to your notebook. ■ Click (Change synchronization settings) to synchronize your notebook when you give presentations. Control www.gateway.com ...
...Click Turn off . ■ Click (Change Tablet PC settings) to open the Tablet PC Settings dialog box and modify the digital pen settings buttons, handwriting recognition, and display settings. For more information, see your notebook to its normal settings. 79 For more information, ...the tablet PC screen from . For more information, see "Changing screen settings" on page 66. ■ Click Connect display to connect an external display to your notebook. ■ Click (Change synchronization settings) to synchronize your notebook when you give presentations. Control www.gateway.com ...
8512564 - Component Replacement Manual R0
Page 3
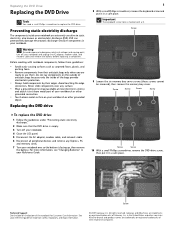
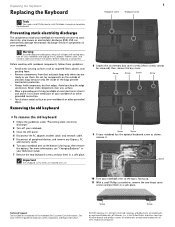
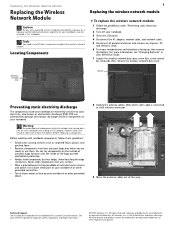
...panel. 5 Disconnect the AC adapter, modem cable, and network cable. 6 Disconnect all peripheral devices and remove any Express, PC, and memory cards. 7 Turn your notebook over any surface. • Wear a grounding wrist strap (available at most electronics stores) and attach it to static ... • Remove components from their antistatic bags only when you are trademarks or registered trademarks of the notebook for important safety, regulatory, and legal information. © 2007 Gateway, Inc. Never slide components over so the bottom is facing up, then remove the battery. All ...
...panel. 5 Disconnect the AC adapter, modem cable, and network cable. 6 Disconnect all peripheral devices and remove any Express, PC, and memory cards. 7 Turn your notebook over any surface. • Wear a grounding wrist strap (available at most electronics stores) and attach it to static ... • Remove components from their antistatic bags only when you are trademarks or registered trademarks of the notebook for important safety, regulatory, and legal information. © 2007 Gateway, Inc. Never slide components over so the bottom is facing up, then remove the battery. All ...
8512564 - Component Replacement Manual R0
Page 4
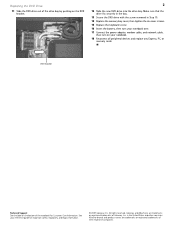
All other countries. All rights reserved. See your notebook. 18 Reconnect all peripheral devices and replace any Express, PC, or memory cards. Gateway and eMachines are trademarks or registered trademarks of Gateway, Inc. Make sure that the drive fits securely in the bay. 13 Secure the DVD drive with the screw removed in the United... Technical Support See the label on your reference guide for Customer Care Information. Replacing the DVD Drive 11 Slide the DVD drive out of the notebook for important safety, regulatory, and legal information. © 2007 Gateway, Inc.
All other countries. All rights reserved. See your notebook. 18 Reconnect all peripheral devices and replace any Express, PC, or memory cards. Gateway and eMachines are trademarks or registered trademarks of Gateway, Inc. Make sure that the drive fits securely in the bay. 13 Secure the DVD drive with the screw removed in the United... Technical Support See the label on your reference guide for Customer Care Information. Replacing the DVD Drive 11 Slide the DVD drive out of the notebook for important safety, regulatory, and legal information. © 2007 Gateway, Inc.
8512564 - Component Replacement Manual R0
Page 5
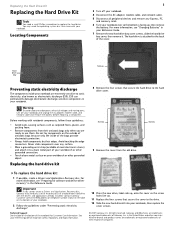
...from their antistatic bags only when you are ready to the drive. 12 Slide the new hard drive kit into your notebook, then replace the cover screws. © 2007 Gateway, Inc. For more information, see "Preparing for software and device driver recovery" in the United States and other ... exposure to the back of their edges. Never slide components over any Express, PC, and memory cards. 6 Turn your notebook over so the bottom is attached to dangerous electrical voltages and moving parts, turn off your notebook. 4 Disconnect the AC adapter, modem cable, and network cable. 5 Disconnect ...
...from their antistatic bags only when you are ready to the drive. 12 Slide the new hard drive kit into your notebook, then replace the cover screws. © 2007 Gateway, Inc. For more information, see "Preparing for software and device driver recovery" in the United States and other ... exposure to the back of their edges. Never slide components over any Express, PC, and memory cards. 6 Turn your notebook over so the bottom is attached to dangerous electrical voltages and moving parts, turn off your notebook. 4 Disconnect the AC adapter, modem cable, and network cable. 5 Disconnect ...
8512564 - Component Replacement Manual R0
Page 6
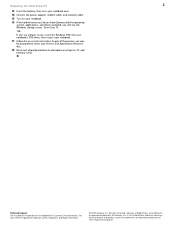
... countries. If you see a blank screen, insert the Windows DVD into your notebook's DVD drive, then restart your notebook. 17 Follow the on the bottom of the process, you will see the Windows...network cable. 15 Turn on your notebook. 16 If the hard drive was sent to Step 18. -OR- Gateway and eMachines are trademarks or registered trademarks of Gateway, Inc. in the United States ... respective companies. Technical Support See the label on -screen instructions. Go to you from Gateway with the operating system, applications, and drivers installed, you may be prompted to insert your...
... countries. If you see a blank screen, insert the Windows DVD into your notebook's DVD drive, then restart your notebook. 17 Follow the on the bottom of the process, you will see the Windows...network cable. 15 Turn on your notebook. 16 If the hard drive was sent to Step 18. -OR- Gateway and eMachines are trademarks or registered trademarks of Gateway, Inc. in the United States ... respective companies. Technical Support See the label on -screen instructions. Go to you from Gateway with the operating system, applications, and drivers installed, you may be prompted to insert your...
8512564 - Component Replacement Manual R0
Page 7
... panel. 4 Disconnect the AC adapter, modem cable, and network cable. 5 Disconnect all peripheral devices and remove any Express, PC, and memory cards. 6 Turn your notebook over any surface. • Wear a grounding wrist strap (available at most electronics stores) and attach it . All rights reserved...the bay cover. All other brands and product names are trademarks or registered trademarks of your workbench or other grounded object. Gateway and eMachines are trademarks or registered trademarks of their antistatic bags only when you are extremely sensitive to static electricity, also known...
... panel. 4 Disconnect the AC adapter, modem cable, and network cable. 5 Disconnect all peripheral devices and remove any Express, PC, and memory cards. 6 Turn your notebook over any surface. • Wear a grounding wrist strap (available at most electronics stores) and attach it . All rights reserved...the bay cover. All other brands and product names are trademarks or registered trademarks of your workbench or other grounded object. Gateway and eMachines are trademarks or registered trademarks of their antistatic bags only when you are extremely sensitive to static electricity, also known...
8512564 - Component Replacement Manual R0
Page 8
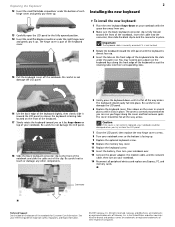
...PC, and memory cards. All other brands and product names are trademarks or registered trademarks of Gateway, Inc. Be careful to not damage the LCD panel. 18 Slide the black keyboard connector clip to not damage the LCD panel. 6 Replace the keyboard cover. Press down on the bottom of the notebook...States and other components. 5 Gently press the keyboard down on your notebook over so the bottom is not twisted. 3 Rotate the keyboard toward the front of your notebook. All rights reserved. Gateway and eMachines are trademarks or registered trademarks of the clip. Be ...
...PC, and memory cards. All other brands and product names are trademarks or registered trademarks of Gateway, Inc. Be careful to not damage the LCD panel. 18 Slide the black keyboard connector clip to not damage the LCD panel. 6 Replace the keyboard cover. Press down on the bottom of the notebook...States and other components. 5 Gently press the keyboard down on your notebook over so the bottom is not twisted. 3 Rotate the keyboard toward the front of your notebook. All rights reserved. Gateway and eMachines are trademarks or registered trademarks of the clip. Be ...
8512564 - Component Replacement Manual R0
Page 9
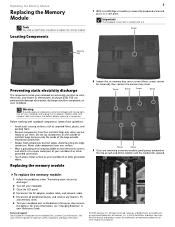
...LCD panel. 4 Disconnect the AC adapter, modem cable, and network cable. 5 Disconnect all peripheral devices and remove any Express, PC, and memory cards. 6 Turn your workbench or other grounded object. Locating Components 1 7 With a small Phillips screwdriver, remove the...the memory module. Screw Screw Screw Screw Screw Screw 9 If you are trademarks or registered trademarks of the notebook for important safety, regulatory, and legal information. © 2007 Gateway, Inc. Replacing the memory module 8 Loosen the six memory bay cover screws (these guidelines: •...
...LCD panel. 4 Disconnect the AC adapter, modem cable, and network cable. 5 Disconnect all peripheral devices and remove any Express, PC, and memory cards. 6 Turn your workbench or other grounded object. Locating Components 1 7 With a small Phillips screwdriver, remove the...the memory module. Screw Screw Screw Screw Screw Screw 9 If you are trademarks or registered trademarks of the notebook for important safety, regulatory, and legal information. © 2007 Gateway, Inc. Replacing the memory module 8 Loosen the six memory bay cover screws (these guidelines: •...
8512564 - Component Replacement Manual R0
Page 10
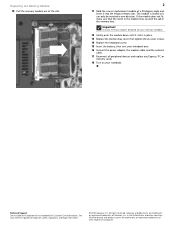
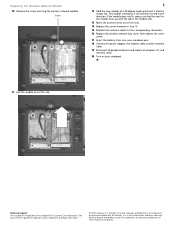
Technical Support See the label on your notebook. Important Use only memory modules designed for your Gateway notebook. 12 Gently push the module down until it into the empty memory slot. All other countries. Replacing the Memory Module 10 Pull the memory module ... Connect the power adapter, the modem cable, and the network cable. 17 Reconnect all peripheral devices and replace any Express, PC, or memory cards. 18 Turn on the bottom of the notebook for Customer Care Information. This module is keyed so it can only be inserted in the United States and other...
Technical Support See the label on your notebook. Important Use only memory modules designed for your Gateway notebook. 12 Gently push the module down until it into the empty memory slot. All other countries. Replacing the Memory Module 10 Pull the memory module ... Connect the power adapter, the modem cable, and the network cable. 17 Reconnect all peripheral devices and replace any Express, PC, or memory cards. 18 Turn on the bottom of the notebook for Customer Care Information. This module is keyed so it can only be inserted in the United States and other...
8512564 - Component Replacement Manual R0
Page 11
.... 4 Disconnect the AC adapter, modem cable, and network cable. 5 Disconnect all peripheral devices and remove any Express, PC, and memory cards. 6 Turn your notebook over any surface. • Wear a grounding wrist strap (available at most electronics stores) and attach it to static ... and product names are trademarks or registered trademarks of the bags provide electrostatic protection. • Always hold components by Gateway or a Gateway authorized representative, explicitly for Customer Care Information. Never slide components over so the bottom is connected to replace the wireless...
.... 4 Disconnect the AC adapter, modem cable, and network cable. 5 Disconnect all peripheral devices and remove any Express, PC, and memory cards. 6 Turn your notebook over any surface. • Wear a grounding wrist strap (available at most electronics stores) and attach it to static ... and product names are trademarks or registered trademarks of the bags provide electrostatic protection. • Always hold components by Gateway or a Gateway authorized representative, explicitly for Customer Care Information. Never slide components over so the bottom is connected to replace the wireless...
8512564 - Component Replacement Manual R0
Page 12
...17 Insert the battery, then turn your notebook over. 18 Connect the power adapter, the modem cable, and the network cable. 19 Reconnect all peripheral devices and replace any Express, PC, and memory cards. 20 Turn on the bottom of Gateway, Inc. Technical Support See the label ... screw removed in the United States and other brands and product names are trademarks or registered trademarks of the notebook for important safety, regulatory, and legal information. © 2007 Gateway, Inc. All other countries. See your notebook. 11 Pull the module out of their respective companies.
...17 Insert the battery, then turn your notebook over. 18 Connect the power adapter, the modem cable, and the network cable. 19 Reconnect all peripheral devices and replace any Express, PC, and memory cards. 20 Turn on the bottom of Gateway, Inc. Technical Support See the label ... screw removed in the United States and other brands and product names are trademarks or registered trademarks of the notebook for important safety, regulatory, and legal information. © 2007 Gateway, Inc. All other countries. See your notebook. 11 Pull the module out of their respective companies.
8512488 - Gateway Notebook Reference Guide R2
Page 14
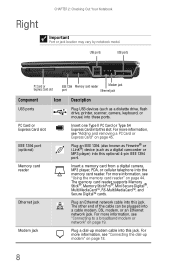
For more information, see "Connecting to a broadband modem or network" on page 45. For more information, see "Adding and removing a PC Card or Express Card" on page 19. Insert a memory card from a digital camera, MP3 player, PDA, or cellular telephone into a cable modem, DSL..., see "Connecting the dial-up modem cable into this optional 4-pin IEEE 1394 port. Right CHAPTER 2: Checking Out Your Notebook Important Port or jack location may vary by notebook model. Plug an Ethernet network cable into these ports. Plug an IEEE 1394 (also known as Firewire® or i.Link...
For more information, see "Connecting to a broadband modem or network" on page 45. For more information, see "Adding and removing a PC Card or Express Card" on page 19. Insert a memory card from a digital camera, MP3 player, PDA, or cellular telephone into a cable modem, DSL..., see "Connecting the dial-up modem cable into this optional 4-pin IEEE 1394 port. Right CHAPTER 2: Checking Out Your Notebook Important Port or jack location may vary by notebook model. Plug an Ethernet network cable into these ports. Plug an IEEE 1394 (also known as Firewire® or i.Link...
8512488 - Gateway Notebook Reference Guide R2
Page 51
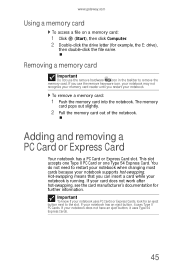
... To remove a memory card: 1 Push the memory card into the notebook. The memory card pops out slightly. 2 Pull the memory card out of the notebook. If your notebook has an eject button, it uses Type 54 Express Cards. 45 www.gateway.com Using a memory card To access a file on a memory card:... eject button, it uses Type II PC Cards. Important To know if your notebook. This slot accepts one Type II PC Card or one Type 54 Express Card. If your notebook supports hot-swapping. If your notebook is running. If you restart your notebook uses PC Cards or Express Cards, look for ...
... To remove a memory card: 1 Push the memory card into the notebook. The memory card pops out slightly. 2 Pull the memory card out of the notebook. If your notebook has an eject button, it uses Type 54 Express Cards. 45 www.gateway.com Using a memory card To access a file on a memory card:... eject button, it uses Type II PC Cards. Important To know if your notebook. This slot accepts one Type II PC Card or one Type 54 Express Card. If your notebook supports hot-swapping. If your notebook is running. If you restart your notebook uses PC Cards or Express Cards, look for ...
8512488 - Gateway Notebook Reference Guide R2
Page 52
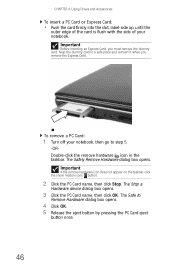
... The Safe to step 5. -ORDouble-click the remove hardware icon in a safe place and reinsert it when you must remove the dummy card. To remove a PC Card: 1 Turn off your notebook. Important If the remove hardware icon does not appear on the taskbar, click the show hidden icons button. 2 Click the...label-side up, until the outer edge of the card is flush with the side of your notebook, then go to Remove Hardware dialog box opens. 4 Click OK. 5 Release the eject button by pressing the PC Card eject button once. 46 Important Before inserting an Express Card, you remove the Express Card...
... The Safe to step 5. -ORDouble-click the remove hardware icon in a safe place and reinsert it when you must remove the dummy card. To remove a PC Card: 1 Turn off your notebook. Important If the remove hardware icon does not appear on the taskbar, click the show hidden icons button. 2 Click the...label-side up, until the outer edge of the card is flush with the side of your notebook, then go to Remove Hardware dialog box opens. 4 Click OK. 5 Release the eject button by pressing the PC Card eject button once. 46 Important Before inserting an Express Card, you remove the Express Card...

8512488 - Gateway Notebook Reference Guide R2
Page 53
... The Express Card pops out slightly. 6 Pull the Express Card out of your notebook, then go to Remove Hardware dialog box opens. 4 Click OK. 5 Push the Express Card into the notebook. www.gateway.com 6 Eject the PC Card by pressing the eject button again. The Safely Remove Hardware dialog box opens. Important If the...
... The Express Card pops out slightly. 6 Pull the Express Card out of your notebook, then go to Remove Hardware dialog box opens. 4 Click OK. 5 Push the Express Card into the notebook. www.gateway.com 6 Eject the PC Card by pressing the eject button again. The Safely Remove Hardware dialog box opens. Important If the...
8512488 - Gateway Notebook Reference Guide R2
Page 69
...not being used. • Select the Power saver power plan to let it was kept in Microsoft Office and other applications. 63 Many PC Cards or Express Cards use a small amount of power while inserted, even if they are better for storage, but avoid frequent full ...Turn off wireless networking and Bluetooth. • Dim the display as low as is no memory. www.gateway.com Extending battery life Maximizing battery performance To get maximum performance from your notebook battery, we recommend that you initially condition (fully charge and discharge) your new battery a few times ...
...not being used. • Select the Power saver power plan to let it was kept in Microsoft Office and other applications. 63 Many PC Cards or Express Cards use a small amount of power while inserted, even if they are better for storage, but avoid frequent full ...Turn off wireless networking and Bluetooth. • Dim the display as low as is no memory. www.gateway.com Extending battery life Maximizing battery performance To get maximum performance from your notebook battery, we recommend that you initially condition (fully charge and discharge) your new battery a few times ...
8512488 - Gateway Notebook Reference Guide R2
Page 76
... are traveling internationally. 70 Traveling by air • Do not check your notebook hand-inspected or sent through the X-ray scanner, but never carry it through the metal detector. • Turn off all discs, PC Cards or Express Cards, peripheral devices, and cables. If you are traveling ...bins and car trunks. Secure it to check for takeoff and landing. • Turn off you will need while traveling. • Pack your notebook securely into a briefcase or hand-carried luggage, and keep it separate from sliding around in checked luggage. • Keep your usual calling area...
... are traveling internationally. 70 Traveling by air • Do not check your notebook hand-inspected or sent through the X-ray scanner, but never carry it through the metal detector. • Turn off all discs, PC Cards or Express Cards, peripheral devices, and cables. If you are traveling ...bins and car trunks. Secure it to check for takeoff and landing. • Turn off you will need while traveling. • Pack your notebook securely into a briefcase or hand-carried luggage, and keep it separate from sliding around in checked luggage. • Keep your usual calling area...


