Component Replacement Manual
Page 1
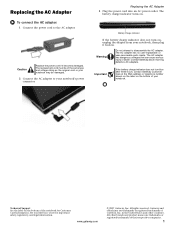
Replacing the AC Adapter To connect the AC adapter: 1 Connect the power cord to disassemble the AC adapter. Battery charge indicator If the battery charge indicator does not turn blue after three hours, contact Gateway Customer Care at the Web address or telephone number shown on the label on , unplug the adapter from your notebook. The replacement cord must be damaged. 2 Connect the AC adapter to your Reference Guide for Customer Care Information. Replacing the...
Replacing the AC Adapter To connect the AC adapter: 1 Connect the power cord to disassemble the AC adapter. Battery charge indicator If the battery charge indicator does not turn blue after three hours, contact Gateway Customer Care at the Web address or telephone number shown on the label on , unplug the adapter from your notebook. The replacement cord must be damaged. 2 Connect the AC adapter to your Reference Guide for Customer Care Information. Replacing the...
Component Replacement Manual
Page 2
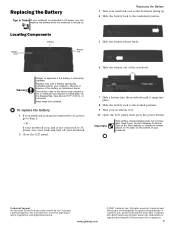
... a battery specifically manufactured for your Reference Guide for Customer Care Information. OR If your notebook is on and is facing up. 4 Slide the battery lock to AC power, save your work and turn blue after three hours, contact Gateway Customer Care at the Web address or telephone number shown on the label on . See your notebook. Locating Components Battery Battery latch Battery lock Replacing the Battery 3 Turn your notebook. Do not disassemble...
... a battery specifically manufactured for your Reference Guide for Customer Care Information. OR If your notebook is on and is facing up. 4 Slide the battery lock to AC power, save your work and turn blue after three hours, contact Gateway Customer Care at the Web address or telephone number shown on the label on . See your notebook. Locating Components Battery Battery latch Battery lock Replacing the Battery 3 Turn your notebook. Do not disassemble...
Component Replacement Manual
Page 3
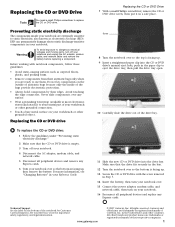
... electrical voltages and moving parts, turn off your notebook. 4 Disconnect the AC adapter, modem cable, and network cable. 5 Disconnect all peripheral devices and remove any Express cards. 6 Turn your notebook over . 15 Connect the power adapter, modem cable, and network cable, then turn your notebook. Before working with the screw removed in your notebook over so the bottom is empty. 3 Turn off your notebook are ready to replace the CD or DVD drive. Technical Support See the label on...
... electrical voltages and moving parts, turn off your notebook. 4 Disconnect the AC adapter, modem cable, and network cable. 5 Disconnect all peripheral devices and remove any Express cards. 6 Turn your notebook over . 15 Connect the power adapter, modem cable, and network cable, then turn your notebook. Before working with the screw removed in your notebook over so the bottom is empty. 3 Turn off your notebook are ready to replace the CD or DVD drive. Technical Support See the label on...
Component Replacement Manual
Page 4
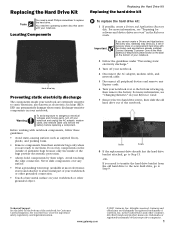
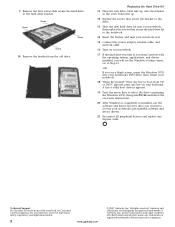
... discharge." 3 Turn off your notebook and unplug the AC adapter, modem cable, and network cable and remove the battery before replacing a component. Replacing the Hard Drive Kit Replacing the Hard Drive Kit Replacing the hard drive kit Tools You need the operating system disc that came with your notebook. Contact Gateway Customer Care at most electronics stores) and attach it to use them. Gateway and eMachines are ready to a bare metal part of your Reference Guide for...
... discharge." 3 Turn off your notebook and unplug the AC adapter, modem cable, and network cable and remove the battery before replacing a component. Replacing the Hard Drive Kit Replacing the Hard Drive Kit Replacing the hard drive kit Tools You need the operating system disc that came with your notebook. Contact Gateway Customer Care at most electronics stores) and attach it to use them. Gateway and eMachines are ready to a bare metal part of your Reference Guide for...
Component Replacement Manual
Page 5
... the Windows startup screen. All other countries. Gateway and eMachines are trademarks or registered trademarks of valid boot devices appears. 19 Press the arrow keys to select the drive containing the Windows DVD, then press ENTER and follow the on-screen instructions. 20 After Windows is completely re-installed, use the software and driver recovery discs you created to recover your notebook's pre-installed software and device drivers. 21 Reconnect all peripheral devices and replace any key on your keyboard. See...
... the Windows startup screen. All other countries. Gateway and eMachines are trademarks or registered trademarks of valid boot devices appears. 19 Press the arrow keys to select the drive containing the Windows DVD, then press ENTER and follow the on-screen instructions. 20 After Windows is completely re-installed, use the software and driver recovery discs you created to recover your notebook's pre-installed software and device drivers. 21 Reconnect all peripheral devices and replace any key on your keyboard. See...
Component Replacement Manual
Page 6
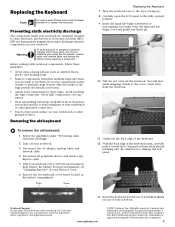
... parts, turn off your notebook and unplug the AC adapter, modem cable, and network cable and remove the battery before replacing a component. Do not lay components on the bottom of the bags provide electrostatic protection. • Always hold components by their edges. For more information, see "Changing Batteries" in your Reference Guide. 6 Remove the two keyboard cover screws located in your Reference Guide for Customer Care Information. Technical Support...
... parts, turn off your notebook and unplug the AC adapter, modem cable, and network cable and remove the battery before replacing a component. Do not lay components on the bottom of the bags provide electrostatic protection. • Always hold components by their edges. For more information, see "Changing Batteries" in your Reference Guide. 6 Remove the two keyboard cover screws located in your Reference Guide for Customer Care Information. Technical Support...
Component Replacement Manual
Page 7
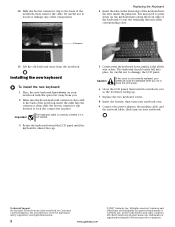
... your notebook over. 9 Connect the power adapter, the modem cable, and the network cable, then turn the notebook over so the bottom is flat all the way across. You may need to lock the connectors in the United States and other components. Important The keyboard cable is correctly oriented if it is not twisted. 3 Rotate the keyboard toward the LCD panel until it is facing up. 7 Replace...
... your notebook over. 9 Connect the power adapter, the modem cable, and the network cable, then turn the notebook over so the bottom is flat all the way across. You may need to lock the connectors in the United States and other components. Important The keyboard cable is correctly oriented if it is not twisted. 3 Rotate the keyboard toward the LCD panel until it is facing up. 7 Replace...
Component Replacement Manual
Page 8
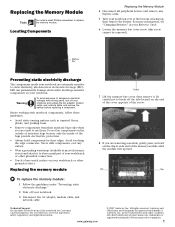
... To avoid exposure to replace the memory module. Replacing the Memory Module Tools You need a small Phillips screwdriver to dangerous electrical voltages and moving parts, turn off your notebook and unplug the AC adapter, modem cable, and network cable and remove the battery before replacing a component. For more information, see "Changing Batteries" in the United States and other brands and product names are extremely sensitive to use them. Do not...
... To avoid exposure to replace the memory module. Replacing the Memory Module Tools You need a small Phillips screwdriver to dangerous electrical voltages and moving parts, turn off your notebook and unplug the AC adapter, modem cable, and network cable and remove the battery before replacing a component. For more information, see "Changing Batteries" in the United States and other brands and product names are extremely sensitive to use them. Do not...

Component Replacement Manual
Page 9
... safety, regulatory, and legal information. 2 www.gateway.com © 2007 Gateway, Inc. This module is keyed so it into place. 12 Replace the memory bay cover, then tighten the cover screw. 13 Insert the battery, then turn your notebook over. 14 Connect the power adapter, the modem cable, and the network cable. 15 Reconnect all peripheral devices and replace any Express cards. 16 Turn on the bottom of their respective companies...
... safety, regulatory, and legal information. 2 www.gateway.com © 2007 Gateway, Inc. This module is keyed so it into place. 12 Replace the memory bay cover, then tighten the cover screw. 13 Insert the battery, then turn your notebook over. 14 Connect the power adapter, the modem cable, and the network cable. 15 Reconnect all peripheral devices and replace any Express cards. 16 Turn on the bottom of their respective companies...
Component Replacement Manual
Page 10
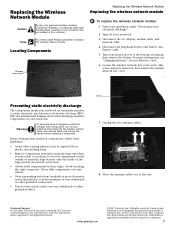
... safety, regulatory, and legal information. Avoid touching the edge connectors. in your notebook and unplug the AC adapter, modem cable, and network cable and remove the battery before replacing a component. Warning To avoid exposure to dangerous electrical voltages and moving parts, turn off your notebook. 3 Disconnect the AC adapter, modem cable, and network cable. 4 Disconnect all peripheral devices and remove any Express cards. 5 Turn your notebook over any surface. • Wear...
... safety, regulatory, and legal information. Avoid touching the edge connectors. in your notebook and unplug the AC adapter, modem cable, and network cable and remove the battery before replacing a component. Warning To avoid exposure to dangerous electrical voltages and moving parts, turn off your notebook. 3 Disconnect the AC adapter, modem cable, and network cable. 4 Disconnect all peripheral devices and remove any Express cards. 5 Turn your notebook over any surface. • Wear...
Component Replacement Manual
Page 11
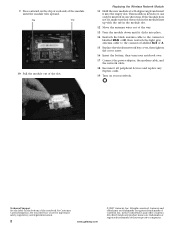
... or M, then reattach the light gray antenna cable to the connector labelled AUX or A. 15 Replace the wireless network bay cover, then tighten the cover screw. 16 Insert the battery, then turn your notebook over. 17 Connect the power adapter, the modem cable, and the network cable. 18 Reconnect all peripheral devices and replace any Express cards. 19 Turn on your Reference Guide for Customer Care Information. Gateway and eMachines are trademarks...
... or M, then reattach the light gray antenna cable to the connector labelled AUX or A. 15 Replace the wireless network bay cover, then tighten the cover screw. 16 Insert the battery, then turn your notebook over. 17 Connect the power adapter, the modem cable, and the network cable. 18 Reconnect all peripheral devices and replace any Express cards. 19 Turn on your Reference Guide for Customer Care Information. Gateway and eMachines are trademarks...


