8512949 - Component Replacement Manual R0
Page 6
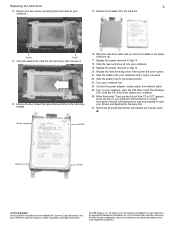
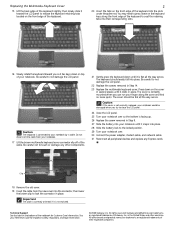
..., press any key on your Drivers and Applications Recovery disc. 27 Reconnect all peripheral devices and replace any key to insert your keyboard and follow the on the bottom of Gateway, Inc. Replacing the hard drive 2 12 Remove the two screws connecting the hard drive to your Reference Guide ...for Customer Care Information. in Step 12. 20 Replace the hard drive bay cover, then tighten the cover...
..., press any key on your Drivers and Applications Recovery disc. 27 Reconnect all peripheral devices and replace any key to insert your keyboard and follow the on the bottom of Gateway, Inc. Replacing the hard drive 2 12 Remove the two screws connecting the hard drive to your Reference Guide ...for Customer Care Information. in Step 12. 20 Replace the hard drive bay cover, then tighten the cover...
8512949 - Component Replacement Manual R0
Page 7
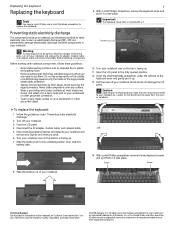
... most electronics stores) and attach it to your notebook by their respective companies. To replace the keyboard: 1 Follow the guidelines under the left end of the keyboard cover and gently pry it up . 7 Slide the battery lock to replace the keyboard. Gateway and eMachines are trademarks or registered trademarks of their edges. Preventing static electricity discharge...
... most electronics stores) and attach it to your notebook by their respective companies. To replace the keyboard: 1 Follow the guidelines under the left end of the keyboard cover and gently pry it up . 7 Slide the battery lock to replace the keyboard. Gateway and eMachines are trademarks or registered trademarks of their edges. Preventing static electricity discharge...

8512949 - Component Replacement Manual R0
Page 8
... clips are fully moved toward the LCD panel to release the keyboard retaining tabs located on the front edge of the keyboard. 2 20 Insert the tabs on the front edge of Gateway, Inc. Caution If the cover is not correctly replaced, your notebook could be flat all the way across . All rights ...reserved. You may need to press down on the cover in several places until it toward the back of their corresponding slots. 16 Slide the brown keyboard connector ...
... clips are fully moved toward the LCD panel to release the keyboard retaining tabs located on the front edge of the keyboard. 2 20 Insert the tabs on the front edge of Gateway, Inc. Caution If the cover is not correctly replaced, your notebook could be flat all the way across . All rights ...reserved. You may need to press down on the cover in several places until it toward the back of their corresponding slots. 16 Slide the brown keyboard connector ...
8512949 - Component Replacement Manual R0
Page 11
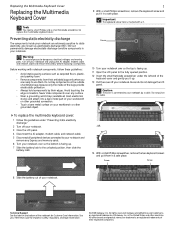
... the cover off your notebook. To replace the multimedia keyboard cover: 1 Follow the guidelines under the left end of the notebook for important safety, regulatory, and legal information. © 2008 Gateway, Inc. in a safe place. Gateway and eMachines are extremely sensitive to dangerous... • Wear a grounding wrist strap (available at most electronics stores) and attach it in your notebook. Replacing the Multimedia Keyboard Cover Replacing the Multimedia Keyboard Cover Tools You need a small Phillips and a small flat-blade screwdriver to not damage the LCD panel. Screw...
... the cover off your notebook. To replace the multimedia keyboard cover: 1 Follow the guidelines under the left end of the notebook for important safety, regulatory, and legal information. © 2008 Gateway, Inc. in a safe place. Gateway and eMachines are extremely sensitive to dangerous... • Wear a grounding wrist strap (available at most electronics stores) and attach it in your notebook. Replacing the Multimedia Keyboard Cover Replacing the Multimedia Keyboard Cover Tools You need a small Phillips and a small flat-blade screwdriver to not damage the LCD panel. Screw...
8512949 - Component Replacement Manual R0
Page 12
... a cable. Do not disconnect the cable from the new cover into place. Caution If the cover is not correctly replaced, your notebook. 17 Lift the brown multimedia keyboard cover connector clip off of Gateway, Inc. All rights reserved. in the United States and other brands and product names are trademarks or registered trademarks...
... a cable. Do not disconnect the cable from the new cover into place. Caution If the cover is not correctly replaced, your notebook. 17 Lift the brown multimedia keyboard cover connector clip off of Gateway, Inc. All rights reserved. in the United States and other brands and product names are trademarks or registered trademarks...
8513065 - Gateway Notebook Hardware Reference R1
Page 5
www.gateway.com Recalibrating the battery 72 Extending battery life 73 Maximizing battery performance 73 Conserving ...Your Notebook . . . . . 87 Caring for your notebook 88 Cleaning your notebook 88 Cleaning the exterior 89 Cleaning the keyboard 89 Cleaning the notebook screen 89 Maintaining the battery 90 Storing batteries 90 Cleaning CDs or DVDs 91 Recovering your system 91 Recovering... Recovering your system using the Windows DVD . . . . .103 Chapter 8: Upgrading Your Notebook . . . . . 105 Preventing static electricity discharge 106 Adding or replacing memory modules 107 iii
www.gateway.com Recalibrating the battery 72 Extending battery life 73 Maximizing battery performance 73 Conserving ...Your Notebook . . . . . 87 Caring for your notebook 88 Cleaning your notebook 88 Cleaning the exterior 89 Cleaning the keyboard 89 Cleaning the notebook screen 89 Maintaining the battery 90 Storing batteries 90 Cleaning CDs or DVDs 91 Recovering your system 91 Recovering... Recovering your system using the Windows DVD . . . . .103 Chapter 8: Upgrading Your Notebook . . . . . 105 Preventing static electricity discharge 106 Adding or replacing memory modules 107 iii
8513065 - Gateway Notebook Hardware Reference R1
Page 6
Contents Replacing the hard drive kit 111 Chapter 9: Troubleshooting 115 Safety guidelines 116 First steps 116 Troubleshooting 117 Audio 117 Battery 117 CD drives 117 Diskette drive (external 117 Display 118 DVD drives 119 Ethernet 121 Express Cards 121 File management 121 Fingerprint reader 122 Hard drive 122 Internet 123 Keyboard 124 Media...
Contents Replacing the hard drive kit 111 Chapter 9: Troubleshooting 115 Safety guidelines 116 First steps 116 Troubleshooting 117 Audio 117 Battery 117 CD drives 117 Diskette drive (external 117 Display 118 DVD drives 119 Ethernet 121 Express Cards 121 File management 121 Fingerprint reader 122 Hard drive 122 Internet 123 Keyboard 124 Media...
8513065 - Gateway Notebook Hardware Reference R1
Page 97
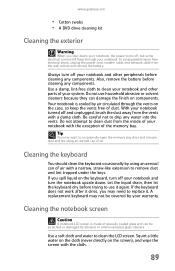
...open the memory bay door and remove dust and lint using an aerosol can damage the finish on components. If you shut down . A replacement keyboard may need to use household abrasive or solvent cleaners because they can of your notebook with a damp cloth. If the...components. www.gateway.com • Cotton swabs • A DVD drive cleaning kit Cleaning the exterior Warning When you spill liquid on the keyboard, turn off your notebook and turn off your notebook and other parts of dust. Let the liquid drain, then let the keyboard dry before trying to replace it again.
...open the memory bay door and remove dust and lint using an aerosol can damage the finish on components. If you shut down . A replacement keyboard may need to use household abrasive or solvent cleaners because they can of your notebook with a damp cloth. If the...components. www.gateway.com • Cotton swabs • A DVD drive cleaning kit Cleaning the exterior Warning When you spill liquid on the keyboard, turn off your notebook and turn off your notebook and other parts of dust. Let the liquid drain, then let the keyboard dry before trying to replace it again.
8513065 - Gateway Notebook Hardware Reference R1
Page 122
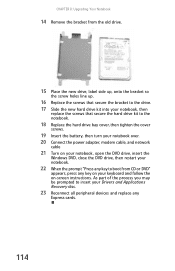
... new drive, label side up, onto the bracket so the screw holes line up. 16 Replace the screws that secure the bracket to the drive. 17 Slide the new hard drive kit into your notebook, then... replace the screws that secure the hard drive kit to the notebook. 18 Replace the hard drive bay cover, then tighten the cover screws. 19 Insert the battery,...Press any key to insert your Drivers and Applications Recovery disc. 23 Reconnect all peripheral devices and replace any key on your keyboard and follow the on-screen instructions.
... new drive, label side up, onto the bracket so the screw holes line up. 16 Replace the screws that secure the bracket to the drive. 17 Slide the new hard drive kit into your notebook, then... replace the screws that secure the hard drive kit to the notebook. 18 Replace the hard drive bay cover, then tighten the cover screws. 19 Insert the battery,...Press any key to insert your Drivers and Applications Recovery disc. 23 Reconnect all peripheral devices and replace any key on your keyboard and follow the on-screen instructions.

8513065 - Gateway Notebook Hardware Reference R1
Page 133
... device with an HDMI or VGA input is not covered in this section, go to the Gateway support Web Site at www.gateway.com. Clean the keyboard and turn off your notebook and unplug the keyboard. Media Center This section only covers problems relating to Media Center mode. Media Center mode is...or the type of TV (interlaced or progressive scan), can affect the video quality significantly: • Display type-Some retail TVs may need to replace it dries, you spilled liquid in the Search Help box, then press ENTER. The Media Center video display looks bad on Windows Vista Home Premium...
... device with an HDMI or VGA input is not covered in this section, go to the Gateway support Web Site at www.gateway.com. Clean the keyboard and turn off your notebook and unplug the keyboard. Media Center This section only covers problems relating to Media Center mode. Media Center mode is...or the type of TV (interlaced or progressive scan), can affect the video quality significantly: • Display type-Some retail TVs may need to replace it dries, you spilled liquid in the Search Help box, then press ENTER. The Media Center video display looks bad on Windows Vista Home Premium...

8513065 - Gateway Notebook Hardware Reference R1
Page 165
www.gateway.com See connections K Kensington cable lock 84 lock slot 10 key combinations 31 keyboard buttons 29 cleaning 89 connecting 29 features 29 keys 29 locating 12, 14 troubleshooting 124 USB port 7, 9 keys application 30 arrow 30 brightness 33 directional ... cable 10 M maintenance cleaning 88, 91 Media Center 43, 44 troubleshooting 125 media reader See memory card reader memory bay 11 installing 107 removing 107 replacing 107 troubleshooting 128 memory card reader inserting card 60 locating 7 memory cards supported 59 removing card 60 troubleshooting 129 using 59 microphone built-in 15...
www.gateway.com See connections K Kensington cable lock 84 lock slot 10 key combinations 31 keyboard buttons 29 cleaning 89 connecting 29 features 29 keys 29 locating 12, 14 troubleshooting 124 USB port 7, 9 keys application 30 arrow 30 brightness 33 directional ... cable 10 M maintenance cleaning 88, 91 Media Center 43, 44 troubleshooting 125 media reader See memory card reader memory bay 11 installing 107 removing 107 replacing 107 troubleshooting 128 memory card reader inserting card 60 locating 7 memory cards supported 59 removing card 60 troubleshooting 129 using 59 microphone built-in 15...


