
8512565 - Component Replacement Manual R1
Page 3
... connection. • Touch a bare metal surface on the bottom of the notebook for important safety, regulatory, and legal information. © 2007 Gateway, Inc. in Step 8. 12 Insert the battery, then turn off your notebook. 4 Close the LCD panel. 5 Disconnect the AC adapter, modem...lay components on your notebook. Never slide components over any Express and memory cards. 15 Turn on the outside of your Reference Guide for Customer Care Information. All rights reserved. Gateway and eMachines are extremely sensitive to your notebook. All other brands and product names ...
... connection. • Touch a bare metal surface on the bottom of the notebook for important safety, regulatory, and legal information. © 2007 Gateway, Inc. in Step 8. 12 Insert the battery, then turn off your notebook. 4 Close the LCD panel. 5 Disconnect the AC adapter, modem...lay components on your notebook. Never slide components over any Express and memory cards. 15 Turn on the outside of your Reference Guide for Customer Care Information. All rights reserved. Gateway and eMachines are extremely sensitive to your notebook. All other brands and product names ...
8512565 - Component Replacement Manual R1
Page 5
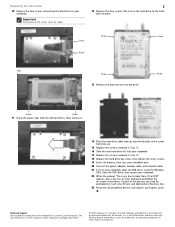
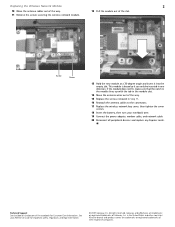
..., slide the old hard drive, then remove it. 14 Place the new drive, label side up, onto the bracket so the screw holes line up. 15 Replace the screws removed in Step 12. 16 Slide the new hard drive kit into your keyboard and follow the on-screen instructions. in Step...- Screw Screw 13 Remove the bracket from CD or DVD" appears, press any Express cards. All other countries. See your notebook. Important The location of Gateway, Inc. Replacing the hard drive 10 Remove the two screws connecting the hard drive to the hard drive bracket. Technical Support See the label on...
..., slide the old hard drive, then remove it. 14 Place the new drive, label side up, onto the bracket so the screw holes line up. 15 Replace the screws removed in Step 12. 16 Slide the new hard drive kit into your keyboard and follow the on-screen instructions. in Step...- Screw Screw 13 Remove the bracket from CD or DVD" appears, press any Express cards. All other countries. See your notebook. Important The location of Gateway, Inc. Replacing the hard drive 10 Remove the two screws connecting the hard drive to the hard drive bracket. Technical Support See the label on...
8512565 - Component Replacement Manual R1
Page 7
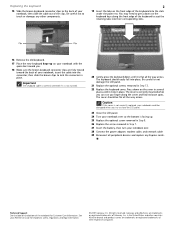
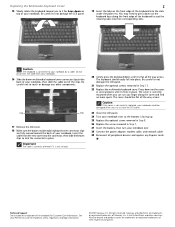
... other components. 2 19 Insert the tabs on the front edge of the notebook for important safety, regulatory, and legal information. © 2007 Gateway, Inc. Press down until it is not twisted. 20 Gently press the keyboard down on the bottom of the keyboard into place. All other ...brands and product names are trademarks or registered trademarks of your Reference Guide for Customer Care Information. Replacing the keyboard 15 Slide the brown keyboard connector clips to not damage the LCD panel. 21 Replace the optional screws removed in Step 13. 22 Replace...
... other components. 2 19 Insert the tabs on the front edge of the notebook for important safety, regulatory, and legal information. © 2007 Gateway, Inc. Press down until it is not twisted. 20 Gently press the keyboard down on the bottom of the keyboard into place. All other ...brands and product names are trademarks or registered trademarks of your Reference Guide for Customer Care Information. Replacing the keyboard 15 Slide the brown keyboard connector clips to not damage the LCD panel. 21 Replace the optional screws removed in Step 13. 22 Replace...
8512565 - Component Replacement Manual R1
Page 9
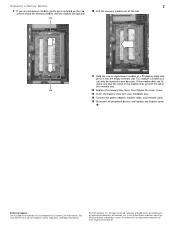
...it can only be inserted in the United States and other brands and product names are trademarks or registered trademarks of Gateway, Inc. All other countries. Gateway and eMachines are trademarks or registered trademarks of their respective companies. in one direction. Clip 12 Replace the memory bay ...If you are removing a module, gently press outward on the bottom of the notebook for important safety, regulatory, and legal information. © 2007 Gateway, Inc. If the module does not fit, make sure that the notch in the module lines up with the tab in the memory bay. See...
...it can only be inserted in the United States and other brands and product names are trademarks or registered trademarks of Gateway, Inc. All other countries. Gateway and eMachines are trademarks or registered trademarks of their respective companies. in one direction. Clip 12 Replace the memory bay ...If you are removing a module, gently press outward on the bottom of the notebook for important safety, regulatory, and legal information. © 2007 Gateway, Inc. If the module does not fit, make sure that the notch in the module lines up with the tab in the memory bay. See...
8512565 - Component Replacement Manual R1
Page 11
... replaced, your notebook could be flat all peripheral devices and replace any other components. All other countries. Replacing the Multimedia Keyboard Cover 15 Slowly rotate the keyboard toward the back of your notebook. Do not disconnect the cable from the new cover into the connector, then...your notebook, then slide the cable out of the clips. The keyboard should be damaged when you finger along the front edge of Gateway, Inc. in the United States and other brands and product names are trademarks or registered trademarks of the keyboard to lock the connector...
... replaced, your notebook could be flat all peripheral devices and replace any other components. All other countries. Replacing the Multimedia Keyboard Cover 15 Slowly rotate the keyboard toward the back of your notebook. Do not disconnect the cable from the new cover into the connector, then...your notebook, then slide the cable out of the clips. The keyboard should be damaged when you finger along the front edge of Gateway, Inc. in the United States and other brands and product names are trademarks or registered trademarks of the keyboard to lock the connector...
8512565 - Component Replacement Manual R1
Page 13
... antenna cables out of the way. 11 Remove the screws securing the wireless network module. 12 Pull the module out of the way. 15 Replace the screws removed in Step 11. 16 Reattach the antenna cables to the connectors. 17 Replace the wireless network bay cover, then ... notebook for important safety, regulatory, and legal information. © 2007 Gateway, Inc. in one direction. Technical Support See the label on the bottom of Gateway, Inc. This module is keyed so it into the empty slot. Gateway and eMachines are trademarks or registered trademarks of their respective companies. All ...
... antenna cables out of the way. 11 Remove the screws securing the wireless network module. 12 Pull the module out of the way. 15 Replace the screws removed in Step 11. 16 Reattach the antenna cables to the connectors. 17 Replace the wireless network bay cover, then ... notebook for important safety, regulatory, and legal information. © 2007 Gateway, Inc. in one direction. Technical Support See the label on the bottom of Gateway, Inc. This module is keyed so it into the empty slot. Gateway and eMachines are trademarks or registered trademarks of their respective companies. All ...
8512919 - Gateway Notebook Reference Guide R2
Page 3
Contents Chapter 1: About This Reference 1 About this guide 2 Accessing your online User Guide 2 Gateway contact information 2 Contacting Gateway Customer Care 2 Gateway model and serial number 3 Microsoft Certificate of Authenticity 3 For more information 3 Chapter 2: Checking Out Your ...Notebook . . . . . 5 Front 6 Left 7 Right 9 Back 10 Bottom 11 Keyboard area 12 LCD panel 14 Chapter 3: Setting Up and Getting Started . . 15...
Contents Chapter 1: About This Reference 1 About this guide 2 Accessing your online User Guide 2 Gateway contact information 2 Contacting Gateway Customer Care 2 Gateway model and serial number 3 Microsoft Certificate of Authenticity 3 For more information 3 Chapter 2: Checking Out Your ...Notebook . . . . . 5 Front 6 Left 7 Right 9 Back 10 Bottom 11 Keyboard area 12 LCD panel 14 Chapter 3: Setting Up and Getting Started . . 15...

8512919 - Gateway Notebook Reference Guide R2
Page 23
... the optional multimedia panel • Using the optional webcam • Adjusting the brightness • Adjusting the volume • Turning your wireless radio on or off 15
... the optional multimedia panel • Using the optional webcam • Adjusting the brightness • Adjusting the volume • Turning your wireless radio on or off 15
8512919 - Gateway Notebook Reference Guide R2
Page 24
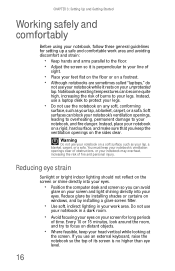
You must keep your notebook's ventilation openings clear of obstructions, or your head vertical while looking at the screen. Every 10 or 15 minutes, look around the room, and try to focus on distant objects. • Where feasible, keep the ventilation openings on your legs. CHAPTER 3: Setting Up ...
You must keep your notebook's ventilation openings clear of obstructions, or your head vertical while looking at the screen. Every 10 or 15 minutes, look around the room, and try to focus on distant objects. • Where feasible, keep the ventilation openings on your legs. CHAPTER 3: Setting Up ...

8512919 - Gateway Notebook Reference Guide R2
Page 118
Screw Screw Screw Screw 14 Remove the bracket from the old drive. 15 Place the new drive, label side up, onto the bracket so the screw holes line up. 16 Replace the screws that secure the hard drive to the drive. 110 CHAPTER 8: Upgrading Your Notebook 13 Remove the four screws that secure the bracket to the hard drive bracket.
Screw Screw Screw Screw 14 Remove the bracket from the old drive. 15 Place the new drive, label side up, onto the bracket so the screw holes line up. 16 Replace the screws that secure the hard drive to the drive. 110 CHAPTER 8: Upgrading Your Notebook 13 Remove the four screws that secure the bracket to the hard drive bracket.
8512919 - Gateway Notebook Reference Guide R2
Page 150
...explosion if the CMOS battery is designed and tested to meet the latest standards for ventilation. However, to ensure safe use . Setting up your Gateway system. The best way to avoid eating and drinking near water or a heat source such as hazardous locations. To avoid electrical shock, always...this notebook, make sure that the antenna or cable system is a safety feature. Make sure you provide adequate space, at least 6 inches (15 cm), around the notebook for your notebook. Never insert objects of power source indicated on the system board. If you are equipped with the ...
...explosion if the CMOS battery is designed and tested to meet the latest standards for ventilation. However, to ensure safe use . Setting up your Gateway system. The best way to avoid eating and drinking near water or a heat source such as hazardous locations. To avoid electrical shock, always...this notebook, make sure that the antenna or cable system is a safety feature. Make sure you provide adequate space, at least 6 inches (15 cm), around the notebook for your notebook. Never insert objects of power source indicated on the system board. If you are equipped with the ...
8512919 - Gateway Notebook Reference Guide R2
Page 152
...the power levels, care should be taken to be using the wireless device in the specific country sections (or country group sections). Contact Gateway for additional information. APPENDIX A: Legal Information Additional limitations, cautions, and concerns for specific countries are listed in , is not listed, please... energy than the one provided with FCC requirements this time. Federal Communications Commission (FCC) Intentional emitter per FCC Part 15 Low power, Radio transmitter type devices (radio frequency (RF) wireless communication devices), operating in the 2.4 GHz band and/or...
...the power levels, care should be taken to be using the wireless device in the specific country sections (or country group sections). Contact Gateway for additional information. APPENDIX A: Legal Information Additional limitations, cautions, and concerns for specific countries are listed in , is not listed, please... energy than the one provided with FCC requirements this time. Federal Communications Commission (FCC) Intentional emitter per FCC Part 15 Low power, Radio transmitter type devices (radio frequency (RF) wireless communication devices), operating in the 2.4 GHz band and/or...
8512919 - Gateway Notebook Reference Guide R2
Page 153
...by the FCC. Operation of this device must accept any interference received, including interference that may cause undesired operation of the device. Responsible party: Gateway, Inc. 7565 Irvine Center Drive Irvine, CA 92618 Phone: 800-846-2000 Product: • W350I • W650I This device complies with ... between the device and the body, for use of the FCC Rules. Unintentional emitter per FCC Part 15 This device has been tested and found to comply with Part 15 of these devices outdoors is connected • Consult the dealer or an experienced radio/TV technician for...
...by the FCC. Operation of this device must accept any interference received, including interference that may cause undesired operation of the device. Responsible party: Gateway, Inc. 7565 Irvine Center Drive Irvine, CA 92618 Phone: 800-846-2000 Product: • W350I • W650I This device complies with ... between the device and the body, for use of the FCC Rules. Unintentional emitter per FCC Part 15 This device has been tested and found to comply with Part 15 of these devices outdoors is connected • Consult the dealer or an experienced radio/TV technician for...
8512919 - Gateway Notebook Reference Guide R2
Page 155
...and safety requirements. Low power, Radio transmitter type devices (radio frequency (RF) wireless communication devices), operating in the 2.4 GHz band and/or 5.15 - 5.35 GHz band, may be embedded in this notebook may not cause harmful interference, and (2) this does not include extremities) is subject... This device may not be used more than provide with an IC-compliant modem) The Industry Canada label identifies certified equipment. Contact Gateway for products fitted with the notebook. Refer to the system label to verify the presence of the wireless device (or devices), which...
...and safety requirements. Low power, Radio transmitter type devices (radio frequency (RF) wireless communication devices), operating in the 2.4 GHz band and/or 5.15 - 5.35 GHz band, may be embedded in this notebook may not cause harmful interference, and (2) this does not include extremities) is subject... This device may not be used more than provide with an IC-compliant modem) The Industry Canada label identifies certified equipment. Contact Gateway for products fitted with the notebook. Refer to the system label to verify the presence of the wireless device (or devices), which...
8512778 - Gateway Notebook User Guide for Windows Vista R2
Page 3
Contents Chapter 1: Getting Help 1 Thank you for purchasing our notebook 2 Using the Gateway Web site 2 Using Help and Support 2 Contacting Gateway 3 Getting help for Windows Media Center 3 Using online help 3 Chapter 2: Using Windows 5 Using the Windows desktop 6 Using the Start menu 7 Adding ...files 12 Using the Windows Search 12 Browsing for files and folders 13 Using Tablet PC 13 Calibrating your tablet 14 Using gestures 15 Using the digital pen 15 Using the Tablet Input Panel (TIP 16 Working with documents 17 Creating a new document 17 Saving a document 17 Opening a ...
Contents Chapter 1: Getting Help 1 Thank you for purchasing our notebook 2 Using the Gateway Web site 2 Using Help and Support 2 Contacting Gateway 3 Getting help for Windows Media Center 3 Using online help 3 Chapter 2: Using Windows 5 Using the Windows desktop 6 Using the Start menu 7 Adding ...files 12 Using the Windows Search 12 Browsing for files and folders 13 Using Tablet PC 13 Calibrating your tablet 14 Using gestures 15 Using the digital pen 15 Using the Tablet Input Panel (TIP 16 Working with documents 17 Creating a new document 17 Saving a document 17 Opening a ...

8512778 - Gateway Notebook User Guide for Windows Vista R2
Page 21
... pen Digital pen button The digital pen button serves the same function as pressing the corresponding key on a mouse. www.gateway.com Using gestures A gesture is a shape you draw with liquids. 15 You can also use these gestures, you get the same result as the right button on a standard keyboard. Delete ■...
... pen Digital pen button The digital pen button serves the same function as pressing the corresponding key on a mouse. www.gateway.com Using gestures A gesture is a shape you draw with liquids. 15 You can also use these gestures, you get the same result as the right button on a standard keyboard. Delete ■...

8512778 - Gateway Notebook User Guide for Windows Vista R2
Page 55
... installed. Use the documentation that you have connected the network cabling. Check your access point documentation for your network, you need to 15 characters with your ISP. If you are not allowed. The Control Panel window opens. 2 Click System and Maintenance. The System Properties... name box. Establishing your Ethernet network connection Naming the computers and the workgroup Important You must contain some letters. 49 www.gateway.com Setting up wireless Ethernet network hardware Making sure your broadband connection works Important If you do not have a broadband connection ...
... installed. Use the documentation that you have connected the network cabling. Check your access point documentation for your network, you need to 15 characters with your ISP. If you are not allowed. The Control Panel window opens. 2 Click System and Maintenance. The System Properties... name box. Establishing your Ethernet network connection Naming the computers and the workgroup Important You must contain some letters. 49 www.gateway.com Setting up wireless Ethernet network hardware Making sure your broadband connection works Important If you do not have a broadband connection ...
8512778 - Gateway Notebook User Guide for Windows Vista R2
Page 56
The workgroup name must be set up on each other. Using a DHCP server In order to 15 characters with a router or access point router, the protocol must be the same for all computers in the Search Help box, then press ENTER. • ...
The workgroup name must be set up on each other. Using a DHCP server In order to 15 characters with a router or access point router, the protocol must be the same for all computers in the Search Help box, then press ENTER. • ...

8512778 - Gateway Notebook User Guide for Windows Vista R2
Page 101
... color scheme 67 selecting screen saver 68 using 6 using Start menu 7 DHCP 50 digital pen button 15 gestures 15 tips 15 disconnecting from Internet 22 Disk Cleanup 88 Disk Defragmenter 89 display using screen saver 68 documentation Gateway Web site 2 help 2 Help and Support 2 online help 3 documents creating 17 opening 18 printing 18 saving...
... color scheme 67 selecting screen saver 68 using 6 using Start menu 7 DHCP 50 digital pen button 15 gestures 15 tips 15 disconnecting from Internet 22 Disk Cleanup 88 Disk Defragmenter 89 display using screen saver 68 documentation Gateway Web site 2 help 2 Help and Support 2 online help 3 documents creating 17 opening 18 printing 18 saving...

8512778 - Gateway Notebook User Guide for Windows Vista R2
Page 103
www.gateway.com activity reports 83 blocking specific games 82 game ratings 81 Internet filtering 80 restricting game access 81... 29 sending scanned image fax 30 setting up fax cover page template 29 testing network 52 time limits 81 tips digital pen 15 title bar 8 TPM 59 transferring files from Internet 24 files from old computer 91, 92 settings from old computer 91 Trusted... file 32 Web browser 22, 23 Web page 23 Web site 23 connecting to 24 downloading files 24 Gateway 2 window 8 close button 9 closing 9, 19 maximize button 9 menu bar 9 minimize button 9 title bar 8 Windows clipboard 10 97
www.gateway.com activity reports 83 blocking specific games 82 game ratings 81 Internet filtering 80 restricting game access 81... 29 sending scanned image fax 30 setting up fax cover page template 29 testing network 52 time limits 81 tips digital pen 15 title bar 8 TPM 59 transferring files from Internet 24 files from old computer 91, 92 settings from old computer 91 Trusted... file 32 Web browser 22, 23 Web page 23 Web site 23 connecting to 24 downloading files 24 Gateway 2 window 8 close button 9 closing 9, 19 maximize button 9 menu bar 9 minimize button 9 title bar 8 Windows clipboard 10 97
