8512949 - Component Replacement Manual R0
Page 3
... the edge connectors. See your notebook are extremely sensitive to your notebook. All rights reserved. Gateway and eMachines are ready to your notebook and remove any Express and memory cards. 7 Turn your notebook and unplug the AC adapter, modem cable, and network cable and... bags only when you are trademarks or registered trademarks of the notebook for important safety, regulatory, and legal information. © 2008 Gateway, Inc. in your notebook. Warning To avoid exposure to dangerous electrical voltages and moving parts, turn off your notebook. 4 Close the...
... the edge connectors. See your notebook are extremely sensitive to your notebook. All rights reserved. Gateway and eMachines are ready to your notebook and remove any Express and memory cards. 7 Turn your notebook and unplug the AC adapter, modem cable, and network cable and... bags only when you are trademarks or registered trademarks of the notebook for important safety, regulatory, and legal information. © 2008 Gateway, Inc. in your notebook. Warning To avoid exposure to dangerous electrical voltages and moving parts, turn off your notebook. 4 Close the...
8512949 - Component Replacement Manual R0
Page 4
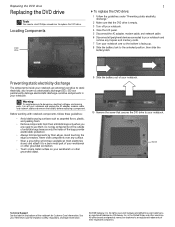
...on your notebook over. 17 Connect the power adapter, modem cable, and network cable. 18 Reconnect all peripheral devices and replace any Express and memory cards. 19 Turn on the bottom of the drive bay. 2 12 Slide the new DVD drive into place. 15 Slide the battery lock ... the drive out of the notebook for important safety, regulatory, and legal information. © 2008 Gateway, Inc. All other countries. All rights reserved. Gateway and eMachines are trademarks or registered trademarks of Gateway, Inc. Make sure that the drive fits securely in the bay. 13 Replace the screw removed ...
...on your notebook over. 17 Connect the power adapter, modem cable, and network cable. 18 Reconnect all peripheral devices and replace any Express and memory cards. 19 Turn on the bottom of the drive bay. 2 12 Slide the new DVD drive into place. 15 Slide the battery lock ... the drive out of the notebook for important safety, regulatory, and legal information. © 2008 Gateway, Inc. All other countries. All rights reserved. Gateway and eMachines are trademarks or registered trademarks of Gateway, Inc. Make sure that the drive fits securely in the bay. 13 Replace the screw removed ...
8512949 - Component Replacement Manual R0
Page 5
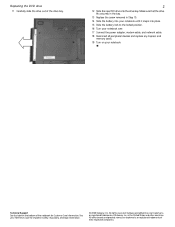
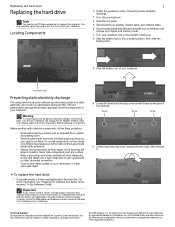
... 5 Disconnect the AC adapter, modem cable, and network cable. 6 Disconnect all peripheral devices connected to your notebook and remove any Express and memory cards. 7 Turn your notebook over any surface. • Wear a grounding wrist strap (available at the Web address or telephone number shown on... the label on the outside of Gateway, Inc. Contact Gateway Customer Care at most electronics stores) and attach it . All other grounded connection. • Touch a bare metal surface on the ...
... 5 Disconnect the AC adapter, modem cable, and network cable. 6 Disconnect all peripheral devices connected to your notebook and remove any Express and memory cards. 7 Turn your notebook over any surface. • Wear a grounding wrist strap (available at the Web address or telephone number shown on... the label on the outside of Gateway, Inc. Contact Gateway Customer Care at most electronics stores) and attach it . All other grounded connection. • Touch a bare metal surface on the ...
8512949 - Component Replacement Manual R0
Page 7
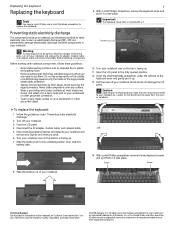
...their antistatic bags only when you are extremely sensitive to your notebook. in a safe place. Never slide components over any Express and memory cards. 6 Turn your notebook over so the top is facing up . 13 Pull the cover off your notebook by their respective... Avoid static-causing surfaces such as electrostatic discharge (ESD). To replace the keyboard: 1 Follow the guidelines under the left end of Gateway, Inc. Gateway and eMachines are trademarks or registered trademarks of your workbench or other grounded connection. • Touch a bare metal surface on the ...
...their antistatic bags only when you are extremely sensitive to your notebook. in a safe place. Never slide components over any Express and memory cards. 6 Turn your notebook over so the top is facing up . 13 Pull the cover off your notebook by their respective... Avoid static-causing surfaces such as electrostatic discharge (ESD). To replace the keyboard: 1 Follow the guidelines under the left end of Gateway, Inc. Gateway and eMachines are trademarks or registered trademarks of your workbench or other grounded connection. • Touch a bare metal surface on the ...
8512949 - Component Replacement Manual R0
Page 9
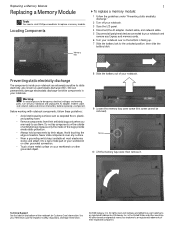
... or other grounded connection. • Touch a bare metal surface on your notebook. 9 Loosen the memory bay cover screw (this screw cannot be removed). Gateway and eMachines are trademarks or registered trademarks of your workbench or other grounded object. 8 Slide the battery... out of Gateway, Inc. Locating Components Memory bay 1 To replace a memory module: 1 Follow the guidelines under "Preventing static electricity discharge." 2 Turn off your Reference Guide for ...
... or other grounded connection. • Touch a bare metal surface on your notebook. 9 Loosen the memory bay cover screw (this screw cannot be removed). Gateway and eMachines are trademarks or registered trademarks of your workbench or other grounded object. 8 Slide the battery... out of Gateway, Inc. Locating Components Memory bay 1 To replace a memory module: 1 Follow the guidelines under "Preventing static electricity discharge." 2 Turn off your Reference Guide for ...
8512949 - Component Replacement Manual R0
Page 10
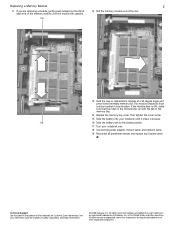
...the United States and other brands and product names are trademarks or registered trademarks of Gateway, Inc. All rights reserved. Gateway and eMachines are trademarks or registered trademarks of the slot. Replacing a Memory Module 2 11 If you are removing a module, gently press outward on the ...bottom of the memory module until it can only be inserted in one direction. Clip 16 Slide ...
...the United States and other brands and product names are trademarks or registered trademarks of Gateway, Inc. All rights reserved. Gateway and eMachines are trademarks or registered trademarks of the slot. Replacing a Memory Module 2 11 If you are removing a module, gently press outward on the ...bottom of the memory module until it can only be inserted in one direction. Clip 16 Slide ...
8512949 - Component Replacement Manual R0
Page 11
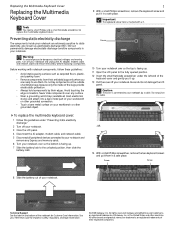
...bottom is connected to use them in a safe place. Screw Screw 8 Slide the battery out of Gateway, Inc. See your notebook over any Express and memory cards. 6 Turn your Reference Guide for Customer Care Information. Important The keyboard screw hole is facing up...fully opened position. 12 Insert the small flat-blade screwdriver under "Preventing static electricity discharge." 2 Turn off your notebook. Gateway and eMachines are trademarks or registered trademarks of your workbench or other countries. ESD can permanently damage electrostatic discharge-sensitive components ...
...bottom is connected to use them in a safe place. Screw Screw 8 Slide the battery out of Gateway, Inc. See your notebook over any Express and memory cards. 6 Turn your Reference Guide for Customer Care Information. Important The keyboard screw hole is facing up...fully opened position. 12 Insert the small flat-blade screwdriver under "Preventing static electricity discharge." 2 Turn off your notebook. Gateway and eMachines are trademarks or registered trademarks of your workbench or other countries. ESD can permanently damage electrostatic discharge-sensitive components ...
8512949 - Component Replacement Manual R0
Page 13
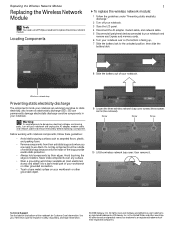
... screws (these guidelines: • Avoid static-causing surfaces such as electrostatic discharge (ESD). Never slide components over any Express and memory cards. 6 Turn your notebook over so the bottom is facing up,. 7 Slide the battery lock to static electricity, also known... bay cover, then remove it to replace the wireless network module. Wireless network bay Preventing static electricity discharge The components inside of Gateway, Inc. Avoid touching the edge connectors. Locating Components 1 To replace the wireless network module: 1 Follow the guidelines under "Preventing...
... screws (these guidelines: • Avoid static-causing surfaces such as electrostatic discharge (ESD). Never slide components over any Express and memory cards. 6 Turn your notebook over so the bottom is facing up,. 7 Slide the battery lock to static electricity, also known... bay cover, then remove it to replace the wireless network module. Wireless network bay Preventing static electricity discharge The components inside of Gateway, Inc. Avoid touching the edge connectors. Locating Components 1 To replace the wireless network module: 1 Follow the guidelines under "Preventing...
8513065 - Gateway Notebook Hardware Reference R1
Page 4
... and Accessories . . . . 55 Using the DVD drive 56 Identifying drive types 56 Using a DVD drive 57 Using the memory card reader 59 Memory card types 59 Inserting a memory card 60 Using a memory card 60 Removing a memory card 60 Adding and removing an Express Card 61 Installing a printer or other peripheral device 62 Connecting a USB device...
... and Accessories . . . . 55 Using the DVD drive 56 Identifying drive types 56 Using a DVD drive 57 Using the memory card reader 59 Memory card types 59 Inserting a memory card 60 Using a memory card 60 Removing a memory card 60 Adding and removing an Express Card 61 Installing a printer or other peripheral device 62 Connecting a USB device...
8513065 - Gateway Notebook Hardware Reference R1
Page 5
www.gateway.com Recalibrating the battery 72 Extending battery life 73 Maximizing battery performance 73 Conserving battery power 73 Using alternate power sources 74 Changing power modes ... its factory condition . . . . . .102 Recovering your system using the Windows DVD . . . . .103 Chapter 8: Upgrading Your Notebook . . . . . 105 Preventing static electricity discharge 106 Adding or replacing memory modules 107 iii
www.gateway.com Recalibrating the battery 72 Extending battery life 73 Maximizing battery performance 73 Conserving battery power 73 Using alternate power sources 74 Changing power modes ... its factory condition . . . . . .102 Recovering your system using the Windows DVD . . . . .103 Chapter 8: Upgrading Your Notebook . . . . . 105 Preventing static electricity discharge 106 Adding or replacing memory modules 107 iii
8513065 - Gateway Notebook Hardware Reference R1
Page 6
... 118 DVD drives 119 Ethernet 121 Express Cards 121 File management 121 Fingerprint reader 122 Hard drive 122 Internet 123 Keyboard 124 Media Center 125 Memory 128 Memory card reader 129 Modem (cable or DSL 129 Modem (dial-up 129 Mouse 132 Networks (wired 133 Networks (wireless 135 Passwords 137 Power 137...
... 118 DVD drives 119 Ethernet 121 Express Cards 121 File management 121 Fingerprint reader 122 Hard drive 122 Internet 123 Keyboard 124 Media Center 125 Memory 128 Memory card reader 129 Modem (cable or DSL 129 Modem (dial-up 129 Mouse 132 Networks (wired 133 Networks (wireless 135 Passwords 137 Power 137...
8513065 - Gateway Notebook Hardware Reference R1
Page 15
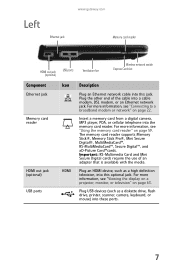
...gateway.com Memory card reader HDMI out jack (optional) USB ports Ventilation fan Wireless network switch Express Card slot Component Ethernet jack Memory card reader HDMI out jack (optional) USB ports Icon HDMI Description Plug an Ethernet network cable into this optional jack. For more information, see "Using the memory... a broadband modem or network" on page 63. Plug the other end of an adapter that is available with the media. Insert a memory card from a digital camera, MP3 player, PDA, or cellular telephone into a cable modem, DSL modem, or an Ethernet network jack....
...gateway.com Memory card reader HDMI out jack (optional) USB ports Ventilation fan Wireless network switch Express Card slot Component Ethernet jack Memory card reader HDMI out jack (optional) USB ports Icon HDMI Description Plug an Ethernet network cable into this optional jack. For more information, see "Using the memory... a broadband modem or network" on page 63. Plug the other end of an adapter that is available with the media. Insert a memory card from a digital camera, MP3 player, PDA, or cellular telephone into a cable modem, DSL modem, or an Ethernet network jack....
8513065 - Gateway Notebook Hardware Reference R1
Page 19
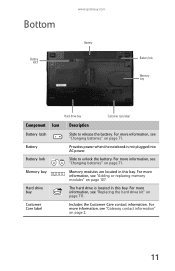
... information" on page 2. 11 For more information, see "Changing batteries" on page 107. Bottom Battery latch www.gateway.com Battery Battery lock Memory bay Hard drive bay Customer care label Component Icon Description Battery latch Slide to unlock the battery. Battery Provides power ... notebook is located in this bay. Customer Care label Includes the Customer Care contact information. For more information, see "Adding or replacing memory modules" on page 71. Hard drive bay The hard drive is not plugged into AC power. Battery lock Slide to release the battery...
... information" on page 2. 11 For more information, see "Changing batteries" on page 107. Bottom Battery latch www.gateway.com Battery Battery lock Memory bay Hard drive bay Customer care label Component Icon Description Battery latch Slide to unlock the battery. Battery Provides power ... notebook is located in this bay. Customer Care label Includes the Customer Care contact information. For more information, see "Adding or replacing memory modules" on page 71. Hard drive bay The hard drive is not plugged into AC power. Battery lock Slide to release the battery...
8513065 - Gateway Notebook Hardware Reference R1
Page 43
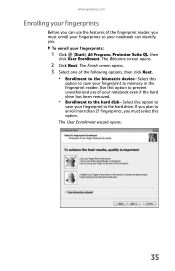
www.gateway.com Enrolling your fingerprints Before you can use of the fingerprint reader, you must enroll your fingerprints so your notebook can identify you must select this option to save your fingerprint to the hard drive. If you plan to memory in the fingerprint reader. The Welcome screen opens. 2 Click Next. The...
www.gateway.com Enrolling your fingerprints Before you can use of the fingerprint reader, you must enroll your fingerprints so your notebook can identify you must select this option to save your fingerprint to the hard drive. If you plan to memory in the fingerprint reader. The Welcome screen opens. 2 Click Next. The...

8513065 - Gateway Notebook Hardware Reference R1
Page 63
CHAPTER4 Using Drives and Accessories • Using the DVD drive • Using the memory card reader • Adding and removing an Express Card • Installing a printer or other peripheral device • Viewing the display on a projector, monitor, or television 55
CHAPTER4 Using Drives and Accessories • Using the DVD drive • Using the memory card reader • Adding and removing an Express Card • Installing a printer or other peripheral device • Viewing the display on a projector, monitor, or television 55

8513065 - Gateway Notebook Hardware Reference R1
Page 67
Using the memory card reader You can also use of the notebook. If you do not want to your notebook, manually eject the disc by inserting an opened paper clip into the manual eject hole. www.gateway.com To remove a CD or DVD: • Press the eject button on to transfer data between... your notebook and a device that is available with the media. 59 You can use memory cards to transfer pictures from a digital camera to turn on...
Using the memory card reader You can also use of the notebook. If you do not want to your notebook, manually eject the disc by inserting an opened paper clip into the manual eject hole. www.gateway.com To remove a CD or DVD: • Press the eject button on to transfer data between... your notebook and a device that is available with the media. 59 You can use memory cards to transfer pictures from a digital camera to turn on...

8513065 - Gateway Notebook Hardware Reference R1
Page 68
...hardware icon in the taskbar to remove the memory card. Using a memory card To access a file on the label pointing towards the notebook. To remove a memory card: 1 Push the memory card into the memory card slot with the label facing up and the arrow on a memory card: 1 Click (Start), then click ..., the E: drive), then double-click the file name. Removing a memory card Important Do not use the remove hardware icon, your notebook may not recognize your notebook. The memory card pops out slightly. 2 Pull the memory card out of the notebook. 60 CHAPTER 4: Using Drives and Accessories ...
...hardware icon in the taskbar to remove the memory card. Using a memory card To access a file on the label pointing towards the notebook. To remove a memory card: 1 Push the memory card into the memory card slot with the label facing up and the arrow on a memory card: 1 Click (Start), then click ..., the E: drive), then double-click the file name. Removing a memory card Important Do not use the remove hardware icon, your notebook may not recognize your notebook. The memory card pops out slightly. 2 Pull the memory card out of the notebook. 60 CHAPTER 4: Using Drives and Accessories ...
8513065 - Gateway Notebook Hardware Reference R1
Page 81
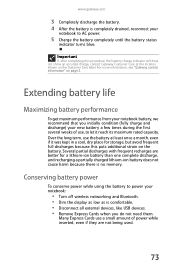
For more information, see "Gateway contact information" on the battery. Over the long term,...avoid frequent full discharges because this procedure, the battery charge indicator still does not show an accurate charge, contact Gateway Customer Care at least once a month, even if it reach its maximum rated capacity. Many Express Cards ... battery performance To get maximum performance from your notebook battery, we recommend that you do not need them. www.gateway.com 3 Completely discharge the battery. 4 After the battery is completely drained, reconnect your notebook: • Turn...
For more information, see "Gateway contact information" on the battery. Over the long term,...avoid frequent full discharges because this procedure, the battery charge indicator still does not show an accurate charge, contact Gateway Customer Care at least once a month, even if it reach its maximum rated capacity. Many Express Cards ... battery performance To get maximum performance from your notebook battery, we recommend that you do not need them. www.gateway.com 3 Completely discharge the battery. 4 After the battery is completely drained, reconnect your notebook: • Turn...
8513065 - Gateway Notebook Hardware Reference R1
Page 83
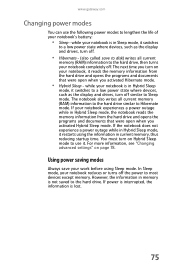
... not experience a power outage while in Hybrid Sleep mode, it restarts using Sleep mode. In Sleep mode, your notebook is in current memory, thus reducing startup time. while your notebook completely off similar to a low power state where devices, such as the display and drives,... and documents that were open when you activated Hibernate mode. • Hybrid Sleep - The notebook also writes all current memory (RAM) information to most devices except memory. www.gateway.com Changing power modes You can use it. while your notebook reduces or turns off . • Hibernate - (also...
... not experience a power outage while in Hybrid Sleep mode, it restarts using Sleep mode. In Sleep mode, your notebook is in current memory, thus reducing startup time. while your notebook completely off similar to a low power state where devices, such as the display and drives,... and documents that were open when you activated Hibernate mode. • Hybrid Sleep - The notebook also writes all current memory (RAM) information to most devices except memory. www.gateway.com Changing power modes You can use it. while your notebook reduces or turns off . • Hibernate - (also...
8513065 - Gateway Notebook Hardware Reference R1
Page 84
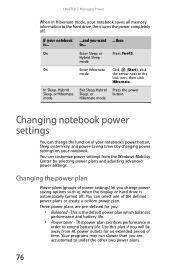
... plans are accustomed to the hard drive, then turns the power completely off . This power plan sacrifices performance in Hibernate mode, your notebook saves all memory information to under the other two power plans. 76 Changing the power plan Power plans (groups of the defined power plans or create a custom power...
... plans are accustomed to the hard drive, then turns the power completely off . This power plan sacrifices performance in Hibernate mode, your notebook saves all memory information to under the other two power plans. 76 Changing the power plan Power plans (groups of the defined power plans or create a custom power...


