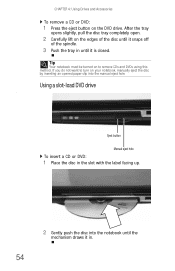
8512919 - Gateway Notebook Reference Guide R2
Page 10
... Care A label on the bottom of Gateway notebook. Your User Guide is an in this section are specific to this guide This guide includes information and maintenance instructions that includes information on ...; Playing and recording media • Networking To access your online User Guide: • Click (Start), All Programs, then click Gateway Documentation. Gateway contact information Important The labels shown in -depth, easy-to-read manual that are for informational purposes only. CHAPTER 1: About This Reference About this guide, your online User Guide has been...
8512919 - Gateway Notebook Reference Guide R2
Page 61
... code must match. If the disc has two playable sides, place the disc so the name of the disc. Using a tray-load DVD drive [ Manual eject hole Eject button To insert a CD or DVD: 1 Press the eject button on your DVD drive is determined by your DVD drive's regional code... to play a prerecorded DVD, the disc's regional code and your notebook's delivery address. The regional code for the United States and Canada is 4. www.gateway.com Using a DVD drive Important Prerecorded DVD discs and DVD drives contain regional codes that the label side is facing up. Important When you want...
8512919 - Gateway Notebook Reference Guide R2
Page 62
... hole To insert a CD or DVD: 1 Place the disc in the slot with the label facing up. 2 Gently push the disc into the manual eject hole. After the tray opens slightly, pull the disc tray completely open. 2 Carefully lift on the edges of the disc until it snaps off ... in until the mechanism draws it is closed. CHAPTER 4: Using Drives and Accessories To remove a CD or DVD: 1 Press the eject button on your notebook, manually eject the disc by inserting an opened paper clip into the notebook until it in. 54 Tip Your notebook must be turned on to turn...
8512919 - Gateway Notebook Reference Guide R2
Page 63
...the memory card reader You can also use the memory card reader to transfer data between your notebook, manually eject the disc by inserting an opened paper clip into the manual eject hole. Memory card types The memory card reader supports Memory Stick®, Memory Stick Pro®,... MultiMediaCard™, Secure Digital™, Mini Secure Digital™, RS-MultiMediaCard™, and xD-Picture Card™. You can use of the notebook. www.gateway.com To remove...
8512919 - Gateway Notebook Reference Guide R2
Page 103
...information about using Microsoft System Restore: 1 Click (Start), Control Panel, System and Maintenance, then click Backup and Restore Center. For instructions, see "Manually creating a restore point" on page 97. The Backup and Restore Center opens. 95 Windows automatically creates an additional restore point each day, and also.... You can return to one of these restore points to -resolve software problems, you install software or device drivers. www.gateway.com Using Microsoft System Restore Microsoft System Restore periodically takes "snapshots" of your system running again.
8512919 - Gateway Notebook Reference Guide R2
Page 105
The restore point is created. 5 Click OK. 97 The Backup and Restore Center opens. 2 On the left side of the window, click Create a restore point or change settings, then click Next. The Create a restore point dialog box opens. 4 Type a description for the restore point (such as the date and time), then click Create. www.gateway.com Manually creating a restore point To manually create a restore point: 1 Click (Start), Control Panel, System and Maintenance, then click Backup and Restore Center. The System Properties dialog box opens to the System Protection tab. 3 Click Create.
8512919 - Gateway Notebook Reference Guide R2
Page 127
...down the SHIFT key or if the Recycle Bin has been emptied, the file cannot be turned on to hear sound while playing a DVD. www.gateway.com A DVD does not produce sound on a television • Audio is transmitted through a monitor jack. Type the keyword System Restore in your notebook...DVDs. Caution If a file was accidentally deleted • Recover the file from the Recycle Bin by inserting an opened paper clip into the manual eject hole. For the location of headphones or external powered speakers, or connect your online User Guide. Express Cards You installed an Express ...
8512919 - Gateway Notebook Reference Guide R2
Page 156
... by means of a CD or DVD drive. 148 Any repairs or alterations made by an authorized Canadian maintenance facility designated by the user to this manual may give the telecommunications company cause to request the user to disconnect the equipment.
8512919 - Gateway Notebook Reference Guide R2
Page 158
...any time, without prior consent in writing from any defect or omission in this manual, even if advised of the possibility of it describes at any time. Use of Gateway, Inc. Gateway may be authorized by copyright and all rights are trademarks or registered trademarks of...used for inaccurate information which may be accurate. However, changes are incorporated in this publication at www.gateway.com. In the interest of Intel Corporation. in this manual has been carefully checked and is not responsible for identification purposes only, and may appear in this...
8512919 - Gateway Notebook Reference Guide R2
Page 160
... slots 55, 57 troubleshooting Express Card 119 troubleshooting memory card 127 CD cleaning 87 controlling playback 29, 40 eject button 53, 54 inserting 53, 54 manual eject hole 53, 54 CD drive See DVD drive cellular phone memory cards 55 Certificate of Authenticity 3 changing battery 66 cleaning audio CD 87 case...
8512919 - Gateway Notebook Reference Guide R2
Page 161
www.gateway.com VGA 10, 60 wired Ethernet 20 wired network 20 copyright notice 150 D default printer 136 dialing codes 78 dial-up modem 10, 21 adjusting ..., 117, 120 types 52 DSL modem 7, 20 connecting 20 troubleshooting 127 DVD cleaning 87 controlling playback 29, 40 eject button 53, 54 inserting 53, 54 manual eject hole 53, 54 playing 59 regional code 53 troubleshooting 117 DVD drive drive status indicator 25 identifying 52 locating 9 troubleshooting 117 using 52 DVD...
8512778 - Gateway Notebook User Guide for Windows Vista R2
Page 5
www.gateway.com Traveling securely 64 Chapter 7: Customizing Windows 65 Changing screen settings 66 Changing color depth and screen resolution 66 Changing the appearance of windows and ... files 90 Scheduling maintenance tasks 91 Moving from your old computer 91 Transferring files and settings with Windows Easy Transfer 91 Transferring files and settings manually 92 iii
8512778 - Gateway Notebook User Guide for Windows Vista R2
Page 8
... CHAPTER 1: Getting Help Thank you ever have made an excellent decision choosing Gateway. To search for purchasing our notebook! Please read this manual carefully to high-quality, brand-name components at www.gateway.com. Thanks again, from all of help information by clicking a general...troubleshooters, and automated support. Using Help and Support Your notebook includes Help and Support, an easily accessible collection of us at Gateway. Help and Support opens. You have a problem, our knowledgeable, dedicated customer service department will provide you will receive the ...
8512778 - Gateway Notebook User Guide for Windows Vista R2
Page 56
... computer. CHAPTER 5: Networking Your Notebook 6 Type a name for your workgroup in the Search Help box, then press ENTER. • Connect to an available network • Manually add a wireless Ethernet network • Connecting to set up on each other. One of up in your network workgroup, and the name must be set...
8512778 - Gateway Notebook User Guide for Windows Vista R2
Page 97
... scheduled tasks. The Windows Easy Transfer dialog box opens. 91 Important Your notebook must manually move files and settings from your old computer to your new one using a writeable disc, flash drive, or external hard drive. www.gateway.com Scheduling maintenance tasks Task Scheduler lets you schedule maintenance tasks such as display...
8512778 - Gateway Notebook User Guide for Windows Vista R2
Page 98
... icon on your saved personal data files. Finding other files Use Windows Find or Search to Step 4. - Transferring files and settings manually You can often identify different data file types by copying them to another computer on the desktop. The Documents folder opens and displays...many of your network. Go to locate other personal data files. OR In Windows XP, click Start, then click My Documents. You can manually transfer your saved personal data files. Look in the documents folder: 1 In Windows Vista, click (Start), then click Documents. The My ...
8512778 - Gateway Notebook User Guide for Windows Vista R2
Page 99
... Results window opens. - However, changes are registered trademarks of Gateway, Inc. Gateway may appear in this manual. For the latest product updates, consult the Gateway Web site at any defect or omission in this manual, even if advised of the possibility of their respective companies. in... which may improve and/or change products described in the U.S. No part of continued product development, Gateway reserves the right to make improvements in this manual has been carefully checked and is intended for direct, indirect, special, exemplary, incidental, or consequential ...
8513068 - Gateway Notebook Hardware Reference R3
Page 10
... addition to this guide This guide includes information and maintenance instructions that are specific to -read manual that identifies your notebook model and its features. Gateway model and serial number A label on the bottom of Gateway notebook. Gateway Customer Care will need this information if you call for assistance. 2 For all other software •...
8513068 - Gateway Notebook Hardware Reference R3
Page 61
... cleaning a CD or DVD, see "Cleaning CDs or DVDs" on the DVD drive. The regional code for the disc is 1. Using a tray-load DVD drive [ Manual eject hole Eject button To insert a CD or DVD: 1 Press the eject button on page 87. To be able to play a prerecorded DVD, the disc... it snaps into place. 3 Push the tray in the tray with the label facing up, then press down carefully on your notebook's delivery address. www.gateway.com Using a DVD drive Important Prerecorded DVD discs and DVD drives contain regional codes that the label side is closed. 53 Important When you want...
8513068 - Gateway Notebook Hardware Reference R3
Page 62
... to remove CDs and DVDs using this method. CHAPTER 4: Using Drives and Accessories To remove a CD or DVD: 1 Press the eject button on your notebook, manually eject the disc by inserting an opened paper clip into the notebook until it is closed. Tip Your notebook must be turned on the edges... the spindle. 3 Push the tray in until the mechanism draws it in the slot with the label facing up. 2 Gently push the disc into the manual eject hole. After the tray opens slightly, pull the disc tray completely open. 2 Carefully lift on to turn on the DVD drive. Using a slot-load...